
TL;DR: This blog post does not encourage smoking nor vaping. The main focus of this blog will be defeating the protections of a regulated electronic cigarette to assess the ability of it being weaponized via a remote attacker by modifying its firmware and delivering it through a malware which waits for electronic cigarettes to be connected over USB or discovered over Bluetooth.
The electronic cigarette market continues to grow. According to statistics presented by the market research company EuroMonitor, the number of people who vape will reach almost 55 million by 2021. In this blog post, we showcase different ways to weaponize electronic cigarettes or their components to cause fires and/or explosions, which can physically impact sectors such as the Aviation industry.

Vaping 101:
Prior to creating havoc, let’s do a quick walkthrough of the components that comprise a mod vape. There are two common types of mod vapes: regulated and unregulated.
Regulated (box) mods have built-in protections against overheating and continuous firing and regulate the power flow through the device.

- An 18650 battery is the most common type of battery used in box mods. They are lithium-ion cell, which are high-drain, rechargeable batteries.
- Two buttons on the box mod control the wattage and tell the mod how much power to deliver to the coils to make them hotter or cooler.
- Box mods can hold one or more batteries. Once the fire button is pressed, the batteries discharge, making the coils heat up and causing the liquid to turn into vapor (hence the term: vape or vaporizer). The user inhales the vapor via the drip tip.

Unregulated (mechanical) mods have no circuitry and do not provide any protections. Mechanical mods provide direct power from the batteries to the coil (these are dangerous on their own).

How vape firing looks like
- Fire button is pressed.
- Current is supplied to the coils which make them heat up.
- Liquid on the cotton wick evaporates.
1- The problem with vape batteries:
The majority of batteries are encased in steel and shrink-wrapped to ensure proper isolation of the positive and negative poles and prevent a short. A short could lead to an explosion or fire depending on the quality of the battery.
High-quality batteries come with safety valves and a protection board, which keeps the safety performance quite high. When a high-quality battery is shorted, the safety valve opens, releasing the pressure and preventing an explosion; but, the chemicals that are released can react with oxygen in the air and still possibly create a fire. Low-quality batteries offer almost no protections. Their safety valves cannot keep up with the fumes being released, thus pressurizing the container and probably exploding.
So what would cause a battery to explode? Well, here are a few potential causes:
- Being stored in humid or high-temperature conditions (exceeding 65˚C).
- Over-charging, shorts, punctures, being exposed to fire.
- Overheating.
- Poor maintenance, such as damaging the shrink wrap.
- Use of non-authentic batteries (a.k.a. clones).
- Using batteries to power coils with inappropriate resistance ratings.
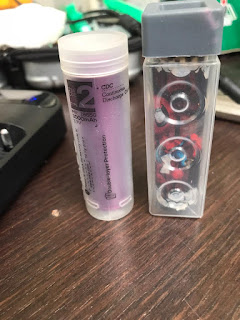
One major problem that vape users face is damage to their batteries’ shrink wrap. Due to repeated removal and insertion, the shrink wrap starts to peel off the battery. This exposes the negative and positive poles, which could allow shorting in certain conditions.
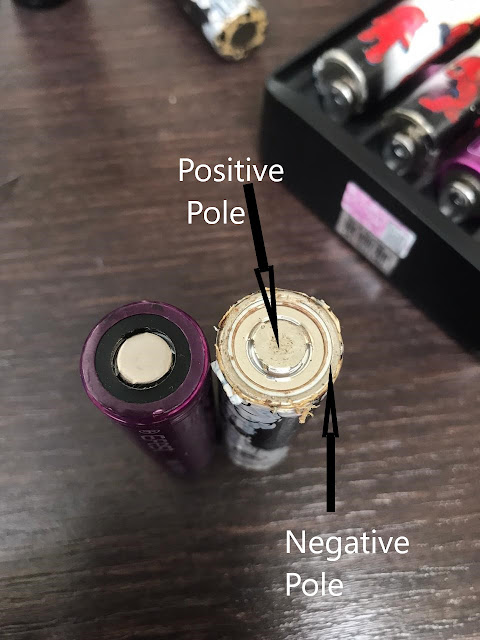
The battery on the left is properly sealed with shrink wrap, while the battery on the right has had its shrink wrap peeled off due to excessive use (placing it into the charger and back into the mod).
The dangers of such batteries include the fact that they can be taken onboard planes with no restrictions. Using just a battery and a coin, you can create a fire or explosion, depending on the quality of the battery.

Battery with a damaged shrink wrap shorted with a coin
2- Disabling protections of a regulated mod:
To weaponize a regulated mod, we need to first set some goals in order to get the best results. Here’s a list of things we need to do:
- Acquire the the firmware. [✔️]
- Find and patch the protections: [✔️]
- Continuous fire protection. [✔️]
- Disable Maximum temperature protection. [✔️]
- Set its initial watt/temperature to the max.[✔️]
- Trigger the firing mechanism without pressing the fire button.[✔️]
- Disable other protections that are triggered along the way.[✔️]
- Reprogram the mod and see if it accepts modified firmware.[✔️]
There are two ways to acquire the firmware: from the vendor’s site (vendors usually have firmware in the support section of their websites where they provide software updates) or by dismantling the device (looking for debug pins (JTAG/SWD) and dumping the firmware).
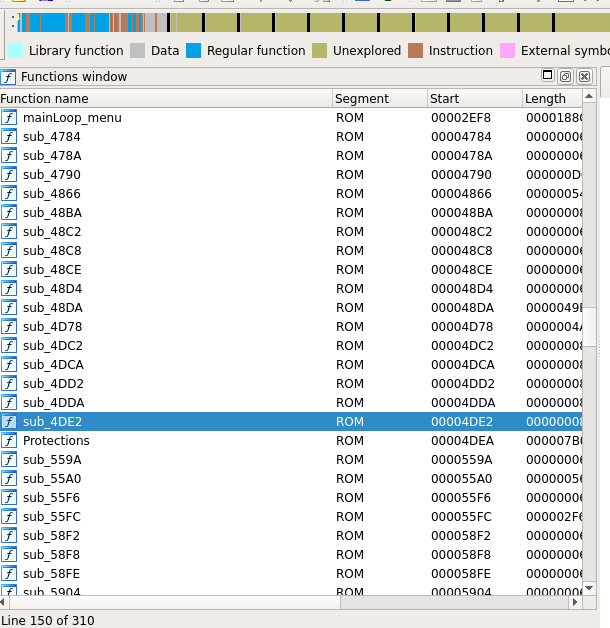
To dump the firmware, we start by identifying the components in the box mod vape.
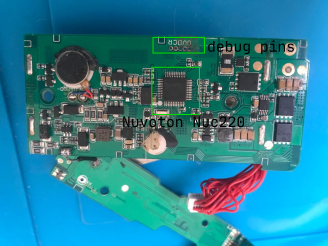
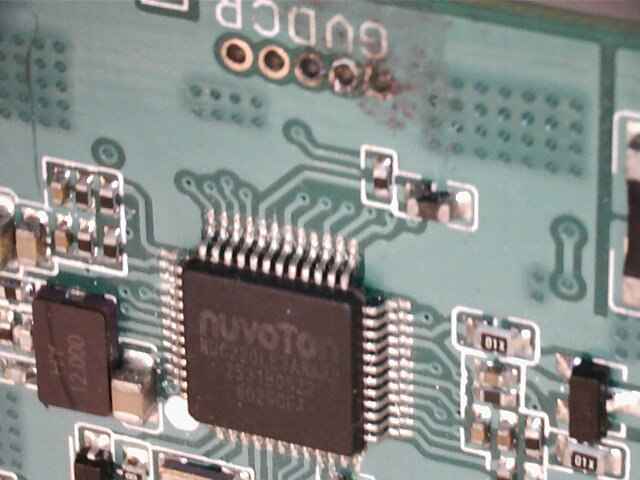
The following pins are exposed on the PCB:
- G: VSS (Ground)
- V: VCC (Power)
- D: DATA
- C: CLOCK
- R: RESET
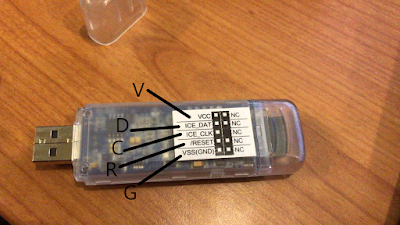
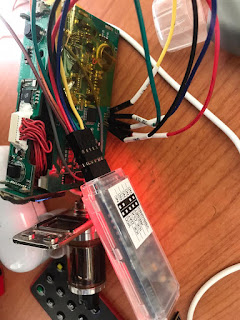
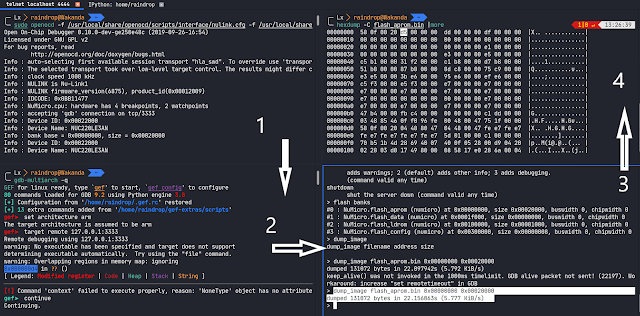
- We used the following steps to dump the firmware:
1.) Hook the NuLink-pro debugger to the Nuvoton chip using OpenOCD.
2.) Attach gdb-multiarch to remote target. (multiarch used for arm) & we’ll debug later.
3.) Telnet to OpenOCD on localhost:4444 to dump firmware.
4.) Check the dumped image.
Once you’ve acquired the firmware, it’s time to take it to your favorite disassembler and load it.
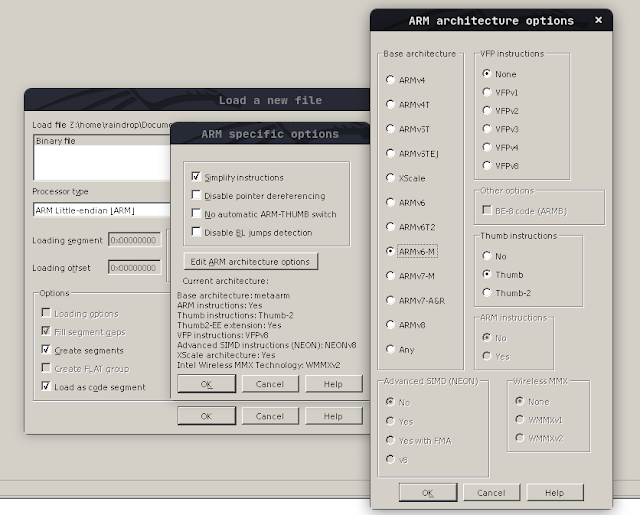
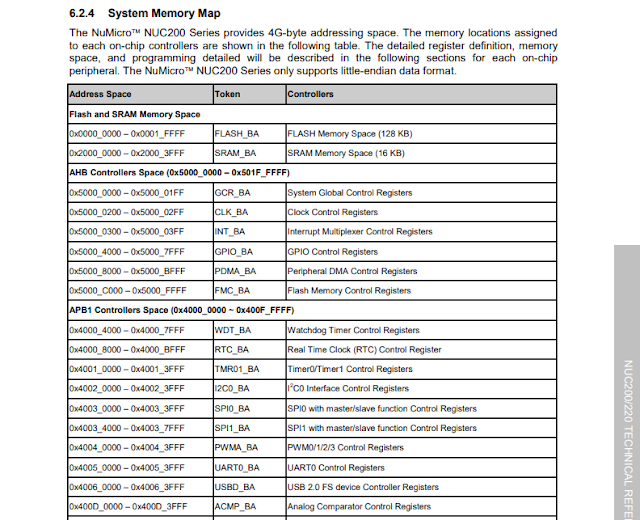
- Then create the segments in accordance with the microcontrollers datasheet
- [TIP]: If you use IDA-PRO 7.5 or BinaryNinja you can use the SVD plugins to create your chip’s peripherals by obtaining its SVD file and loading it via that plugin.
- An SVD file is a XML file which includes the descriptions and information for your chip’s peripherals.
- You can get SVD files from: https://developer.arm.com/tools-and-software/embedded/cmsis/cmsis-search then load it via the SVD plugin in your disassembler to automatically create all your segments/peripherals.
- [TIP]: If you use IDA-PRO 7.5 or BinaryNinja you can use the SVD plugins to create your chip’s peripherals by obtaining its SVD file and loading it via that plugin.
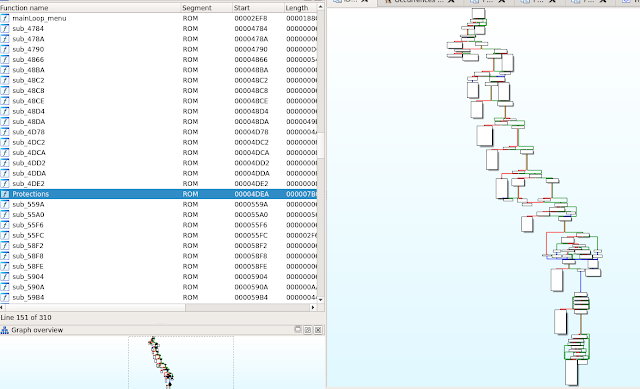
Or, you can write a small script and let it create the segments for you.

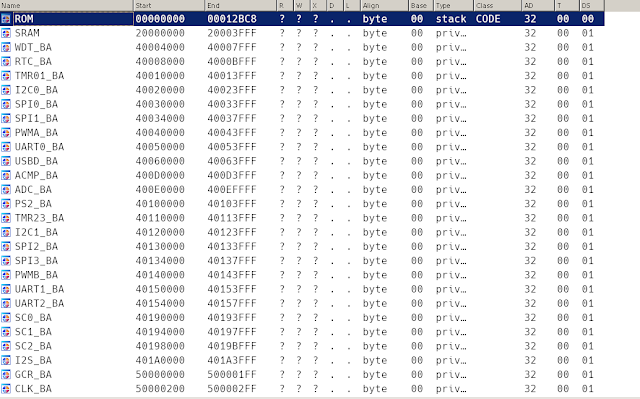
Segments created
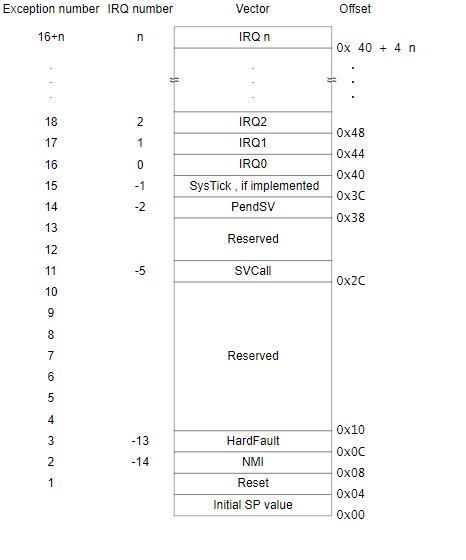
- Align the interrupt vector table: (the interrupt vector table is 4-byte aligned)
- An interrupt vector table is a structure full of exception handlers; when an exception is triggered, a function is called and its instructions are executed. Each exception in the interrupt vector table points to a function. For instance, if you press a button on a device, it triggers an exception. The function associated with the exception is looked up in the interrupt vector table, and the instructions within that function are executed.
- The interrupt vector table includes an exception named the reset vector. This address is the entry point where the first instructions that the microcontroller will execute after a reset/startup/boot are found (usually at offset 0x4 from the firmware’s base address).
- The image below illustrates how the interrupt vector table is aligned.
- An interrupt vector table is a structure full of exception handlers; when an exception is triggered, a function is called and its instructions are executed. Each exception in the interrupt vector table points to a function. For instance, if you press a button on a device, it triggers an exception. The function associated with the exception is looked up in the interrupt vector table, and the instructions within that function are executed.
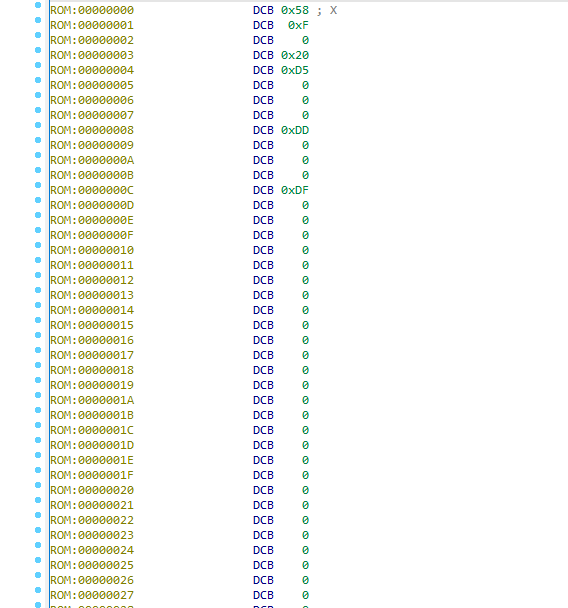


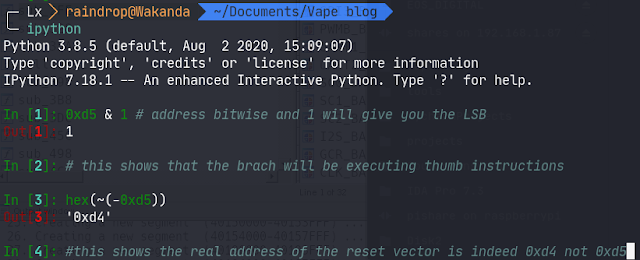
· The reset vector initially points to address 0xd5, which is actually one byte after the real reset vector address. The reason behind this is that before it branches to an address, the microcontroller checks to see if the LSB is set to 1 or 0. Depending on the value, it will branch to execute Thumb (1) or ARM (0) instructions. In our case, the LSB will be set to 1 as the ARM Cortex-M0 executes Thumb code. If the LSB is set to 0, it will raise a hard-fault exception since there are no ARM instructions supported here. To know what a branch will do, you can simply do a bitwise operation on the address. Once you get the address, go to the reset vector address, convert it into a function, and let the disassembler do its magic.
Now we’re all set for finding our protections and start our patching process.
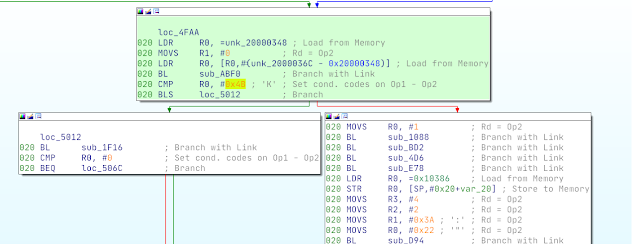
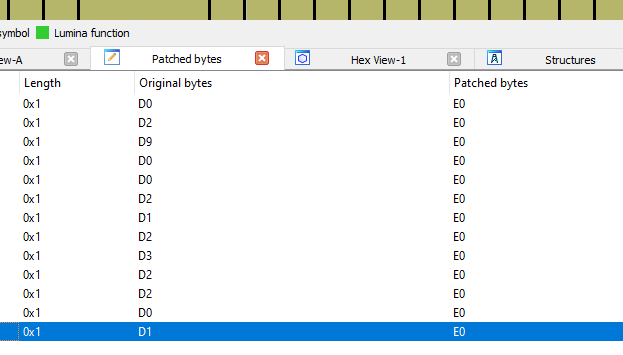
Patch#1 Disable maximum temperature protection
· This protection does not allow the vape to fire if the device temperature exceeds 75˚C (0x4b). This can be patched to 0xff (255˚C) or disabled altogether, meaning there is no max temperature check.
Patch#2: Set initial watt/temperature to max
- These patches set the mod to deliver maximum power to the coils. Referring to the video below, you can hear the difference when the mod is fired at the same wattage (6.1) before and after patching the firmware.

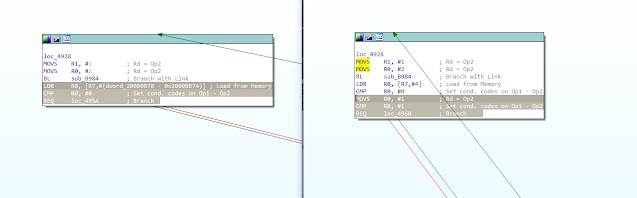
Patch#3: Disable continuous fire protection
- This can be accomplished by patching the firmware to never allow the GPIO’s data output value to be reset to its original value, which in this chip was `0x0000FFFF` (see patch #4).
Patch#4: patch the firmware to trigger the firing mechanism without pressing the fire button
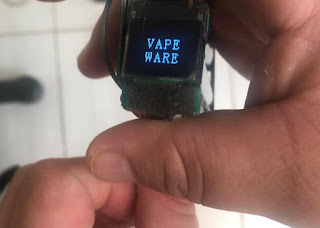
- The following video demonstrates what can happen if the device is programmed with malicious firmware that causes the vape to fire on its own.
Other Protections:
- I found a few other protections that needed to be patched, such as:
- OHM resistance checks for the coils.
- Battery checks.
- Max puffs.
- Atomizer checks.
- Protection Abuse checks.
Based on what I learned about the inner workings of regulated vape devices, I do believe that in certain cases vapes can be weaponized. A malicious actor could wreak havoc by causing them to explode or start a fire remotely, since the firmware can be patched to make the vape or its components operate without any sort of protection in place, effectively turning it into a unregulated mechanical mod.
Threat scenarios:
- I don’t doubt that in the near future we will see malware (MalVape, vapeware) targeting users that charge their devices from a laptop or devices that support OTA updates via Bluetooth. Simply put, malware can listen on USB/Bluetooth for vape devices and then trigger a firmware update, reprogramming the vape to become weaponized.
- Vapes, high-drain batteries, and coins are allowed on airplanes. A malicious actor can cause a fire in an aircraft lavatory by throwing a battery attached to a coin into the waste bin where all the tissues are thrown. Same goes for the vape being triggered.
- Vapes can be maliciously programmed to suddenly fire at a set time and date, if they have time and date settings.
Recommendations:
- Vape firmware should be signed and encrypted:
- Firmware that is signed ensures that the firmware being reprogrammed to the device is indeed by the vendor not by a malicious actor.
- Encrypting firmware makes it more difficult for attackers to reverse engineer it. Although this is security by obscurity, it would stop most attackers.
- Vapes can be dangerous if poorly maintained.
- Don’t charge your vape from a laptop. Use authentic external battery chargers.
- Always ensure Bluetooth/wireless connectivity is switched off on your vape if it supports OTA firmware updates. In general, vapes shouldn’t have wireless capabilities, as it expands the attack surface.
- Choose and buy authentic and well-known atomizers and mods.
- Always ensure that you purchase Authentic batteries. Accidents happen when fake batteries are used.
- Always carry batteries in a battery case.
References:
- The Definitive Guide to ARM Cortex -M0 and Cortex-M0+ Processors 2nd Edition by Joseph Yiu (Joseph writes the best ARM books I recommend reading his books)
- Cortex-M0 Devices Generic User Guide
- NuMicro NUC200/220 Series Technical Reference Manual
- Customized OpenOCD for Nuvoton devices
- CMSIS Search: