RESEARCH | December 17, 2015

(In)secure iOS Mobile Banking Apps – 2015 Edition

Two years ago, I decided to conduct research in order to obtain a global view of the state of security of mobile banking apps from some important banks. In this blog post, I will present my latest results to show how the security of the same mobile banking apps has evolved.

(more…)

RESEARCH | November 19, 2015

Breaking into and Reverse Engineering iOS Photo Vaults

Every so often we hear stories of people losing their mobile phones, often with sensitive photos on them. Additionally, people may lend their phones to friends only to have those friends start going through their photos. For whatever reason, a lot of people store risqué pictures on their devices. Why they feel the need to do that is left for another discussion. This behavior has fueled a desire to protect photos on mobile devices.

One popular option are photo vault applications. These applications claim to protect your photos, videos, etc. In general, they create albums within their application containers and limit access with a passcode, pattern, or, in the case of newer devices, TouchID.

I decided to take a look at some options for the iOS platform. I did a quick Google search for “best photo vaults iOS” and got the following results:
 
Figure 1: Search results for best iOS photo vaults


I downloaded the free applications, as this is what most typical users would do. This blog post discusses my findings.
Lab Setup
  • Jailbroken iPhone 4S (7.1.2)
  • BurpSuite Pro
  • Hex editor of choice
  • Cycript

Applications Reviewed
  • Private Photo Vault
  •  Photo+Video Vault Keep Safe(My Media)
  •  KeepSafe

I will cover the common techniques I used during each iOS application assessment. Additionally, I will take a deeper look at the Private Photo Vault application and get into some actual reverse engineering. The techniques discussed in the reverse engineering section can be applied to the other applications (left as an exercise for the reader).
Note: Unless otherwise stated, all commands are issued from Mac OS after having ssh’d into the jailbroken mobile device.
 
Private Photo Vault
The first application I looked at was Private Photo Vault. As it turns out, there have been several write-ups about the security, or lack thereof, of this application (see the references section for additional details). Because those write ups were published some time ago, I wanted to see if the developers had corrected the issues. As it turns out, the app was still vulnerable to some of the issues at the time of writing this post.
Bypassing the Lock Screen
When the app launches, the user is presented with the following screen:
Figure 2: Private Photo Vault Lock Screen
 
Bypassing this lock screen was trivial. The first step is to identify the Photo Vault process and then attach to it with cycript. For those not familiar with cycript, the following is taken from the cycript.org site:
Cycript allows developers to explore and modify running applications on either iOS or Mac OS X using a hybrid of Objective-C++ and JavaScript syntax through an interactive console that features syntax highlighting and tab completion.”
To identify the Photo Vault process we issue the following commands:
ps –e | grep “Photo”
And then attach to it as shown:
cycript –p PhotoVault


Figure 3: Attaching to PhotoVault process with cycript
We then print the current view hierarchy using recursiveDescription by issuing the following command:
[[UIApp keyWindow] recursiveDescription]


Figure 4: Current View Hierarchy with recursiveDescription
 
Reviewing the current view hierarchy, we see a number of references to PasswordBox. Let’s see if we can alter what is being displayed. To do that we can issue the following command:
[#viewAddress setHidden:YES].
In this case we are testing the first PasswordBox at 0x15f687f0.
Figure 5: Hiding the first password input box
 
After executing the command we note that the first PasswordBox disappeared:
Figure 6: First password box hidden
Great, we can alter what is being displayed. Having obtained the current view, we now need to determine the controller. This can be accomplished with nextResponder as shown below. See references for details on nextResponder and the whole MVC model.
In a nutshell we keep calling nextResponder on the view until we hit a controller. In our case, we start with [#0x15f687f0 nextResponder] which returns <UIView: 0x15f68790> and then we call nextResponder on that like [#0x15f68790 nextResponder]. Eventually we hit a controller as shown:
Figure 7: Determining the View Controller
 
The WhiteLockScreenViewController controller seems to be responsible for the view. Earlier I dumped the class information with class-dump-z (not shown here). Examining the class revealed an interesting method called dismissLockScreen. Could it be that easy? As it turned out, it was. Simply calling the method as shown below was enough to bypass the lock screen:
Figure 8: Bypassing the lock screen with dismissLockScreen
 
Insecure Storage
During the setup I entered a passcode of 1337 to “protect” my photos. The next step, therefore, was to determine how the application was storing this passcode. Browsing the application directory revealed that the passcode was being stored in plaintext in the com.enchantedcloud.photovault.plistfile in /var/mobile/Applications/A025EF5F-ED84-4D82-A23D-BBCFE183F539/Library/Preferences.
As a side note I wonder what would be the effect of changing “Request Pin = 0”? It may be worth investigating further.
Figure 9: Passcode stored in plaintext
 
Not only is the PIN stored in plaintext, but the user has the option to password protect their albums. This again is stored in plaintext in the Albums.plist plist file.
Figure 10: Album password stored in plaintext
No Encryption
As if this wasn’t bad enough, the stored photos were not encrypted. This has already been pointed out elsewhere. Surprisingly enough, it remains the case as at the time of this writing. The pictures are stored in the /0 directory:
Figure 11: Location of unencrypted photos


Figure 12: Unencrypted view of stored photo
Reverse Engineering Private Photo Vault
Ok, so we have seen how to bypass the lock screen using cycript. However, let’s say that you wanted to go “under the hood “in order to achieve the same goal.
You could achieve this using:
  • IDA Pro/Hopper
  • LLDB
  • Usbmuxd
  • Debugserver

Environment Setup
Attach the mobile device to your host machine and launch tcprelay (usbmuxd directory) using the following syntax:
tcprelay.py  -t  <remote-port-to-forward><local-port-to-listen>


Figure 13: Launching tcprelay for debugging via USB
Tcprelay allows us to debug the application over USB as opposed to wifi, which can often be slow.
SSH into the device, start the debugserver, and attach to the PhotoVault process. Issue the following command:
debugserver *:8080 –a “PhoyoVault”


Figure 14: Launching debugserver on the mobile device
 
Launch lldb from your host machine, and connect to the listening debug server on the mobile device by issuing the following command from within lldb:
process connect connect://localhost:8080


Figure 15: Connecting to debugserver with lldb
Decrypt Binary
Now that the environment is configured, we can start debugging. Decrypt the binary and open it in IDA. I used the following command to decrypt the binary:
DYLD_INSERT_LIBRARIES=dumpdecrypted_armv7.dylib /var/mobile/Applications/A025EF5F-ED84-4D82-A23D-BBCFE183F539/PhotoVault.app/PhotoVault mach -o decryption dumper


Figure 16:Decrypting the PhotoVault binary
At this point I usually check to see if the binary is a FAT binary (i.e. it supports many devices). The command for that is: otool –hV PhotoVault.decrypted


Figure 17: Determining if the binary is a FAT binary
 
If it is indeed a FAT binary, I strip the architecture for my device. Given I am running an iPhone 4S, I ran the following command:
lipo -thin armv7 -output PhotoVault-v7 PhotoVault.decrypted.
The PhotoVault-v7 binary is what we will analyze in IDA or Hopper (see the reference section for instructions on configuring lldb and debugserver).
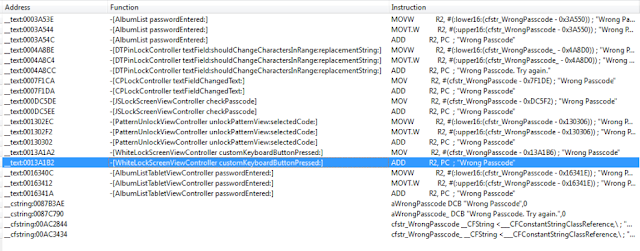
Earlier we established that WhiteLockScreenViewController was the controller responsible for the lock screen. This will become important in a bit. If we enter an incorrect password, the application prints “Wrong Passcode – Try Again”. Our first step, therefore, is to find occurrences of this in IDA.

Figure 18: Searching for occurrences of “Wrong Passcode”
We see several occurrences, but any reference to WhiteLockScreenViewController should be of interest to us. Let’s investigate this more. After a brief examination we discover the following:

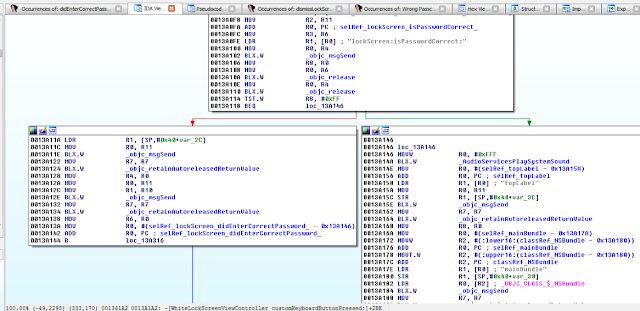
Figure 19: Examining WhiteLockScreenViewController customKeyboardButtonPressed
 
At 0013A102, the lockScreen:isPasswordCorrect method is called, and at 0013A114 the return value is checked. At 0013A118 a decision is made on how to proceed. If we entered an incorrect passcode, the application will branch to loc_13A146 and display “Wrong Passcode” as shown in the snippet below. 
Figure 20: Wrong Passcode branch we need to avoid
Obviously, we want the application to branch to 0013A11A, because in that branch we see references to a selRef_lockScreen_didEnterCorrectPassword_ method.
Figure 21: Branch we are interested in taking
Let’s set breakpoint at 0013A110, right before the check for the return value is done. Before we can do that, we need to account for ASLR, so we must first determine the ASLR Offset on the device.
Figure 22: Breakpoint will set at 0013A110
To accomplish this we issue the following command from within our lldb session:
image list –o -f
The image is loaded at 0xef000 so the address we need to break on is the 0x000ef000 + 0013A110.
Figure 23: Determining ASLR offset
We set a breakpoint at 0x229110 with the following command: br s -a 0x229110.
From this point breakpoints will be calculated as ASLR Offset + IDA Offset.
 
Figure 24: Setting the breakpoint
With our breakpoint set, we go back to the device and enter an arbitrary passcode. The breakpoint is hit and we print the value of register r8 with p $r8.


Figure 25: Examining the value in register r8
Given the value of zero, the TST.W R8, #0xFF instructions will see us taking the branch that prints “Wrong Passcode”. We need to change this value so that we take the other branch. To do that we issue the following command: register write r8 1


Figure 26: Updating the r8 register to 1
 
The command sets the value of register r8 to 1. We are almost there. But before we continue, let’s examine the branch we have taken. In that branch we see a call to lockScreen_didEnterCorrectPassword. So again, we search IDA for that function and the results show it references the PasswordManager class.
Figure 27: Searching IDA for occurences of lockScreen_didEnterCorrectPassword
 
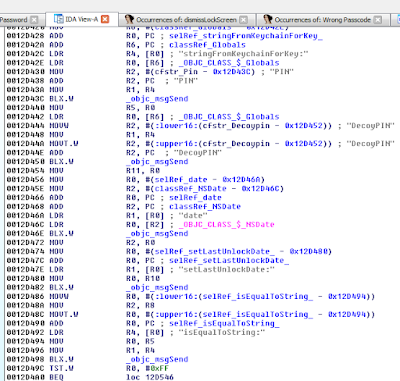
We next examine that function where we notice several things happening:
Figure 28: Examining lockScreen_didEnterCorrectPassword
 
In short, in this block the application reads the PIN stored on the device and compares it to the value we entered at 0012D498. Of course this check will fail, because we entered an incorrect PIN. Looking further at this function revealed a call to the familiar dismissLockScreen. Recall this is the function we called in cycript earlier.
Figure 29: Branch with dismissLockScreen
 
It seems then that we need to take this branch. To do that, we change the value in r0  so that we get our desired result when the TST instruction is called. This ends up tricking the application into thinking we entered the correct PIN. We set a breakpoint at 0012D49C (i.e. the point at which we test for the return value from isEqualToString). Recall we are still in the lockScreen_didEnterCorrectPassword method of the PasswordManager class.
Figure 30: Point at which the PIN is verified
We already know the check will fail, since we entered an incorrect PIN, so we update the value in r0 to 1.
Figure 31: Updating r0 register to 1 to call dismissLockScreen
When we do that and continue execution, the dismissLockScreen method is called and the lock screen disappears, granting us access to the photos. So to recap the first patch allows us to call lockScreen_didEnterCorrectPassword. And then the second patch allows us to call dismissLockScreen, all with an arbitrary pin.
Let’s now look at the other applications.
My Media
Insecure Webserver
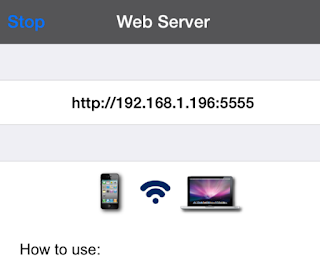
This was a very popular application in the app store. However, it suffered from some of the same vulnerabilities highlighted previously. What is interesting about this application is that it starts a web server on port 5555, which essentially allows users to manage their albums.
Figure 32: Web server started on port 5555
Browsing to the address results in the following interface:
Figure 33: My Media Wifi Manager
 
The first thing I noticed was that there was no authentication. Anybody on the same network could potentially gain access to the user’s albums. Looking a little deeper revealed that the application was vulnerable to common web application vulnerabilities. An example of this is stored cross-site scripting (XSS) in the Album name parameter:
Figure 34: Stored XSS in Album name
Insecure Storage
Again, the photos were not encrypted (verified using the hex editor from earlier). Photos and videos were stored in the following location:
/var/mobile/Applications/61273D04-3925-41EF-BD63-C2B0BC128F70/Library/XFFile/Decoy/1/Picture/Album1
Figure 35: Insecure storage of photos
On the device, this looks like the following:
Figure 36:Albums and photos on device
 
One of the features of these password-protected photo vaults is the ability to setup decoys. If the user chooses to create a decoy, then when the decoy password is entered it takes them to a “fake” album. I created a decoy in this application and found that the photos were also not encrypted (not that I expected them to be). I created a decoy album and added a photo. The decoy photos were stored in the following location:
/var/mobile/Applications/B73BB177-CEB7-4576-BDFC-2408A0369D42/Library/XFFile/Decoy/2/Picture/Decoy Album
The application stored user credentials in an unencrypted sqlite database. The passcode required to access the application was 1234 and was tied to the administrative account as shown. This was the passcode I chose when I was configuring the application. I also created a decoy user. These credentials were stored plaintext in the users table.
Figure 37: Extracting credentials with sqlite
 
KeepSafe
 
Bypassing the Lock Screen
Again bypassing the lock screen was trivial.
Figure 38: KeepSafe LockScreen
 
The lock screen could be bypassed by calling the showMainStoryboard method from the KeepSafe.AppDelegateclass. Again we attach to the process with cycript and this time we get the instance methods:
Examining the instance methods reveals the following methods:
And calling the showAccountStoryboard or showMainStoryboard methods as shown bypasses the lock screen: 
Figure 39: Bypassing the lock screen
 
The application also allows the user to password protect each album. Each album is synced to the cloud.
Figure 40: KeepSafe cloud storage
I discovered that the password for the albums was returned in plaintext from the server as shown:
Figure 41: Album password return in plaintext from the server
 
An attacker could therefore not only bypass the lockscreen but he could obtain the passcode for password protected albums as well.
Conclusion
Ok so let’s do a quick recap on what we were able to accomplish. We used:
  • cycript to bypass the lock screens
  • sqlite to extract sensitive information from the application databases
  • plutil to read plist files and access sensitive information
  • BurpSuite Pro to intercept traffic from the application
  • IDA Pro to reverse the binary and achieve results similar to cycript

The scary part of this is that, on average, it took less than 30 minutes to gain access to the photos and user credentials for each application. The only exception was the use of IDA, and as we highlighted, we only did that to introduce you to and get you comfortable reading ARM assembly. In other words, it’s possible for an attacker to access your private photos in minutes.
In all cases it was trivial to bypass the lock screen protection. In short I found:
  • No jailbreak detection routines
  • Insecure storage of credentials
  • Photos stored unencrypted
  • Lock screens are easy to bypass
  • Common web application vulnerabilities

Let me hasten to say that this research does not speak to ALL photo vault applications. I just grabbed what seemed to be the most popular and had a quick look. That said, I wouldn’t be surprised if others had similar issues, as developers often make incorrect assumptions (believing users will never have access to the file system).
What are some of the risks? First and foremost, if you are running these apps on a jailbroken device, it is trivial to gain access to them. And in the case of My Media, even if you are not on a jailbroken device, anyone could connect to the media server it starts up and access your data.
More importantly though is the fact that your data is not encrypted. A malicious app (some of which have popped up recently) could gain access to your data.
The next time you download one of these apps, keep in mind it may not be doing what you think it is doing. Better yet, don’t store “private” photos on your device in the first place.
References:
  1. http://www.zdziarski.com/blog/?p=3951
  2. Hacking and Securing iOS Applications: Stealing Data, Hijacking Software, and How to Prevent It
  3. http://www.cycript.org/
  4. http://cgit.sukimashita.com/usbmuxd.git/snapshot/usbmuxd-1.0.8.tar.gz
  5. http://resources.infosecinstitute.com/ios-application-security-part-42-lldb-usage-continued/
  6. https://github.com/stefanesser/dumpdecrypted
  7. https://developer.apple.com/library/ios/technotes/tn2239/_index.html#//apple_ref/doc/uid/DTS40010638-CH1-SUBSECTION34
  8. https://developer.apple.com/library/ios/documentation/UIKit/Reference/UIResponder_Class/#//apple_ref/occ/instm/UIResponder/nextResponder

RESEARCH | September 15, 2015

The iOS Get out of Jail Free Card

If you have ever been part of a Red Team engagement, you will be familiar with the “Get out of Jail Free Card”. In a nutshell, it’s a signed document giving you permission to perform the activity you were caught doing. In some instances, it’s the difference between walking away and spending the night in a jail cell. You may be saying, “Ok, but what does a Get out of Jail Free Card have to do with iOS applications?”

Well, iOS mobile application assessments usually occur on jailbroken devices, and application developers often implement measures that seek to thwart this activity. The tester often has to come up with clever ways of bypassing detection and breaking free from this restriction, a.k.a. “getting out of jail”. This blog post will walk you through the steps required to identify and bypass frequently recommended detection routines. It is intended for persons who are just getting started in reverse engineering mobile platforms. This is not for the advanced user.

Environment Setup
§  Jailbroken iPhone 4S (iOS 7.xx)
§  Xcode 6.4 (command-line tools)
§  IDA Pro or Hopper
§  Mac OS X
 
Intro to ARM Architecture
Before we get started, let’s cover some very basic groundwork. iOS applications are compiled to native code for the ARM architecture running on your mobile device. The ARM architecture defines sixteen 32-bit general-purpose registers, numbered from R0-R15. The first 12 are for general-purpose usage, and the last three have special meaning. R13 is denoted as the stack pointer (SP), R14 the link register (LR), and R15 the program counter (PC). The link register normally holds the return address during a function call. R0-R3 hold arguments passed to functions with R0 storing the return value. For the purposes of this post, the most important takeaway is that register R0 holds the return value from a function call. See the references section for additional details on the ARM architecture.
Detecting the Jailbreak
When a device is jailbroken, a number of artifacts are often left behind. Typical jailbreak detection routines usually involve checking for those artifacts before allowing access to the application. Some of the checks you will often see include checking for:
  • Known file paths
  • Use of non-default ports such as port 22(OpenSSH), which is often used to connect to and administer the device
  • Symbolic links to various directories (e.g. /Applications, etc.)
  • Integrity of the sandbox (i.e. a call to fork() should return a negative value in a properly functioning sandbox)

In addition to the above, developers will often seek to prevent us from debugging the process with the use of PT_ATTACH_DENY, which prevents the use of the ptrace() system call (a call used in the debugging of iOS applications). The point is, there are a multitude of ways developers try to thwart our efforts as pen testers. That discussion, however, is beyond the scope of this post. You are encouraged to check out the resources included in the references section. Of the resources listed, The Mobile Application Hackers Handbook does a great job covering the topic.

Simple PoC
We begin with bypassing routines that check for known file paths. This approach will lay the foundation for bypassing the other checks later on. To demonstrate this, I wrote a very simple PoC that checks for the existence of some these files. In the event one is found, the program prints out a message stating the device is jailbroken. In a real world scenario, the application may perform a number of actions that include, but are not limited to, preventing you from accessing the application entirely or restricting access to parts of the application.
Figure 1: Jailbreak detection PoC
 
If you have a jailbroken device and would like to test this for yourself, you can use clang – the Clang C, C++, and Objective-C compiler to compile it from your Mac OS host. Refer to the man page for details on the following command.
clang -framework Foundation -arch armv7 -isysroot /Applications/Xcode.app/Contents/Developer/Platforms/iPhoneOS.platform/Developer/SDKs/iPhoneOS.sdk/ jailbreak.c -o jailbreak -miphoneos-version-min=5.0
Once compiled, simply copy the binary to your jailbroken device and execute it from the command line. On a side note, Objective-C is a strict superset of C, and in most instances you will see jailbreak detections implemented in C/C++. A sample run of the program reveals that the device is jailbroken:
Figure 2: PoC execution showing device is jailbroken
 
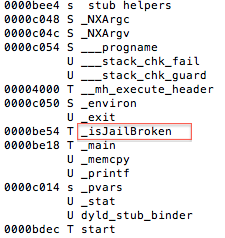
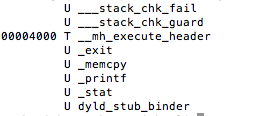
One of the first steps during an assessment is static analysis on the binary. Let’s begin by viewing the symbols with the following command nm jailbreak

Figure 3: Static analysis – extracting symbol information
 
Luckily for us, symbols have not been stripped, and based on the above, the _isJailBrokenmethod looks like the function responsible for determining the state of the device.
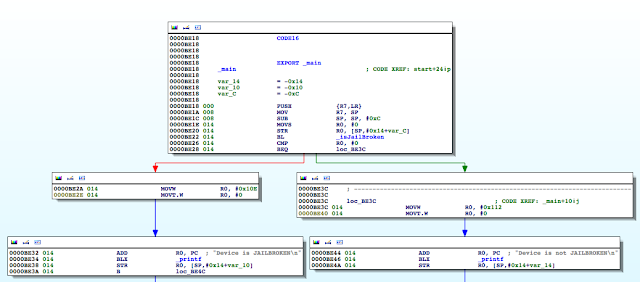
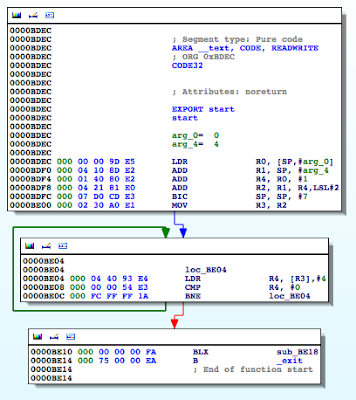
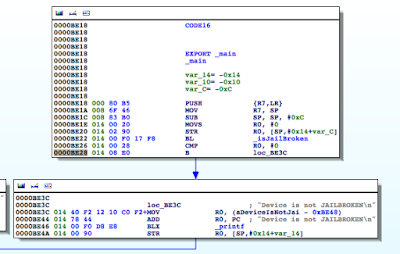
Figure 4: Examining the binary in IDA
 
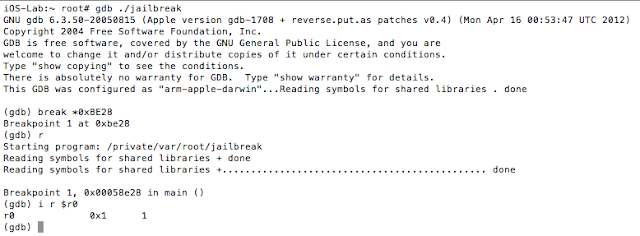
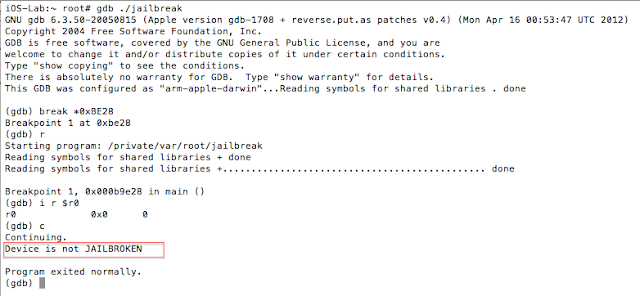
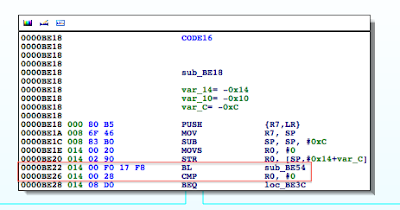
The isJailBrokenmethod is called at 0000BE22, after which the value in R0 is compared to 0. Recall from earlier that the return value from a function call is stored in the R0 register. Let’s confirm this in gdb. We will set a break point at 0000BE28the BEQ (branch if eq) instruction and examine the contents of the R0 register.

Figure 5: Examining the contents of the R0 register

As expected the value at R0 is 1, and the program takes the branch that prints the message “Device is JAILBROKEN”. Our goal then is to take the other branch. Let’s examine the isJailBroken function.

Figure 6: isJailBroken function analysis

At 0000BEA0, the stat function is called, and at 0000BEA8, R0 is compared to 0. If the value is not zero, meaning the path hasn’t been found, the program processes the next file path in the jbFiles[] array shown in the PoC earlier on. However, if the path was found, we see R0 is set to 1 before the program returns and eventually exits.

Figure 7: Determining where R0 register is set

This above snippet corresponds to the following section in our PoC:

Figure 8: R0 gets set to 1 if artifact found
 
So if we update this, and instead of moving 1 in R0 we move a 0, we should be able to bypass the jailbreak detection check and thus get of jail. Let’s make this modification and run our binary again.
Figure 9: Updating R0 register to 0
 
Linking this to our PoC, it is the equivalent of doing:
Figure 10: Effect of setting R0 to 0
 
In other words, the isJailBroken function will always return 0. Let’s set another breakpoint after the comparison like we did before and examine the value in R0. If we are right, then according to the following snippet, we should branch to loc_BE3C and defeat the check.
Figure 11: PoC snippet
 
As expected the value is now 0, and when we continue program execution we get our desired result.

Figure 12: Bypassing the detection
 
But what if the binary has been stripped?
Earlier we said that we were lucky because the binary was not stripped, so we had the symbol information. Suppose however, that the developer decided to make our job a bit more difficult by stripping the binary (in our case we used strip <binaryname>). In this case, our approach would be a bit different. Let’s first look at the stripped binary using the nm tool:
Figure 13: Stripped binary
 
And then with gdb on the jailbroken mobile device:
Figure 14: Examining the stripped binary in gdb
 
It should be immediately clear that we now have a lot less information to work with. In the case of gdb, we now see “No symbol table is loaded”. Where has our isJailBrokensymbol gone? Let’s push ahead with our analysis by running strings on the binary.
Figure 15: Extracting strings from the binary
 
Ok, so we seem to be getting closer as we can see some familiar messages. Let’s head back to IDA once again:
Figure 16: Disassembled stripped binary
 
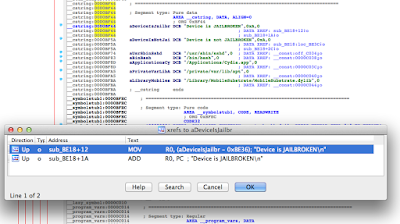
This certainly looks different from what we saw when the symbols were included. Nonetheless, let’s find the references to the strings we saw earlier. You can use the strings view in IDA and then use Ctrl+X to find all references to where they are used.
Figure 17: Locating references to the status message
 
Navigating to the highlighted location, we again see the familiar CMP R0, #0:
Figure 18: Locating CMP R0, #0
 
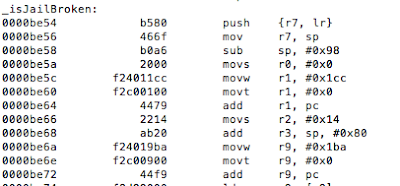
And if we go to the highlighted sub_BE54, we end up in our isJailBroken function. From that point on, it’s a repeat of what we already discussed.
Ok, but the functions are now inline
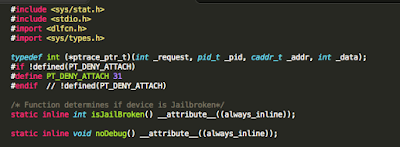
Another practice that is often recommended is to inline your functions. This causes the compiler to embed the full body of the function, as opposed to making a function call. With this in mind, our modified isJailBroken function declaration now looks like this:
Figure 19: Declaring functions inline
 
Before we continue, let’s remind ourselves of what the disassembled binary looked like prior to this change:

Figure 20: Binary before inline function
 
Now, let’s examine the modified binary:
Figure 21: Modified binary with function now inline
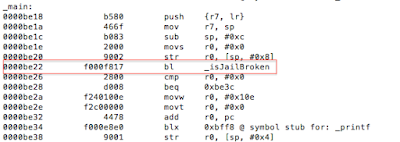
The _isJailBrokenmethod has now been inlined, and we no longer see the call(bl) instruction at 0000BE22 as before. Note that the original function body is still stored in the binary:
Figure 22: Function body still stored despite being inline
 
To prevent this, some very astute developers will go a step further and make the function static thereby removing the function body. The new function declaration will now be:
Figure 23: Static inline function
 
Again let’s look at this in IDA.
Figure 24: Disassembled inline binary
 
Instead of R0 being set from a function call as we saw previously, it is set from a value read from the stack using the LDRcommand at 0000BE9C. On closer examination we see the R0 register being set at 0000BE8Aand 0000BE98 and then stored on the stack:
Figure 25: Disassembled inline binary
At this point it’s the same process as before, we just need to move a 0 into R0at location 0000BE8A. And the rest is history.
Let’s block debugging then
We hinted at this earlier, when we said that the ptrace() system call is used when debugging an application. Let’s examine one implementation often used by developers:
Figure 26: ptrace function declaration
 
Figure 27: ptrace implementation
 
See the references section for additional details and source of the above code snippet. If we run our modified binary on the device and try to debug it as we have been doing with gdb, we are presented with the following:
Figure 28: Unable to use gdb
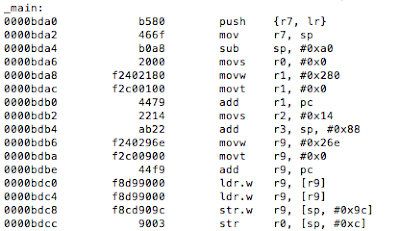
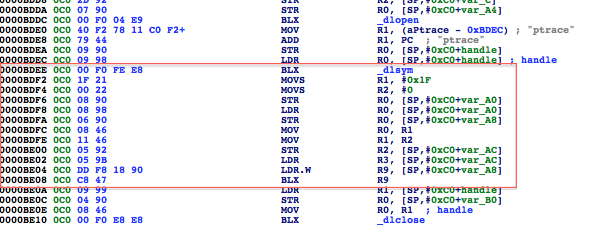
We were stopped in our tracks. Also, keep in mind that the function was inlined and the binary stripped of symbols. Examining it in IDA reveals the following:

Figure 29: Disassembled binary with call to ptrace_ptr
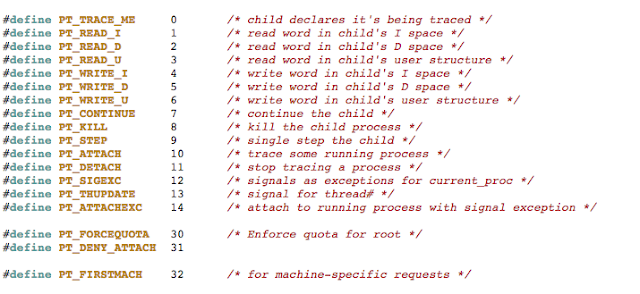
Pay special attention to the highlighted area. Recall from earlier, we said function arguments are in registers R0-R3. The ptrace_ptr call takes four arguments the first being PT_DENY_ATTACH with a value of 31. The /usr/include/sys/ptrace.h header file reveals the list of possible values:
Figure 30: Snippet ptrace documentation
 
So what happens if we pass a value that is outside of the expected values? The parameter is set at 0000BDF2 and later passed as the parameter to ptrace_ptrat 0000BDFC. We see a value of 1F, which translates, to 31 in decimal. Lets update this to 0x7F.
Figure 31: Updating PT_DENY_ATTACH to random value
 
We copy the modified binary back to our device and have our bypass.
Figure 32: Bypassing PT_DENY_ATTACH
 
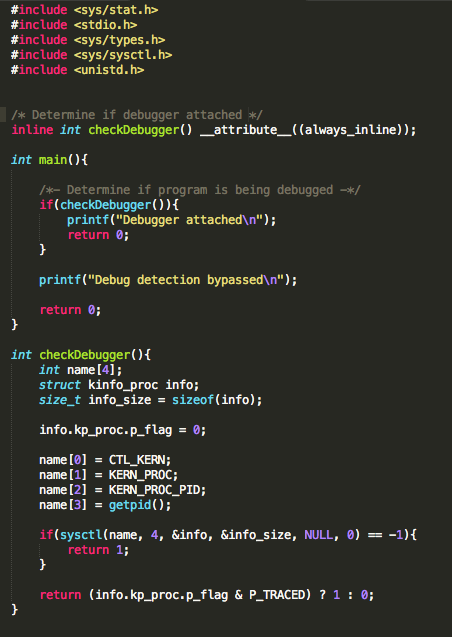
Another oft recommended technique for determining if a debugger is attached is the use of the sysctl()function. Now it doesn’t explicitly prevent a debugger from being attached, but it does return enough information for you to determine whether you are debugging the application. The code is normally a variation of the following:
Figure 33: Using sysctl()
When we run this from gdb, we get:
Figure 34: Output from running with sysctl()
Let’s pop this in IDA. Again the binary has been stripped and the checkDebugger function inlined.
Figure 35: Call to sysctl()
At 0000BE36we see the sysctl() function call and at 0000BE3A we see the comparison of register R0 to -1. If the call was not successful, then at 0000BE40 the program copies 1 to R0 before returning. That logic corresponds to:
Figure 36: Code snippet showing call to sysctl()
The fun begins when sysctl() was successful. We see the following snippet:
Figure 37: A look at the ternary operator
This corresponds to the following code snippet:
Figure 38: Ternary operator in our source code
When the application is being debugged/traced, the kernel sets the P_TRACED flag for the process where P_TRACED is defined in /usr/include/sys/proc.h as:
Figure 39: P_TRACED definition in /usr/include/sys/proc.h
 
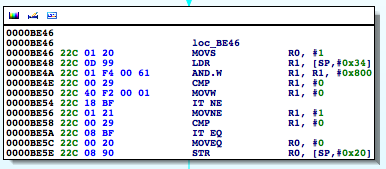
So at 0000BE4Awe see the bitwise AND against this value. In effect, the loc_BE46 block corresponds to the above ternary operator in the return statement. What we want then is for this call to return 0.
If we change the instruction at 0000BE46 to a MOVS R0, 0 instead:
Figure 40: Patching the binary
 
When we run the program again we get
Figure 41: Successful bypass
 
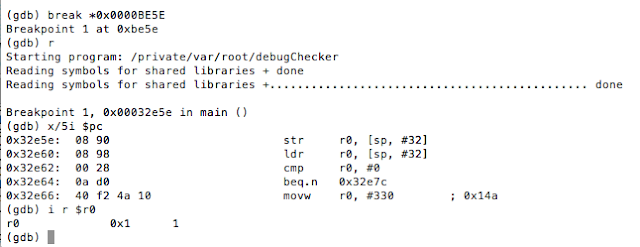
Now, you may be asking, how did we know to update that specific instruction? Well, as we said, the loc_BE46 block corresponds to the use of the ternary operator in our code. Now don’t allow the compiler’s representation of the operator to confuse you. The ternary operator says if the process is being traced return 1 otherwise return 0. At 0000BE46 R0 is set to 1, and R0is also set at 0000BE5C.[EW1] However, in the latter case, the register is set in a conditional block. That block gets hit when the check returns 0. In other words, the process is not being traced. Let’s look at this in gdb. We will set a breakpoint at 0000BE5E, the point at which R0gets stored on the stack at [sp,#0x20].
Figure 42: Inspecting the R0 register
As you can see, R0has a value of 1, and this was set at 0000BE46 as discussed earlier. This value is then written to the stack and later accessed at 0000BE60 to determine if the process is being traced. We see the comparison against 0 at 0000BE62, and if it’s true, we take the path that shows we bypassed the debug check.
Figure 43: Reversing the binary
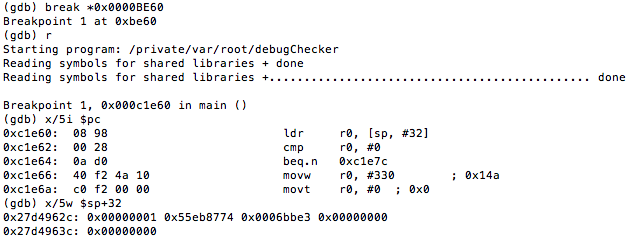
So, if we set a breakpoint at 0000BE60 and look what value was read from the stack, we see the following:
Figure 44: Examining the value in R0 that will be checked to determine if process is being debugged
This value(0x00000001) is the 1 that was copied to R0 earlier on. Hence, updating this to 0 helps achieve our goal.
Bringing down the curtains
Before we go, let’s revisit our very first example:
Figure 45: Revisiting first example
Recall we modified the isJailBroken function by setting register R0 to 0. However, there is a much simpler way to achieve our objective, and some of you would have already picked it up. The instruction at 0000BE28 is BEQ (branch if eq), so all we really need to do is change this to an unconditional jump to loc_BE3C. After the modification we end up with:
Figure 46: Updated conditional jump to unconditional jump
And we are done, however, we had to take the long scenic route first.
 
Conclusion
As we demonstrated, each time the developer added a new measure, we were able to bypass it. This however does not mean that the measures were completely ineffective. It just means that developers should implement these and other measures to guard against this type of activity. There is no silver bullet.
From a pen tester’s stand point, it comes down to time and effort. No matter how complex the function, at some point it has to return a value, and it’s a matter of finding that value and changing it to suit our needs.
Detecting jailbreaks will continue to be an interesting topic. Remember, however, that an application running at a lower privilege can be tampered with by one that is at a higher privilege. A jailbroken device can run code in kernel-mode and can therefore supply false information to the application about the state of the device.
Happy hacking.
 
References:
  1. http://www.amazon.com/The-Mobile-Application-Hackers-Handbook/dp/1118958500
  2. http://www.amazon.com/Practical-Reverse-Engineering-Reversing-Obfuscation/dp/1118787315
  3. http://www.amazon.com/Hacking-Securing-iOS-Applications-Hijacking/dp/1449318746
  4. https://www.owasp.org/index.php/IOS_Application_Security_Testing_Cheat_Sheet
  5. https://www.theiphonewiki.com/wiki/Bugging_Debuggers
  6. http://www.opensource.apple.com/source/xnu/xnu-792.13.8/bsd/sys/ptrace.h
RESEARCH | October 23, 2014

Bad Crypto 101

This post is part of a series about bad cryptography usage . We all rely heavily on cryptographic algorithms for data confidentiality and integrity, and although most commonly used algorithms are secure, they need to be used carefully and correctly. Just as holding a hammer backwards won’t yield the expected result, using cryptography badly won’t yield the expected results either.


To refresh my Android skillset, I decided to take apart a few Android applications that offer to encrypt personal files and protect them from prying eyes. I headed off to the Google Play Store and downloaded the first free application it recommended to me. I decided to only consider free applications, since most end users would prefer a cheap (free) solution compared to a paid one.


I stumbled upon the Encrypt File Free application by MobilDev. It seemed like the average file manager/encryption solution a user would like to use. I downloaded the application and ran it through my set of home-grown Android scanning scripts to look for possible evidence of bad crypto. I was quite surprised to see that no cryptographic algorithms where mentioned anywhere in the source code, apart from MD5. This looked reasonably suspicious, so I decided to take a closer look.


Looking at the JAR/DEX file’s structure, one class immediately gets my attention: the Crypt class in the com.acr.encryptfilefree package. Somewhere halfway into the class you find an interesting initializer routine:


public void init()
    {
        encrypt[0] = (byte)-61;
        encrypt[1] = (byte)64;
        encrypt[2] = (byte)43;
        encrypt[3] = (byte)-67;
        encrypt[4] = (byte)29;
        encrypt[5] = (byte)15;
        encrypt[6] = (byte)118;
        encrypt[7] = (byte)-50;
        encrypt[8] = (byte)-28;
        encrypt[9] = (byte)6;
        encrypt[10] = (byte)-75;
        encrypt[11] = (byte)87;
        encrypt[12] = (byte)-128;
        encrypt[13] = (byte)40;
        encrypt[14] = (byte)13;
        encrypt[15] = (byte)63;
        encrypt[16] = (byte)124;
        encrypt[17] = (byte)-68;
        …
        decrypt[248] = (byte)52;
        decrypt[249] = (byte)-51;
        decrypt[250] = (byte)123;
        decrypt[251] = (byte)105;
        decrypt[252] = (byte)-112;
        decrypt[253] = (byte)-86;
        decrypt[254] = (byte)-38;
        decrypt[255] = (byte)81;
    }


Continuing forward through the code, you immediately spot the following routine:
    // cleaned up decompiler code
    public byte[] decrypt(byte[] inputBuffer)
    {
        byte[] output = new byte[inputBuffer.length];
        int i = 0;
        while(i < inputBuffer.length)
        {
            int temp = inputBuffer[i];
            if(temp >= -128)
            {
                int temp = inputBuffer[i];
                if(temp < 128)
                {
                    int inputByte = inputBuffer[i];
                    int lookupPosition = 128 + inputByte;
                    int outputByte = decrypt[lookupPosition];
                    output[i] = (byte)i4;
                }
            }
            i = i + 1;
        }
        return output;

    }


This is basically a pretty bad substitution cipher. While looking through the code, I noticed that the values set in the init() function aren’t really used in production, they’re just test values which are likely a result of testing the code while it’s being written up. Since handling signedness is done manually, it is reasonable to assume that the initial code didn’t really work as expected and that the developer poked it until it gave the right output. Further evidence of this can be found in one of the encrypt() overloads in that same class, which contains a preliminary version of the file encryption routines.


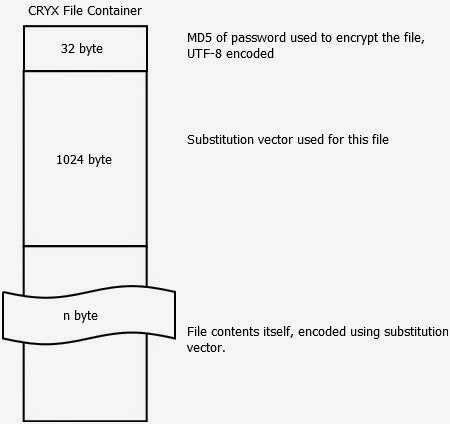
Going further through the application reveals that the actual encryption logic is stored in the Main$UpdateProgress.class file, and further information is revealed about the file format itself. Halfway through the doInBackground(Void[] a) function you discover that the file format is basically the following:


The password check on the files itself turns out to be just a branch instruction, which can be located in Main$15$1.class and various other locations. Using this knowledge, an attacker could successfully modify a copy of the application that would allow unrestricted access to all of the files encoded by any password. Apart from rolling your own crypto, this is one of the worst offenses in password protecting sensitive data: make sure you use the password as part of the key for the data, and not as part of a branch instruction. Branches can be patched, keys need to be brute forced, or, in the event of a weak algorithm, calculated.


The substitution vector in the file is remarkably long–it seems that the vector stored is 1024 bytes. But, don’t be fooled–this is a bug. Only the first 256 bytes are actually used, the rest of them are simply ignored during processing. If we forget for a moment that a weak encoding is used as a substitute for encryption, and assume this is a real algorithm, reducing the key space from 1024 byte to 256 byte would be a serious compromise. Algorithms have ended up in the “do not use” corner for lesser offenses.


Yvan Janssens
RESEARCH | August 19, 2014

Silly Bugs That Can Compromise Your Social Media Life

A few months ago while I was playing with my smartphone, I decided to intercept traffic to see what it was sending. The first thing that caught my attention was the iOS Instagram app. For some reason, the app sent a request using a Facebook access token through an HTTP plain-text communication.

Here is the original request that I intercepted from the Instagram app:
 
POST /api/v1/fb/find/?include=extra_display_name HTTP/1.1
Host: instagram.com
Proxy-Connection: keep-alive
Accept: */*
Accept-Encoding: gzip, deflate
Content-Length: 337
Content-Type: multipart/form-data; boundary=Boundary+0xAbCdEfGbOuNdArY
Accept-Language: en;q=1, es-MX;q=0.9, fr;q=0.8, de;q=0.7, zh-Hans;q=0.6, zh-Hant;q=0.5
Cookie: ccode=AR; csrftoken=dab2c8d0c4fd28627ac9f2a77fa221d2; ds_user_id=1045525821; igfl=testlocura; is_starred_enabled=yes; mid=UuvAbgAAAAHj6L0tnOod5roiGYnr; sessionid=IGSC3aaf1427aa901bb052263b368642a34fe59897cba046682b7d95775ae70db64d%3AioaQSiHdJ61kCjuRaAD9sEJTEWXv6dqB%3A%7B%22_token%22%3A%221045525821%3Au91J1dZgsiJCBo0QVeF98nkohO0TV928%3A70d9eee5449941dc80fb238991e191f8f33cac5c98c1b078d86975b07979531d%22%2C%22last_refreshed%22%3A1392496331.661547%2C%22_auth_user_id%22%3A1045525821%2C%22_auth_user_backend%22%3A%22accounts.backends.CaseInsensitiveModelBackend%22%2C%22_platform%22%3A0%7D
Connection: keep-alive
User-Agent: Instagram 5.0.2 (iPhone5,3; iPhone OS 7_0_4; en_US; en) AppleWebKit/420+
 
–Boundary+0xAbCdEfGbOuNdArY
Content-Disposition: form-data; name=”fb_access_token”
 
CAABwzLixnjYBAE71ZAmnpZAaJeTcSqnPSSvjEZA0CqIokUOj60VkZCOhuZCy4dT6TlcG9OpbMIO7dJnGiROm7XFEnRj….
–Boundary+0xAbCdEfGbOuNdArY–

After a quick review, I determined that the request was sent when I clicked on the Facebook Friends button, which allows users to search for friends from their Facebook account.
 
As an aside, an access token is an opaque string that identifies a user, app, or page. It can be used to perform certain actions on behalf of the user or to access the user’s profile. Each access token is associated with a select set of permissions that allow users to perform actions, such as reading their wall, accessing friend profiles, and posting to their wall.
 
In this case, these permissions were granted to the access token:
  • installed
  • basic_info
  • public_profile
  • create_note
  • photo_upload
  • publish_actions
  • publish_checkins
  • publish_stream
  • status_update
  • share_item
  • video_upload
  • user_friends
Potential Risk
 
Sending a request using access token through a plain-text communication poses a potential risk. An attacker who can intercept the app’s traffic and acquire access tokens can gain access to Facebook user accounts and manipulate their walls and access personal information.
 
If you use Instagram on a public WiFi, then someone might access your Facebook account and hack it.
 
Conclusion
 
Third-party apps that use these access tokens to associate users with their Facebook accounts should take extra precautions to protect their integrity and confidentiality. This will help avoid potential risks of leaking user information. 
 
Instagram already fixed the vulnerability mentioned in this blog post. 
Ariel Sanchez
INSIGHTS | August 17, 2012

One Mail to Rule Them All

This small research project was conducted over a four-week period a while back, so current methods may differ as password restoration methods change.
While writing this blog post, the Gizmodo writer Mat Honan’s account was hacked with some clever social engineering that ultimately brought numerous small bits and pieces of information together into one big chunk of usable data. The downfall in all this is that different services use different alternative methods to reset passwords: some have you enter the last four digits of your credit card and some would like to know your mother’s maiden name; however, the attacks described here differ a bit, but the implications are just as devastating.
For everything we do online today we need an identity, a way to be contacted. You register on some forum because you need an answer, even if it’s just once and just to read that answer. Afterwards, you have an account there, forcing you to trust the service provider. You register on Facebook, LinkedIn, and Twitter; some of you use online banking services, dating sites, and online shopping. There’s a saying that all roads lead to Rome? Well, the big knot in this thread is—you guessed it—your email address.


Normal working people might have 1-2 email addresses: a work email that belongs to the company and a private one that belongs to the user. Perhaps the private one is one of the popular web-based email services like Gmail or Hotmail. To break it down a bit, all the sensitive info in your email should be stored in a secure vault, home, or in a bank because it’s important information that, in an attackers hand, could turn your life into a nightmare.


I live in a EU country where our social security numbers aren’t considered information worthy of protecting and can be obtained by anyone. Yes, I know—it’s a huge risk. But in some cases you need some form of identification to pick up the sent package. Still, I consider this a huge risk.


Physically, I use paper destroyers when I’ve filed a paper and then put it in my safe. I destroy the remnants of important stuff I have read. Unfortunately, storing personal data in your email is easy, convenient, and honestly, how often do you DELETE emails anyway? And if you do, are you deleting them from the trash right away? In addition, there’s so much disk space that you don’t have to care anymore. Lovely.


So, you set your email account at the free hosting service and you have to select a password. Everybody nags nowadays to have a secure and strong password. Let’s use 03L1ttl3&bunn13s00!—that’s strong, good, and quite easy to remember. Now for the secure question. Where was your mother born? What’s your pets name? What’s your grandparent’s profession? Most people pick one and fill it out.


Well, in my profession security is defined by the weakest link; in this case disregarding human error and focusing on the email alone. This IS the weakest link. How easy can this be? I wanted to dive in to how my friends and family have set theirs up, and how easy it is to find this information, either by goggling it or doing a social engineering attack. This is 2012, people should be smarter…right? So with mutual agreement obtained between myself, friends, and family, this experiment is about to begin.


A lot of my friends and former colleagues have had their identities stolen over the past two years, and there’s a huge increase. This has affected some of them to the extent that they can’t take out loans without going through a huge hassle. And it’s not often a case that gets to court, even with a huge amount of evidence including video recordings of the attackers claiming to be them, picking up packages at the local postal offices. 
Why? There’s just too much area to cover, and less man power and competence to handle it. The victims need to file a complaint, and use the case number and a copy of the complaint; and fax this around to all the places where stuff was ordered in their name. That means blacklisting themselves in their system, so if they ever want to shop there again, you can imagine the hassle of un-blacklisting yourself then trying to prove that you are really you this time.


A good friend of mine was hiking in Thailand and someone got access to his email, which included all his sensitive data: travel bookings, bus passes, flights, hotel reservations. The attacker even sent a couple of emails and replies, just to be funny; he then canceled the hotel reservations, car transportations, airplane tickets, and some of the hiking guides. A couple days later he was supposed to go on a small jungle hike—just him, his camera, and a guide—the guide never showed up, nor did his transportation to the next location. 
Thanks a lot. Sure, it could have been worse, but imagine being stranded in a jungle somewhere in Thailand with no Internet. He also had to make a couple of very expensive phone calls, ultimately abort his photography travel vacation, and head on home.


One of my best friends uses Gmail, like many others. While trying a password restore on that one, I found an old Hotmail address, too. Why? When I asked him about it afterwards, he said he had his Hotmail account for about eight years, so it’s pretty nested in with everything and his thought was, why remove it? It could be good to go back and find old funny stuff, and things you might forget. He’s not keen to security and he doesn’t remember that there is a secret question set. So I need that email.
Lets use his Facebook profile as a public attacker would—it came out empty, darn; he must be hiding his email. However, his friends are displayed. Let’s make a fake profile based on one of his older friends—the target I chose was a girl he had gone to school with. How do I know that? She was publicly sharing a photo of them in high school. Awesome. Fake profile ready, almost identical to the girl, same photo as hers, et cetera. And Friend Request Sent.
A lot of email vendors and public boards such as Facebook have started to implement phone verification, which is a good thing. Right? So I decided to play a small side experiment with my locked mobile phone.
I choose a dating site that has this feature enabled then set up an account with mobile phone verification and an alternative email. I log out and click Forgot password? I enter my username or email, “IOACasanova2000,” click and two options pop up: mobile phone or alternative email. My phone is locked and lying on the table. I choose phone. Send. My phone vibrates and I take a look at the display:  From “Unnamed Datingsite” “ZUGA22”. That’s all I need to know to reset the password.
Imagine if someone steals or even lends your phone at a party. Or if you’re sloppy enough to leave in on a table. I don’t need your pin—at least not for that dating site.What can you do to protect yourself from this?   Edit the settings so the preview shows less of the message. My phone shows three lines of every SMS; that’s way too much. However, on some brands you can disable SMS notifications from showing up on a locked screen.
From my screen i got a instant; Friend Request Accepted.
I quickly check my friend’s profile and see:
hismainHYPERLINK “mailto:hismaingmail@nullgmail.com”GmailHYPERLINK “mailto:hismaingmail@nullgmail.com”@HYPERLINK “mailto:hismaingmail@nullgmail.com”GmailHYPERLINK “mailto:hismaingmail@nullgmail.com”.com
hishotmail@nullhotmail.com


I had a dog, and his name was BINGO! Hotmail dot com and password reset.
hishotmail@nullhotmail.com


The anti bot algorithm… done…
And the Secret question is active…
“What’s your mother’s maiden name”…


I already know that, but since I need to be an attacker, I quickly check his Facebook, which shows his mother’s maiden name! I type that into Hotmail and click OK….


New Password: this1sAsecret!123$


I’m half way there….


Another old colleague of mine got his Hotmail hacked and he was using the simple security question “Where was your mother born”. It was the same city she lived in today and that HE lived in, Malmö (City in Sweden). The attack couldn’t have come more untimely as he was on his way, in an airplane, bound for the Canary Islands with his wife. After a couple of hours at the airport, his flight, and a taxi ride, he gets  a “Sorry, you don’t have a reservation here sir.” from the clerk. His hotel booking was canceled.


Most major sites are protected with advanced security appliances and several audits are done before a site is approved for deployment, which makes it more difficult for an attacker to find vulnerabilities using direct attacks aimed at the provided service. On the other hand, a lot of companies forget to train their support personnel and that leaves small gaps. As does their way of handling password restoration. All these little breadcrumbs make a bun in the end, especially when combined with information collected from other vendors and their services—primarily because there’s no global standard for password retrieval. Nor what should, and should not be disclosed over the phone.


You can’t rely on the vendor to protect you—YOU need to take precautions yourself. Like destroying physical papers, emails, and vital information. Print out the information and then destroy the email. Make sure you empty the email’s trashcan feature (if your client offers one) before you log out. Then file the printout and put it in your home safety box. Make sure that you minimize your mistakes and the information available about you online. That way, if something should happen with your service provider, at least you know you did all you could. And you have minimized the details an attacker might get.


I think you heard this one before, but it bears repeating: Never use the same password twice!
I entered my friend’s email in Gmail’s Forgot Password and answered the anti-bot question.
There we go; I quickly check his Hotmail and find the Gmail password restore link. New password, done.

Now for the gold: his Facebook. Using the same method there, I gained access to his Facebook; he had Flickr as well…set to login with Facebook. How convenient. I now own his whole online “life”.. There’s an account at an online electronics store; nice, and it’s been approved for credit.

An attacker could change the delivery address and buy stuff online. My friend would be knee deep in trouble. Theres also a iTunes account tied to his email, which would allow me to remote-erase his phones and pads. Lucky for him, I’m not that type of attacker.


Why would anyone want to have my information? Maybe you’re not that important; but consider that maybe I want access to your corporate network. I know you are employed because of that LinkedIn group. Posting stuff in that group with a malicious link from your account is more trustworthy than just a stranger with a URL. Or maybe you’re good friends with one of the admins—what if I contact him from your account and mail, and ask him to reset your corporate password to something temporary?
I’ve tried the method on six of my friends and some of my close relatives (with permission, of course). It worked on five of them. The other one had forgot what she put as the security question, so the question wasn’t answered truthfully. That saved her.
When I had a hard time finding information, I’d used voice-changing software on my computer, transforming my voice to that of a girl. Girls are gentle and less likely to try a hoax you; that’s how the mind works. Then I’d use Skype to dial them, telling them that I worked for the local church historical department, and the records about their grandfather were a bit hard to read. We are currently adding all this into a computer so people could more easily do ancestor searching and in this case, what I wanted was her grandfather’s profession. So I asked a couple of question then inserted the real question in the middle. Like the magician I am. Mundus vult decipi is latin for; The world wan’t to be decived.
In this case, it was easy.
She wasn’t suspicious at all I thanked her for her trouble and told her I would send two movie tickets as a thank you. And I did.
Another quick fix you can do today while cleaning your email? Use an email forwarder and make sure you can’t log into the email provided with the forwarding email. For example, in my domain there’s the email “spam@nullxxxxxxxxx.se” that is use for registering on forums and other random sites. This email doesn’t have a login, which means you can’t really log into the email provider with that email. And mail is then forwarded to the real address. An attacker trying to reset that password would not succeed.
Create a new email such as “imp.mail2@nullsomehost.com” and use THIS email for important stuff, such as online shopping, etc. Don’t disclose it on any social sites or use it to email anyone; this is just a temporary container for your online shopping and password resets from the shopping sites. Remember what I said before? Print it, delete it. Make sure you add your mobile number as a password retrieval option to minimize the risk.
It’s getting easier and easier to use just one source for authentication and that means if any link is weak, you jeopardize all your other accounts aswell. You also might pose a risk to your employer.
INSIGHTS | May 24, 2012

QR Fuzzing Fun

QR codes [1] have become quite popular due to their fast readability and large storage capacity to send information. It is very easy to find QR codes anywhere these days with encoded information such as a URL, phone number, vCard information, etc. There exist tons of apps on smartphones that are able to read / scan QR codes.


The table below shows some of the most common apps and libraries for the major mobile platforms – keep in mind that there are many more apps than listed here.
 
Platform
Popular QR Apps / Libraries
Android
·       Google Goggles
·       ZXing
·       QRDroid
iOS
·       Zxing
·       Zbar
BlackBerry
·       App World
Windows Phone
·       Bing Search App
·       ZXlib

QR codes are very interesting for attackers as they can store large quantity of information, from under 1000 up to 7000 characters, perfect for a malicious payload, and QR codes can be encrypted and used for security purposes. There are malicious QR codes that abuse permissive apps permissions to compromise system and user data. This attack is known as “attagging”. Also QR codes can be used as an attack vector for DoS, SQL Injection, Cross-Site Scripting (XSS) and information stealing attacks among others.
 
I have been pentesting Apps that supported QR codes lately, so I thought will be a good idea to fuzz this feature looking for bugs. I developed a tool for QR fuzzing called IOAQRF (beta phase) that is quite easy to use and modify as well in case you need to add something else.
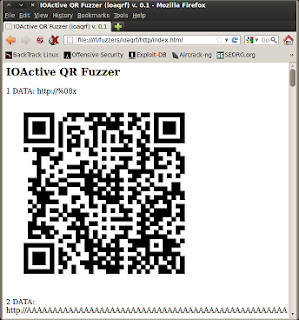
This tool is composed of two files: a Python file that generates QR fuzz patterns and a shell script that can be used to generate common QR code content that apps use, such as phone numbers, SMS, and URLs. Previous work has been done on this field [2] [3] but more can be researched for sure! Enjoy the fuzzing!
 
 
Links
 
 
IOAQRF directory output


Opening index.html with fuzz QR codes
 

By continuing to use the site, you agree to the use of cookies. more information

The cookie settings on this website are set to "allow cookies" to give you the best browsing experience possible. If you continue to use this website without changing your cookie settings or you click "Accept" below then you are consenting to this.

Close