A Brief Introduction to Barcodes
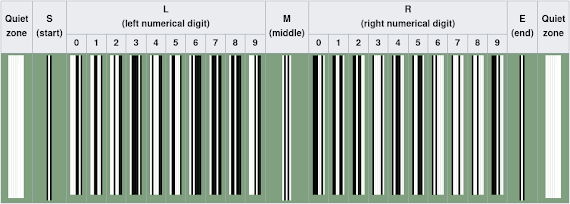
Barcodes are used everywhere: trains, planes, passports, post offices… you name it. And just as numerous as their applications are the systems themselves. Everybody’s seen a UPC barcode like this one:
But what about one like this on a package from UPS?
This is a MaxiCode matrix, and though it looks quite different from the UPC barcode, it turns out that these systems use many common techniques for storing and reading data. Both consist of black or white “modules” which serve different purposes depending on their location. Some modules are used to help with orientation when scanning the barcode, some act as data storage, and some provide error correction in case the modules are obscured. (I won’t address how the error correction algorithms work, but those who are interested can read more here [3].)
The diagram above shows the orientation patterns used in UPC barcodes to designate the start, middle, and end of the barcode, as well as how the data-storage modules are encoded. The last digit of a UPC barcode is not used to store data, serving instead as a checksum to verify that no errors were made when printing or reading the barcode.
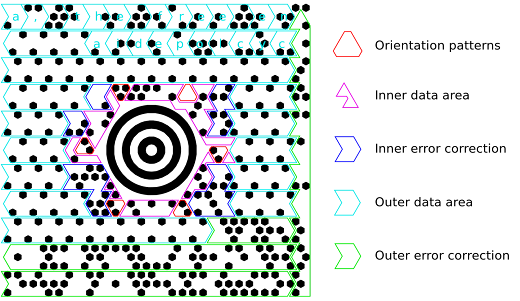
Though they look quite different, MaxiCode matrices employ the same mechanisms:
I want to stop here for a moment and just appreciate the intricacy of this system. The tinkerer in me can’t help but wonder, How could someone possibly figure all this out?For better or for worse, there is no need to figure it out since MaxiCode is public domain and Wikipedia has all the answers. But wouldn’t that be an interesting puzzle?
If you answered no, here’s a QR code for your troubles:
For those of you still reading, I’d like to introduce another barcode system, and the guest of honor in today’s adventure: Snapcode.
Snapcode is a proprietary 2D barcode system that can trigger a variety of actions when scanned in the Snapchat app. Snapcodes can add a friend, unlock image filters, follow a link, and more. Unlike MaxiCode, however, there is no public documentation about how the Snapcode system works! Thus the scene is set. Driven merely by curiosity, I set out to answer the following questions:
1. What data do Snapcodes encode?
2. How do Snapcodes encode data?
3. What actions can be triggered when these codes are scanned?
Chapter 1: Our Adventure Begins
The Tale of the Treasure
The first question I had to answer was, Is it even possible? Figuring out how Snapcodes encode data is impossible without first knowing what data they encode. In the hopes of uncovering a reliable correlation between the data underlying a Snapcode and the Snapcode itself, I generated the following URL Snapcodes that would navigate to the same address when scanned. If the Snapcodes store the URL directly, then they should look very similar.
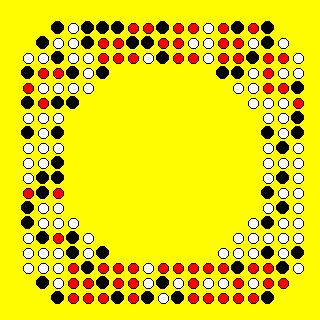
To aid in the process of ingesting these images, I wrote a simple Python script that I will reference periodically throughout this tale [6]. The “scan” method checks each position that could contain a dot and stores it as a 1 (present) or 0 (empty) in a 2D array. This allowed me to efficiently ingest, process, and visualize the data, like in the image below. This image was generated by putting a black dot where both Snapcodes had a dot, a white dot if neither Snapcode had a dot, and red if one had a dot and the other did not:
This first trial showed quite a few red dots, suggesting that there may not be any connection between the Snapcode and the URL it represents. Hoping for a clearer correlation, I tried another type of Snapcode which adds a user as a friend when scanned. Repeating the experiment with the add-friend Snapcodes of two users with similar names (“aaaac123456789” and “aaaad123456789”) showed a more promising result.
Generating the same type of secondary Snapcode gave the following matrix:
The top and bottom show quite a bit of red, but take a look at the regions just to the left and right of the center. There is almost no red! From this, I drew two conclusions. First, the add-friend Snapcodes store, potentially among other data, some form of the username. Second, the dots to the left and right of the center are the ones used to encode this data, since this is where the highest correlation occurs.
There is still a long way to go, but we have taken an important first step. Fundamentally, we know that there is in fact something to find within these dots, and on top of that, the fact that we know what is being stored may help us down the line.
What’s Below Deck?
In addition to the Snapcodes, another area to explore was of course the Snapchat app. Just from playing around with the app, I knew that it had the ability to generate and read these codes, so perhaps a closer look would uncover something useful to my pursuit. Using the Android Debug Bridge [7], I pulled the Android package file (APK) from a phone with Snapchat installed. An APK is a ZIP file that contains many different types of information, but of greatest interest to me was the compiled Java code. From the many tools available to decompile the code and reverse engineer the app, I chose to use JADX [8].
After some time poking around the decompiled Java code, I found that the app referenced several methods from a Java Native Interface (JNI) library used to produce the Snapcode images. This library was packaged along with the compiled Java files and provided the following functions that can be called from Java code:
String nativeGenerateWithVersion(long j, int i, byte[] bArr);

String nativeGenerateDotsOnlyWithVersion(long j, int i, byte[] bArr);
These methods took (among other arguments) a byte array containing the underlying data, and returned an SVG image of the Snapcode. If I could call these methods with data that I controlled, perhaps I could determine what exactly each of the dots means.
Chapter 2: The Treasure Map
As any treasure-hunter knows, it’s important to be lazy resourceful. Snapchat was kind enough to provide all the code I needed to construct a map: the Snapcode library, the logic to load it, and the method signatures to create the Snapcode images. A little paring down and I had my very own Android app [9] that could create Snapcodes with any data I wanted. The question was, What data?
Some helpful error messages told me that each Snapcode stored 16 bytes of data, presumably mapping to 16 groupings of eight dots. To light these byte-groups up one at a time, I passed the function an array with one byte set to -1 (which Java represents as b11111111 using two’s complement) and the rest set to 0. The result was a sequence of Snapcodes with one of these groupings lit up at a time.
Notice that some groups of dots are always present, some light up only once throughout the set, and some turn off and on sporadically. It seems plausible that these regions are respectively acting as orientation patterns, data storage, and error correction, just as we saw in the UPC and MaxiCode standards. To more clearly show the byte groupings, the orientation patterns and error correction dots have been removed:
A different set of byte arrays can be used to determine the order of the dots within each of these groupings: setting one bit in each byte to 1 and the rest to 0. This can be achieved with a series of byte arrays with each byte in the array being set to the same power of 2. For example, the array is filled with all 1s (b00000001) to identify the lowest bit in each byte, all 2s (b00000010) for the second bit, all 4s (b00000100) for the third bit, and so on.
Pieced together correctly, these two sets of data provide a perfect map between a Snapcode and the bit-string of data it represented. From the first set of Snapcodes, we identified the grouping of bits that made up each byte as well as the order of the bytes. From the second, we learned the ordering of the bits within each byte. The dot corresponding to bit X of byte Y, then, would be the dot that is present in both Snapcode Y of the first set (groupings) and the Snapcode X of the second set (orderings).
For my script, this map took the form of a list of coordinates. The bit-string was constructed by checking the corresponding positions in the Snapcode grid one by one, adding a value of 1 to the bit-string if there was a dot in that position and a 0 if not.
DATA_ORDER = [(16,5), (17,6), (17,5), (16,6), (18,5), (18,6), (0,7), (1,8), (1,7), (0,8), (2,7), (2,8), (16,3), (17,4), (17,3), (16,4), (18,3),(18,4),(0,5),(1,6), (0,6), (1,5), (2,6), (2,5), (4,16), (5,17), (5,16), (4,17), (4,18), (5,18), (4,0), (5,1), (4,1), (5,0), (4,2), (5,2), (16,16), (17,16), (16,17), (17,17), (16,18), (18,16), (16,0), (17,1), (16,1), (17,2), (16,2), (18,2), (14,16), (15,17), (14,17), (15,18), (14,18), (15,16), (14,0), (15,1), (14,1), (15,2), (14,2), (15,0), (0,3), (1,4), (1,3), (0,4), (2,3), (2,4), (12,16), (13,17), (12,17), (13,18), (12,18), (13,16), (12,0), (13,1), (12,1), (13,2), (12,2), (13,0), (8,16), (9,17), (8,17), (9,18), (8,18), (9,16), (8,0), (9,1), (8,1), (9,2), (8,2), (9,0), (3,13), (4,14), (3,14), (3,15), (4,15), (5,15), (3,3), (4,3), (3,4), (4,4), (3,5), (5,3), (15,13), (14,14), (15,14), (13,15), (14,15), (15,15), (13,3), (14,4), (15,3), (14,3), (15,4), (15,5), (10,16), (11,17), (10,17), (11,18), (10,18), (11,16), (10,0), (11,1), (10,1), (11,2), (10,2), (11,0), (0,2), (1,2)]
Reordering the dot matrix (a 2D array of 1s and 0s) into a bit-string using this data structure looked something like this:
def reorder_bits(dots):
    return [dots[row][col] for (row,col) in DATA_ORDER]
It wasn’t exactly pretty, but the pieces were coming together. At this point, I knew the add-friend Snapcodes somehow stored the username, and I knew how to reorder the dots into a series of bits. The final transformation, how those bits were being decoded into characters, was all that remained.
Chapter 3: Lost at Sea
Making Headway?
The methodology from here was a bit fuzzy. I created an account with the desired username, fed the account’s Snapcode into my script, and out popped a string of 1s and 0s for me to… do something with. As in the previous phase, the choice of input was the crux of the matter. I began with usernames that seemed interesting on their own, like ones consisting of a single character repeated many times. The first two usernames, “aaaaaaaaaaaaa4m” and “zzzzzzzzzzzzz4m”, had the respective bit-string representations:
01000000100000000000001100000000010000000101000100010100010001010101000100010100010001010101000100010100010001010010000100101100
00000000000000000000001010000001011000000001110011000111011100010001110011000111011100010001110011000111011100010010010000101100
Staring at 1s and 0s, hoping to find something, was a particular kind of fun. You can’t help but see patterns in the data, but it can be difficult to know whether they are just in your imagination or if you are really on to something. If you’d like, take a few minutes and see what you can find before reading on. What I took away from this first experiment was the following:
...[010100010001010001000101][010100010001010001000101][010100010001010001000101]0010000100101100

...[000111001100011101110001][000111001100011101110001][000111001100011101110001]0010010000101100
The only patterns that I could identify appeared in the last 88 bits of the string. Both strings had a sequence of 24 bits (bits 41 to 64, in bold) that repeated three times followed by a sequence of 16 bits (underlined). 14 of these last 16 bits were the same between the two bit-strings. I also noticed that a similar pattern could be found in the usernames:
[aaaa][aaaa][aaaa]a4m
[zzzz][zzzz][zzzz]z4m
Finding patterns in the bit-string was exciting on its own, but finding matching patterns in the two representations of the data suggested the presence of a clear path forward in converting the bits to characters. However, try as I might to find a connection, these patterns led nowhere. Every one of my (sometimes hair-brained) theories on how these bits may have been converted to letters proved fruitless.
Where Are We?
Having hit a dead end, I changed my tack and tried to learn more about what constituted a valid Snapchat username. According to Snapchat’s documentation [10], usernames must consist of 3-15 characters chosen from an alphabet of 39: lowercase letters, digits, and the three symbols “.”, “-“, and “_”. Furthermore, they must begin with a letter, end with a letter or number, and contain at most one non-alphanumeric character.
A little math shows that representing a single character from this 39-letter alphabet would require six bits, since 2^5 (32) < 39 < 2^6 (64). 15 characters, then, would require 90 bits. However, as far as I could tell, these 15 characters were being encoded in the 88 bits where I noticed the patterns. No other similarities showed up in the two bit-strings. How else could they be encoded, if not separately using six bits per character?
As some background research had turned up, one of the encoding schemes used in the QR code standard solves a similar problem. Using an alphabet of 45 characters, QR’s alphanumeric encoding scheme [11] treats pairs of characters as two-digit base-45 numbers and encodes the resulting value into binary. The result is two characters per 11 bits, rather than one per six bits! Hypothesizing that the creators of the Snapcode system may have done something similar, I tried each of the possible permutations for decoding sets of X bits into N characters using an alphabet of size 39, but none of them created strings that showed any pattern like the underlying username.
This was just one of many rabbit holes I went down. I learned a great deal about other barcode encoding schemes and came up with many ways the engineers may have optimized the usage of those 88 bits, but with regards to decoding the Snapcode I was dead in the water.
Chapter 4: ‘X’ Marks the Spot
Land, Ho!
With a strategy as fuzzy as “staring at bits,” it should be no surprise that the final breakthrough came when I found a way to better present the data on which I was relying. Snapchat provides a mechanism for generating new Snapcodes and deactivating old ones, in case an old Snapcode is leaked and the user is receiving unwanted friend requests. Using this tool, I generated five Snapcodes for each of the accounts and combined these into a single string using the following rules: each character of this string was assigned a value of “1” if each of the five Snapcodes had a dot in the corresponding position, “0” if none of them had a dot in that position, or “x” if some had a dot and some didn’t.
Reducing the noise in the data with this new representation made the answer I had been looking for as clear as day. The modified bit-strings looked like this:
xx0xxxxxxxxxxxxxxxxxxx1xxxxxxxxx010xxxxx0101000100010100010001010101000100010100010001010101000100010100010001010010000100101100

xxxxxxxxxx0xxxxxxxxxxxx0xxxxxxxx011xxxxx0001110011000111011100010001110011000111011100010001110011000111011100010010010001000010
These three extra bits (underlined) were separated from the rest of the data I had been looking at, bringing the total to 91. This meant the process of encoding a username could be done one character at a time. I felt quite silly having spent so much time trying to fit the username into fewer bits rather than looking for more bits that may be used, but I imagine the path of a treasure hunt is seldom a straight one.
Digging for Gold
Because the values of these 91 bits were identical in each of the five Snapcodes, it seemed safe to assume that they somehow contained the username. I continued from here using the Snapcodes of two more users: “abcdefghmnopggg” and “bcdefghnopqhhh”. The first seven characters are sequential and offset by one between the two names, a pattern I was hoping would highlight which bits were being incremented for each character. The respective bit-strings were:
...010xxxxx0101100110011000110001100111100110100000110010001011101010110000000011001000001000100000

...011xxxxx01100001000110101110011110000001101000100000101111001011101101000010100010001010011x0xx0
Once again, some interesting patterns showed up. Both strings could be split up into segments whose binary values were either the same between the two usernames or off by exactly one:
010 ... 01011 001 1 001100 0 110 00110 01111 001 1 010000 ...
011 ... 01100 001 0 001101 0 111 00111 10000 001 1 010001 ...
Presumably, the segments that were identical between the two strings were the higher bits of the encoded character, whose values we may not expect to change, and the off-by-one segments were the lower bits, whose values would be incremented when representing sequential characters.
I also noticed that the lengths of these segments followed the sequence 5-3-1-6-1-3-5. A strange pattern, it seemed at first, but it eventually dawned on me that these segments could be paired up to create chunks of six bits, each of which could represent a single character. I began enumerating the possible combinations of these segments, eventually coming across the following set of six-bit chunks:
[001|010] [0|01011] [001100] [00110|1] [001|110] [0|01111] [010000] ...
[001|011] [0|01100] [001101] [00111|0] [001|111] [0|10000] [010001] ...
Converted to decimal, these values show the same characteristics seen in the pair of usernames:
10, 11, 12, 13, 14, 15, 16 ...
11, 12, 13, 14, 15, 16, 17 ...
The second unknown, how these values were being converted into characters, fell quite nicely into place from here. Assuming 10 mapped to ‘a’, 11 to ‘b’, and so on, it felt safe to assume that 0 through 9 mapped to ‘0’ through ‘9’, and 36 through 38 represented the three symbols. Verifying these assumptions and identifying the exact value assigned to each character was achieved by testing them on a range of other usernames.
One final detail fell into place when trying to decode usernames that did not use all 15 available characters. The end of a username was simply marked by any value greater than 38, after which the remaining bits were ignored by the decoding process. QR codes use a similar mechanism, designed to avoid large empty spaces in the barcode that make it unsightly and harder to scan.
In Python, the process of reordering the bit-string into six-bit chunks took the form of lists of integers whose value indicated the position of a bit in the bit-string. For example, the binary value of the first character was determined by taking bits 46-48 of the bit-string and appending bits 33-35:
USERNAME_DATA = [
    [46, 47, 48, 33, 34, 35],
    [56, 41, 42, 43, 44, 45],
    [50, 51, 52, 53, 54, 55],
    [60, 61, 62, 63, 64, 49],
    [70, 71, 72, 57, 58, 59],
    [80, 65, 66, 67, 68, 69],
    [74, 75, 76, 77, 78, 79],
    [84, 85, 86, 87, 88, 73],
    [94, 95, 96, 81, 82, 83],
    [104, 89, 90, 91, 92, 93],
    [98, 99, 100, 101, 102, 103],
    [108, 109, 110, 111, 112, 97],
    [118, 119, 120, 105, 106, 107],
    [128, 113, 114, 115, 116, 117],
    [122, 123, 124, 125, 126, 127]
]
A dictionary converted the decimal values of these chunks to characters:
HAR_MAP = {
    0: '0', 1: '1', 2: '2', ..., 9: '9',
    10: 'a', 11: 'b', 12: 'c', ..., 35: 'z',
    36: '-', 37: '_', 38: '.'
}
With that, I was at last able to trace the username data through each stage of the decoding process: dots, bits, six-bit chunks, and finally characters.
Chapter 5: A Smooth Sail Home
Tying up Loose Ends
Revisiting my third research question, What actions can be triggered when these codes are scanned?, was simple compared to what I had just been through. Snapchat publicly documented several other types of Snapcodes that were easy to interact with, like URL Snapcodes and content Snapcodes to unlock in-app content. Others I had to read about, like ones that are used to pair Snapchat’s “Spectacles” devices to your phone [12].
I found the above Snapcode on a mysterious page of Snapchat’s website, which contained only the title “Snapchat Update.” Scanning it in the app did nothing on my phone, but presumably it would update the Snapchat app if it was out of date. I spent a good deal of time trying to reverse engineer the app to determine how this Snapcode is handled, and whether there were any other undocumented functions a Snapcode may invoke, but I was unable to find anything.
One final loose end that a curious reader may have identified was the mechanism for deactivating old Snapcodes mentioned in the previous chapter. Having several Snapcodes for each of the test users, I compared the values of the non-username bits both across accounts (e.g. the first Snapcode for each account) and within accounts (i.e. the sequence of Snapcodes for a single account). No discernible patterns showed up, which led me to hypothesize that the Snapcodes were differentiated by some sort of random key in the non-username bits. In this scenario, each account would be associated with one “active” key at a time, and the Snapchat app would only perform the add-friend function if the Snapcode with that user’s active key was scanned.
A Last Golden Nugget
I decided to see what else I could find in those types of Snapcode I could easily create, but neither one showed any patterns between the underlying data and the resulting Snapcode. As seen earlier, URL Snapcodes change drastically even when creating two that redirect to the same URL, and the content Snapcodes show no correlation between the barcode and the content pack metadata like the author, name, etc.
Exploring Snapchat’s website eventually led me to the following URL:
https://www.snapchat.com/unlock/?type=SNAPCODE&uuid=c4bf0e0ec8384a06b22f67edcc02d1c3
On this page, there is a Snapcode labeled “Gold Fish Lens” that presumably once unlocked a Snapchat lens, though this no longer works when scanning it in the app. However, the HTTP parameter “uuid=c4bf0e0ec8384a06b22f67edcc02d1c3” jumped out as a possible piece of data that was being stored in this type of Snapcode. Sure enough, converting the dots to a bit-string (just as we did with the username) and then converting this bit-string to a hexadecimal string resulted in this exact UUID!
I found a similar piece of data when creating a URL Snapcode. The initial response includes a “scannableId” in a similar format to the UUID. This value is then used in a subsequent request to pull up the image of the resulting Snapcode, leading me to believe it serves the same general purpose.
Based on these findings, I hypothesized the following work flow: Whenever a new lens filter or sticker pack is created or a new URL Snapcode is requested, a UUID is generated and stored in a database along with any associated information like the content pack name or URL. When a Snapcode of one of these types is scanned in the app, it prompts a web request including this UUID to query the database and determine what action to perform.
There was nothing more I could (legally) try to definitively confirm this hypothesis, so I guess I’ll just have to wait for Snapchat to tell me if I got it right.
Final Considerations
Reflecting on this exercise, I came up with a few personal takeaways, as well as some thoughts for organizations who have their own proprietary barcode system or perhaps are considering implementing one.
The first implication for barcode systems is that if they are used to store recognizable data, they can feasibly be cracked. Had I not known what data was stored in the add-friend Snapcodes, this entire project would have been dead in the water. It may be impossible to keep the process of barcode-to-bit-string transformation entirely secret if you need that functionality in client-accessible software (like the Snapchat mobile app), but this alone will not be enough to crack the barcode system if you don’t know the underlying data.
This makes Snapchat’s UUID system a great way to avoid leaking potentially sensitive information and significantly decrease the risk of the barcodes being reverse engineered in the first place. If the bits are translated directly to a hexadecimal UUID then perhaps there’s a chance of guessing how to decode the UUID as I did, but without access to the database that value is meaningless.
Inversely, storing any sensitive information in a barcode is a very bad idea, for obvious reasons. Even Snapchat’s inclusion of username data is potentially dangerous. Recall the solution they came up with in case an old Snapcode is leaked and the user is receiving unwanted friend requests; a malicious user can extract the username and find the updated Snapcode at this URL: https://www.snapchat.com/add/USERNAME. Snapchat does have other controls to prevent unwanted friend requests, but the ability to find a user’s active Snapcode effectively nullifies the current mitigation. (I did disclose this to Snapchat, and they have acknowledged and accepted the issue.)
As for my personal takeaways, the first is that sometimes it pays to have a wide range of skills, even if your experience is minimal. The skills involved in this challenge included reverse engineering, scripting, Android internals and development, web development, and logic. I am far from an expert in any of these domains, but in a challenge where the solution is not just a matter of one’s depth of technical knowledge, any angle of attack you can find is important. This could be as simple as knowing that a tool exists to do something you need.
Finally, I’d like to think I learned a lesson about making assumptions. When the information surrounding a problem is incomplete, some assumptions are required to make any progress at all, but it’s important to revisit these every so often to make sure they aren’t sending you down a rabbit hole. A breadth-first approach, exploring several possible solutions together as opposed to one at a time in depth, may have lessened the pain of realizing that days of work were useless.
I am sure you learned more than you ever wanted to know about Snapcodes, but I thank you for joining me for this adventure!